


一、组件的基本理解和使用
组件是 React的一等公民,使用React就是在用组件 组件表示页面中的部分功能 组合多个组件实现完整的页面
功能特点:可复用、独立、可组合
1-1、函数式组件
适用于简单组件(无状态的组件)
<script type="text/babel">
        // 定义函数式组件
        function Demo(){
            return <h2>我是函数定义的组件</h2>
        }
        // 渲染组件到页面
        ReactDOM.render(<Demo/>,document.getElementById('test'))
        // 执行了ReactDOM.render(<Demo/>之后发生了什么
            // 1.React解析组件标签,找到了Demo组件
            // 2.发现组件式使用函数定义的,随后调用该函数,将返回的虚拟dom转为真实dom,随后呈现在页面中

    </script>
1-2、类式组件
适用于复杂组件(有状态的组件)
<script type="text/babel">
        // 创建类式组件
        class Demo extends React.Component {
            render(){
                // 这里的this指向类的实例对象
                console.log(this);
                // render式放在哪里的?Demo的原型对象上,供实例使用
                return  <h2>我是类式组件适用于复杂组件的定义</h2>
            }
        }

        // 渲染组件到页面
        ReactDOM.render(<Demo />,document.getElementById('test'))
        // 执行了ReactDOM.render(<Demo/>之后发生了什么
            // 1.React解析组件标签,找到了Demo组件
            // 2.发现组件式使用函数定义的,随后new出来该类的实例,通过该实例,调用到原型上的render方法
            // 3.将render返回的虚拟dom转为真实dom,渲染到页面上
    </script>
二、组件实例的三大核心属性
2-1、state的基本使用
<script type="text/babel">
        // 定义函数式组件
        class Weather extends React.Component{
           //构造器调用几次? ———— 1次
			constructor(props){
				console.log('constructor');
				super(props)
				//初始化状态
				this.state = {isHot:false}
				//解决changeWeather中this指向问题
				this.changeWeather = this.changeWeather.bind(this)
			}

            render(){
                console.log('render');
				//读取状态
				const {isHot} = this.state
				return <h1 onClick={this.changeWeather}>今天天气很{isHot ? '炎热' : '凉爽'}</h1>
            }
            //changeWeather调用几次? ———— 点几次调几次
			changeWeather(){
				//changeWeather放在哪里? ———— Weather的原型对象上,供实例使用
				//由于changeWeather是作为onClick的回调,所以不是通过实例调用的,是直接调用
				//类中的方法默认开启了局部的严格模式,所以changeWeather中的this为undefined
				console.log('changeWeather');
				//获取原来的isHot值
				const isHot = this.state.isHot
				//严重注意:状态必须通过setState进行更新,且更新是一种合并,不是替换。
				this.setState({isHot:!isHot})
				console.log(this);
				//严重注意:状态(state)不可直接更改,下面这行就是直接更改!!!
				//this.state.isHot = !isHot //这是错误的写法
			}
        }
        // 渲染组件到页面
        ReactDOM.render(<Weather/>,document.getElementById('test'))
        // 执行了ReactDOM.render(<Demo/>之后发生了什么
            // 1.React解析组件标签,找到了Demo组件
            // 2.发现组件式使用函数定义的,随后调用该函数,将返回的虚拟dom转为真实dom,随后呈现在页面中

    </script>
2-2-1、state的总结
1.state是组件对象中最重要的属性,值是对象【可以包含多个key-value的组合】
2.组件呗称为状态机,通过更新组件的state来更新对应页面现实【重新渲染组件】
强烈注意:
- 组件中render方法中的this为组件实例。
- 组件的自定义方法中的this为undefine,如何解决?
a:强制绑定this,通过函数对象的bind()
b:箭头函数 - 状态数据,不能直接修改或更新。
2-2、props的基本使用
2-2-1、props的传值与批量传值
<script type="text/babel">
        // 定义函数式组件
        class Person extends React.Component{
            render(){
                console.log(this);
                return (
                    <ul>
                    <li>姓名:{this.props.name}</li>
                    <li>性别:{this.props.sex}</li>
                    <li>年龄:{this.props.age}</li>
                </ul>
                )
            }
        }
        // 渲染组件到页面
        ReactDOM.render(<Person name="Zhangsan" age="12" sex="男"/>,document.getElementById('test1'))
        ReactDOM.render(<Person name="lisi" age="12" sex="男"/>,document.getElementById('test2'))
        ReactDOM.render(<Person name="wangwu" age="12" sex="男"/>,document.getElementById('test3'))
        // 批量传值
        let info = {name:'四六',age:'23',sex:'女'}
        ReactDOM.render(<Person {...info}/>,document.getElementById('test4'))
    </script>
2-2-2、对props进行限制
<script type="text/babel">
        // 定义函数式组件
        class Person extends React.Component{
            render(){
                return (
                    <ul>
                    <li>姓名:{this.props.name}</li>
                    <li>性别:{this.props.sex}</li>
                    <li>年龄:{this.props.age}</li>
                </ul>
                )
            }
        }
        // 对props的值进行限制
        Person.propTypes = {
            name:PropTypes.string.isRequired,//限制name必传并且是字符串型
            sex:PropTypes.string,//限制sex是字符串型
            age:PropTypes.number,//限制age是数值型
            speak:PropTypes.func//限制speak是函数型
        }
        // 给props默认值
        Person.defaultProps = {
            name:'未知'
        }
        // 渲染组件到页面
        ReactDOM.render(<Person name="Zhangsan" age={21} sex="男" speak={()=>{}}/>,document.getElementById('test1'))
        // 批量传值
        let info = {name:'李四',age:23,sex:'女'}
        ReactDOM.render(<Person {...info}/>,document.getElementById('test2'))
    </script>
2-2-3、props的简写
<script type="text/babel">
        // 定义函数式组件
        class Person extends React.Component {
            // 对props的值进行限制
            static propTypes = {
                name: PropTypes.string.isRequired,//限制name必传并且是字符串型
                sex: PropTypes.string,//限制sex是字符串型
                age: PropTypes.number,//限制age是数值型
                speak: PropTypes.func//限制speak是函数型
            }
            // 给props默认值
            static defaultProps = {
                name: '未知'
            }

            render() {
                return (
                    <ul>
                        <li>姓名:{this.props.name}</li>
                        <li>性别:{this.props.sex}</li>
                        <li>年龄:{this.props.age}</li>
                    </ul>
                )
            }
        }


        // 渲染组件到页面
        ReactDOM.render(<Person name="Zhangsan" age={21} sex="男" speak={() => { }} />, document.getElementById('test1'))
        // 批量传值
        let info = { name: '李四', age: 23, sex: '女' }
        ReactDOM.render(<Person {...info} />, document.getElementById('test2'))
    </script>
2-2-4、类式组件中的构造器与props
 //构造器调用几次? ———— 1次
			constructor(props){
				console.log('constructor',props);
				super(props)
				//初始化状态
				this.state = {isHot:false}
				//解决changeWeather中this指向问题
				this.changeWeather = this.changeWeather.bind(this)
			}
注意事项:
1.构造器是否接收props,是否传递给super,是否希望在构造器中通过this访问props,就取决于是否使用构造器接收peops,开发中不写构造器,能省略就省略
2-2-5、函数式组件中使用props
<script type="text/babel">
        // 定义函数式组件
        function Person(props){
            return (
                <ul>
                    <li>姓名:{props.name}</li>
                    <li>性别:{props.sex}</li>
                    <li>年龄:{props.age}</li>
                </ul>
            )
        }
        // 对props的值进行限制
        Person.propTypes = {
            name:PropTypes.string.isRequired,//限制name必传并且是字符串型
            sex:PropTypes.string,//限制sex是字符串型
            age:PropTypes.number,//限制age是数值型
            speak:PropTypes.func//限制speak是函数型
        }
        // 给props默认值
        Person.defaultProps = {
            name:'未知'
        }

        // 渲染组件到页面
        // 批量传值
        let info = {name:null,age:23,sex:'女'}
        ReactDOM.render(<Person {...info}/>,document.getElementById('test2'))
    </script>
注意事项:
1.函数式组件只能使用props,不能使用state和refs
2-3、refs的基本使用
2-3-1、字符串形式的ref
 <script type="text/babel">
        // 创建组件
        class Ref extends React.Component{
            showData = ()=>{
                const {input1} = this.refs
                alert(input1.value)
            }
            showData2 = ()=>{
                const {input2} = this.refs
                alert(input2.value)
            }
            render(){
                return (
                    <div>
                        <input ref="input1" type="text" placeholder="点击按钮展示数据" />
                        <button onClick={this.showData}>点击展示左侧数据</button>
                        <input onBlur={this.showData2} ref="input2"  type="text" placeholder="失去焦点展示数据"/>
                    </div>
                )
            }
        }
        // 展示数据
        ReactDOM.render(<Ref />,document.getElementById('test'))
    </script>
2-3-2、回调函数形式的ref
 <script type="text/babel">
        // 创建组件
        class Ref extends React.Component{
            showData = ()=>{
                const {input1} = this
                alert(input1.value)
            }
            showData2 = ()=>{
                const {input2} = this
                alert(input2.value)
            }
            render(){
                return (
                    <div>
                        <input ref={a=>this.input1 = a} type="text" placeholder="点击按钮展示数据" />
                        <button onClick={this.showData}>点击展示左侧数据</button>
                        <input onBlur={this.showData2} ref={a=>this.input2 = a} type="text" placeholder="失去焦点展示数据" />
                    </div>
                )
            }
        }
        // 展示数据
        ReactDOM.render(<Ref />,document.getElementById('test'))
    </script>
2-3-3、回调函数形式的ref的调用次数问题
注意:
1.内联函数的形式会造成回调函数调用两次第一次为null,第二次为绑定的属性
<script type="text/babel">
        // 创建组件
        class Ref extends React.Component{
            showData = ()=>{
                const {input1} = this
                alert(input1.value)
            }
            changeWeather = ()=>{
                const {isHot} = this.state
                this.setState({isHot:!isHot})
            }
            saveInput = (a)=>{
                this.input1 = a;
                console.log('@',a);
            }
            state = {isHot:false}
            render(){
                const {isHot} = this.state
                return (
                    <div>
                        <h2>今天的天气很{isHot ? '炎热' : '寒冷'}</h2>
                        {/*以下内联形式的回调会造成回调执行两次,第一次为null,第二次为绑定的属性标签,先调集展示测试功能,在点击切换天气控制台查看执行次数*/}
                        { /*<input ref={(a)=>{this.input1 = a; console.log('@',a);}} type="text" placeholder="点击按钮展示数据" />*/  }
                        <input ref={this.saveInput} type="text" placeholder="点击按钮展示数据" />
                        <button onClick={this.showData}>点击展示左侧数据</button>
                        <button onClick={this.changeWeather}>点我切换天气</button>
                    </div>
                )
            }
        }
        // 展示数据
        ReactDOM.render(<Ref />,document.getElementById('test'))
    </script>
2-3-4、creatRef
注意:
1.creatRef创建的自己myRef是专人专用的,只能有一个节点使用这个myRef,如果有多个会被最后一个覆盖
<script type="text/babel">
        // 创建组件
        class Ref extends React.Component{
            myRef1 = React.createRef()
            myRef2 = React.createRef()
            showData = ()=>{
                alert(this.myRef1.current.value)
            }
            showData2 = ()=>{
                alert(this.myRef2.current.value)
            }

            render(){
                return (
                    <div>
                        <input ref={this.myRef1} type="text" placeholder="点击按钮展示数据" />
                        <button onClick={this.showData}>点击展示左侧数据</button>
                        <input onBlur={this.showData2}  ref={this.myRef2}  type="text" placeholder="失去焦点展示数据" />
                    </div>
                )
            }
        }
        // 展示数据
        ReactDOM.render(<Ref />,document.getElementById('test'))
    </script>
三、React的事件处理
注意:
1.通过onXxx属性指定事件处理函数
2.React使用的是自定义(合成事件),而不是使用的原生DOM事件
3.React中的事件是通过事件委托方式处理的(委托给徐建最外层的元素)
4.通过event.target得到发生事件的DOM元素对象
script type="text/babel">
        // 创建组件
        class Ref extends React.Component{
            myRef1 = React.createRef()
            myRef2 = React.createRef()
            showData = ()=>{
                alert(this.myRef1.current.value)
            }
            showData2 = (e)=>{
                alert(e.target.value)
            }

            render(){
                return (
                    <div>
                        <input ref={this.myRef1} type="text" placeholder="点击按钮展示数据" />
                        <button onClick={this.showData}>点击展示左侧数据</button>
                        <input onBlur={this.showData2}   type="text" placeholder="失去焦点展示数据" />
                    </div>
                )
            }
        }
        // 展示数据
        ReactDOM.render(<Ref />,document.getElementById('test'))
    </script>
四、收集表单数据
4-1、非受控组件
<script type="text/babel">
        class Login extends React.Component{
            subFn = (e)=>{
                e.preventDefault()
                const {username,password} = this
                alert(username.value)
            }
            render(){
                return (
                    <form  onSubmit={this.subFn}>
                        用户名:<input  ref={c=>this.username = c} type="text" />
                        密码:<input ref={c=>this.password = c}  type="password" />
                       <button>登录</button>
                    </form>
                )
            }
        }
        // 展示数据
        ReactDOM.render(<Login />,document.getElementById('test'))
    </script>
4-2、受控组件
<script type="text/babel">
        class Login extends React.Component{
            state = {
                username:"",
                password:''
            }
            subFn = (e)=>{
                e.preventDefault()
                const {username,password} = this.state
                alert(`您输入的用户名是${username},您输入的密码是${password}`)
            }
            saveUsername = (e)=>{
                this.setState({username:e.target.value})
            }
            savePassword = (e)=>{
                this.setState({password:e.target.value})
            }
            render(){
                return (
                    <form  onSubmit={this.subFn}>
                        用户名:<input onChange={this.saveUsername}  type="text" />
                        密码:<input onChange={this.savePassword}   type="password" />
                       <button>登录</button>
                    </form>
                )
            }
        }
        // 展示数据
        ReactDOM.render(<Login />,document.getElementById('test'))
    </script>
五、生命周期(旧)
原理图
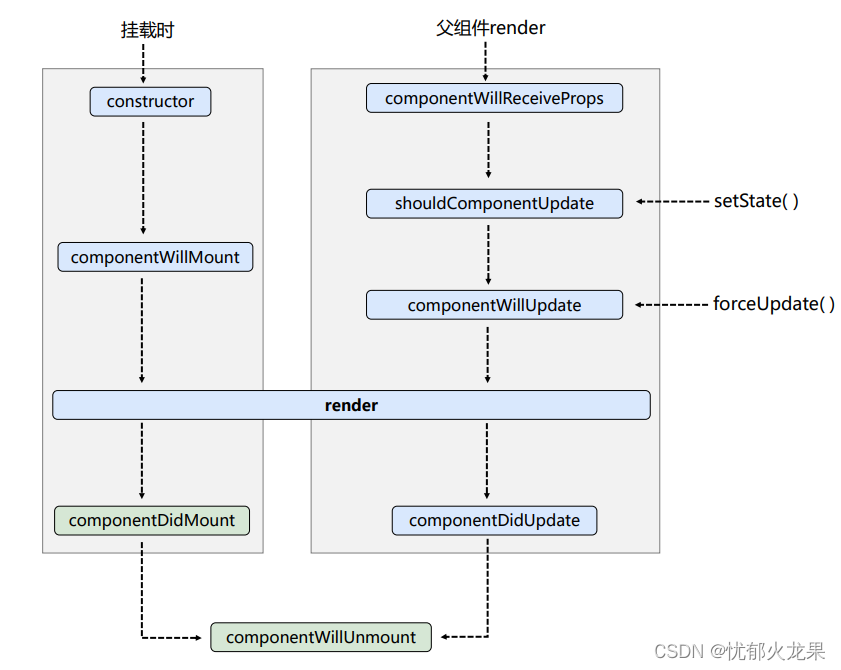
生命周期的三个阶段(旧)
1. 初始化阶段: 由ReactDOM.render()触发---初次渲染
	1.constructor()
	2.componentWillMount()
	3.render()
	4.componentDidMount()
2. 更新阶段: 由组件内部this.setSate()或父组件重新render触发
	1.shouldComponentUpdate()
	2.componentWillUpdate()
	3.render()
	4.componentDidUpdate()
3. 卸载组件: 由ReactDOM.unmountComponentAtNode()触发
	1.componentWillUnmount()
代码演示
<!DOCTYPE html>
<html lang="en">

<head>
    <meta charset="UTF-8">
    <title>React生命周期</title>
</head>

<body>
    <div id="test"></div>
    <!-- 引入react核心库 -->
    <script type="text/javascript" src="../js/react.development.js"></script>
    <!-- 引入react-dom 用于支持react操作dom -->
    <script type="text/javascript" src="../js/react-dom.development.js"></script>
    <!-- 引入bable,用于将jsx转为js -->
    <script type="text/javascript" src="../js/babel.min.js"></script>

    <script type="text/babel">
        class Count extends React.Component {
            constructor(props) {
                super(props)
                // 初始化状态
                this.state = { count: 0 }
                console.log('constructor');
            }

            // 组件即将要挂载
            componentWillMount() {
                console.log('componentWillMount');
            }
            // 组件挂载完成的钩子
            componentDidMount() {
                console.log('componentDidMount');
            }
            // 组件将要卸载的钩子
            componentWillUnmount() {
                console.log('componentWillUnmount');
            }
            // 控制组件更新的阀门
            shouldComponentUpdate() {
                console.log('shouldComponentUpdate');
                return true
            }
            // 组件将要更新的钩子
            componentWillUpdate() {
                console.log('componentWillUpdate');
            }
            // 组件更新完毕的钩子
            componentDidUpdate() {
                console.log('componentDidUpdate');
            }
            render() {
                console.log('render');
                const { count } = this.state
                return (
                    <div>
                        <h2>当前求和为:{count}</h2>
                        <button onClick={this.add}>点我加一</button>
                        <button onClick={this.death}>卸载组件</button>
                        <button onClick={this.force}>不更新任何状态,旧强制 更新一下</button>
                    </div>
                )
            }

            // 加一的处理函数
            add = () => {
                const { count } = this.state
                this.setState({ count: count + 1 })
            }
            // 卸载组件的回调
            death = () => {
                ReactDOM.unmountComponentAtNode(document.getElementById('test'))
            }
            // 强制更新按钮的回调
            force = () => {
                this.forceUpdate()
            }
        }

        class A extends React.Component {
            // 初始化状态
            state = {carName:'奔驰'}
            changeCar = ()=>{
                this.setState({carName:'宝马'})
            }
            render() {
                return (
                    <div>
                        <div>我是A组件</div>
                        <button onClick={this.changeCar}>换车</button>
                        <B carName={this.state.carName}/>
                    </div>
                )
            }
        }
        class B extends React.Component {

            // 组件将要接收到新的props值
            componentWillReceiveProps(){
                console.log('B--componentWillReceiveProps');
            }
             // 控制组件更新的阀门
             shouldComponentUpdate() {
                console.log('B--shouldComponentUpdate');
                return true
            }
            // 组件将要更新的钩子
            componentWillUpdate() {
                console.log('B--componentWillUpdate');
            }
            // 组件更新完毕的钩子
            componentDidUpdate() {
                console.log('B--componentDidUpdate');
            }
            render() {
                return (
                    <div>我是B组件,接收的车是:{this.props.carName}</div>
                )
            }
        }
        // 展示数据
        ReactDOM.render(<A />, document.getElementById('test'))
    </script>
</body>

</html>
六、生命周期(新)
原理图
与旧的生命周期来比废除了旧生命周期的三个钩子,新提出了两个新的生命周期钩子
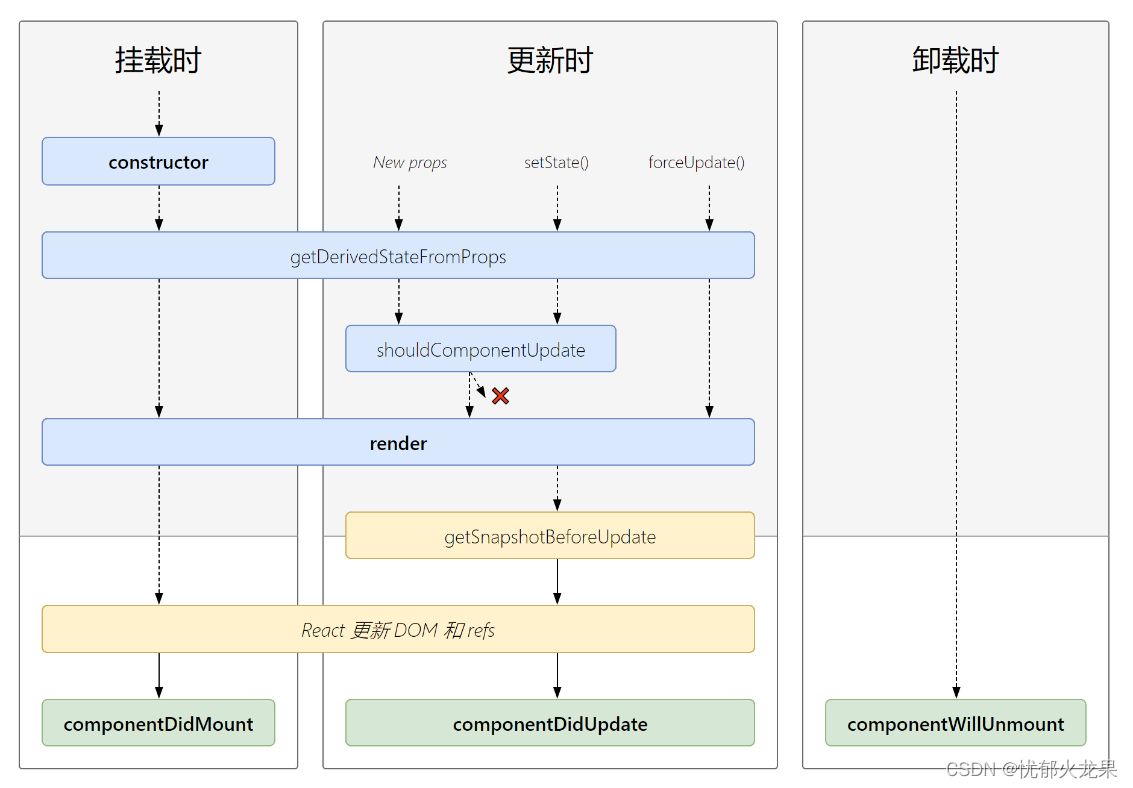
生命周期的三个阶段(新)
1. 初始化阶段: 由ReactDOM.render()触发---初次渲染
	1.constructor()
	2.getDerivedStateFromProps
	3.render()
	4.componentDidMount()
2. 更新阶段: 由组件内部this.setSate()或父组件重新render触发
	1.getDerivedStateFromProps
	2.shouldComponentUpdate()
	3.render()
	4.getSnapshotBeforeUpdate
	5.componentDidUpdate()
3. 卸载组件: 由ReactDOM.unmountComponentAtNode()触发
	1.componentWillUnmount()
重要的勾子
	1.render:初始化渲染或更新渲染调用
	2.componentDidMount:开启监听, 发送ajax请求
	3.componentWillUnmount:做一些收尾工作, 如: 清理定时器
即将废弃的勾子
	1.componentWillMount
	2.componentWillReceiveProps
	3.componentWillUpdate
现在使用会出现警告,下一个大版本需要加上UNSAFE_前缀才能使用,以后可能会被彻底废弃,不建议使用。
6-1.getDerivedStateFromProps
<script type="text/babel">
        class Count extends React.Component {
            // 构造器
            constructor(props) {
                super(props)
                // 初始化状态
                this.state = { count: 0 }
                console.log('constructor');
            }

            // 若state的值在任何时候都取决于props,那么可以使用getDerivedStateFromProps
            static getDerivedStateFromProps(props,state){
                console.log('getDerivedStateFromProps');
                // return出去的状态旧不会被修改了
                return props
            }

            // 组件挂载完成的钩子
            componentDidMount() {
                console.log('componentDidMount');
            }
            // 组件将要卸载的钩子
            componentWillUnmount() {
                console.log('componentWillUnmount');
            }
            // 控制组件更新的阀门
            shouldComponentUpdate() {
                console.log('shouldComponentUpdate');
                return true
            }

            // 组件更新完毕的钩子
            componentDidUpdate() {
                console.log('componentDidUpdate');
            }
            render() {
                console.log('render');
                const { count } = this.state
                return (
                    <div>
                        <h2>当前求和为:{count}</h2>
                        <button onClick={this.add}>点我加一</button>
                        <button onClick={this.death}>卸载组件</button>
                        <button onClick={this.force}>不更新任何状态,旧强制 更新一下</button>
                    </div>
                )
            }

            // 加一的处理函数
            add = () => {
                const { count } = this.state
                this.setState({ count: count + 1 })
            }
            // 卸载组件的回调
            death = () => {
                ReactDOM.unmountComponentAtNode(document.getElementById('test'))
            }
            // 强制更新按钮的回调
            force = () => {
                this.forceUpdate()
            }
        }

        // 展示数据
        ReactDOM.render(<Count />, document.getElementById('test'))
    </script>
6-2.getSnapshotBeforeUpdate的使用场景
<!DOCTYPE html>
<html lang="en">
<head>
	<meta charset="UTF-8">
	<title>getSnapShotBeforeUpdate的使用场景</title>
	<style>
		.list{
			width: 200px;
			height: 150px;
			background-color: skyblue;
			overflow: auto;
		}
		.news{
			height: 30px;
		}
	</style>
</head>
<body>
	<!-- 准备好一个“容器” -->
	<div id="test"></div>

	<!-- 引入react核心库 -->
	<script type="text/javascript" src="../js/17.0.1/react.development.js"></script>
	<!-- 引入react-dom,用于支持react操作DOM -->
	<script type="text/javascript" src="../js/17.0.1/react-dom.development.js"></script>
	<!-- 引入babel,用于将jsx转为js -->
	<script type="text/javascript" src="../js/17.0.1/babel.min.js"></script>

	<script type="text/babel">
		class NewsList extends React.Component{

			state = {newsArr:[]}

			componentDidMount(){
				setInterval(() => {
					//获取原状态
					const {newsArr} = this.state
					//模拟一条新闻
					const news = '新闻'+ (newsArr.length+1)
					//更新状态
					this.setState({newsArr:[news,...newsArr]})
				}, 1000);
			}

			getSnapshotBeforeUpdate(){
				return this.refs.list.scrollHeight
			}

			componentDidUpdate(preProps,preState,height){
				this.refs.list.scrollTop += this.refs.list.scrollHeight - height
			}

			render(){
				return(
					<div className="list" ref="list">
						{
							this.state.newsArr.map((n,index)=>{
								return <div key={index} className="news">{n}</div>
							})
						}
					</div>
				)
			}
		}
		ReactDOM.render(<NewsList/>,document.getElementById('test'))
	</script>
</body>
</html>


 2382
2382


 被折叠的 条评论
为什么被折叠?
被折叠的 条评论
为什么被折叠?
 到【灌水乐园】发言


