


什么是 LogicFlow
LogicFlow 是一个开源的前端流程图编辑器和工作流引擎,旨在帮助开发者和业务人员在网页端创建、编辑和管理复杂的业务流程和工作流。它提供了一个直观的界面和强大的功能,使得设计和管理工作流变得更加高效和便捷。
官网地址:https://site.logic-flow.cn/tutorial
LogicFlow 的主要功能
- 可视化编辑: 提供拖拽式的节点和连线操作,用户可以通过简单的鼠标操作设计和调整流程图。
- 节点和边的自定义: 支持自定义节点和边的样式、行为和属性,满足不同业务场景的需求。
- 插件系统: 提供丰富的插件机制,可以根据需要扩展 LogicFlow 的功能,例如增加特定类型的节点或边。
- 数据导入导出: 支持将流程图数据导出为 JSON 格式,便于保存和共享,同时也支持从 JSON 数据导入流程图。
- 事件机制: 提供丰富的事件机制,可以监听节点、边的添加、删除、修改等操作,方便与其他系统进行集成。
- 嵌入式使用: 可以嵌入到任何前端应用中,支持 React、Vue 等主流前端框架。
更多有关 LogicFlow 文章:https://site.logic-flow.cn/article/article01
新建前端项目编写 LogicFlow Demo
为了方便和系统化地学习 LogicFlow,这里我们将新建一个前端项目来编写对应的样例代码。我们选择使用 Vite + Vue + TypeScript 的技术栈来构建前端项目。
Vite 官网:https://www.vitejs.net/
新建前端项目
我们将创建一个使用 Vite4, Vue3, TypeScript, ES6, vue-router-next 以及 Element-Plus 的前端项目,并使用 pnpm 作为包管理器。
-
初始化项目
在终端中运行以下命令来创建一个新的项目文件夹并进入该文件夹:mkdir logicflow_example && cd logicflow_example -
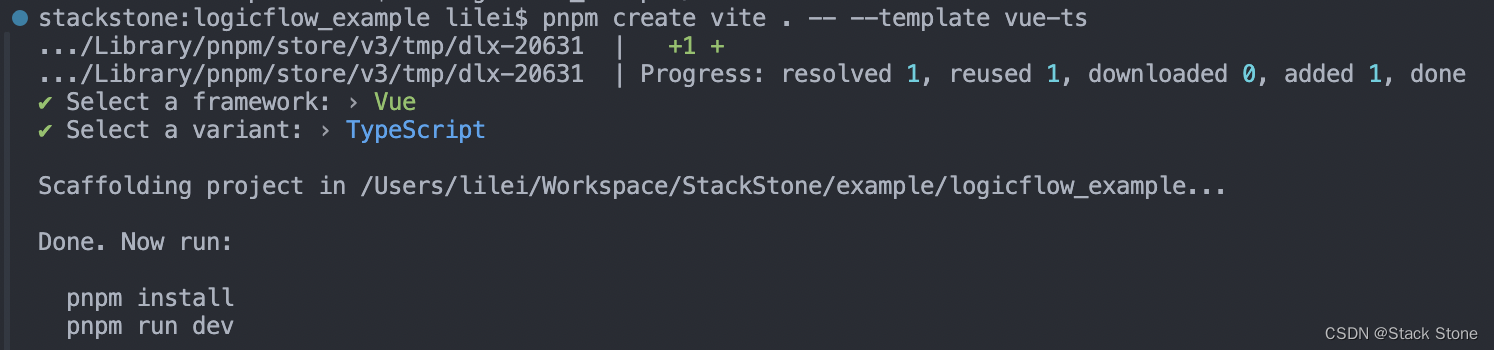
创建一个新的Vite项目
使用Vite的官方模板初始化一个新的Vue + TypeScript项目:pnpm create vite . -- --template vue-ts命令行中选择 VUE 和 TypeScript,如下图所示:
-
安装 Vue Router 和 Element-Plus 以及安装 Node.js 类型定义文件
安装最新版本的vue-router-next和Element-Plus:pnpm add vue-router@4 element-plus安装Node.js类型定义文件
pnpm add -D @types/node -
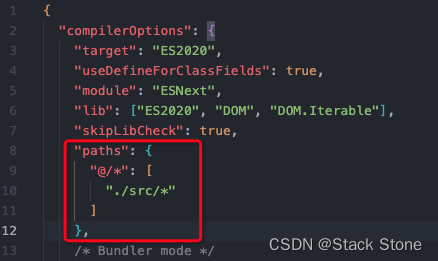
配置路径别名
在 Vite 项目中配置路径别名,以便使用 ‘@’ 符号来代替相对路径,从而简化模块导入。修改 vite.config.ts 文件,设置别名让 ‘@’ 指向 src 文件夹的步骤如下:a. 打开或创建 Vite 配置文件
如果你的项目中还没有 vite.config.ts 文件,请在项目根目录下创建这个文件。b. 编辑配置文件
在 vite.config.ts 文件中,编辑如下内容:import { defineConfig } from 'vite' import vue from '@vitejs/plugin-vue' import path from 'path' // https://vitejs.dev/config/ export default defineConfig({ plugins: [vue()], resolve: { alias: { '@': path.resolve(__dirname, './src') } } })c. 在 tsconfig.json 文件中新增如下配置:
-
配置Vue Router
在 src 目录下新建 router 目录,并创建 index.ts 文件,代码内容如下:import { createRouter, createWebHistory } from "vue-router"; const routes = [ { path: "/example/logic_flow/example01", name: "LogicFlowExample01", component: () => import("@/views/Example/LogicFlow/Example01.vue"), }, { path: "/example/logic_flow/example02", name: "LogicFlowExample02", component: () => import("@/views/Example/LogicFlow/Example02.vue"), }, ]; const router = createRouter({ history: createWebHistory(import.meta.env.BASE_URL), routes, }); export default router; -
配置 Element-Plus 和 Router
在src/main.ts中,添加Element-Plus 和 Router 的全局引用:import { createApp } from 'vue' import './style.css' import App from './App.vue' import router from '@/router' import ElementPlus from 'element-plus' import 'element-plus/dist/index.css' const app = createApp(App) app.use(router) app.use(ElementPlus) app.mount('#app') -
新建 Router 中配置的对应的页面
在项目中新建views/Example/LogicFlow目录,并创建两个 Vue 文件Example01.vue和Example02.vue,如下所示:
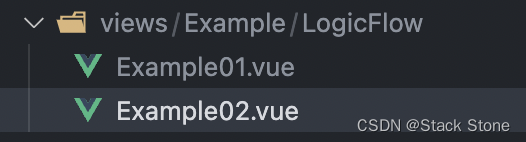
文件内容可以自己随意编写,例如:<script setup lang="ts"></script> <template> <h1>Example01</h1> </template> -
修改 App.vue
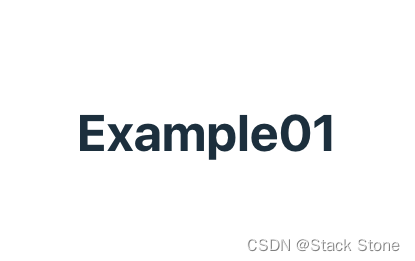
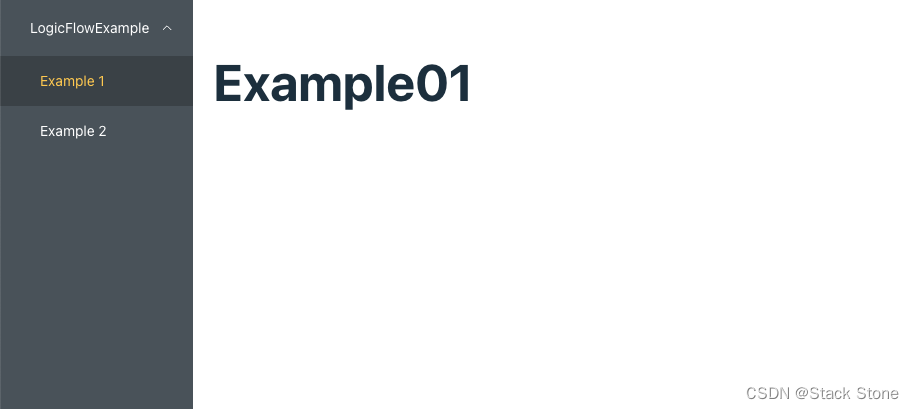
修改 App.vue 内容如下:<script setup lang="ts"> </script> <template> <RouterView /> </template> <style scoped> </style>此时启动项目
pnpm run dev访问前端页面http://localhost:5173/example/logic_flow/example01会出现如下页面:
-
配置样式以及进行简单布局
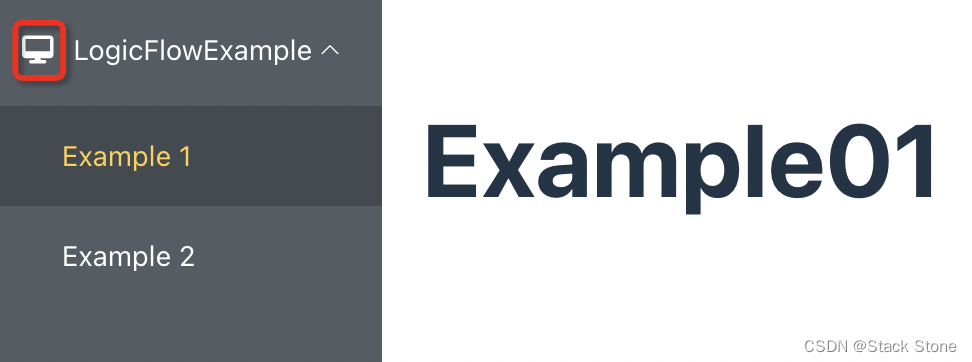
为了方便页面的选择,这里可以使用 Element Plus 的 Menu 组件。首先需要修改style.css中的样式:body { margin: 0; min-height: 100vh; } #app { padding: 0; }新建
layout/AppView.vue内容如下:<script setup lang="ts"> import { ElMenu, ElMenuItem, ElSubMenu } from 'element-plus' import { menuItems } from './config' import 'element-plus/dist/index.css' </script> <template> <div id="app"> <ElMenu style="height: 100vh; width: 200px" default-active="1" class="el-menu-vertical-demo" active-text-color="#ffd04b" background-color="#545c64" text-color="#fff" router > <!-- 使用 v-for 和 v-if/v-else 分别处理有子菜单和无子菜单的情况 --> <template v-for="item in menuItems"> <!-- 当存在子菜单时,使用 ElSubMenu --> <ElSubMenu v-if="item.children" :key="'submenu-' + item.index" :index="item.index" > <template #title> <i v-if="item.icon" :class="item.icon" style="margin-right: 10px" /> <span>{{ item.title }}</span> </template> <ElMenuItem v-for="child in item.children" :key="child.index" :index="child.index" :route="child.path" > {{ child.title }} </ElMenuItem> </ElSubMenu> <!-- 没有子菜单时,直接显示 ElMenuItem --> <ElMenuItem v-else :key="'menuitem-' + item.index" :index="item.index" :route="item.path" > <i v-if="item.icon" :class="item.icon" style="margin-right: 10px" /> <span>{{ item.title }}</span> </ElMenuItem> </template> </ElMenu> <div class="main-content"> <RouterView /> </div> </div> </template> <style> #app { display: flex; width: 100%; } .el-menu-vertical-demo { border-right: 0; } .main-content { flex-grow: 1; padding: 20px; width: 100%; } </style>创建
layout/config/index.ts文件内容如下:interface MenuItem { index: string; title: string; icon?: string; path?: string; children?: MenuItem[]; } export const menuItems: MenuItem[] = [ { index: '1', title: 'LogicFlowExample', icon: 'fa-solid fa-desktop', children: [ { index: '1-1', title: 'Example 1', path: '/example/logic_flow/example01' }, { index: '1-2', title: 'Example 2', path: '/example/logic_flow/example02' } ] } ];修改
App.vue如下所示:<script setup lang="ts"> import AppView from './layout/AppView.vue'; </script> <template> <AppView /> </template> <style scoped></style> -
配置 eslint
运行以下命令安装 ESLint 及其相关插件:pnpm add -D eslint prettier eslint-plugin-prettier eslint-config-prettier eslint-plugin-vue项目中新建
.prettierrc文件,并添加如下内容:{ "semi": false, "singleQuote": true, "trailingComma": "none" }新建
.eslintrc文件,并添加如下内容:{ // "extends" 部分用于继承一系列预定义的规则集或配置。 "extends": [ // "eslint:recommended": 包含 ESLint 的核心规则集,这些规则可以检测JavaScript代码中的潜在问题。 "eslint:recommended", // "plugin:vue/vue3-recommended": 专为 Vue 3 设计的规则集,包含对 Vue 代码风格和最佳实践的严格检查。 // 这个规则集适用于 Vue 3 项目,涵盖了 Vue 特定的语法和模式。 "plugin:vue/vue3-recommended", // "plugin:prettier/recommended": 这是一个配置集,旨在集成 Prettier 的格式化功能到 ESLint 中。 // 它首先使用 "eslint-plugin-prettier" 来运行 Prettier 作为 ESLint 规则, // 然后使用 "eslint-config-prettier" 来禁用所有可能与 Prettier 冲突的 ESLint 规则。 "plugin:prettier/recommended" ], // "rules" 部分允许你定义或重写从 "extends" 部分继承来的规则。 "rules": { // "prettier/prettier": "error": 配置 Prettier 产生的问题为 ESLint 的 "error" 级别错误。 // 这意味着任何代码风格不符合 Prettier 配置的地方都会被 ESLint 标记为错误, // 这样可以在编写代码时即时纠正格式问题。 "prettier/prettier": "error" } }在
.vscode中配置settings.json,内容如下:{ "editor.formatOnSave": true, "editor.codeActionsOnSave": { "source.fixAll": "always", "source.fixAll.eslint": "always" }, "eslint.validate": [ "javascript", "vue", "typescript" ], "[vue]": { "editor.defaultFormatter": "esbenp.prettier-vscode" }, "[typescript]": { "editor.formatOnSave": true } }项目启动后运行如下所示:
-
安装 Font Awesome CSS
使用 pnpm 安装 Font Awesome 的 CSS 包pnpm install @fortawesome/fontawesome-free在
main.js中引入// main.js 或 main.ts import '@fortawesome/fontawesome-free/css/all.min.css';此时页面即可显示图图标:
初步使用 LogicFlow
LogicFlow 分为:
core包——核心包extension包——插件包(不使用插件时不需要引入)engine包——执行引擎
- 使用 pnpm 安装 logicflow
pnpm install @logicflow/core --save - 在 Example01.vue 中编写如下代码:
运行后页面如下所示:<script setup lang="ts"> import LogicFlow from '@logicflow/core' import '@logicflow/core/dist/style/index.css' import { onMounted } from 'vue' // 定义图表数据,包含节点和边 const data = { nodes: [ { id: '1', type: 'rect', // 节点类型为矩形 x: 100, // 节点的 x 坐标 y: 100, // 节点的 y 坐标 text: '节点1' // 节点显示的文本 }, { id: '2', type: 'circle', // 节点类型为圆形 x: 300, // 节点的 x 坐标 y: 100, // 节点的 y 坐标 text: '节点2' // 节点显示的文本 } ], edges: [ { sourceNodeId: '1', // 起始节点的 ID targetNodeId: '2', // 目标节点的 ID type: 'polyline', // 边的类型为折线 text: '连线', // 边显示的文本 startPoint: { x: 140, // 边起点的 x 坐标 y: 100 // 边起点的 y 坐标 }, endPoint: { x: 250, // 边终点的 x 坐标 y: 100 // 边终点的 y 坐标 } } ] } // 在组件挂载时执行 onMounted(() => { // 创建 LogicFlow 实例 const lf = new LogicFlow({ container: document.getElementById('container')!, // 指定容器元素 grid: true // 启用网格 }) // 渲染图表数据 lf.render(data) }) </script> <template> <h3>Example01</h3> <div id="container"></div> <!-- 用于显示 LogicFlow 图表的容器 --> </template> <style> #container { /* 容器宽度 */ width: 100%; /* 容器高度 */ height: 500px; } </style>
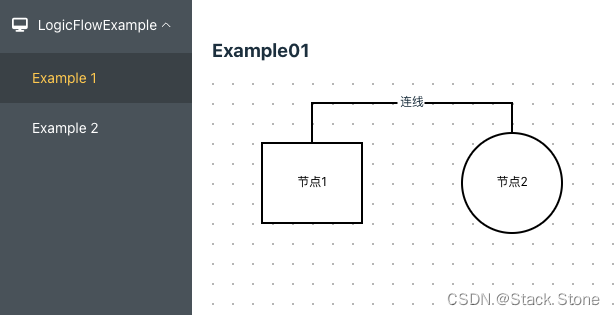
LogicFlow 支持 JSON 格式数据,上面代码 data 对象中nodes代表节点数据,edges代表边数据
渲染节点和边
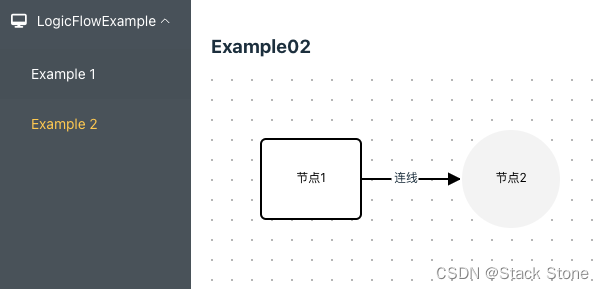
在 Example02.vue 中编写如下代码:
<script setup lang="ts">
import { LogicFlow, Definition } from '@logicflow/core'
import '@logicflow/core/dist/style/index.css'
import { onMounted } from 'vue'

// 静默模式配置,禁用滚动、移动和缩放等功能
const SilentConfig = {
  isSilentMode: true, // 启用静默模式
  stopScrollGraph: true, // 禁止滚动图表
  stopMoveGraph: true, // 禁止移动图表
  stopZoomGraph: true, // 禁止缩放图表
  adjustNodePosition: true // 调整节点位置
}

// 样式配置部分,定义节点和边的样式
const styleConfig: Partial<Definition> = {
  style: {
    rect: {
      rx: 5, // 矩形节点的圆角 x 半径
      ry: 5, // 矩形节点的圆角 y 半径
      strokeWidth: 2 // 矩形节点的边框宽度
    },
    circle: {
      fill: '#f5f5f5', // 圆形节点的填充颜色
      stroke: '#fff' // 圆形节点的边框颜色
    }
  }
}

// 定义图表数据,包含节点和边
const data = {
  nodes: [
    {
      id: '1',
      type: 'rect', // 节点类型为矩形
      x: 100, // 节点的 x 坐标
      y: 100, // 节点的 y 坐标
      text: '节点1' // 节点显示的文本
    },
    {
      id: '2',
      type: 'circle', // 节点类型为圆形
      x: 300, // 节点的 x 坐标
      y: 100, // 节点的 y 坐标
      text: '节点2' // 节点显示的文本
    }
  ],
  edges: [
    {
      sourceNodeId: '1', // 起始节点的 ID
      targetNodeId: '2', // 目标节点的 ID
      type: 'polyline', // 边的类型为折线
      text: '连线', // 边显示的文本
      startPoint: {
        x: 140, // 边起点的 x 坐标
        y: 100 // 边起点的 y 坐标
      },
      endPoint: {
        x: 250, // 边终点的 x 坐标
        y: 100 // 边终点的 y 坐标
      }
    }
  ]
}

// 在组件挂载时执行
onMounted(() => {
  // 创建 LogicFlow 实例
  const lf = new LogicFlow({
    container: document.getElementById('container')!, // 指定容器元素
    grid: true, // 启用网格
    ...SilentConfig, // 应用静默模式配置
    ...styleConfig // 应用样式配置
  })
  // 渲染图表数据
  lf.render(data)
})
</script>

<template>
  <h3>Example02</h3>
  <div id="container"></div>
  <!-- 用于显示 LogicFlow 图表的容器 -->
</template>

<style>
#container {
  width: 100%; /* 容器宽度 */
  height: 500px; /* 容器高度 */
}
</style>
运行后页面如下:
使用前端框架节点
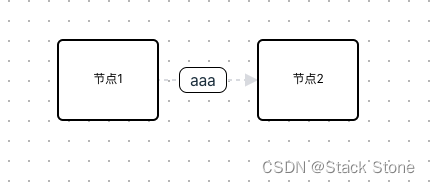
创建 src/views/Example/LogicFlow/component/CustomEdge 目录,在目录下新建 CustomLine.vue 文件,内容如下:
<script setup lang="ts">
// 这里可以包含 TypeScript 代码或特定逻辑
</script>
<template>
  <div class="custom-edge">aaa</div>
</template>

<style scoped>
.custom-edge {
  flex: 1 1;
  text-align: center;
  background-color: #fff;
  border: 1px solid black;
  border-radius: 8px;
}
</style>
之后创建 src/views/Example/LogicFlow/component/CustomEdge/types/index.ts 文件,内容如下:
import { BaseEdgeModel, h, LineEdge } from '@logicflow/core'
import { createApp } from 'vue'
import CustomLine from '../CustomLine.vue'

// 默认的边的宽度和高度
const DEFAULT_WIDTH = 48
const DEFAULT_HEIGHT = 32

// 自定义边的模型类,继承自BaseEdgeModel
export class CustomEdgeModel extends BaseEdgeModel {
  // 获取边的样式,可以在这里自定义边的视觉效果
  getEdgeStyle() {
    const edgeStyle = super.getEdgeStyle()
    edgeStyle.strokeDasharray = '4 4' // 设置虚线样式
    edgeStyle.stroke = '#DDDFE3' // 设置线的颜色
    return edgeStyle
  }
}

// 自定义边的视图类,继承自LineEdge
export class CustomEdgeView extends LineEdge {
  // 生成边的SVG元素
  getEdge() {
    const { model } = this.props // 从props中获取模型
    const { customWidth = DEFAULT_WIDTH, customHeight = DEFAULT_HEIGHT } =
      model.getProperties() // 获取自定义的宽度和高度
    const id = model.id // 获取模型的ID
    const edgeStyle = model.getEdgeStyle() // 获取边的样式
    const { startPoint, endPoint, arrowConfig } = model // 获取起点、终点和箭头配置

    // 计算线条的SVG属性
    const lineData = {
      x1: startPoint.x,
      y1: startPoint.y,
      x2: endPoint.x,
      y2: endPoint.y
    }

    // 计算外部对象的位置和尺寸
    const positionData = {
      x: (startPoint.x + endPoint.x - customWidth) / 2,
      y: (startPoint.y + endPoint.y - customHeight) / 2,
      width: customWidth,
      height: customHeight
    }
    const wrapperStyle = {
      width: customWidth,
      height: customHeight
    }

    // 延迟挂载Vue组件到DOM
    setTimeout(() => {
      const container = document.querySelector(`#${id}`) // 查找容器
      if (container) {
        createApp(CustomLine).mount(container) // 如果容器存在,则挂载Vue组件
      }
    }, 0)

    // 返回SVG元素的集合
    return h('g', {}, [
      h('line', { ...lineData, ...edgeStyle, ...arrowConfig }), // 创建线条
      h('foreignObject', { ...positionData }, [
        // 创建外部对象,用于承载Vue组件
        h('div', {
          id,
          style: wrapperStyle,
          class: 'lf-custom-edge-wrapper'
        })
      ])
    ])
  }

  // 返回追加的SVG元素,这里默认为空
  getAppend() {
    return h('g', {}, [])
  }
}
创建 src/views/Example/LogicFlow/component/CustomEdge/index.ts 文件内容如下:
// index.ts
import { CustomEdgeModel, CustomEdgeView } from './types'

export default {
  type: 'CustomEdge',
  view: CustomEdgeView,
  model: CustomEdgeModel
}
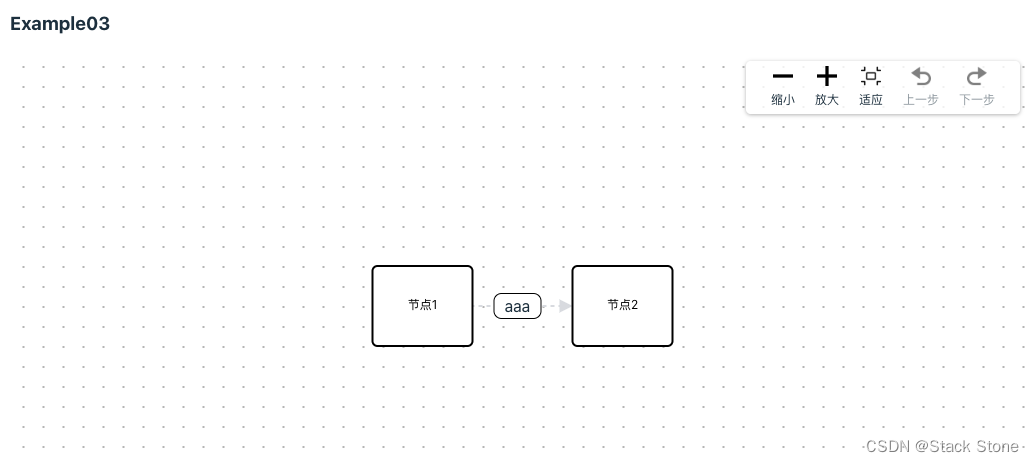
创建 src/views/Example/LogicFlow/Example03.vue 文件,代码如下:
<script setup lang="ts">
import { LogicFlow, Definition } from '@logicflow/core'
import '@logicflow/core/dist/style/index.css'
import { onMounted } from 'vue'
import CustomEdge from './component/CustomEdge'

// 静默模式配置,禁用滚动、移动和缩放等功能
const SilentConfig = {
  isSilentMode: true, // 启用静默模式
  stopScrollGraph: true, // 禁止滚动图表
  stopMoveGraph: true, // 禁止移动图表
  stopZoomGraph: true, // 禁止缩放图表
  adjustNodePosition: true // 调整节点位置
}

// 样式配置部分,定义节点和边的样式
const styleConfig: Partial<Definition> = {
  style: {
    rect: {
      rx: 5, // 矩形节点的圆角 x 半径
      ry: 5, // 矩形节点的圆角 y 半径
      strokeWidth: 2 // 矩形节点的边框宽度
    },
    circle: {
      fill: '#f5f5f5', // 圆形节点的填充颜色
      stroke: '#fff' // 圆形节点的边框颜色
    }
  }
}

// 定义图表数据,包含节点和边
const data = {
  nodes: [
    {
      type: 'rect',
      x: 100,
      y: 100,
      text: '节点1',
      id: 'node_id_1'
    },
    {
      type: 'rect',
      text: '节点2',
      x: 300,
      y: 100,
      id: 'node_id_2'
    }
  ],
  edges: [
    {
      id: 'edge_id_1',
      type: 'CustomEdge',
      sourceNodeId: 'node_id_1',
      properties: {},
      targetNodeId: 'node_id_2',
      startPoint: {
        x: 140,
        y: 100
      },
      endPoint: {
        x: 250,
        y: 100
      }
    }
  ]
}

// 在组件挂载时执行
onMounted(() => {
  // 创建 LogicFlow 实例
  const lf = new LogicFlow({
    container: document.getElementById('container')!, // 指定容器元素
    grid: true, // 启用网格
    ...SilentConfig, // 应用静默模式配置
    ...styleConfig // 应用样式配置
  })
  lf.register(CustomEdge)
  // 渲染图表数据
  lf.render(data)
  lf.translateCenter()
})
</script>

<template>
  <h3>Example03</h3>
  <div id="container"></div>
  <!-- 用于显示 LogicFlow 图表的容器 -->
</template>

<style>
#container {
  width: 100%; /* 容器宽度 */
  height: 500px; /* 容器高度 */
}
.lf-custom-edge-wrapper {
  display: flex;
  align-items: center;
  justify-content: center;
}
</style>
再配置下 Menu 和 Router,运行结果如下:
使用插件
LogicFlow 最初的目标就是支持一个扩展性强的流程绘制工具,用来满足各种业务需求。为了让LogicFlow的拓展性足够强,LogicFlow将所有的非核心功能都使用插件的方式开发,然后将这些插件放到@logicflow/extension包中。
执行命令安装插件包:
pnpm install @logicflow/extension --save
修改 Example03.vue,新增如下内容:
import '@logicflow/extension/lib/style/index.css'
import { Control } from '@logicflow/extension'
LogicFlow.use(Control)
页面内容如下:
需要注意的是如果代码中使用 LogicFlow.use(Control) 其将注册插件到全局,也就是说如果此时访问了Example03页面,代码加载了LogicFlow.use(Control)那么此时再访问其他页面,其他页面的 LogicFlow 实例也会加载该插件,为了不影响其他页面的实例可以注册插件到对应的实例:
  const lf = new LogicFlow({
    container: document.getElementById('container')!, // 指定容器元素
    grid: true, // 启用网格
    ...SilentConfig, // 应用静默模式配置
    ...styleConfig, // 应用样式配置
    plugins: [Control] // 使用插件 注册插件到实例
  })
完整样例代码:https://github.com/lt5227/example_code/tree/main/logicflow_example
下一篇:LogicFlow 基础 实例


 1万+
1万+

 被折叠的 条评论
为什么被折叠?
被折叠的 条评论
为什么被折叠?
 到【灌水乐园】发言


