


redis cluster百万QPS的挑战
最近在做redis cluster性能测试过程中,发现当集群吞吐量到达一定程度后(4台12core的redis服务器,80wQPS左右),集群整体性能不能线性增长。也就是说,通过加机器不能提升集群的整体吞吐。以下是详细记录了一下这个case的排查并最终解决的过程。
先来看一个压测图:
上图中每一条线代表一个起压端进程的压测QPS(一台起压机上开4个起压端),可以看到随着起压机的增多,每个起压机的QPS却在下滑。而此时redis的CPU、内存、网卡都还没有跑满。另外尝试增多redis服务器,发现增多一倍服务器后,每台服务器上每个redis实例的CPU大幅降低。总的QPS却基本没有变化。
由于起压机是无状态的,只是简单的mock随机请求到redis cluster,并且请求的路由策略会在起压机内部调jedis的过程中做好,直接请求到目标redis实例,并且在起压过程中没有槽迁移导致的ASK/MOVED动作。所以排除了起压机的影响,只能怀疑是redis cluster服务端导致的问题。
一开始怀疑是服务端连接数过多的问题,看了一下, 服务端连接数在1w以下,每个客户端与每个redis实例的连接数也就在几十个长连接,远没有到达系统瓶颈。
难道是CPU的问题?但是top看每个核的CPU也就打到60%左右,而且如果是CPU到瓶颈了,通过增加redis服务器应该可以线性伸缩才对,但并没有。
再仔细观察top信息,发现每个核的CPU都有一定的si开销,也就是软中断,中断开销在10%以上:

怀疑是软中断导致抢占了Redis的CPU资源,软中断耗在哪里了可以用以下命令看到:
Java代码

- watch -d -n 1 'cat /proc/softirqs'
发现中断开销主要集中在网卡中断上,也就是eth0-TxRx上面。解决思路是将网卡中断和Redis进程使用的CPU隔离开,这样避免网卡中断抢占CPU拖慢Redis服务。另外,由于Redis是单线程模型,在多核服务器上,可以将多个Redis实例绑定到不同的CPU上,使每个Redis进程独占一个CPU。
先将网卡的中断号绑定到特定CPU上:
Java代码
- # 如果开了irqbalance服务,需要先停止服务,否则后续的绑定将无效:
- service irqbalance stop
- # 将网卡中断号绑定到CPU0-CPU2上:
- echo "1" > /proc/irq/78/smp_affinity
- echo "1" > /proc/irq/79/smp_affinity
- echo "2" > /proc/irq/80/smp_affinity
- echo "2" > /proc/irq/81/smp_affinity
- echo "2" > /proc/irq/82/smp_affinity
- echo "4" > /proc/irq/83/smp_affinity
- echo "4" > /proc/irq/84/smp_affinity
- echo "4" > /proc/irq/85/smp_affinity
再将Redis master实例绑定到CPU3-CPU10上。这里没有绑定Redis slave,是因为观察到slave占用的CPU极低,每个slave占用大概一个核的5%以下。当然如果CPU核数够多的话也可以考虑绑slave到其它多余的核。
Java代码
- # 绑定master的pid到CPU3-CPU10上:
- taskset -cp 3 [pid1]
- taskset -cp 4 [pid2]
- taskset -cp 5 [pid3]
- ...
绑定好后再压,看top会发现,前三个CPU主要耗在si上(网卡中断),后8个CPU耗在us/sy上(redis master服务):
至此,解决了单机CPU的问题,但是集群不能线性增长的问题还是解释不通。因为即使单台redis服务器的软中断导致单机性能受影响,在加Redis机器时总吞吐也不应该上不去呀。所以,开始怀疑redis cluster的通讯总线导致线性增长受阻。
每个redis cluster实例都会开一个集群通讯总线端口,并且redis cluster会用gossip协议,每隔一秒钟将集群一部分节点的信息发送给某个实例的总线端口。利用这种传播方式,可以将集群节点的变更以无中心的方式传播到整个集群。这里关键是总线传播的数据量,数据量的大小取决于PING消息携带的gossip数组的长度和大小,这个长度就是具体要捎带多少个其它节点的信息:
C代码
- /** cluster.c的clusterSendPing函数 **/
- /* Send a PING or PONG packet to the specified node, making sure to add enough
- * gossip informations. */
- void clusterSendPing(clusterLink *link, int type) {
- unsigned char *buf;
- clusterMsg *hdr;
- int gossipcount = 0; /* Number of gossip sections added so far. */
- int wanted; /* Number of gossip sections we want to append if possible. */
- int totlen; /* Total packet length. */
- /* freshnodes is the max number of nodes we can hope to append at all:
- * nodes available minus two (ourself and the node we are sending the
- * message to). However practically there may be less valid nodes since
- * nodes in handshake state, disconnected, are not considered. */
- int freshnodes = dictSize(server.cluster->nodes)-2;
- /* How many gossip sections we want to add? 1/10 of the number of nodes
- * and anyway at least 3. Why 1/10?
- *
- * If we have N masters, with N/10 entries, and we consider that in
- * node_timeout we exchange with each other node at least 4 packets
- * (we ping in the worst case in node_timeout/2 time, and we also
- * receive two pings from the host), we have a total of 8 packets
- * in the node_timeout*2 falure reports validity time. So we have
- * that, for a single PFAIL node, we can expect to receive the following
- * number of failure reports (in the specified window of time):
- *
- * PROB * GOSSIP_ENTRIES_PER_PACKET * TOTAL_PACKETS:
- *
- * PROB = probability of being featured in a single gossip entry,
- * which is 1 / NUM_OF_NODES.
- * ENTRIES = 10.
- * TOTAL_PACKETS = 2 * 4 * NUM_OF_MASTERS.
- *
- * If we assume we have just masters (so num of nodes and num of masters
- * is the same), with 1/10 we always get over the majority, and specifically
- * 80% of the number of nodes, to account for many masters failing at the
- * same time.
- *
- * Since we have non-voting slaves that lower the probability of an entry
- * to feature our node, we set the number of entires per packet as
- * 10% of the total nodes we have. */
- wanted = floor(dictSize(server.cluster->nodes)/10);
- if (wanted < 3) wanted = 3;
- if (wanted > freshnodes) wanted = freshnodes;
- /* Compute the maxium totlen to allocate our buffer. We'll fix the totlen
- * later according to the number of gossip sections we really were able
- * to put inside the packet. */
- totlen = sizeof(clusterMsg)-sizeof(union clusterMsgData);
- totlen += (sizeof(clusterMsgDataGossip)*wanted);
- /* Note: clusterBuildMessageHdr() expects the buffer to be always at least
- * sizeof(clusterMsg) or more. */
- if (totlen < (int)sizeof(clusterMsg)) totlen = sizeof(clusterMsg);
- buf = zcalloc(totlen);
- hdr = (clusterMsg*) buf;
- /* Populate the header. */
- if (link->node && type == CLUSTERMSG_TYPE_PING)
- link->node->ping_sent = mstime();
- clusterBuildMessageHdr(hdr,type);
- /* Populate the gossip fields */
- int maxiterations = wanted*3;
- while(freshnodes > 0 && gossipcount < wanted && maxiterations--) {
- dictEntry *de = dictGetRandomKey(server.cluster->nodes);
- clusterNode *this = dictGetVal(de);
- clusterMsgDataGossip *gossip;
- int j;
- /* Don't include this node: the whole packet header is about us
- * already, so we just gossip about other nodes. */
- if (this == myself) continue;
- /* Give a bias to FAIL/PFAIL nodes. */
- if (maxiterations > wanted*2 &&
- !(this->flags & (REDIS_NODE_PFAIL|REDIS_NODE_FAIL)))
- continue;
- /* In the gossip section don't include:
- * 1) Nodes in HANDSHAKE state.
- * 3) Nodes with the NOADDR flag set.
- * 4) Disconnected nodes if they don't have configured slots.
- */
- if (this->flags & (REDIS_NODE_HANDSHAKE|REDIS_NODE_NOADDR) ||
- (this->link == NULL && this->numslots == 0))
- {
- freshnodes--; /* Tecnically not correct, but saves CPU. */
- continue;
- }
- /* Check if we already added this node */
- for (j = 0; j < gossipcount; j++) {
- if (memcmp(hdr->data.ping.gossip[j].nodename,this->name,
- REDIS_CLUSTER_NAMELEN) == 0) break;
- }
- if (j != gossipcount) continue;
- /* Add it */
- freshnodes--;
- gossip = &(hdr->data.ping.gossip[gossipcount]);
- memcpy(gossip->nodename,this->name,REDIS_CLUSTER_NAMELEN);
- gossip->ping_sent = htonl(this->ping_sent);
- gossip->pong_received = htonl(this->pong_received);
- memcpy(gossip->ip,this->ip,sizeof(this->ip));
- gossip->port = htons(this->port);
- gossip->flags = htons(this->flags);
- gossip->notused1 = 0;
- gossip->notused2 = 0;
- gossipcount++;
- }
- /* Ready to send... fix the totlen fiend and queue the message in the
- * output buffer. */
- totlen = sizeof(clusterMsg)-sizeof(union clusterMsgData);
- totlen += (sizeof(clusterMsgDataGossip)*gossipcount);
- hdr->count = htons(gossipcount);
- hdr->totlen = htonl(totlen);
- clusterSendMessage(link,buf,totlen);
- zfree(buf);
- }
以上函数定义了发送PING包的逻辑,重点是wanted变量的计算方式,也就是每次PING包内要携带多少个其他节点信息发送。可以看到,wanted最小3个,最大不超过集群总实例数-2个,一般情况是集群实例数的1/10个。
再来看看每个gossip包的大小:
C代码
- typedef struct {
- /* REDIS_CLUSTER_NAMELEN是常量40 */
- char nodename[REDIS_CLUSTER_NAMELEN];
- uint32_t ping_sent;
- uint32_t pong_received;
- char ip[REDIS_IP_STR_LEN]; /* IP address last time it was seen */
- uint16_t port; /* port last time it was seen */
- uint16_t flags; /* node->flags copy */
- uint16_t notused1; /* Some room for future improvements. */
- uint32_t notused2;
- } clusterMsgDataGossip;
看到这里就明白了,总线传播的数据量wanted是一个变量,会随着集群实例数的增多而增多。当集群节点数不多时不会造成影响,但随着节点数变多,每次wanted要携带的节点信息也就随之变多,会导致对网卡的消耗越来越大。我压测时每台Redis服务器8主8从共16个节点,四台服务器共64个节点,每个节点每秒钟PING包都要携带6个gossip包的信息(64/10)。如果扩大到十台,就是每个节点每秒钟PING包要携带16个gossip包的信息(160/10)。
解决了网卡中断问题后,Redis实例的CPU不会再被中断抢走,QPS基本可以线性增长。在6台12coreCPU的Redis服务器上,总QPS可以到达200w/s以上,单机QPS在30w以上。
ps:
1. 推荐一篇有关软中断的文章:http://huoding.com/2013/10/30/296
2. 给一个查询当前网卡中断所在的cpu核的脚本(只在CentOS系统的多队列网卡模式下测试通过):
Java代码
- netarr=(`grep eth /proc/interrupts | awk '{print $1}' |awk -F':' '{print $1}'`) && for netid in ${netarr[*]}; do cat /proc/irq/$netid/smp_affinity_list; done

- 大小: 96.1 KB

- 大小: 151.6 KB

- 大小: 330 KB
===========================================================================================================================================================================================================================================================================
linux CPU SI软中断比较占用率比较大(网络解决方案)
2017年06月22日 13:36:10 achejq 阅读数:3620
https://my.oschina.net/323148/blog/724408
irq 默认linux自动启动的,但是往往它自己控制不是很好(CPU SI经常某个CPU占用大)
通常碰到大流量的,通常我们会把自动启动的irqblance关闭,然后手动指定一下IRQ进行优化:(IRQ全称为Interrupt Request,即是“中断请求”的意思,)
-
看CPU的 si利用率:

-
看设备的ID号:

-
配置指定的CPU: (1表示第1个,2表示第2个,4表示第4个,8表示第4个,这是16进制化2进制,显示的数值是16进制的)

例子:我本机是8核心的。。。。我的操作是。。。。
/etc/init.d/irqbalance stop
echo 1 > /proc/irq/59/smp_affinity
echo 2 > /proc/irq/60/smp_affinity
echo 4 > /proc/irq/61/smp_affinity
echo 8 > /proc/irq/62/smp_affinity
echo 10 > /proc/irq/63/smp_affinity
echo 20 > /proc/irq/64/smp_affinity
echo 40 > /proc/irq/65/smp_affinity
echo 80 > /proc/irq/66/smp_affinity
====================================================================================================================================================================================================================================================================================================================================================================
Redis Cluster集群
Redis Cluster集群
一、redis-cluster设计
Redis集群搭建的方式有多种,例如使用zookeeper等,但从redis 3.0之后版本支持redis-cluster集群,Redis-Cluster采用无中心结构,每个节点保存数据和整个集群状态,每个节点都和其他所有 节点连接。其redis-cluster架构图如下:
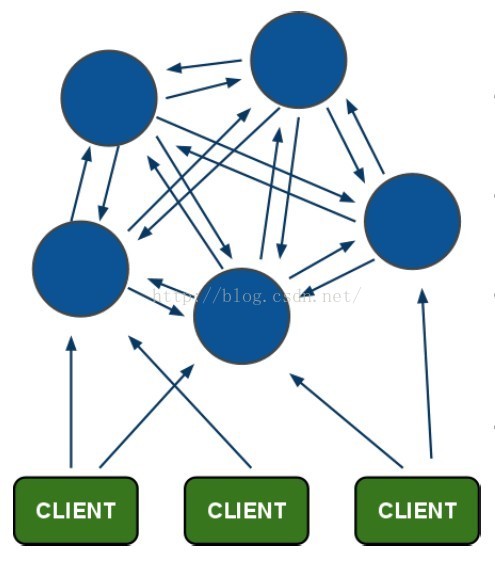
其结构特点:
1、所有的redis节点彼此互联(PING-PONG机制),内部使用二进制协议优化传输速度和带宽。
2、节点的fail是通过集群中超过半数的节点检测失效时才生效。
3、客户端与redis节点直连,不需要中间proxy层.客户端不需要连接集群所有节点,连接集群中任何一个可用节点即可。
4、redis-cluster把所有的物理节点映射到[0-16383]slot上(不一定是平均分配),cluster 负责维护node<->slot<->value。
5、Redis集群预分好16384个桶,当需要在 Redis 集群中放置一个 key-value 时,根据 CRC16(key) mod 16384的值,决定将一个key放到哪个桶中。
1、redis cluster节点分配
现在我们是三个主节点分别是:A, B, C 三个节点,它们可以是一台机器上的三个端口,也可以是三台不同的服务器。那么,采用哈希槽 (hash slot)的方式来分配16384个slot 的话,它们三个节点分别承担的slot 区间是:
节点A覆盖0-5460;
节点B覆盖5461-10922;
节点C覆盖10923-16383.
获取数据:
如果存入一个值,按照redis cluster哈希槽的算法: CRC16('key')%16384 = 6782。 那么就会把这个key 的存储分配到 B 上了。同样,当我连接(A,B,C)任何一个节点想获取'key'这个key时,也会这样的算法,然后内部跳转到B节点上获取数据
新增一个主节点:
新增一个节点D,redis cluster的这种做法是从各个节点的前面各拿取一部分slot到D上,我会在接下来的实践中实验。大致就会变成这样:
节点A覆盖1365-5460
节点B覆盖6827-10922
节点C覆盖12288-16383
节点D覆盖0-1364,5461-6826,10923-12287
同样删除一个节点也是类似,移动完成后就可以删除这个节点了。
2、Redis Cluster主从模式
redis cluster 为了保证数据的高可用性,加入了主从模式,一个主节点对应一个或多个从节点,主节点提供数据存取,从节点则是从主节点拉取数据备份,当这个主节点挂掉后,就会有这个从节点选取一个来充当主节点,从而保证集群不会挂掉。
上面那个例子里, 集群有ABC三个主节点, 如果这3个节点都没有加入从节点,如果B挂掉了,我们就无法访问整个集群了。A和C的slot也无法访问。
所以我们在集群建立的时候,一定要为每个主节点都添加了从节点, 比如像这样, 集群包含主节点A、B、C, 以及从节点A1、B1、C1, 那么即使B挂掉系统也可以继续正确工作。
B1节点替代了B节点,所以Redis集群将会选择B1节点作为新的主节点,集群将会继续正确地提供服务。 当B重新开启后,它就会变成B1的从节点。
不过需要注意,如果节点B和B1同时挂了,Redis集群就无法继续正确地提供服务了。
二、redis集群的搭建
集群中至少应该有奇数个节点,所以至少有三个节点,每个节点至少有一个备份节点,所以下面使用6节点(主节点、备份节点由redis-cluster集群确定)。
下面使用redis-3.2.0安装,下载地址
1、安装redis节点指定端口
解压redis压缩包,编译安装
[plain] view plain copy ![]()
![]()
- [root@localhost redis-3.2.0]# tar xzf redis-3.2.0.tar.gz
- [root@localhost redis-3.2.0]# cd redis-3.2.0
- [root@localhost redis-3.2.0]# make
- [root@localhost redis01]# make install PREFIX=/usr/andy/redis-cluster
在redis-cluster下 修改bin文件夹为redis01,复制redis.conf配置文件
配置redis的配置文件redis.conf
daemonize yes #后台启动
port 7001 #修改端口号,从7001到7006
cluster-enabled yes #开启cluster,去掉注释
cluster-config-file nodes.conf
cluster-node-timeout 15000
appendonly yes
复制六份,修改对应的端口号
2、安装redis-trib所需的 ruby脚本
复制redis解压文件src下的redis-trib.rb文件到redis-cluster目录
[plain] view plain copy ![]()
![]()
- [root@localhost redis-cluster]# cp /usr/andy/redis/redis-3.2.0/src/redis-trib.rb ./
安装ruby环境:
[plain] view plain copy ![]()
![]()
- [root@localhost redis-cluster]# yum install ruby
- [root@localhost redis-cluster]# yum install rubygems
安装redis-trib.rb运行依赖的ruby的包redis-3.2.2.gem,下载
[plain] view plain copy ![]()
![]()
- [root@localhost redis-cluster]# gem install redis-3.2.2.gem
3、启动所有的redis节点
可以写一个命令脚本start-all.sh
[plain] view plain copy ![]()
![]()
- cd redis01
- ./redis-server redis.conf
- cd ..
- cd redis02
- ./redis-server redis.conf
- cd ..
- cd redis03
- ./redis-server redis.conf
- cd ..
- cd redis04
- ./redis-server redis.conf
- cd ..
- cd redis05
- ./redis-server redis.conf
- cd ..
- cd redis06
- ./redis-server redis.conf
- cd ..
设置权限启动
[plain] view plain copy ![]()
![]()
- [root@localhost redis-cluster]# chmod 777 start-all.sh
- [root@localhost redis-cluster]# ./start-all.sh
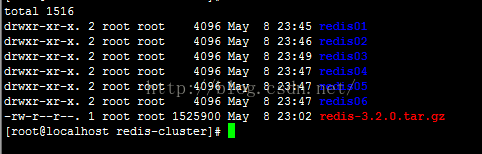
查看redis进程启动状态
[plain] view plain copy ![]()
![]()
- [root@localhost redis-cluster]# ps -ef | grep redis
- root 4547 1 0 23:12 ? 00:00:00 ./redis-server 127.0.0.1:7001 [cluster]
- root 4551 1 0 23:12 ? 00:00:00 ./redis-server 127.0.0.1:7002 [cluster]
- root 4555 1 0 23:12 ? 00:00:00 ./redis-server 127.0.0.1:7003 [cluster]
- root 4559 1 0 23:12 ? 00:00:00 ./redis-server 127.0.0.1:7004 [cluster]
- root 4563 1 0 23:12 ? 00:00:00 ./redis-server 127.0.0.1:7005 [cluster]
- root 4567 1 0 23:12 ? 00:00:00 ./redis-server 127.0.0.1:7006 [cluster]
- root 4840 4421 0 23:26 pts/1 00:00:00 grep --color=auto redis
可以看到redis的6个节点已经启动成功
杀死全部的几点:
[plain] view plain copy ![]()
![]()
- [root@localhost redis-cluster]# pkill -9 redis
4、使用redis-trib.rb创建集群
[plain] view plain copy ![]()
![]()
- ./redis-trib.rb create --replicas 1 127.0.0.1:7001 127.0.0.1:7002 127.0.0.1:7003 127.0.0.1:7004 127.0.0.1:7005 127.0.0.1:7006
使用create命令 --replicas 1 参数表示为每个主节点创建一个从节点,其他参数是实例的地址集合。
[plain] view plain copy ![]()
![]()
- [root@localhost redis-cluster]# ./redis-trib.rb create --replicas 1 127.0.0.1:7001 127.0.0.1:7002 127.0.0.1:7003 127.0.0.1:7004 127.0.0.1:7005 127.0.0.1:7006
- >>> Creating cluster
- >>> Performing hash slots allocation on 6 nodes...
- Using 3 masters:
- 127.0.0.1:7001
- 127.0.0.1:7002
- 127.0.0.1:7003
- Adding replica 127.0.0.1:7004 to 127.0.0.1:7001
- Adding replica 127.0.0.1:7005 to 127.0.0.1:7002
- Adding replica 127.0.0.1:7006 to 127.0.0.1:7003
- M: dfd510594da614469a93a0a70767ec9145aefb1a 127.0.0.1:7001
- slots:0-5460 (5461 slots) master
- M: e02eac35110bbf44c61ff90175e04d55cca097ff 127.0.0.1:7002
- slots:5461-10922 (5462 slots) master
- M: 4385809e6f4952ecb122dbfedbee29109d6bb234 127.0.0.1:7003
- slots:10923-16383 (5461 slots) master
- S: ec02c9ef3acee069e8849f143a492db18d4bb06c 127.0.0.1:7004
- replicates dfd510594da614469a93a0a70767ec9145aefb1a
- S: 83e5a8bb94fb5aaa892cd2f6216604e03e4a6c75 127.0.0.1:7005
- replicates e02eac35110bbf44c61ff90175e04d55cca097ff
- S: 10c097c429ca24f8720986c6b66f0688bfb901ee 127.0.0.1:7006
- replicates 4385809e6f4952ecb122dbfedbee29109d6bb234
- Can I set the above configuration? (type 'yes' to accept): yes
- >>> Nodes configuration updated
- >>> Assign a different config epoch to each node
- >>> Sending CLUSTER MEET messages to join the cluster
- Waiting for the cluster to join......
- >>> Performing Cluster Check (using node 127.0.0.1:7001)
- M: dfd510594da614469a93a0a70767ec9145aefb1a 127.0.0.1:7001
- slots:0-5460 (5461 slots) master
- M: e02eac35110bbf44c61ff90175e04d55cca097ff 127.0.0.1:7002
- slots:5461-10922 (5462 slots) master
- M: 4385809e6f4952ecb122dbfedbee29109d6bb234 127.0.0.1:7003
- slots:10923-16383 (5461 slots) master
- M: ec02c9ef3acee069e8849f143a492db18d4bb06c 127.0.0.1:7004
- slots: (0 slots) master
- replicates dfd510594da614469a93a0a70767ec9145aefb1a
- M: 83e5a8bb94fb5aaa892cd2f6216604e03e4a6c75 127.0.0.1:7005
- slots: (0 slots) master
- replicates e02eac35110bbf44c61ff90175e04d55cca097ff
- M: 10c097c429ca24f8720986c6b66f0688bfb901ee 127.0.0.1:7006
- slots: (0 slots) master
- replicates 4385809e6f4952ecb122dbfedbee29109d6bb234
- [OK] All nodes agree about slots configuration.
- >>> Check for open slots...
- >>> Check slots coverage...
- [OK] All 16384 slots covered.
上面显示创建成功,有3个主节点,3个从节点,每个节点都是成功连接状态。
3个主节点[M]以及分配的哈希卡槽如下:
M: dfd510594da614469a93a0a70767ec9145aefb1a 127.0.0.1:7001
slots:0-5460 (5461 slots) master
M: e02eac35110bbf44c61ff90175e04d55cca097ff 127.0.0.1:7002
slots:5461-10922 (5462 slots) master
M: 4385809e6f4952ecb122dbfedbee29109d6bb234 127.0.0.1:7003
slots:10923-16383 (5461 slots) master
3个从节点[S]以及附属的主节点如下:
S: ec02c9ef3acee069e8849f143a492db18d4bb06c 127.0.0.1:7004
replicates dfd510594da614469a93a0a70767ec9145aefb1a
S: 83e5a8bb94fb5aaa892cd2f6216604e03e4a6c75 127.0.0.1:7005
replicates e02eac35110bbf44c61ff90175e04d55cca097ff
S: 10c097c429ca24f8720986c6b66f0688bfb901ee 127.0.0.1:7006
replicates 4385809e6f4952ecb122dbfedbee29109d6bb234
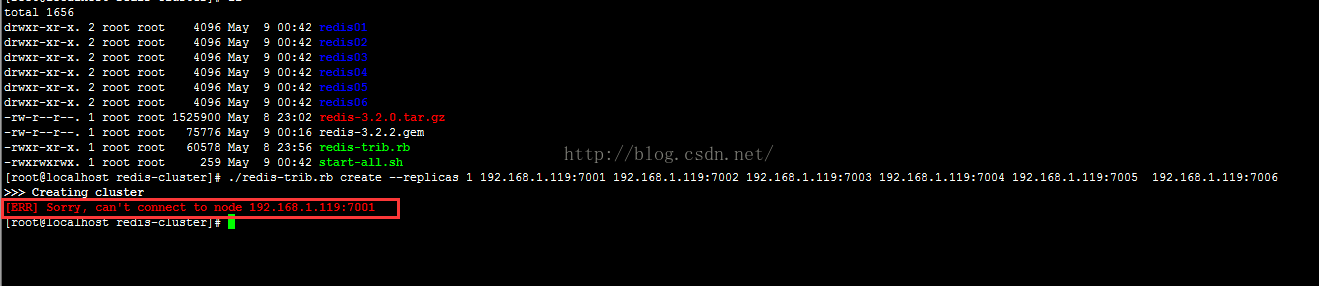
以上集群安装成功了,如果安装未成功报如下错误
>>> Creating cluster
[ERR] Sorry, can't connect to node ....
需要安装最新的ruby源码,下载
[plain] view plain copy ![]()
![]()
- [root@localhost redis-cluster]# tar -zxvf ruby-2.3.1.tar.gz
- [root@localhost redis-cluster]# cd
- [root@localhost redis-cluster]# ./configure --prefix=/usr/local/ruby-2.3.1
- [root@localhost redis-cluster]# make && make install
- [root@localhost redis-cluster]#gem install redis
还有一种情况是,在VMware做测试的时间(都在一台服务器时),ip应该使用127.0.0.1,如果使用局域网ip,也会报节点创建失败。
三、redis集群的测试
1、测试存取值
客户端连接集群redis-cli需要带上 -c ,redis-cli -c -p 端口号
[plain] view plain copy ![]()
![]()
- [root@localhost redis01]# ./redis-cli -c -p 7001
- 127.0.0.1:7001> set name andy
- -> Redirected to slot [5798] located at 127.0.0.1:7002
- OK
- 127.0.0.1:7002> get name
- "andy"
- 127.0.0.1:7002>
根据redis-cluster的key值分配,name应该分配到节点7002[5461-10922]上,上面显示redis cluster自动从7001跳转到了7002节点。
我们可以测试一下7006从节点获取name值
[plain] view plain copy ![]()
![]()
- [root@localhost redis06]# ./redis-cli -c -p 7006
- 127.0.0.1:7006> get name
- -> Redirected to slot [5798] located at 127.0.0.1:7002
- "andy"
- 127.0.0.1:7002>
7006位7003的从节点,从上面也是自动跳转至7002获取值,这也是redis cluster的特点,它是去中心化,每个节点都是对等的,连接哪个节点都可以获取和设置数据。
四、集群节点选举
现在模拟将7002节点挂掉,按照redis-cluster原理会选举会将 7002的从节点7005选举为主节点。
[plain] view plain copy ![]()
![]()
- [root@localhost redis-cluster]# ps -ef | grep redis
- root 7950 1 0 12:50 ? 00:00:28 ./redis-server 127.0.0.1:7001 [cluster]
- root 7952 1 0 12:50 ? 00:00:29 ./redis-server 127.0.0.1:7002 [cluster]
- root 7956 1 0 12:50 ? 00:00:29 ./redis-server 127.0.0.1:7003 [cluster]
- root 7960 1 0 12:50 ? 00:00:29 ./redis-server 127.0.0.1:7004 [cluster]
- root 7964 1 0 12:50 ? 00:00:29 ./redis-server 127.0.0.1:7005 [cluster]
- root 7966 1 0 12:50 ? 00:00:29 ./redis-server 127.0.0.1:7006 [cluster]
- root 11346 10581 0 14:57 pts/2 00:00:00 grep --color=auto redis
- [root@localhost redis-cluster]# kill 7952
在查看集群中的7002节点
[plain] view plain copy ![]()
![]()
- [root@localhost redis-cluster]#
- [root@localhost redis-cluster]# ./redis-trib.rb check 127.0.0.1:7002
- [ERR] Sorry, can't connect to node 127.0.0.1:7002
- [root@localhost redis-cluster]# ./redis-trib.rb check 127.0.0.1:7005
- >>> Performing Cluster Check (using node 127.0.0.1:7005)
- M: a5db243087d8bd423b9285fa8513eddee9bb59a6 127.0.0.1:7005
- slots:5461-10922 (5462 slots) master
- 0 additional replica(s)
- S: 50ce1ea59106b4c2c6bc502593a6a7a7dabf5041 127.0.0.1:7004
- slots: (0 slots) slave
- replicates dd19221c404fb2fc4da37229de56bab755c76f2b
- M: f9886c71e98a53270f7fda961e1c5f730382d48f 127.0.0.1:7003
- slots:10923-16383 (5461 slots) master
- 1 additional replica(s)
- M: dd19221c404fb2fc4da37229de56bab755c76f2b 127.0.0.1:7001
- slots:0-5460 (5461 slots) master
- 1 additional replica(s)
- S: 8bb3ede48319b46d0015440a91ab277da9353c8b 127.0.0.1:7006
- slots: (0 slots) slave
- replicates f9886c71e98a53270f7fda961e1c5f730382d48f
- [OK] All nodes agree about slots configuration.
- >>> Check for open slots...
- >>> Check slots coverage...
- [OK] All 16384 slots covered.
- [root@localhost redis-cluster]#
可以看到集群连接不了7002节点,而7005有原来的S转换为M节点,代替了原来的7002节点。我们可以获取name值:
[plain] view plain copy ![]()
![]()
- [root@localhost redis01]# ./redis-cli -c -p 7001
- 127.0.0.1:7001> get name
- -> Redirected to slot [5798] located at 127.0.0.1:7005
- "andy"
- 127.0.0.1:7005>
- 127.0.0.1:7005>
从7001节点连入,自动跳转到7005节点,并且获取name值。
现在我们将7002节点恢复,看是否会自动加入集群中以及充当的M还是S节点。
[plain] view plain copy ![]()
![]()
- [root@localhost redis-cluster]# cd redis02
- [root@localhost redis02]# ./redis-server redis.conf
- [root@localhost redis02]#
在check一下7002节点
[plain] view plain copy ![]()
![]()
- [root@localhost redis-cluster]# ./redis-trib.rb check 127.0.0.1:7002
- >>> Performing Cluster Check (using node 127.0.0.1:7002)
- S: 1f07d76585bfab35f91ec711ac53ab4bc00f2d3a 127.0.0.1:7002
- slots: (0 slots) slave
- replicates a5db243087d8bd423b9285fa8513eddee9bb59a6
- M: f9886c71e98a53270f7fda961e1c5f730382d48f 127.0.0.1:7003
- slots:10923-16383 (5461 slots) master
- 1 additional replica(s)
- M: a5db243087d8bd423b9285fa8513eddee9bb59a6 127.0.0.1:7005
- slots:5461-10922 (5462 slots) master
- 1 additional replica(s)
- S: 50ce1ea59106b4c2c6bc502593a6a7a7dabf5041 127.0.0.1:7004
- slots: (0 slots) slave
- replicates dd19221c404fb2fc4da37229de56bab755c76f2b
- S: 8bb3ede48319b46d0015440a91ab277da9353c8b 127.0.0.1:7006
- slots: (0 slots) slave
- replicates f9886c71e98a53270f7fda961e1c5f730382d48f
- M: dd19221c404fb2fc4da37229de56bab755c76f2b 127.0.0.1:7001
- slots:0-5460 (5461 slots) master
- 1 additional replica(s)
- [OK] All nodes agree about slots configuration.
- >>> Check for open slots...
- >>> Check slots coverage...
- [OK] All 16384 slots covered.
- [root@localhost redis-cluster]#
可以看到7002节点变成了a5db243087d8bd423b9285fa8513eddee9bb59a6 7005的从节点。
五、集群节点添加
节点新增包括新增主节点、从节点两种情况。以下分别做一下测试:
1、新增主节点
新增一个节点7007作为主节点修改配置文件
[plain] view plain copy ![]()
![]()
- [root@localhost redis-cluster]# cp -r redis01 redis07
- [root@localhost redis-cluster]# cd redis07/
- [root@localhost redis07]# sed -i "s/7001/7007/g" ./redis.conf
启动7007redis服务
[plain] view plain copy ![]()
![]()
- [root@localhost redis07]# ./redis-server redis.conf
- [root@localhost redis07]# netstat -anp | grep 7007
- tcp 0 0 127.0.0.1:17007 0.0.0.0:* LISTEN 13441/./redis-serve
- tcp 0 0 127.0.0.1:7007 0.0.0.0:* LISTEN 13441/./redis-serve
- [root@localhost redis07]#
上面可以看到,7007已经启动,现在加入集群中。添加使用redis-trib.rb的add-node命令
[plain] view plain copy ![]()
![]()
- ./redis-trib.rb add-node 127.0.0.1:7007 127.0.0.1:7002
add-node是加入集群节点,127.0.0.1:7007为要加入的节点,127.0.0.1:7002 表示加入的集群的一个节点,用来辨识是哪个集群,理论上那个集群的节点都可以。
执行以下add-node
[plain] view plain copy ![]()
![]()
- [root@localhost redis-cluster]# ./redis-trib.rb add-node 127.0.0.1:7007 127.0.0.1:7002
- >>> Adding node 127.0.0.1:7007 to cluster 127.0.0.1:7002
- >>> Performing Cluster Check (using node 127.0.0.1:7002)
- S: 1f07d76585bfab35f91ec711ac53ab4bc00f2d3a 127.0.0.1:7002
- slots: (0 slots) slave
- replicates a5db243087d8bd423b9285fa8513eddee9bb59a6
- M: f9886c71e98a53270f7fda961e1c5f730382d48f 127.0.0.1:7003
- slots:10923-16383 (5461 slots) master
- 1 additional replica(s)
- M: a5db243087d8bd423b9285fa8513eddee9bb59a6 127.0.0.1:7005
- slots:5461-10922 (5462 slots) master
- 1 additional replica(s)
- S: 50ce1ea59106b4c2c6bc502593a6a7a7dabf5041 127.0.0.1:7004
- slots: (0 slots) slave
- replicates dd19221c404fb2fc4da37229de56bab755c76f2b
- S: 8bb3ede48319b46d0015440a91ab277da9353c8b 127.0.0.1:7006
- slots: (0 slots) slave
- replicates f9886c71e98a53270f7fda961e1c5f730382d48f
- M: dd19221c404fb2fc4da37229de56bab755c76f2b 127.0.0.1:7001
- slots:0-5460 (5461 slots) master
- 1 additional replica(s)
- [OK] All nodes agree about slots configuration.
- >>> Check for open slots...
- >>> Check slots coverage...
- [OK] All 16384 slots covered.
- >>> Send CLUSTER MEET to node 127.0.0.1:7007 to make it join the cluster.
- [OK] New node added correctly.
- [root@localhost redis-cluster]#
可以看到7007加入这个Cluster,并成为一个新的节点。
可以check以下7007节点状态
[plain] view plain copy ![]()
![]()
- [root@localhost redis-cluster]# ./redis-trib.rb check 127.0.0.1:7007
- >>> Performing Cluster Check (using node 127.0.0.1:7007)
- M: ee3efb90e5ac0725f15238a64fc60a18a71205d7 127.0.0.1:7007
- slots: (0 slots) master
- 0 additional replica(s)
- S: 8bb3ede48319b46d0015440a91ab277da9353c8b 127.0.0.1:7006
- slots: (0 slots) slave
- replicates f9886c71e98a53270f7fda961e1c5f730382d48f
- M: dd19221c404fb2fc4da37229de56bab755c76f2b 127.0.0.1:7001
- slots:0-5460 (5461 slots) master
- 1 additional replica(s)
- M: f9886c71e98a53270f7fda961e1c5f730382d48f 127.0.0.1:7003
- slots:10923-16383 (5461 slots) master
- 1 additional replica(s)
- S: 1f07d76585bfab35f91ec711ac53ab4bc00f2d3a 127.0.0.1:7002
- slots: (0 slots) slave
- replicates a5db243087d8bd423b9285fa8513eddee9bb59a6
- M: a5db243087d8bd423b9285fa8513eddee9bb59a6 127.0.0.1:7005
- slots:5461-10922 (5462 slots) master
- 1 additional replica(s)
- S: 50ce1ea59106b4c2c6bc502593a6a7a7dabf5041 127.0.0.1:7004
- slots: (0 slots) slave
- replicates dd19221c404fb2fc4da37229de56bab755c76f2b
- [OK] All nodes agree about slots configuration.
- >>> Check for open slots...
- >>> Check slots coverage...
- [OK] All 16384 slots covered.
- [root@localhost redis-cluster]#
M: ee3efb90e5ac0725f15238a64fc60a18a71205d7 127.0.0.1:7007
slots: (0 slots) master
0 additional replica(s)
上面信息可以看到有4个M节点,3个S节点,7007成为了M主节点,它没有附属的从节点,而且Cluster并未给7007分配哈希卡槽(0 slots)。
可以从客户端连接集群查看一下,集群节点的连接情况
[plain] view plain copy ![]()
![]()
- [root@localhost redis-cluster]# cd redis07/
- [root@localhost redis07]# ./redis-cli -c -p 7007
- 127.0.0.1:7007> cluster nodes
- 8bb3ede48319b46d0015440a91ab277da9353c8b 127.0.0.1:7006 slave f9886c71e98a53270f7fda961e1c5f730382d48f 0 1462955393326 3 connected
- dd19221c404fb2fc4da37229de56bab755c76f2b 127.0.0.1:7001 master - 0 1462955388247 1 connected 0-5460
- ee3efb90e5ac0725f15238a64fc60a18a71205d7 127.0.0.1:7007 myself,master - 0 0 0 connected
- f9886c71e98a53270f7fda961e1c5f730382d48f 127.0.0.1:7003 master - 0 1462955390270 3 connected 10923-16383
- 1f07d76585bfab35f91ec711ac53ab4bc00f2d3a 127.0.0.1:7002 slave a5db243087d8bd423b9285fa8513eddee9bb59a6 0 1462955394334 7 connected
- a5db243087d8bd423b9285fa8513eddee9bb59a6 127.0.0.1:7005 master - 0 1462955392309 7 connected 5461-10922
- 50ce1ea59106b4c2c6bc502593a6a7a7dabf5041 127.0.0.1:7004 slave dd19221c404fb2fc4da37229de56bab755c76f2b 0 1462955389663 1 connected
- 127.0.0.1:7007>
redis-cluster在新增节点时并未分配卡槽,需要我们手动对集群进行重新分片迁移数据,需要重新分片命令 reshard
redis-trib.rb reshard 127.0.0.1:7005
这个命令是用来迁移slot节点的,后面的127.0.0.1:7005是表示是哪个集群,端口填[7000-7007]都可以,执行结果如下:
[plain] view plain copy ![]()
![]()
- [root@localhost redis-cluster]# ./redis-trib.rb reshard 127.0.0.1:7005
- >>> Performing Cluster Check (using node 127.0.0.1:7005)
- M: a5db243087d8bd423b9285fa8513eddee9bb59a6 127.0.0.1:7005
- slots:5461-10922 (5462 slots) master
- 1 additional replica(s)
- S: 50ce1ea59106b4c2c6bc502593a6a7a7dabf5041 127.0.0.1:7004
- slots: (0 slots) slave
- replicates dd19221c404fb2fc4da37229de56bab755c76f2b
- M: f9886c71e98a53270f7fda961e1c5f730382d48f 127.0.0.1:7003
- slots:10923-16383 (5461 slots) master
- 1 additional replica(s)
- S: 1f07d76585bfab35f91ec711ac53ab4bc00f2d3a 127.0.0.1:7002
- slots: (0 slots) slave
- replicates a5db243087d8bd423b9285fa8513eddee9bb59a6
- M: ee3efb90e5ac0725f15238a64fc60a18a71205d7 127.0.0.1:7007
- slots: (0 slots) master
- 0 additional replica(s)
- M: dd19221c404fb2fc4da37229de56bab755c76f2b 127.0.0.1:7001
- slots:0-5460 (5461 slots) master
- 1 additional replica(s)
- S: 8bb3ede48319b46d0015440a91ab277da9353c8b 127.0.0.1:7006
- slots: (0 slots) slave
- replicates f9886c71e98a53270f7fda961e1c5f730382d48f
- [OK] All nodes agree about slots configuration.
- >>> Check for open slots...
- >>> Check slots coverage...
- [OK] All 16384 slots covered.
- How many slots do you want to move (from 1 to 16384)?
它提示我们需要迁移多少slot到7007上,我们平分16384个哈希槽给4个节点:16384/4 = 4096,我们需要移动4096个槽点到7007上。
[plain] view plain copy ![]()
![]()
- [OK] All 16384 slots covered.
- How many slots do you want to move (from 1 to 16384)? 4096
- What is the receiving node ID?
需要输入7007的节点id,ee3efb90e5ac0725f15238a64fc60a18a71205d7
[plain] view plain copy ![]()
![]()
- Please enter all the source node IDs.
- Type 'all' to use all the nodes as source nodes for the hash slots.
- Type 'done' once you entered all the source nodes IDs.
- Source node #1:
redis-trib 会向你询问重新分片的源节点(source node),即,要从特点的哪个节点中取出 4096 个哈希槽,还是从全部节点提取4096个哈希槽, 并将这些槽移动到7007节点上面。
如果我们不打算从特定的节点上取出指定数量的哈希槽,那么可以向redis-trib输入 all,这样的话, 集群中的所有主节点都会成为源节点,redis-trib从各个源节点中各取出一部分哈希槽,凑够4096个,然后移动到7007节点上:
[plain] view plain copy ![]()
![]()
- Source node #1:all
然后开始从别的主节点迁移哈希槽,并且确认。
[plain] view plain copy ![]()
![]()
- Moving slot 1343 from dd19221c404fb2fc4da37229de56bab755c76f2b
- Moving slot 1344 from dd19221c404fb2fc4da37229de56bab755c76f2b
- Moving slot 1345 from dd19221c404fb2fc4da37229de56bab755c76f2b
- Moving slot 1346 from dd19221c404fb2fc4da37229de56bab755c76f2b
- Moving slot 1347 from dd19221c404fb2fc4da37229de56bab755c76f2b
- Moving slot 1348 from dd19221c404fb2fc4da37229de56bab755c76f2b
- Moving slot 1349 from dd19221c404fb2fc4da37229de56bab755c76f2b
- Moving slot 1350 from dd19221c404fb2fc4da37229de56bab755c76f2b
- Moving slot 1351 from dd19221c404fb2fc4da37229de56bab755c76f2b
- Moving slot 1352 from dd19221c404fb2fc4da37229de56bab755c76f2b
- Moving slot 1353 from dd19221c404fb2fc4da37229de56bab755c76f2b
- Moving slot 1354 from dd19221c404fb2fc4da37229de56bab755c76f2b
- Moving slot 1355 from dd19221c404fb2fc4da37229de56bab755c76f2b
- Moving slot 1356 from dd19221c404fb2fc4da37229de56bab755c76f2b
- Moving slot 1357 from dd19221c404fb2fc4da37229de56bab755c76f2b
- Moving slot 1358 from dd19221c404fb2fc4da37229de56bab755c76f2b
- Moving slot 1359 from dd19221c404fb2fc4da37229de56bab755c76f2b
- Moving slot 1360 from dd19221c404fb2fc4da37229de56bab755c76f2b
- Moving slot 1361 from dd19221c404fb2fc4da37229de56bab755c76f2b
- Moving slot 1362 from dd19221c404fb2fc4da37229de56bab755c76f2b
- Moving slot 1363 from dd19221c404fb2fc4da37229de56bab755c76f2b
- Moving slot 1364 from dd19221c404fb2fc4da37229de56bab755c76f2b
- Do you want to proceed with the proposed reshard plan (yes/no)? yes
确认之后,redis-trib就开始执行分片操作,将哈希槽一个一个从源主节点移动到7007目标主节点。
重新分片结束后我们可以check以下节点的分配情况。
[plain] view plain copy ![]()
![]()
- [root@localhost redis-cluster]# ./redis-trib.rb check 127.0.0.1:7001
- >>> Performing Cluster Check (using node 127.0.0.1:7001)
- M: dd19221c404fb2fc4da37229de56bab755c76f2b 127.0.0.1:7001
- slots:1365-5460 (4096 slots) master
- 1 additional replica(s)
- M: ee3efb90e5ac0725f15238a64fc60a18a71205d7 127.0.0.1:7007
- slots:0-1364,5461-6826,10923-12287 (4096 slots) master
- 0 additional replica(s)
- M: a5db243087d8bd423b9285fa8513eddee9bb59a6 127.0.0.1:7005
- slots:6827-10922 (4096 slots) master
- 1 additional replica(s)
- S: 8bb3ede48319b46d0015440a91ab277da9353c8b 127.0.0.1:7006
- slots: (0 slots) slave
- replicates f9886c71e98a53270f7fda961e1c5f730382d48f
- M: f9886c71e98a53270f7fda961e1c5f730382d48f 127.0.0.1:7003
- slots:12288-16383 (4096 slots) master
- 1 additional replica(s)
- S: 1f07d76585bfab35f91ec711ac53ab4bc00f2d3a 127.0.0.1:7002
- slots: (0 slots) slave
- replicates a5db243087d8bd423b9285fa8513eddee9bb59a6
- S: 50ce1ea59106b4c2c6bc502593a6a7a7dabf5041 127.0.0.1:7004
- slots: (0 slots) slave
- replicates dd19221c404fb2fc4da37229de56bab755c76f2b
- [OK] All nodes agree about slots configuration.
- >>> Check for open slots...
- >>> Check slots coverage...
- [OK] All 16384 slots covered.
- [root@localhost redis-cluster]#
slots:0-1364,5461-6826,10923-12287 (4096 slots) master
可以看到7007节点分片的哈希槽片不是连续的,间隔的移动。
[plain] view plain copy ![]()
![]()
- [root@localhost redis-cluster]# cd redis07/
- [root@localhost redis07]# ./redis-cli -c 7007
- Could not connect to Redis at 127.0.0.1:6379: Connection refused
- [root@localhost redis07]# ./redis-cli -c -p 7007
- 127.0.0.1:7007> keys *
- 1) "name"
- 2) "age"
- 127.0.0.1:7007>
- 127.0.0.1:7007>
可以看到将7001的age[741]和name[5798]移动到7007节点上,
主节点7007添加成功。
2、新增从节点
新增一个节点7008节点,使用add-node --slave命令。
[plain] view plain copy ![]()
![]()
- [root@localhost redis-cluster]# cp -r redis01/ redis08
- [root@localhost redis-cluster]# cd redis08/
- [root@localhost redis08]# sed -i "s/7001/7008/g" ./redis.conf
- [root@localhost redis08]# ./redis-server redis.conf
redis-trib增加从节点的命令为:
[plain] view plain copy ![]()
![]()
- ./redis-trib.rb add-node --slave --master-id $[nodeid] 127.0.0.1:7008 127.0.0.1:7000
nodeid为要加到master主节点的node id,127.0.0.1:7008为新增的从节点,127.0.0.1:7000为集群的一个节点(集群的任意节点都行),用来辨识是哪个集群;如果没有给定那个主节点--master-id的话,redis-trib将会将新增的从节点随机到从节点较少的主节点上。
现在我们添加一下7008,看是否会自动加到没有从节点的7007主节点上。
[plain] view plain copy ![]()
![]()
- [root@localhost redis-cluster]# ./redis-trib.rb add-node --slave 127.0.0.1:7008 127.0.0.1:7001>>> Adding node 127.0.0.1:7008 to cluster 127.0.0.1:7001
- >>> Performing Cluster Check (using node 127.0.0.1:7001)
- M: dd19221c404fb2fc4da37229de56bab755c76f2b 127.0.0.1:7001
- slots:1365-5460 (4096 slots) master
- 1 additional replica(s)
- M: ee3efb90e5ac0725f15238a64fc60a18a71205d7 127.0.0.1:7007
- slots:0-1364,5461-6826,10923-12287 (4096 slots) master
- 0 additional replica(s)
- M: a5db243087d8bd423b9285fa8513eddee9bb59a6 127.0.0.1:7005
- slots:6827-10922 (4096 slots) master
- 1 additional replica(s)
- S: 8bb3ede48319b46d0015440a91ab277da9353c8b 127.0.0.1:7006
- slots: (0 slots) slave
- replicates f9886c71e98a53270f7fda961e1c5f730382d48f
- M: f9886c71e98a53270f7fda961e1c5f730382d48f 127.0.0.1:7003
- slots:12288-16383 (4096 slots) master
- 1 additional replica(s)
- S: 1f07d76585bfab35f91ec711ac53ab4bc00f2d3a 127.0.0.1:7002
- slots: (0 slots) slave
- replicates a5db243087d8bd423b9285fa8513eddee9bb59a6
- S: 50ce1ea59106b4c2c6bc502593a6a7a7dabf5041 127.0.0.1:7004
- slots: (0 slots) slave
- replicates dd19221c404fb2fc4da37229de56bab755c76f2b
- [OK] All nodes agree about slots configuration.
- >>> Check for open slots...
- >>> Check slots coverage...
- [OK] All 16384 slots covered.
- Automatically selected master 127.0.0.1:7007
- >>> Send CLUSTER MEET to node 127.0.0.1:7008 to make it join the cluster.
- Waiting for the cluster to join.
- >>> Configure node as replica of 127.0.0.1:7007.
- [OK] New node added correctly.
- [root@localhost redis-cluster]#
可以看到自动选择了127.0.0.1:7007为master主节点,并且添加成功。
可以check一下7008:
[plain] view plain copy ![]()
![]()
- [root@localhost redis-cluster]# ./redis-trib.rb check 127.0.0.1:7008
- >>> Performing Cluster Check (using node 127.0.0.1:7008)
- S: 2ab1b061c36f30ae35604e9a171ae3afdc3c87e5 127.0.0.1:7008
- slots: (0 slots) slave
- replicates ee3efb90e5ac0725f15238a64fc60a18a71205d7
- M: a5db243087d8bd423b9285fa8513eddee9bb59a6 127.0.0.1:7005
- slots:6827-10922 (4096 slots) master
- 1 additional replica(s)
- M: dd19221c404fb2fc4da37229de56bab755c76f2b 127.0.0.1:7001
- slots:1365-5460 (4096 slots) master
- 1 additional replica(s)
- S: 8bb3ede48319b46d0015440a91ab277da9353c8b 127.0.0.1:7006
- slots: (0 slots) slave
- replicates f9886c71e98a53270f7fda961e1c5f730382d48f
- M: ee3efb90e5ac0725f15238a64fc60a18a71205d7 127.0.0.1:7007
- slots:0-1364,5461-6826,10923-12287 (4096 slots) master
- 1 additional replica(s)
- S: 50ce1ea59106b4c2c6bc502593a6a7a7dabf5041 127.0.0.1:7004
- slots: (0 slots) slave
- replicates dd19221c404fb2fc4da37229de56bab755c76f2b
- M: f9886c71e98a53270f7fda961e1c5f730382d48f 127.0.0.1:7003
- slots:12288-16383 (4096 slots) master
- 1 additional replica(s)
- S: 1f07d76585bfab35f91ec711ac53ab4bc00f2d3a 127.0.0.1:7002
- slots: (0 slots) slave
- replicates a5db243087d8bd423b9285fa8513eddee9bb59a6
- [OK] All nodes agree about slots configuration.
- >>> Check for open slots...
- >>> Check slots coverage...
- [OK] All 16384 slots covered.
- [root@localhost redis-cluster]#
可以看到7008作为了7007的从节点。
再测试一下指定主节点添加从节点,给7007增加7009从节点。
[plain] view plain copy ![]()
![]()
- [root@localhost redis-cluster]# cp -r redis01/ redis09
- [root@localhost redis-cluster]# cd redis09
- [root@localhost redis09]# sed -i "s/7001/7009/g" ./redis.conf
- [root@localhost redis09]# ./redis-server redis.conf
添加7007主节点上
[plain] view plain copy ![]()
![]()
- [root@localhost redis-cluster]# ./redis-trib.rb add-node --slave --master-id ee3efb90e5ac0725f15238a64fc60a18a71205d7 127.0.0.1:7009 127.0.0.1:7001
- >>> Adding node 127.0.0.1:7009 to cluster 127.0.0.1:7001
- >>> Performing Cluster Check (using node 127.0.0.1:7001)
- M: dd19221c404fb2fc4da37229de56bab755c76f2b 127.0.0.1:7001
- slots:1365-5460 (4096 slots) master
- 1 additional replica(s)
- S: 2ab1b061c36f30ae35604e9a171ae3afdc3c87e5 127.0.0.1:7008
- slots: (0 slots) slave
- replicates ee3efb90e5ac0725f15238a64fc60a18a71205d7
- M: ee3efb90e5ac0725f15238a64fc60a18a71205d7 127.0.0.1:7007
- slots:0-1364,5461-6826,10923-12287 (4096 slots) master
- 1 additional replica(s)
- M: a5db243087d8bd423b9285fa8513eddee9bb59a6 127.0.0.1:7005
- slots:6827-10922 (4096 slots) master
- 1 additional replica(s)
- S: 8bb3ede48319b46d0015440a91ab277da9353c8b 127.0.0.1:7006
- slots: (0 slots) slave
- replicates f9886c71e98a53270f7fda961e1c5f730382d48f
- M: f9886c71e98a53270f7fda961e1c5f730382d48f 127.0.0.1:7003
- slots:12288-16383 (4096 slots) master
- 1 additional replica(s)
- S: 1f07d76585bfab35f91ec711ac53ab4bc00f2d3a 127.0.0.1:7002
- slots: (0 slots) slave
- replicates a5db243087d8bd423b9285fa8513eddee9bb59a6
- S: 50ce1ea59106b4c2c6bc502593a6a7a7dabf5041 127.0.0.1:7004
- slots: (0 slots) slave
- replicates dd19221c404fb2fc4da37229de56bab755c76f2b
- [OK] All nodes agree about slots configuration.
- >>> Check for open slots...
- >>> Check slots coverage...
- [OK] All 16384 slots covered.
- >>> Send CLUSTER MEET to node 127.0.0.1:7009 to make it join the cluster.
- Waiting for the cluster to join.
- >>> Configure node as replica of 127.0.0.1:7007.
- [OK] New node added correctly.
- [root@localhost redis-cluster]#
显示从节点7009节点添加到7007主节点,可以看一下7007的从节点,如下:
[plain] view plain copy ![]()
![]()
- [root@localhost redis-cluster]# cd ./redis07
- [root@localhost redis07]# ./redis-cli -c -p 7007 cluster nodes | grep ee3efb90e5ac0725f15238a64fc60a18a71205d7
- 1f51443ede952b98724fea2a12f61fe710ab6cb1 127.0.0.1:7009 slave ee3efb90e5ac0725f15238a64fc60a18a71205d7 0 1462962710266 8 connected
- ee3efb90e5ac0725f15238a64fc60a18a71205d7 127.0.0.1:7007 myself,master - 0 0 8 connected 0-1364 5461-6826 10923-12287
- 2ab1b061c36f30ae35604e9a171ae3afdc3c87e5 127.0.0.1:7008 slave ee3efb90e5ac0725f15238a64fc60a18a71205d7 0 1462962711607 8 connected
- [root@localhost redis07]#
maser 7007有2个slave 7008,7009。
我们测试一下7007节点挂掉,看7008和7009那个成为主节点。
[plain] view plain copy ![]()
![]()
- [root@localhost redis-cluster]# ps -ef | grep redis
- root 7950 1 0 12:50 ? 00:02:05 ./redis-server 127.0.0.1:7001 [cluster]
- root 7956 1 0 12:50 ? 00:02:11 ./redis-server 127.0.0.1:7003 [cluster]
- root 7960 1 0 12:50 ? 00:01:47 ./redis-server 127.0.0.1:7004 [cluster]
- root 7964 1 0 12:50 ? 00:02:07 ./redis-server 127.0.0.1:7005 [cluster]
- root 7966 1 0 12:50 ? 00:01:46 ./redis-server 127.0.0.1:7006 [cluster]
- root 12070 1 0 15:14 ? 00:01:08 ./redis-server 127.0.0.1:7002 [cluster]
- root 13441 1 0 16:09 ? 00:01:25 ./redis-server 127.0.0.1:7007 [cluster]
- root 15939 1 0 17:41 ? 00:00:20 ./redis-server 127.0.0.1:7008 [cluster]
- root 16623 1 0 18:07 ? 00:00:10 ./redis-server 127.0.0.1:7009 [cluster]
- root 17295 10581 0 18:37 pts/2 00:00:00 grep --color=auto redis
- [root@localhost redis-cluster]# kill -9 13441
- [root@localhost redis-cluster]# cd ./redis08
- [root@localhost redis08]# ./redis-cli -c -p 7008
- 127.0.0.1:7008> get name
- -> Redirected to slot [5798] located at 127.0.0.1:7009
- "andy"
- 127.0.0.1:7009> cluster nodes
- ee3efb90e5ac0725f15238a64fc60a18a71205d7 127.0.0.1:7007 master,fail - 1462963082317 1462963080194 8 disconnected
- 50ce1ea59106b4c2c6bc502593a6a7a7dabf5041 127.0.0.1:7004 slave dd19221c404fb2fc4da37229de56bab755c76f2b 0 1462963170968 1 connected
- f9886c71e98a53270f7fda961e1c5f730382d48f 127.0.0.1:7003 master - 0 1462963168525 3 connected 12288-16383
- dd19221c404fb2fc4da37229de56bab755c76f2b 127.0.0.1:7001 master - 0 1462963164466 1 connected 1365-5460
- 2ab1b061c36f30ae35604e9a171ae3afdc3c87e5 127.0.0.1:7008 slave 1f51443ede952b98724fea2a12f61fe710ab6cb1 0 1462963167508 9 connected
- 1f51443ede952b98724fea2a12f61fe710ab6cb1 127.0.0.1:7009 myself,master - 0 0 9 connected 0-1364 5461-6826 10923-12287
- 1f07d76585bfab35f91ec711ac53ab4bc00f2d3a 127.0.0.1:7002 slave a5db243087d8bd423b9285fa8513eddee9bb59a6 0 1462963170564 7 connected
- 8bb3ede48319b46d0015440a91ab277da9353c8b 127.0.0.1:7006 slave f9886c71e98a53270f7fda961e1c5f730382d48f 0 1462963167915 3 connected
- a5db243087d8bd423b9285fa8513eddee9bb59a6 127.0.0.1:7005 master - 0 1462963169538 7 connected 6827-10922
- 127.0.0.1:7009>
可以看到7009代替7007成了主节点。
重启7007之后,会自动变成7009的从节点。
[plain] view plain copy ![]()
![]()
- [root@localhost redis-cluster]# cd redis07
- [root@localhost redis07]# ./redis-server redis.conf
- [root@localhost redis07]# cd ../
- [root@localhost redis-cluster]# ./redis-trib.rb check 127.0.0.1:7007
- >>> Performing Cluster Check (using node 127.0.0.1:7007)
- S: ee3efb90e5ac0725f15238a64fc60a18a71205d7 127.0.0.1:7007
- slots: (0 slots) slave
- replicates 1f51443ede952b98724fea2a12f61fe710ab6cb1
- S: 50ce1ea59106b4c2c6bc502593a6a7a7dabf5041 127.0.0.1:7004
- slots: (0 slots) slave
- replicates dd19221c404fb2fc4da37229de56bab755c76f2b
- M: 1f51443ede952b98724fea2a12f61fe710ab6cb1 127.0.0.1:7009
- slots:0-1364,5461-6826,10923-12287 (4096 slots) master
- 2 additional replica(s)
- S: 8bb3ede48319b46d0015440a91ab277da9353c8b 127.0.0.1:7006
- slots: (0 slots) slave
- replicates f9886c71e98a53270f7fda961e1c5f730382d48f
- M: dd19221c404fb2fc4da37229de56bab755c76f2b 127.0.0.1:7001
- slots:1365-5460 (4096 slots) master
- 1 additional replica(s)
- M: a5db243087d8bd423b9285fa8513eddee9bb59a6 127.0.0.1:7005
- slots:6827-10922 (4096 slots) master
- 1 additional replica(s)
- S: 1f07d76585bfab35f91ec711ac53ab4bc00f2d3a 127.0.0.1:7002
- slots: (0 slots) slave
- replicates a5db243087d8bd423b9285fa8513eddee9bb59a6
- M: f9886c71e98a53270f7fda961e1c5f730382d48f 127.0.0.1:7003
- slots:12288-16383 (4096 slots) master
- 1 additional replica(s)
- S: 2ab1b061c36f30ae35604e9a171ae3afdc3c87e5 127.0.0.1:7008
- slots: (0 slots) slave
- replicates 1f51443ede952b98724fea2a12f61fe710ab6cb1
- [OK] All nodes agree about slots configuration.
- >>> Check for open slots...
- >>> Check slots coverage...
- [OK] All 16384 slots covered.
- [root@localhost redis-cluster]#
验证了之前的测试。
六、节点的移除
和节点添加一样,移除节点也有移除主节点,从节点。
1、移除主节点
移除节点使用redis-trib的del-node命令,
[plain] view plain copy ![]()
![]()
- redis-trib del-node 127.0.0.1:7002 ${node-id}
127.0.0.1:7002位集群节点,node-id为要删除的主节点。 和添加节点不同,移除节点node-id是必需的,测试删除7001主节点:
[plain] view plain copy ![]()
![]()
- [root@localhost redis-cluster]# ./redis-trib.rb del-node 127.0.0.1:7001 <span style="font-size: 14px;">dd19221c404fb2fc4da37229de56bab755c76f2b</span>
- >>> Removing node <span style="font-size: 14px;">dd19221c404fb2fc4da37229de56bab755c76f2b</span> from cluster 127.0.0.1:7002
- [ERR] Node 127.0.0.1:7001 is not empty! Reshard data away and try again.
- [root@localhost redis-cluster]#
redis cluster提示7001已经有数据了,不能够被删除,需要将他的数据转移出去,也就是和新增主节点一样需重新分片。
[plain] view plain copy ![]()
![]()
- [root@localhost redis-cluster]# ./redis-trib.rb reshard 127.0.0.1:7002
执行以后会提示我们移除的大小,因为7001占用了4096个槽点
[plain] view plain copy ![]()
![]()
- >>> Check for open slots...
- >>> Check slots coverage...
- [OK] All 16384 slots covered.
- How many slots do you want to move (from 1 to 16384)?
输入4096
提示移动的node id,填写7009的node id。
[plain] view plain copy ![]()
![]()
- How many slots do you want to move (from 1 to 16384)? 4096
- What is the receiving node ID?
需要移动到全部主节点上还是单个主节点
[plain] view plain copy ![]()
![]()
- Please enter all the source node IDs.
- Type 'all' to use all the nodes as source nodes for the hash slots.
- Type 'done' once you entered all the source nodes IDs.
- Source node #1:
将4096个槽点移动到7009上,填写7001的node id :dd19221c404fb2fc4da37229de56bab755c76f2b
[plain] view plain copy ![]()
![]()
- Source node #1:dd19221c404fb2fc4da37229de56bab755c76f2b
- Source node #2:done
- Do you want to proceed with the proposed reshard plan (yes/no)? yes
确认之后会一个一个将7001的卡槽移到到7009上。
[plain] view plain copy ![]()
![]()
- [root@localhost redis-cluster]# ./redis-trib.rb check 127.0.0.1:7009
- >>> Performing Cluster Check (using node 127.0.0.1:7009)
- M: 1f51443ede952b98724fea2a12f61fe710ab6cb1 127.0.0.1:7009
- slots:0-6826,10923-12287 (8192 slots) master
- 3 additional replica(s)
- S: ee3efb90e5ac0725f15238a64fc60a18a71205d7 127.0.0.1:7007
- slots: (0 slots) slave
- replicates 1f51443ede952b98724fea2a12f61fe710ab6cb1
- S: 50ce1ea59106b4c2c6bc502593a6a7a7dabf5041 127.0.0.1:7004
- slots: (0 slots) slave
- replicates 1f51443ede952b98724fea2a12f61fe710ab6cb1
- M: f9886c71e98a53270f7fda961e1c5f730382d48f 127.0.0.1:7003
- slots:12288-16383 (4096 slots) master
- 1 additional replica(s)
- M: dd19221c404fb2fc4da37229de56bab755c76f2b 127.0.0.1:7001
- slots: (0 slots) master
- 0 additional replica(s)
- S: 2ab1b061c36f30ae35604e9a171ae3afdc3c87e5 127.0.0.1:7008
- slots: (0 slots) slave
- replicates 1f51443ede952b98724fea2a12f61fe710ab6cb1
- S: 1f07d76585bfab35f91ec711ac53ab4bc00f2d3a 127.0.0.1:7002
- slots: (0 slots) slave
- replicates a5db243087d8bd423b9285fa8513eddee9bb59a6
- S: 8bb3ede48319b46d0015440a91ab277da9353c8b 127.0.0.1:7006
- slots: (0 slots) slave
- replicates f9886c71e98a53270f7fda961e1c5f730382d48f
- M: a5db243087d8bd423b9285fa8513eddee9bb59a6 127.0.0.1:7005
- slots:6827-10922 (4096 slots) master
- 1 additional replica(s)
- [OK] All nodes agree about slots configuration.
- >>> Check for open slots...
- >>> Check slots coverage...
- [OK] All 16384 slots covered.
- [root@localhost redis-cluster]#
可以看到7001有0个卡槽,而7009有8192个卡槽。
在执行移除操作
[plain] view plain copy ![]()
![]()
- [root@localhost redis-cluster]# ./redis-trib.rb del-node 127.0.0.1:7002 dd19221c404fb2fc4da37229de56bab755c76f2b
- >>> Removing node dd19221c404fb2fc4da37229de56bab755c76f2b from cluster 127.0.0.1:7002
- >>> Sending CLUSTER FORGET messages to the cluster...
- >>> SHUTDOWN the node.
- [root@localhost redis-cluster]#
已经删除了7001节点。
[plain] view plain copy ![]()
![]()
- [root@localhost redis-cluster]# ./redis-trib.rb check 127.0.0.1:7001
- [ERR] Sorry, can't connect to node 127.0.0.1:7001
- [root@localhost redis-cluster]# ./redis-trib.rb check 127.0.0.1:7009
- >>> Performing Cluster Check (using node 127.0.0.1:7009)
- M: 1f51443ede952b98724fea2a12f61fe710ab6cb1 127.0.0.1:7009
- slots:0-6826,10923-12287 (8192 slots) master
- 3 additional replica(s)
- S: ee3efb90e5ac0725f15238a64fc60a18a71205d7 127.0.0.1:7007
- slots: (0 slots) slave
- replicates 1f51443ede952b98724fea2a12f61fe710ab6cb1
- S: 50ce1ea59106b4c2c6bc502593a6a7a7dabf5041 127.0.0.1:7004
- slots: (0 slots) slave
- replicates 1f51443ede952b98724fea2a12f61fe710ab6cb1
- M: f9886c71e98a53270f7fda961e1c5f730382d48f 127.0.0.1:7003
- slots:12288-16383 (4096 slots) master
- 1 additional replica(s)
- S: 2ab1b061c36f30ae35604e9a171ae3afdc3c87e5 127.0.0.1:7008
- slots: (0 slots) slave
- replicates 1f51443ede952b98724fea2a12f61fe710ab6cb1
- S: 1f07d76585bfab35f91ec711ac53ab4bc00f2d3a 127.0.0.1:7002
- slots: (0 slots) slave
- replicates a5db243087d8bd423b9285fa8513eddee9bb59a6
- S: 8bb3ede48319b46d0015440a91ab277da9353c8b 127.0.0.1:7006
- slots: (0 slots) slave
- replicates f9886c71e98a53270f7fda961e1c5f730382d48f
- M: a5db243087d8bd423b9285fa8513eddee9bb59a6 127.0.0.1:7005
- slots:6827-10922 (4096 slots) master
- 1 additional replica(s)
- [OK] All nodes agree about slots configuration.
- >>> Check for open slots...
- >>> Check slots coverage...
- [OK] All 16384 slots covered.
- [root@localhost redis-cluster]#
可以看到7001已经连接不了;而7001的从节点7004自动分配到了7009主节点中,7009现在3个从节点。
2、移除从节点
比如删除7009的7008节点:
[plain] view plain copy ![]()
![]()
- [root@localhost redis-cluster]# ./redis-trib.rb del-node 127.0.0.1:7009 2ab1b061c36f30ae35604e9a171ae3afdc3c87e5
- >>> Removing node 2ab1b061c36f30ae35604e9a171ae3afdc3c87e5 from cluster 127.0.0.1:7009
- >>> Sending CLUSTER FORGET messages to the cluster...
- >>> SHUTDOWN the node.
- [root@localhost redis-cluster]# ./redis-trib.rb check 127.0.0.1:7008
- [ERR] Sorry, can't connect to node 127.0.0.1:7008
- [root@localhost redis-cluster]#
删除从节点比较方便,现在redis-cluster中有3个主节点,4个从节点,如下:
[plain] view plain copy ![]()
![]()
- [root@localhost redis-cluster]# ./redis-trib.rb check 127.0.0.1:7009
- >>> Performing Cluster Check (using node 127.0.0.1:7009)
- M: 1f51443ede952b98724fea2a12f61fe710ab6cb1 127.0.0.1:7009
- slots:0-6826,10923-12287 (8192 slots) master
- 2 additional replica(s)
- S: ee3efb90e5ac0725f15238a64fc60a18a71205d7 127.0.0.1:7007
- slots: (0 slots) slave
- replicates 1f51443ede952b98724fea2a12f61fe710ab6cb1
- S: 50ce1ea59106b4c2c6bc502593a6a7a7dabf5041 127.0.0.1:7004
- slots: (0 slots) slave
- replicates 1f51443ede952b98724fea2a12f61fe710ab6cb1
- M: f9886c71e98a53270f7fda961e1c5f730382d48f 127.0.0.1:7003
- slots:12288-16383 (4096 slots) master
- 1 additional replica(s)
- S: 1f07d76585bfab35f91ec711ac53ab4bc00f2d3a 127.0.0.1:7002
- slots: (0 slots) slave
- replicates a5db243087d8bd423b9285fa8513eddee9bb59a6
- S: 8bb3ede48319b46d0015440a91ab277da9353c8b 127.0.0.1:7006
- slots: (0 slots) slave
- replicates f9886c71e98a53270f7fda961e1c5f730382d48f
- M: a5db243087d8bd423b9285fa8513eddee9bb59a6 127.0.0.1:7005
- slots:6827-10922 (4096 slots) master
- 1 additional replica(s)
- [OK] All nodes agree about slots configuration.
- >>> Check for open slots...
- >>> Check slots coverage...
- [OK] All 16384 slots covered.
- [root@localhost redis-cluster]#
ok,测试到这儿吧。
====================================================================================================================================================================================================================================================================================================================================================================
如何理解Redis集群的Slot映射
2017年08月17日 13:47:45 derekzhuo 阅读数:4686
版权声明:本文为博主原创文章,未经博主允许不得转载。 https://blog.csdn.net/hjjomiqpl/article/details/77324168
Redis在单机模式时,使用数据结构dict来实现数据库。
Redis在集群模式时,也是使用数据结构dict来实现数据库,但是集群模式对于数据库有其他需求,包括数据的节点无关性、内部操作对客户端需要屏蔽、冗余备份等,并且在一定的情况,数据还需要在不同的节点间实现迁移。
在所有模式下,Redis的节点数据的备份都是使用备份来实现的。这个暂时不深入。
Redis引入的slot来解决如何实现集群模式下部分需求的问题。
事实下,节点并不是存储在slot里面,slot只是用于管理数据与节点相联的手段而已。在处理相关逻辑问题时,redis使用slot作为索引来管理数据下的所有数据。
举一个例子,集群模式下,使用redis-cli连接服务器节点A(指派了slot[2000-3000])并issue如下指令set name derekzhuo。
-node A计算name的slot为1000,发现slot 1000不在本节点上,向redis-cli返回该slot的节点信息;
-redis-cli连接新的node,并且重新issue该指令。
以上流程就是cluster模式下如何处理一个键的流程,也可以很清楚地看出slot的作用其实就是用于做key索引而已。
===========================================================================================================================================================================================================================================================================
Raft算法和Gossip协议
发表于 2017-11-12 | 分类于 NFV
简单介绍下集群数据同步,集群监控用到的两种常见算法。
Raft算法
raft 集群中的每个节点都可以根据集群运行的情况在三种状态间切换:follower, candidate 与 leader。leader 向 follower 同步日志,follower 只从 leader 处获取日志。在节点初始启动时,节点的 raft 状态机将处于 follower 状态并被设定一个 election timeout,如果在这一时间周期内没有收到来自 leader 的 heartbeat,节点将发起选举:节点在将自己的状态切换为 candidate 之后,向集群中其它 follower 节点发送请求,询问其是否选举自己成为 leader。当收到来自集群中过半数节点的接受投票后,节点即成为 leader,开始接收保存 client 的数据并向其它的 follower 节点同步日志。leader 节点依靠定时向 follower 发送 heartbeat 来保持其地位。任何时候如果其它 follower 在 election timeout 期间都没有收到来自 leader 的 heartbeat,同样会将自己的状态切换为 candidate 并发起选举。每成功选举一次,新 leader 的步进数都会比之前 leader 的步进数大1。
Raft一致性算法处理日志复制以保证强一致性。
follower 节点不可用
follower 节点不可用的情况相对容易解决。因为集群中的日志内容始终是从 leader 节点同步的,只要这一节点再次加入集群时重新从 leader 节点处复制日志即可。
leader 不可用
一般情况下,leader 节点定时发送 heartbeat 到 follower 节点。

由于某些异常导致 leader 不再发送 heartbeat ,或 follower 无法收到 heartbeat 。

当某一 follower 发生 election timeout 时,其状态变更为 candidate,并向其他 follower 发起投票。

当超过半数的 follower 接受投票后,这一节点将成为新的 leader,leader 的步进数加1并开始向 follower 同步日志。
当一段时间之后,如果之前的 leader 再次加入集群,则两个 leader 比较彼此的步进数,步进数低的 leader 将切换自己的状态为 follower。

较早前 leader 中不一致的日志将被清除,并与现有 leader 中的日志保持一致。

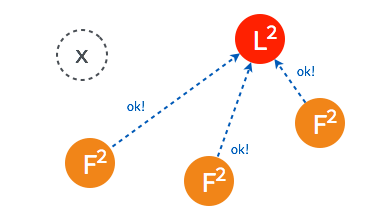
Gossip协议
传统的监控,如ceilometer,由于每个节点都会向server报告状态,随着节点数量的增加server的压力随之增大。分布式健康检查可以解决这类性能瓶颈,降节点数量从数百台扩至数千台,甚至更多。
Agent在每台节点上运行,可以在每个Agent上添加一些健康检查的动作,Agent会周期性的运行这些动作。用户可以添加脚本或者请求一个URL链接。一旦有健康检查报告失败,Agent就把这个事件上报给服务器节点。用户可以在服务器节点上订阅健康检查事件,并处理这些报错消息。
在所有的Agent之间(包括服务器模式和普通模式)运行着Gossip协议。服务器节点和普通Agent都会加入这个Gossip集群,收发Gossip消息。每隔一段时间,每个节点都会随机选择几个节点发送Gossip消息,其他节点会再次随机选择其他几个节点接力发送消息。这样一段时间过后,整个集群都能收到这条消息。示意图如下。
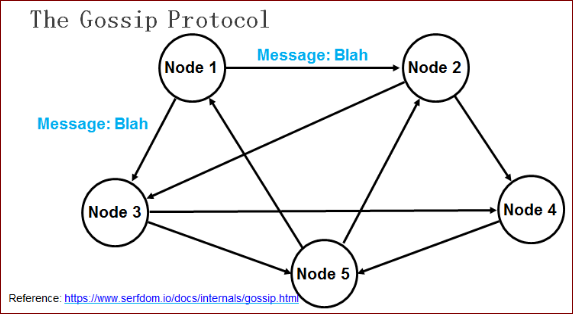
Gossip协议已经是P2P网络中比较成熟的协议了。Gossip协议的最大的好处是,即使集群节点的数量增加,每个节点的负载也不会增加很多,几乎是恒定的。这就允许Consul管理的集群规模能横向扩展到数千个节点。
Consul的每个Agent会利用Gossip协议互相检查在线状态,本质上是节点之间互Ping,分担了服务器节点的心跳压力。如果有节点掉线,不用服务器节点检查,其他普通节点会发现,然后用Gossip广播给整个集群。
Gossip算法又被称为反熵(Anti-Entropy),熵是物理学上的一个概念,代表杂乱无章,而反熵就是在杂乱无章中寻求一致,这充分说明了Gossip的特点:在一个有界网络中,每个节点都随机地与其他节点通信,经过一番杂乱无章的通信,最终所有节点的状态都会达成一致。每个节点可能知道所有其他节点,也可能仅知道几个邻居节点,只要这些节可以通过网络连通,最终他们的状态都是一致的,当然这也是疫情传播的特点。
要注意到的一点是,即使有的节点因宕机而重启,有新节点加入,但经过一段时间后,这些节点的状态也会与其他节点达成一致,也就是说,Gossip天然具有分布式容错的优点。


 144
144


 被折叠的 条评论
为什么被折叠?
被折叠的 条评论
为什么被折叠?
 到【灌水乐园】发言


