


本文参考NI的《C#与Visual Basic .Net仪器控制指南》
IT6522是ITECH公司的一款数控电源,提供USB,RS232,485,GPIB,以太网等接口,
在之前的文章《winform串口通过SCPI协议与数控电源M8811通信》使用的是串口,
本文介绍如何使用USB来控制数控电源。
USB协议很复杂,厂家也没有提供相应的dll,甚至连驱动都没有,幸好有NI-VISA
首先,http://www.ni.com/download/ni-visa-16.0/6184/en/建议您下载完整版的NI-VISA
安装完成之后,打开NI MAX,插上usb,打开数控电源,然后在面板上设置usb通信
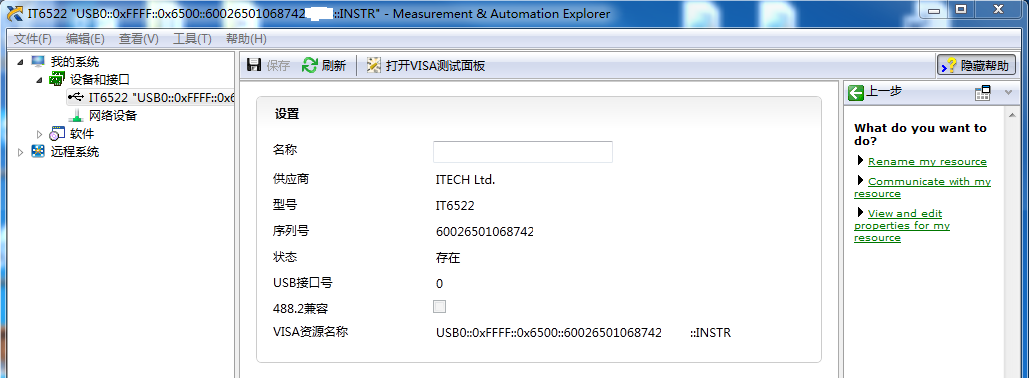
这样复制VISA资源名称,备用。
打开VS2008或者VS2010,(VS2013似乎不行)
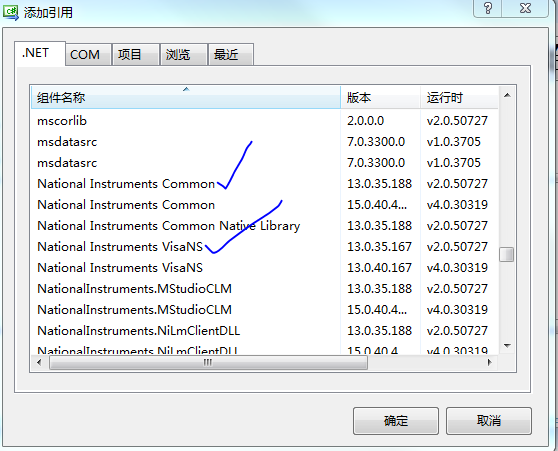
添加引用
然后上代码
using System;
using System.Collections.Generic;
using System.Linq;
using System.Text;
using NationalInstruments.VisaNS;

namespace USBPowerTester
{
    class DPit6700 : IDigitalPower
    {
        #region IDigitalPower 成员

        public bool OpenDevice()
        {
            bool flag = true;
            try
            {
                mbSession = (MessageBasedSession)ResourceManager.GetLocalManager().Open(resourceName);
            }
            catch
            {
                flag = false;
            }
            return flag;
        }

        public void SetVoltage(double voltage)
        {
            string str = "VOLT " + voltage.ToString("0.0000");
            mbSession.Write(str);
        }

        public void SetCurrent(double current)
        {
            string str = "CURR " + current.ToString("0.0000");
            mbSession.Write(str);
        }

        public double GetSetVoltage()
        {
            double vol = 0;
            vol = GetDoubleCmd("VOLT?");
            return vol;
        }

        public double GetSetCurrent()
        {
            double cur = 0;
            cur = GetDoubleCmd("CURR?");
            return cur;
        }

        public double GetOutVoltage()
        {
            double vol = 0;
            vol = GetDoubleCmd("MEAS:VOLT?");
            return vol;
        }

        public double GetOutCurrent()
        {
            double cur = 0;
            cur = GetDoubleCmd("MEAS:CURR?");
            return cur;
        }

        public void SetOutput(bool open)
        {
            if (open)
                mbSession.Write("OUTP 1");
            else
                mbSession.Write("OUTP 0");
        }

        public bool GetOutputStatus()
        {
            bool ret = false;
            string str = mbSession.Query("OUTP?");
            if (str == "1\n")
                ret = true;
            else
                ret = false;
            return ret;
        }

        public void CloseDevice()
        {
            try
            {
                mbSession.Dispose();
            }
            catch { }
        }

        #endregion

        private MessageBasedSession mbSession;
        private const string resourceName = "USB0::0xFFFF::0x6500::60026501068742XXXX::INSTR";

        private double GetDoubleCmd(string cmd)
        {
            double ret = 0;

            try
            {
                string str = mbSession.Query(cmd);
                ret = Convert.ToDouble(str);
            }
            catch { }

            return ret;
        }
    }
}
using System;
using System.Collections.Generic;
using System.Linq;
using System.Text;

namespace USBPowerTester
{
    interface IDigitalPower
    {
        bool OpenDevice();
        void SetVoltage(double voltage);
        void SetCurrent(double current);
        double GetSetVoltage();
        double GetSetCurrent();
        double GetOutVoltage();
        double GetOutCurrent();
        void SetOutput(bool open);
        bool GetOutputStatus();
        void CloseDevice();
    }
}
这上面的SCPI指令需要参考厂家提供的编程指南(随机光盘中有)


 468
468

 被折叠的 条评论
为什么被折叠?
被折叠的 条评论
为什么被折叠?
 到【灌水乐园】发言


