


CANcaseXL是Vector的usb CAN适配器,其配套的软件CANoe是个非常强大的软件……
CANoe的介绍改天再说,今天演示一下如何在winform中使用CANcaseXL收发报文
首先得感谢Vector提供的详细文档XL Driver Libary - Description.pdf(此文件在安装盘\Drivers\XL Driver Libary\doc中)
还需要一些dll,如vxlapi_NET20.dll(此文件在安装盘\Drivers\XL Driver Libary\bin中)
当然了,里面还有很多demo可以参考有C++和C#的
1.首先参考文档给出的流程图,文档有介绍函数的作用和参数列表,这里面是C++版本的,和C#版略有不同
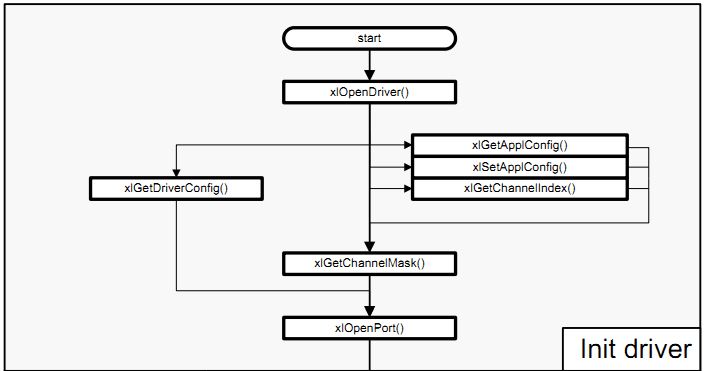
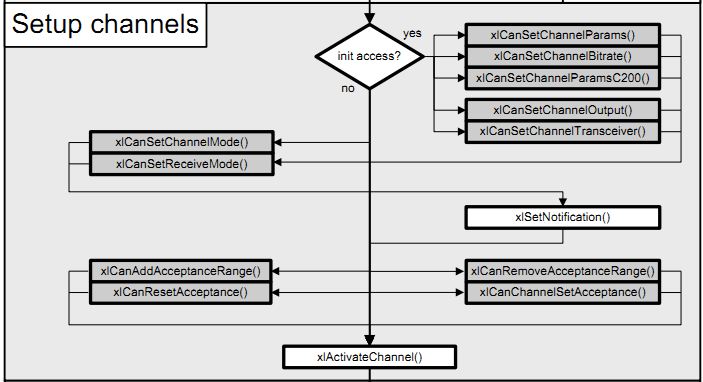
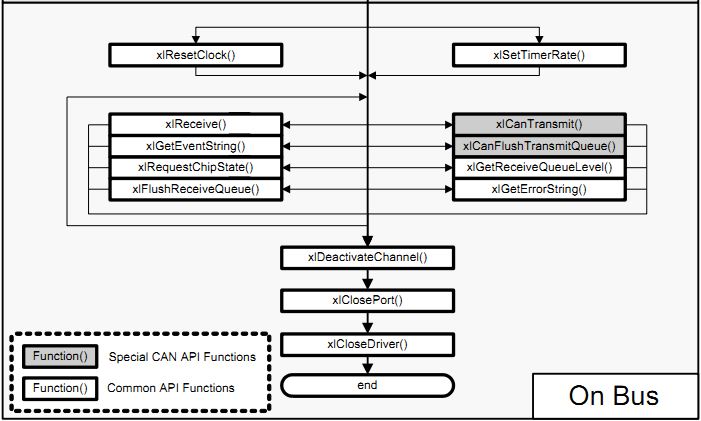
2.废话不多说,然后贴代码
using System;
using System.Collections.Generic;
using System.Linq;
using System.Text;
using vxlapi_NET20;

namespace Bootloader
{
    class DeviceCANcaseXL : ICANDevice
    {
        // variables needed by XLDriver
        private static uint hwType = (uint)XLClass.XLhwTypes.XL_HWTYPE_CANCASEXL;
        private static uint hwIndex = 0;
        private static uint hwChannel = 0;
        private static uint busType = (uint)XLClass.XLbusTypes.XL_BUS_TYPE_CAN;
        private static uint flags = 0;
        private static int portHandle = -1;
        private static int eventHandle = -1;
        private static UInt64 accessMask = 0;
        private static UInt64 permissionMask = 0;
        private static UInt64 txMask = 0;
        private static uint appChannel = 0;
        private const string applicationName = "Bootloader";
        private static int channelIndex = 0;

        public XLDriver xd;
        private UInt32 responseID;
        bool ICANDevice.initDevice(int baudRate, UInt32 responseID)
        {
            XLClass.XLstatus status;
            xd = new XLDriver();
            this.responseID = responseID;
            /* init driver */
            status = xd.XL_OpenDriver();
            status = xd.XL_SetApplConfig(applicationName, appChannel, hwType, hwIndex, hwChannel, busType);
            accessMask = xd.XL_GetChannelMask((int)hwType, (int)hwIndex, (int)hwChannel);
            permissionMask = accessMask;//必要的
            status = xd.XL_OpenPort(ref portHandle, applicationName, accessMask, ref permissionMask, 1024, busType);
            /* setup channels */
            if (status == XLClass.XLstatus.XL_SUCCESS)
            {
                status = xd.XL_CanSetChannelBitrate(portHandle, accessMask, (uint)(baudRate * 1000));

                status = xd.XL_CanSetChannelOutput(portHandle, accessMask, (byte)XLClass.XLoutputModes.XL_OUTPUT_MODE_NORMAL);

                status = xd.XL_CanSetChannelAcceptance(portHandle, accessMask, responseID, 0x7FF, XLClass.XLacceptanceFilter.XL_CAN_STD);

                status = xd.XL_CanSetReceiveMode(portHandle, 0, 0);

                status = xd.XL_SetNotification(portHandle, ref eventHandle, 1);

                status = xd.XL_ActivateChannel(portHandle, accessMask, busType, flags);
                /* on bus */
                xd.XL_ResetClock(portHandle);

                xd.XL_FlushReceiveQueue(portHandle);
                xd.XL_CanFlushTransmitQueue(portHandle, accessMask);
                return true;
            }
            else
                return false;
        }

        bool ICANDevice.closeDevice()
        {
            if (
                (xd.XL_DeactivateChannel(portHandle, accessMask) == XLClass.XLstatus.XL_SUCCESS)
             && (xd.XL_ClosePort(portHandle) == XLClass.XLstatus.XL_SUCCESS)
             && (xd.XL_CloseDriver() == XLClass.XLstatus.XL_SUCCESS)
                )
                return true;
            else
                return false;
        }

        bool ICANDevice.sendData(CAN_DATA cd)
        {
            XLClass.xl_event xlEvent = new XLClass.xl_event();
            xlEvent.tag = 0x0A;//必要的
            xlEvent.tagData.can_Msg.id = cd.ID;
            xlEvent.tagData.can_Msg.dlc = (ushort)cd.DLC;
            for (int i = 0; i < cd.DLC; i++)
                xlEvent.tagData.can_Msg.data[i] = cd.Data[i];
            XLClass.XLstatus status = xd.XL_CanTransmit(portHandle, accessMask, xlEvent);

            return (bool)(status == XLClass.XLstatus.XL_SUCCESS);
        }

        int ICANDevice.receiveData(ref CAN_DATA[] cdBuffer)
        {
            int count = 0;
            XLClass.XLstatus status;
            XLClass.xl_event xlEvent = new XLClass.xl_event();
            status = xd.XL_Receive(portHandle, ref xlEvent);
            while (status == XLClass.XLstatus.XL_SUCCESS && count < 100)
            {
                if (xlEvent.tagData.can_Msg.dlc > 0 && responseID == xlEvent.tagData.can_Msg.id)
                {
                    cdBuffer[count].DLC = xlEvent.tagData.can_Msg.dlc;
                    cdBuffer[count].ID = xlEvent.tagData.can_Msg.id;
                    cdBuffer[count].channel = 0;
                    cdBuffer[count].isExtendFlag = false;
                    cdBuffer[count].isRemtoeFlag = false;
                    cdBuffer[count].isRx = true;
                    cdBuffer[count].Time = DateTime.Now.Ticks;
                    cdBuffer[count].Data = new byte[8];
                    for (int i = 0; i < cdBuffer[count].DLC; i++)
                    {
                        cdBuffer[count].Data[i] = xlEvent.tagData.can_Msg.data[i];
                    }
                    count++;
                }

                status = xd.XL_Receive(portHandle, ref xlEvent);
            }

            return count;
        }
    }
}
public struct CAN_DATA
    {
        public UInt32 ID;
        public int DLC;
        public byte[] Data;
        public long Time;
        public bool isRemtoeFlag;
        public bool isExtendFlag;
        public byte channel;
        public bool isRx;
}namespace Bootloader
{
interface ICANDevice
{
bool initDevice(int baudRate, UInt32 responseID);
bool closeDevice();
bool sendData(CAN_DATA cd);
int receiveData(ref CAN_DATA[] cdBuffer);
}
}当然了,工程中必须添加对vxlapi_NET20的静态引用
需要注意的是:
1.文档注释必要的有两处,这两句必不可少
2.每次发送的是数据都会出现在接收的队列中,以获得时间戳,因此要注意接收数据的区分


 1269
1269

 被折叠的 条评论
为什么被折叠?
被折叠的 条评论
为什么被折叠?
 到【灌水乐园】发言


