


动画的本质就是在一个时间段内对象位置、角度、颜色、透明度等属性值的连续变化。这些属性种,有些是对象自身的单属性,有些是图形变形 的属性。WPF规定,可以用来制作动画的属性必须是依赖属性。
动画就是“会动的画”,而这个会动值得就是能够让UI元素或元素变形的某个属性值产生连续变化。任何一个属性都有自己的数据类型,比如UIElement的With和Height属性为Double类型、Window的Title属性为String类型。几乎针对每个可能的数据类型,WPF的动画子系统都为其准备了相应的动画类,这些动画类均派生自AnimationTimeline。3种具体动画,即简单动画、关键帧动画、沿路径运动的动画。例如:DoubleAnimationbase,它完整地派生了3个具体动画:DoubleAnimation、DoubleAnimationUsingKeyFrames和DoubleAnimationUsingPath,分别是简单动画、关键帧动画、沿路径运动的动画。
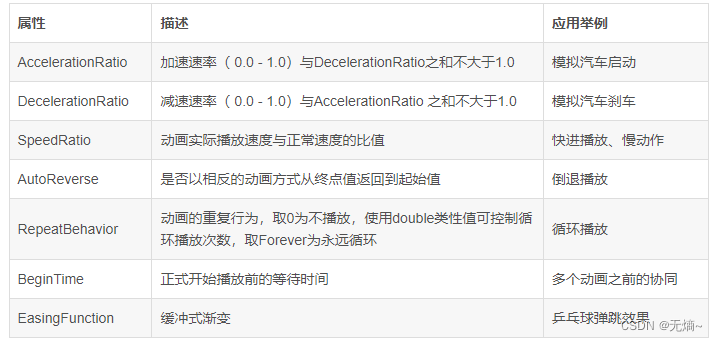
动画由下面几部分组成:
- 动画类型:DoubleAnimation,ColorAnimation,PointAnimation等
- 起始值:From
- 终止值:To
- 偏移量值:By
- 故事板:Storyboard 将动画应用于对象,Storyboard必须知道在何处应用动画,使用 Storyboard.TargetName 附加属性指定要进行动画处理的对象,使用 TargetProperty 附加属性指定要进行动画处理的属性.
- 事件触发器:EventTrigger 创建 BeginStoryboard 对象,并将情节提要与它关联.
高级动画
使用From、To、By、Duration几个属性进行组合就可以制作很多不同效果的动画了,然而WPF动画系统提供的控制属性远不止这些。
实例,一个矩形实现淡入淡出效果:
方式一,前端代码实现:
<!--对其属性进行Opacity动画处理,鼠标移入显示淡出的效果-->
<Rectangle
  Name="MyRectangle"
  Width="100"
  Height="100"
  Fill="Blue">
  <Rectangle.Triggers>
    <!-- Animates the rectangle's opacity. -->
    <EventTrigger RoutedEvent="Rectangle.Loaded">
      <BeginStoryboard>
        <Storyboard>
          <DoubleAnimation
            Storyboard.TargetName="MyRectangle"
            Storyboard.TargetProperty="Opacity"
            From="1.0" To="0.0" Duration="0:0:5"
            AutoReverse="True" RepeatBehavior="Forever" />
        </Storyboard>
      </BeginStoryboard>
    </EventTrigger>
  </Rectangle.Triggers>
</Rectangle>
方式二,后台代码实现:
    public partial class AnimationDemo : Window
    {
        private Storyboard myStoryboard;
        public AnimationDemo()
        {
            InitializeComponent();
            StackPanel myPanel = new StackPanel();
            myPanel.Margin = new Thickness(10);

            Rectangle myRectangle = new Rectangle();
            myRectangle.Name = "myRectangle";
            this.RegisterName(myRectangle.Name, myRectangle);
            myRectangle.Width = 100;
            myRectangle.Height = 100;
            myRectangle.Fill = Brushes.Blue;

            DoubleAnimation myDoubleAnimation = new DoubleAnimation();
            myDoubleAnimation.From = 1.0;
            myDoubleAnimation.To = 0.0;
            myDoubleAnimation.Duration = new Duration(TimeSpan.FromSeconds(5));

            //设置AutoReverse属性,如果将该属性设置为true,将会反向运动
            //myDoubleAnimation.AutoReverse = true;
            //重复动画
            //myDoubleAnimation.RepeatBehavior = RepeatBehavior.Forever;

            myDoubleAnimation.FillBehavior = FillBehavior.HoldEnd;
            myDoubleAnimation.Completed += MyDoubleAnimation_Completed;

            myStoryboard = new Storyboard();
            myStoryboard.Children.Add(myDoubleAnimation);
            Storyboard.SetTargetName(myDoubleAnimation, myRectangle.Name);
            Storyboard.SetTargetProperty(myDoubleAnimation, new PropertyPath(Rectangle.OpacityProperty));

            // Use the Loaded event to start the Storyboard.
            myRectangle.Loaded += new RoutedEventHandler(myRectangleLoaded);
            myPanel.Children.Add(myRectangle);
            this.Content = myPanel;
        }
        private void MyDoubleAnimation_Completed(object sender, EventArgs e)
        {
            MessageBox.Show("动画完成");
        }
        /// <summary>
        /// 动画完成事件,使用Completed事件时,不能设置动画重复且要将事件设置BeginAnimation()方法之前,否则不起作用。
        /// </summary>
        /// <param name="sender"></param>
        /// <param name="e"></param>
        private void myRectangleLoaded(object sender, RoutedEventArgs e)
        {
            myStoryboard.Begin(this);
        }
    }
关键帧动画
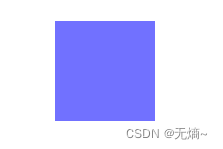
动画是UI元素属性连续改变所产生的视觉效果。属性每次细微的变化都会产生一个新的画面,每个新画面就称为一“帧”,帧的连续播放就产生动画的效果。关键帧动画允许程序员为一段动画设置几个里程碑,动画执行到里程碑所在的时间点时,被动画所控制的属性值也必须达到设定的值,这些时间线上的里程碑就是关键帧。
实例:
一个Button在单击后用900毫秒的时长从左上角移动到右下角,但移动路线不是直接移动而是走“Z”字形。我们只需创建两个DoubleAnimationUsingKeyFrames实例,一个控制TranslateTransform的X属性,一个控制TranslateTransform的Y属性。每个DoubleAnimationUsingKeyFrames各拥有三个关键帧用于指明X或Y在三个时间点(两个拐点和终点)应该达到什么样的值。
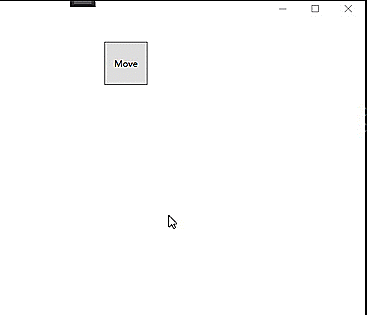
程序的XAML代码如下:
 <Button Width="60" Height="60" Content="Move" Click="Button_Click"
     HorizontalAlignment="Left" VerticalAlignment="Top">
     <Button.RenderTransform>
         <TranslateTransform x:Name="tt" X="30" Y="30"/>
     </Button.RenderTransform>
 </Button>
后台代码如下:
        private void Button_Click(object sender, RoutedEventArgs e)
        {
            DoubleAnimationUsingKeyFrames dakX = new DoubleAnimationUsingKeyFrames();
            DoubleAnimationUsingKeyFrames dakY = new DoubleAnimationUsingKeyFrames();
            // 设置动画总时长
            dakX.Duration = new Duration(TimeSpan.FromMilliseconds(900));
            dakY.Duration = new Duration(TimeSpan.FromMilliseconds(900));
            // 创建关键帧
            LinearDoubleKeyFrame x_kf_1 = new LinearDoubleKeyFrame();
            LinearDoubleKeyFrame x_kf_2 = new LinearDoubleKeyFrame();
            LinearDoubleKeyFrame x_kf_3 = new LinearDoubleKeyFrame();
            //设置关键帧
            x_kf_1.KeyTime = KeyTime.FromTimeSpan(TimeSpan.FromMilliseconds(300));
            x_kf_1.Value = 200;
            x_kf_2.KeyTime = KeyTime.FromTimeSpan(TimeSpan.FromMilliseconds(600));
            x_kf_2.Value = 0;
            x_kf_3.KeyTime = KeyTime.FromTimeSpan(TimeSpan.FromMilliseconds(900));
            x_kf_3.Value = 200;
            //添加关键帧
            dakX.KeyFrames.Add(x_kf_1);
            dakX.KeyFrames.Add(x_kf_2);
            dakX.KeyFrames.Add(x_kf_3);

            LinearDoubleKeyFrame y_kf_1 = new LinearDoubleKeyFrame();
            LinearDoubleKeyFrame y_kf_2 = new LinearDoubleKeyFrame();
            LinearDoubleKeyFrame y_kf_3 = new LinearDoubleKeyFrame();
            y_kf_1.KeyTime = KeyTime.FromTimeSpan(TimeSpan.FromMilliseconds(300));
            y_kf_1.Value = 0;
            y_kf_2.KeyTime = KeyTime.FromTimeSpan(TimeSpan.FromMilliseconds(600));
            y_kf_2.Value = 180;
            y_kf_3.KeyTime = KeyTime.FromTimeSpan(TimeSpan.FromMilliseconds(900));
            y_kf_3.Value = 180;
            dakY.KeyFrames.Add(y_kf_1);
            dakY.KeyFrames.Add(y_kf_2);
            dakY.KeyFrames.Add(y_kf_3);

            //执行动画
            this.tt.BeginAnimation(TranslateTransform.XProperty, dakX);
            this.tt.BeginAnimation(TranslateTransform.YProperty, dakY);

        }
特殊的关键帧
DoubleAnimationUsingKeyFrames 的KeyFrames 属性的数据类型是DoubleKeyFrameCollection,此集合类可接收的类型为 DoubleKeyFrame。DoubleKeyFrame 是一个抽象类,它的所有派生类如下:
- LinearDoubleKeyFrame:线性变化关键帧,目标属性值的变化时是直线性的、均匀的,即变化速率不变。
- DiscreteDoubleKeyFrame:不连续变化关键帧,目标属性值的变化是跳跃性的、跃迁的。
- SplineDoubleKeyFrame:样条函数式变化关键帧,目标属性的变化速率是一条贝塞尔曲线。
- EasingDoubleKeyFrame:缓冲式变化关键帧,目标属性以某种缓冲形式变化。
4个派生类中最常用的是SplineDoubleKeyFrame。可以非常方面的制作非匀速动画,因为他使用一条贝塞尔曲线来控制目标属性值的变化速率。这条用于控制变化速率的贝塞尔曲线的起点是(0,0)和(1,1),分别映射着目标属性的变化起点和变化终点,意思是目标属性值由0%变化到100%。这条曲线的有两个控制点ControlPoint1和ControlPoint2,意思是曲线从起点出发先向ControlPoint1的方向前进、再向ControlPoint2的方向前进、最后到达终点,形成一条平滑的曲线。如果设置ControlPoint1和ControlPoint2的横纵坐标值相等,这是曲线成为一条直线,SplineDoubleKeyFrame和LinearDoubleKeyFrame是等价的。
下面是SplineDoubleKeyFrame的实例,程序的XAML代码如下:
<Button x:Name="btnSpecial" Width="60" Height="60" Content="Move" Click="btnSpecial_Click"
    HorizontalAlignment="Left" VerticalAlignment="Top">
    <Button.RenderTransform>
        <TranslateTransform x:Name="translate" X="30" Y="30"/>
    </Button.RenderTransform>
</Button>
后台代码如下:
        private void btnSpecial_Click(object sender, RoutedEventArgs e)
        {
            // 创建动画
            DoubleAnimationUsingKeyFrames dakX = new DoubleAnimationUsingKeyFrames();
            dakX.Duration = new Duration(TimeSpan.FromMilliseconds(1000));
            //创建、添加关键帧
            SplineDoubleKeyFrame kf = new SplineDoubleKeyFrame();
            kf.KeyTime = KeyTime.FromPercent(1);
            kf.Value = 400;
            //设置速率
            KeySpline ks = new KeySpline();
            ks.ControlPoint1 = new Point(0, 1);
            ks.ControlPoint2 = new Point(1, 0);
            kf.KeySpline = ks;
            dakX.KeyFrames.Add(kf);
            //执行动画
            this.translate.BeginAnimation(TranslateTransform.XProperty, dakX);
        }
路径动画
如何让目标对象沿着一条给定的路径移动呢?答案是使用DoubleAnimationUsingPath类。DoubleAnimationUsingPath需要一个PathGeometry来指明移动路径,PathGeometry的数据信息可以用XAML的Path语法书写。PathGeometry的另一个重要属性是Source,Source属性的数据类型是PathAnimationSource枚举,枚举值可取X(关注曲线上每一点横坐标的变化)、Y(关注曲线上每一点纵坐标的变化)或Angle关注曲线上每一点处切线方向的变化。
实例:让Button沿着一条贝塞尔曲线做波浪形运动。
程序XAML代码如下:
<Grid>
        <Grid x:Name="LayoutRoot">
            <!--移动路径-->
            <Grid.Resources>
                <PathGeometry x:Key="movingPath"
            	Figures="M 0,150 C 300,-100 300,400 600,120"/>
            </Grid.Resources>
            <Button Content="Move" HorizontalAlignment="Left" VerticalAlignment="Top"
                Width="80" Height="80" Click="Button_Click">
                <Button.RenderTransform>
                    <TranslateTransform x:Name="tt" X="0" Y="0"/>
                </Button.RenderTransform>
            </Button>
        </Grid>
</Grid>
后台代码如下:
        private void Button_Click(object sender, RoutedEventArgs e)
        {
            // 查找资源
            PathGeometry pg = this.LayoutRoot.FindResource("movingPath") as PathGeometry;
            Duration duration = new Duration(TimeSpan.FromMilliseconds(600));// 设置动画时间
            // 创建动画
            DoubleAnimationUsingPath dapX = new DoubleAnimationUsingPath();
            dapX.PathGeometry = pg;
            dapX.Source = PathAnimationSource.X;
            dapX.Duration = duration;

            DoubleAnimationUsingPath dapY = new DoubleAnimationUsingPath();
            dapY.PathGeometry = pg;
            dapY.Source = PathAnimationSource.Y;
            dapY.Duration = duration;

            //设置来回循环效果
            dapX.AutoReverse = true;
            dapX.RepeatBehavior = RepeatBehavior.Forever;
            dapY.AutoReverse = true;
            dapY.RepeatBehavior = RepeatBehavior.Forever;
            //执行动画
            this.tt.BeginAnimation(TranslateTransform.XProperty, dapX);
            this.tt.BeginAnimation(TranslateTransform.YProperty, dapY);
        }
场景
场景就是并行执行的一组动画。先是把一组独立的动画组织在一个Storyboard元素中、安排好他们的协作关系,然后制定哪个动画由哪个UI元素、哪个属性负责完成。Storyboard设计好后,你可以为他选择一个恰当的触发时机,比如按钮按下或下载开始时。一旦触发条件被满足,动画产经就会开始执行。实例:
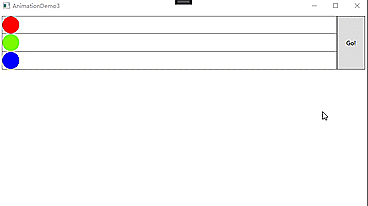
程序XAML代码如下:
<Grid Margin="6">
        <!--布局控制-->
        <Grid.RowDefinitions>
            <RowDefinition Height="38"/>
            <RowDefinition Height="38"/>
            <RowDefinition Height="38"/>
        </Grid.RowDefinitions>
        <Grid.ColumnDefinitions>
            <ColumnDefinition Width="*"/>
            <ColumnDefinition Width="60"/>
        </Grid.ColumnDefinitions>
        <!--跑道红-->
        <Border BorderBrush="Gray" BorderThickness="1" Grid.Row="0">
            <Ellipse x:Name="ballR" Height="36" Width="36" Fill="Red"
                     HorizontalAlignment="Left">
                <Ellipse.RenderTransform>
                    <TranslateTransform x:Name="ttR"/>
                </Ellipse.RenderTransform>
            </Ellipse>
        </Border>
        <!--跑道绿-->
        <Border BorderBrush="Gray" BorderThickness="1,0,1,1" Grid.Row="1">
            <Ellipse x:Name="ballG" Height="36" Width="36" Fill="LawnGreen"
                     HorizontalAlignment="Left">
                <Ellipse.RenderTransform>
                    <TranslateTransform x:Name="ttG"/>
                </Ellipse.RenderTransform>
            </Ellipse>
        </Border>
        <!--跑道蓝-->
        <Border BorderBrush="Gray" BorderThickness="1,0,1,1" Grid.Row="2">
            <Ellipse x:Name="ballB" Height="36" Width="36" Fill="Blue"
                     HorizontalAlignment="Left">
                <Ellipse.RenderTransform>
                    <TranslateTransform x:Name="ttB"/>
                </Ellipse.RenderTransform>
            </Ellipse>
        </Border>
        <!--按钮-->
        <Button Content="Go!" Grid.Column="1" Grid.RowSpan="3">
            <!--按钮触发-->
            <Button.Triggers>
                <EventTrigger RoutedEvent="Button.Click">
                    <BeginStoryboard>
                        <Storyboard Duration="0:0:0.6">
                           <!--红色小球动画-->
                            <DoubleAnimation Duration="0:0:0.6" To="400"
                                 Storyboard.TargetName="ttR"
                                 Storyboard.TargetProperty="X"/>
                            <!--绿色小球动画-->
                            <DoubleAnimationUsingKeyFrames Duration="0:0:0.6"
                        Storyboard.TargetName="ttG" Storyboard.TargetProperty="X">
                                <SplineDoubleKeyFrame KeyTime="0:0:0.6" Value="400"
                                          KeySpline="0,1,1,0"/>
                            </DoubleAnimationUsingKeyFrames>
                            <!--蓝色小球动画-->
                            <DoubleAnimationUsingKeyFrames Duration="0:0:0.6"
                        Storyboard.TargetName="ttB" Storyboard.TargetProperty="X">
                                <SplineDoubleKeyFrame KeyTime="0:0:0.6" Value="400"
                                          KeySpline="1,0,0,1"/>
                            </DoubleAnimationUsingKeyFrames>
                        </Storyboard>
                    </BeginStoryboard>
                </EventTrigger>
            </Button.Triggers>
        </Button>
    </Grid>
参考:
实例地址:https://download.csdn.net/download/lvxingzhe3/87656988
Style样式中根据属性或事件添加动画实例:https://download.csdn.net/download/lvxingzhe3/34831843


 1537
1537


 被折叠的 条评论
为什么被折叠?
被折叠的 条评论
为什么被折叠?
 到【灌水乐园】发言


