


最近,我使用react-native-firebase在我的react本机应用程序中集成了推送通知。在整合到成功实施的过程中,我遇到了很多挑战,所以我想与大家分享一些步骤
在控制台上创建应用
首先在Firebase控制台上创建一个应用程序。按照云消息传递部分中的步骤,根据您的要求添加iOS和Android应用程序。
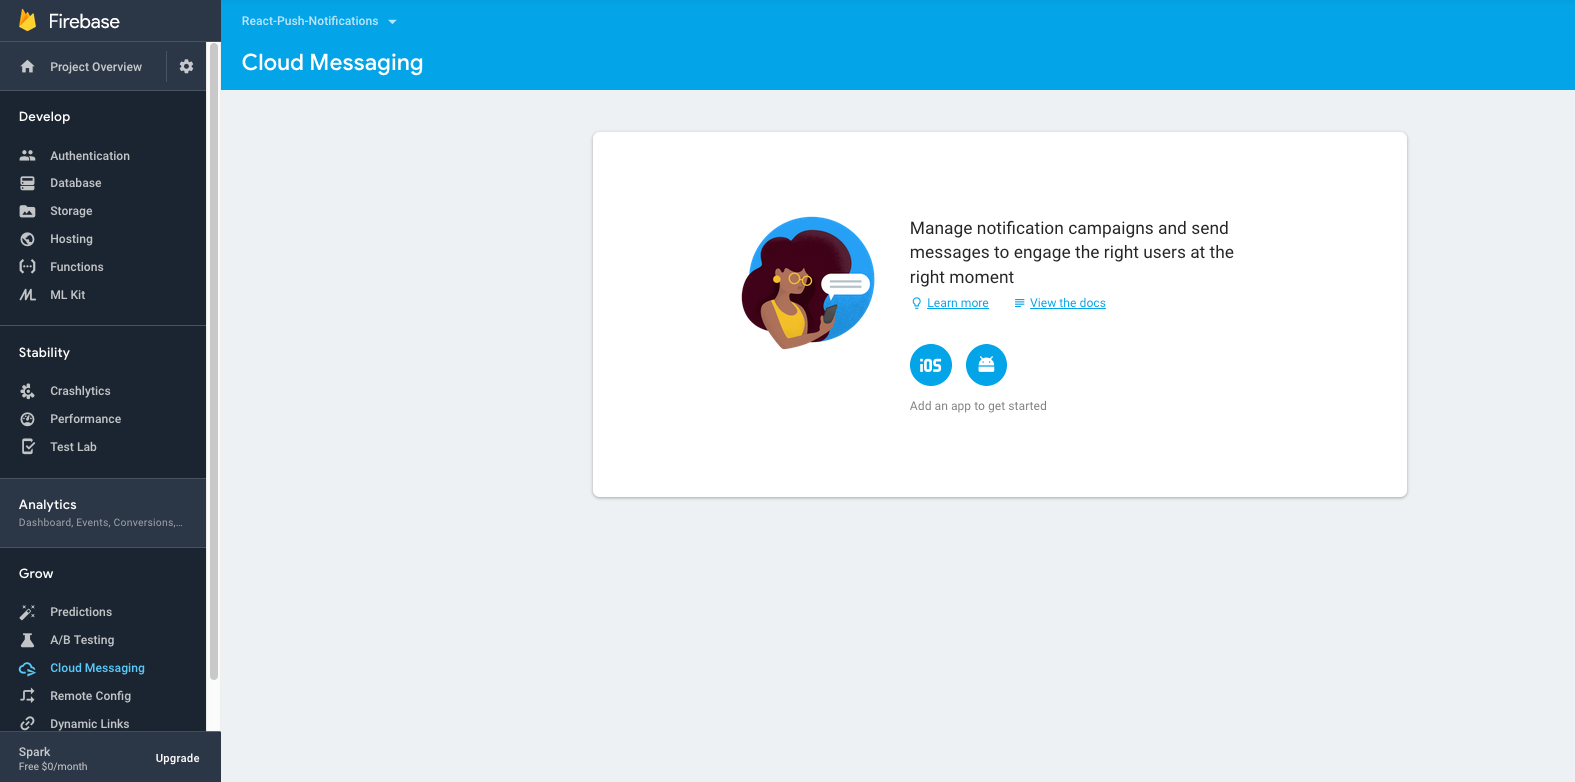
云消息传递部分 - Firebase
确保您的google-services.json和GoogleService-Info.plist放置在正确的文件夹中。
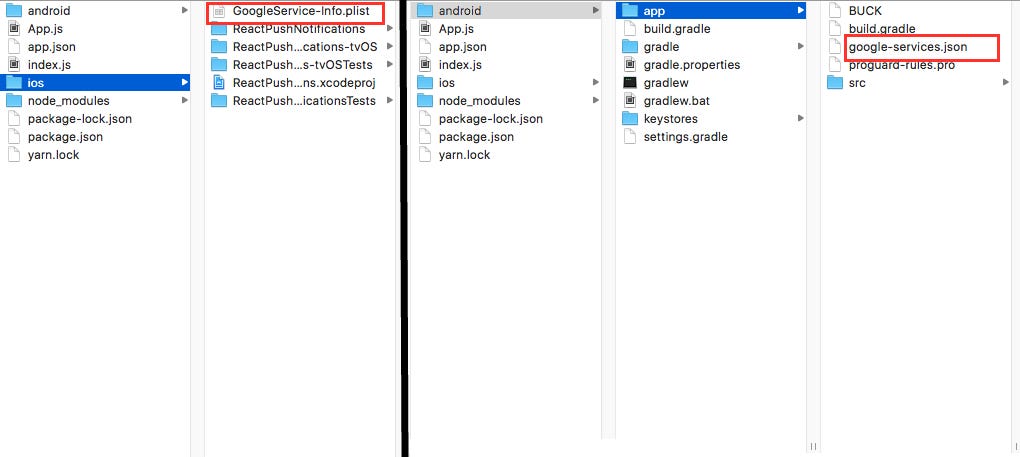
正确放置Google服务文件
Android的
配置gradle文件。请遵循本教程,使用最新的firebase依赖项。您可以在此处找到官方FCM指南。供您参考,我的gradle文件如下:
dependencies {
    implementation fileTree(include: ['*.jar'], dir: 'libs')
    implementation 'com.android.support:appcompat-v7:27.1.1'
    implementation 'com.facebook.react:react-native:+'

    //Add these lines fcm
    implementation 'com.google.firebase:firebase-core:16.0.9'
    implementation 'com.google.firebase:firebase-messaging:18.0.0'
}

//Put this on bottom of file
apply plugin: 'com.google.gms.google-services'
app/build.gradle 应用程序模块构建gradle代码段
buildscript {
    repositories {
        google()
        jcenter()
    }
    dependencies {
        classpath 'com.android.tools.build:gradle:3.3.2'
        classpath 'com.google.gms:google-services:4.2.0'

    }
}
项目根目录build.gradle根构建gradle片段
iOS版
- 在Firebase控制台中,您必须在项目设置>云消息传递中包含APNs身份验证密钥或APNs证书才能接收推送通知。推送证书的创建超出了本教程的范围,因此这里有一个很好的链接供您参考:)
注意:您需要两个单独的推送证书。一个用于沙盒环境(开发证书),另一个用于生产(分发证书)。两者都应上传到Firebase控制台。
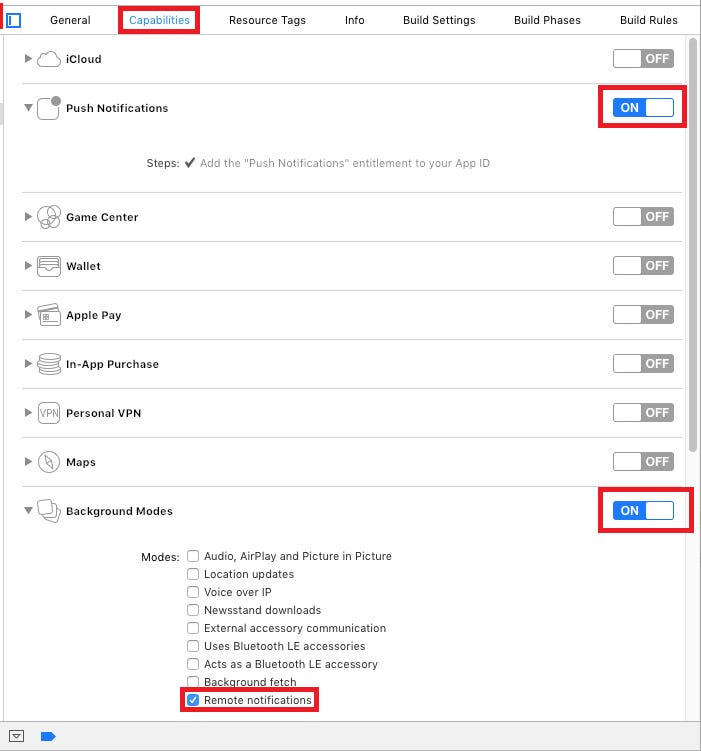
2.在Xcode中打开以下两项功能。确保在步骤1中创建的证书中打开这些证书。
a)推送通知
b)后台模式 - 仅检查远程通知
确保<YourProject>.xcworkspace使用Xcode而不是打开文件<YourProject>.xcodeproj。
3.打开Podfile并编辑其内容,如下所示:
# Uncomment the next line to define a global platform for your project
platform :ios, '9.0'

target 'ReactPushNotifications' do
  # Uncomment the next line if you're using Swift or would like to use dynamic frameworks
  # use_frameworks!

  # Pods for ReactPushNotifications - Add these lines
  pod 'Firebase/Core'
  pod 'Firebase/Messaging'

  target 'ReactPushNotificationsTests' do
    inherit! :search_paths
    # Pods for testing
  end

end
Podfile内容片段
如果您之前没有设置Podfile文件,请从此处按照指南进行操作。如果您遇到任何错误,可以查看官方FCM指南。

安装Firebase模块
在您的react项目的根文件夹中运行以下命令。
npm install --save react-native-firebase您可以使用以下命令将firebase节点模块与本机应用程序链接:
react-native link react-native-firebase在这里,我将手动链接firebase节点模块和本机平台,而没有react-native链接,因为它在大多数时候避免了混乱和不完整的绑定。此外,如果您在链接后遇到任何问题,您可以从下面确认在本机平台中正确包含所有内容的步骤。
Android 设置步骤
- 编辑MainApplication.java:
import io.invertase.firebase.RNFirebasePackage; import io.invertase.firebase.messaging.RNFirebaseMessagingPackage; import io.invertase.firebase.notifications.RNFirebaseNotificationsPackage; @Override protected List<ReactPackage> getPackages() { return Arrays.<ReactPackage>asList( new MainReactPackage(), new RNFirebasePackage(), new RNFirebaseMessagingPackage(), new RNFirebaseNotificationsPackage() ); }2.在settings.gradle中添加这些行
include ':react-native-firebase'
project(':react-native-firebase').projectDir = new File(rootProject.projectDir, '../node_modules/react-native-firebase/android')
3.在app build gradle中,添加依赖项:
dependencies {
   compile(project(':react-native-firebase')){
       transitive = false
   }
   // ...列出的其他依赖项
}
同步gradle。你应该很高兴去Android。此时,我们可以从Firebase控制台快速测试Android设备上的通知。
在测试时确保您的应用程序处于后台,以便Firebase可以自动发送到通知状态栏
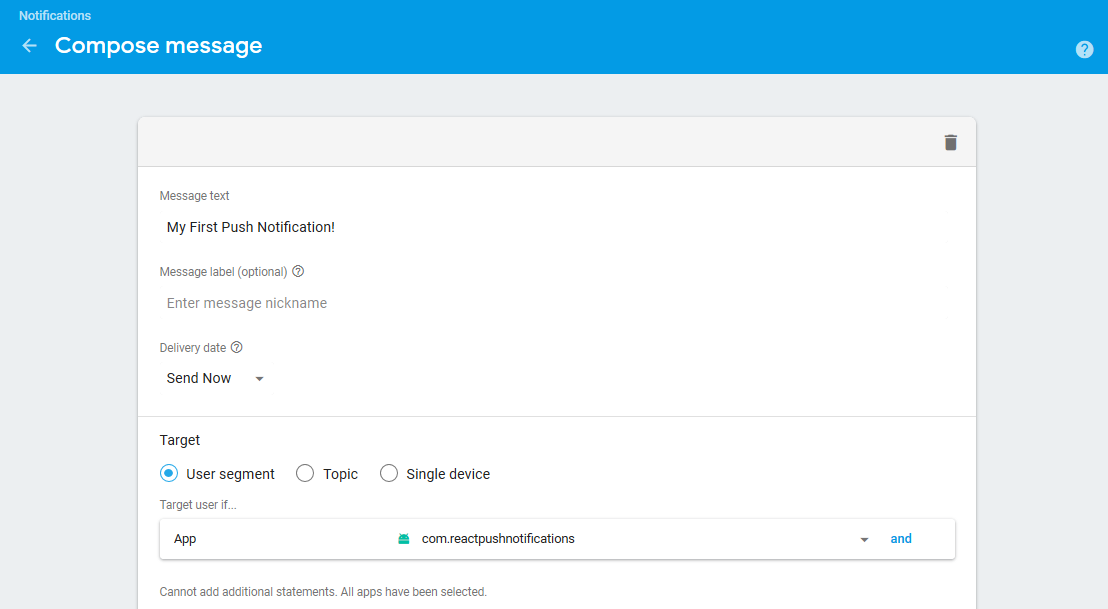
要在控制台上测试:
a)转到左窗格中的云消息传递部分。
b)单击发送您的第一条消息。
c)输入文本,在“ 用户段”中选择您的应用,然后单击“ 发送消息”按钮。您应该能够收到通知。
iOS设置
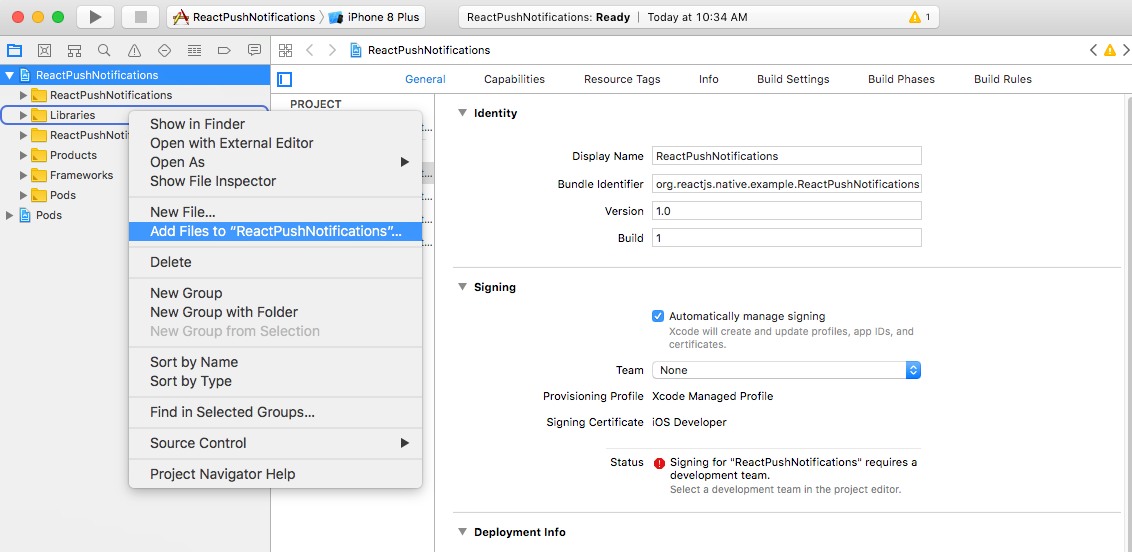
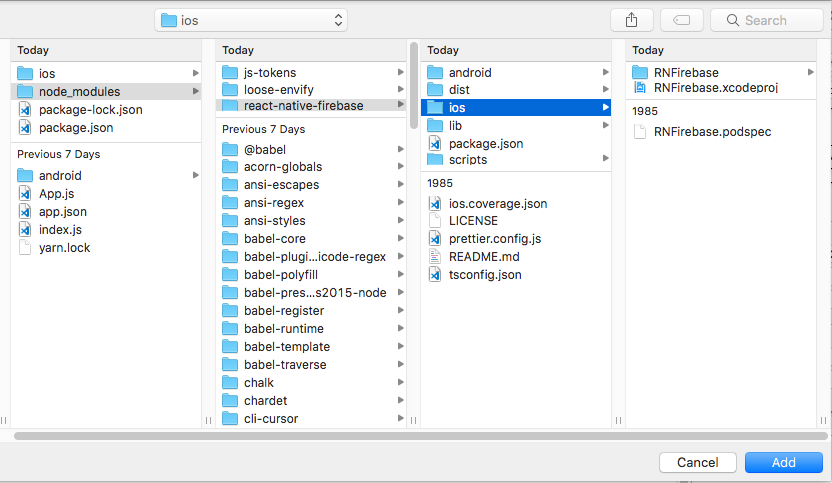
- 在Project Navigator中,右键单击Libraries> Add Files To <YourProject>。导航到<YourProject> / node_modules / react-native-firebase / ios /。选择RNFirebase.xcodeproj并单击“添加”按钮。
- 转到构建阶段。单击“Link Binary With Libraries”下的“+”以添加新库。添加UserNotifications.framework。从iOS 10开始,此框架是推送通知处理所必需的。
- 再次单击“+”,选择libRNFirebase.a并添加它。如果您无法找到它,请清理并构建项目。
- 转到“构建设置”,找到“页眉搜索路径”,双击其值并按“+”按钮。在那里添加以下行:
$(SRCROOT)/../node_modules/react-native-firebase/ios/RNFirebase使用“Cmd + Shift + Enter + K”快捷键清除缓存,然后构建项目。现在,firecode依赖关系应该被xcode识别。
4.在AppDelegate中:
#import <UIKit/UIKit.h>
#import <UserNotifications/UserNotifications.h>

@interface AppDelegate : UIResponder <UIApplicationDelegate, UNUserNotificationCenterDelegate>

@property (nonatomic, strong) UIWindow *window;

@end
#import "AppDelegate.h"
#import <Firebase.h>
#import "RNFirebaseNotifications.h"
#import "RNFirebaseMessaging.h"
#import <React/RCTBundleURLProvider.h>
#import <React/RCTRootView.h>
@implementation AppDelegate
- (BOOL)application:(UIApplication *)application didFinishLaunchingWithOptions:(NSDictionary *)launchOptions
{
NSURL *jsCodeLocation;
//Add these 3 lines
[FIRApp configure];
[[UNUserNotificationCenter currentNotificationCenter] setDelegate:self];
[RNFirebaseNotifications configure];
jsCodeLocation = [[RCTBundleURLProvider sharedSettings] jsBundleURLForBundleRoot:@"index" fallbackResource:nil];
RCTRootView *rootView = [[RCTRootView alloc] initWithBundleURL:jsCodeLocation
moduleName:@"agiledefense"
initialProperties:nil
launchOptions:launchOptions];
rootView.backgroundColor = [[UIColor alloc] initWithRed:1.0f green:1.0f blue:1.0f alpha:1];
self.window = [[UIWindow alloc] initWithFrame:[UIScreen mainScreen].bounds];
UIViewController *rootViewController = [UIViewController new];
rootViewController.view = rootView;
self.window.rootViewController = rootViewController;
[self.window makeKeyAndVisible];
return YES;
}
- (void)application:(UIApplication *)application didReceiveRemoteNotification:(nonnull NSDictionary *)userInfo
fetchCompletionHandler:(nonnull void (^)(UIBackgroundFetchResult))completionHandler{
[[RNFirebaseNotifications instance] didReceiveRemoteNotification:userInfo fetchCompletionHandler:completionHandler];
}
- (void)application:(UIApplication *)application didRegisterUserNotificationSettings:(UIUserNotificationSettings *)notificationSettings {
[[RNFirebaseMessaging instance] didRegisterUserNotificationSettings:notificationSettings];
}
-(void) userNotificationCenter:(UNUserNotificationCenter *)center didReceiveNotificationResponse:(UNNotificationResponse *)response withCompletionHandler:(void (^)(void))completionHandler {
[[RNFirebaseMessaging instance] didReceiveRemoteNotification:response.notification.request.content.userInfo];
completionHandler();
}
@end接收推送通知
现在让我们编写最期待的部分...接收通知!?
处理权限
在应用程序可以获得任何通知之前,在iOS中特别要求用户许可至关重要。如果用户不允许您的应用接收通知,则除非用户从“设置”中明确更改通知,否则它永远不会获得通知。
您的打开主成分反应原生应用程式,从那里基本上路由开始即App.js。根据以下代码段修改文件。
import React, {Component} from 'react';
import { AsyncStorage } from 'react-native';
import firebase from 'react-native-firebase';

export default class App extends Component {

async componentDidMount() {
  this.checkPermission();
}

  //1
async checkPermission() {
  const enabled = await firebase.messaging().hasPermission();
  if (enabled) {
      this.getToken();
  } else {
      this.requestPermission();
  }
}

  //3
async getToken() {
  let fcmToken = await AsyncStorage.getItem('fcmToken');
  if (!fcmToken) {
      fcmToken = await firebase.messaging().getToken();
      if (fcmToken) {
          // user has a device token
          await AsyncStorage.setItem('fcmToken', fcmToken);
      }
  }
}

  //2
async requestPermission() {
  try {
      await firebase.messaging().requestPermission();
      // User has authorised
      this.getToken();
  } catch (error) {
      // User has rejected permissions
      console.log('permission rejected');
  }
}

  render() {
    return (
      <View style={{flex: 1}}>
        <Text>Welcome to React Native!</Text>
      </View>
    );
  }
}
view raw- 在componentDidMount中,我们检查用户是否已授予接收推送通知的权限。
- 如果尚未向我们的应用授予权限,请在requestPermission方法中请求用户。如果成功分配了权限,则继续进行令牌提取,否则优雅地忽略该事实。
- 如果先前获取了令牌,则可以从AsyncStorage中检索它。如果未找到令牌,请请求Firebase并将其保存在AsyncStorage中。
监听通知
我们现在准备好听取推送通知事件。在继续之前,您应该了解Firebase支持的不同类型的通知。
- 仅通知消息:这些是Firebase SDK自动处理的显示消息。通知被扔到设备托盘。
- 通知+可选数据消息:这些消息也由Firebase SDK处理。这里唯一的区别是当用户点击通知时,您的应用会收到与该通知相关联的有效负载。
- 仅数据消息:这些类型的通知仅由app处理。除非app明确指出,否则不会在设备托盘上抛出任何通知。在iOS中,这些类型的通知也称为“无声推送通知”。
有关详细信息,请参阅此处。
在App.js中添加这些行。
import firebase from 'react-native-firebase';

export default class App extends Component {

async componentDidMount() {
  this.checkPermission();
  this.createNotificationListeners(); //add this line
}

// Add these methods //

  //Remove listeners allocated in createNotificationListeners()
componentWillUnmount() {
  this.notificationListener();
  this.notificationOpenedListener();
}

async createNotificationListeners() {
  /*
  * Triggered when a particular notification has been received in foreground
  * */
  this.notificationListener = firebase.notifications().onNotification((notification) => {
      const { title, body } = notification;
      this.showAlert(title, body);
  });

  /*
  * If your app is in background, you can listen for when a notification is clicked / tapped / opened as follows:
  * */
  this.notificationOpenedListener = firebase.notifications().onNotificationOpened((notificationOpen) => {
      const { title, body } = notificationOpen.notification;
      this.showAlert(title, body);
  });

  /*
  * If your app is closed, you can check if it was opened by a notification being clicked / tapped / opened as follows:
  * */
  const notificationOpen = await firebase.notifications().getInitialNotification();
  if (notificationOpen) {
      const { title, body } = notificationOpen.notification;
      this.showAlert(title, body);
  }
  /*
  * Triggered for data only payload in foreground
  * */
  this.messageListener = firebase.messaging().onMessage((message) => {
    //process data message
    console.log(JSON.stringify(message));
  });
}

showAlert(title, body) {
  Alert.alert(
    title, body,
    [
        { text: 'OK', onPress: () => console.log('OK Pressed') },
    ],
    { cancelable: false },
  );
}
}
我希望评论足以解释所有情景。您现在应该能够在两个平台上接收通知。
在 iOS中,您需要在设备上测试以接收通知。iOS模拟器目前不支持推送通知。
在 Android中,如果要在模拟器上进行测试,则需要安装Google Play服务包。
React-native-firebase是Firebase的一个很好的包装器,用于本地反应。但是,您应该知道几点:
- 在Android中,如果您在应用程序被杀时点击通知,则此库将无法捕获通知的标题和正文。因此,这些属性将在showAlert函数中未定义。作为解决方案,您还应该在通知的数据有效负载中发送标题和正文。
- 到目前为止,此库不支持iOS上的静默推送通知。我已经在他们的issues上打开了一个问题。
- 要在应用程序处于后台或在Android中杀死时收听数据消息通知,您需要实现Headless JS功能。有关详细信息,请参阅此链接。
希望本教程可以节省您的时间,并使FCM集成变得容易。如果它对你有帮助,别忘了点赞!谢谢 :)
参考文献:
invertase / react-native-firebase-docs
react-native-firebase-docs - React Native Firebase文档github.com


 1万+
1万+

 被折叠的 条评论
为什么被折叠?
被折叠的 条评论
为什么被折叠?
 到【灌水乐园】发言


