


这是《Android 4.0网络编程详解》书上的一个例子,可能是由于版本的原因吧,报了很多错。
新建android工程GetAPictureFromInternet
布局文件main.xml
<LinearLayout xmlns:android="http://schemas.android.com/apk/res/android"
    xmlns:tools="http://schemas.android.com/tools"
    android:id="@+id/LinearLayout1"
    android:layout_width="match_parent"
    android:layout_height="match_parent"
    android:orientation="vertical"
    tools:context="com.example.getapicturefrominternet.MainActivity" >

    <TextView
        android:id="@+id/textView1"
        android:layout_width="match_parent"
        android:layout_height="50sp"
        android:text="图片路径:"
        android:textSize="40sp" />

    <EditText
        android:id="@+id/path"
        android:layout_width="match_parent"
        android:layout_height="wrap_content"
        android:background="@android:drawable/edit_text"
        android:text="http://10.107.56.64:8080/ServerForPicture/girl.jpg" >

        <!-- 不要用localhost,localhost表示android虚拟机的本机地址,我们要访问的是自己电脑的ip -->

        <requestFocus />
    </EditText>

    <Button
        android:id="@+id/button1"
        android:layout_width="match_parent"
        android:layout_height="wrap_content"
        android:text="查看" />

    <ImageView
        android:id="@+id/imageView1"
        android:layout_width="match_parent"
        android:layout_height="match_parent" />

</LinearLayout>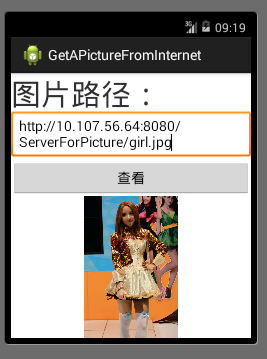
然后是新建服务器
File—>New–>Other–>Server–>Tomcat v7.0 Server–>Finish
新建web项目
File–>New–>Project–>Dynamic WebProject。一路next,最后
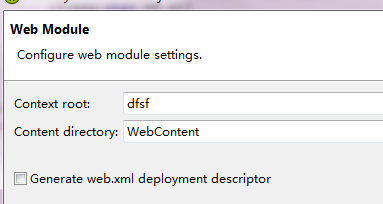
勾选Generate XXX选项
右键新建的web项目,Run As–>Run On Server.补全地址就会有如下的画面

至此,服务器搭建完成
接下来是android工程的编码
MainActivity.java
package com.example.getapicturefrominternet;

import android.app.Activity;
import android.graphics.Bitmap;
import android.os.Bundle;
import android.os.Handler;
import android.os.Message;
import android.view.View;
import android.view.View.OnClickListener;
import android.widget.Button;
import android.widget.EditText;
import android.widget.ImageView;

public class MainActivity extends Activity {
    private EditText path;
    private ImageView image;
    private Button button;
    private Bitmap bitmap;
    private Handler myHandler = new Handler(){
        public void handleMessage(Message msg) {
            if(msg.what == 0){
                image.setImageBitmap(bitmap);
            }
        };
    };

    @Override
    protected void onCreate(Bundle savedInstanceState) {
        super.onCreate(savedInstanceState);
        setContentView(R.layout.main);

        path = (EditText)findViewById(R.id.path);
        image = (ImageView)findViewById(R.id.imageView1);
        button = (Button)findViewById(R.id.button1);
        button.setOnClickListener(new OnClickListener() {
            @Override
            public void onClick(View v) {
                final String pathString = path.getText().toString();
                new Thread(new Runnable() {
                    @Override
                    public void run() {
                        bitmap = ImageService.getBitmap(pathString);
                        myHandler.sendEmptyMessage(0);
                    }
                }).start();
            }
        });
    }
}
ImageService.java
package com.example.getapicturefrominternet;

import java.io.ByteArrayOutputStream;
import java.io.IOException;
import java.io.InputStream;
import java.net.HttpURLConnection;
import java.net.MalformedURLException;
import java.net.URL;

import android.graphics.Bitmap;
import android.graphics.BitmapFactory;

public class ImageService {
    public static Bitmap getBitmap(String path) {
        Bitmap bitmap = null;
        try {
            URL url = new URL(path);
            HttpURLConnection connection = (HttpURLConnection) url
                    .openConnection();
            connection.setConnectTimeout(500);
            connection.setRequestMethod("GET");
            if (connection.getResponseCode() == 200) {
                InputStream inputStream = connection.getInputStream();
                byte[] buffer = new byte[1024];
                int len = -1;
                ByteArrayOutputStream bos = new ByteArrayOutputStream();
                while ((len = inputStream.read(buffer)) != -1) {
                    bos.write(buffer, 0, len);
                }
                byte[] data = bos.toByteArray();
                bos.close();
                bitmap = BitmapFactory.decodeByteArray(data, 0, data.length);
            }
        } catch (MalformedURLException e) {
            e.printStackTrace();
        } catch (IOException e) {
            e.printStackTrace();
        }
        return bitmap;
    }
}
书上的代码有问题,按照书上的敲运行一直出错。第一,网络处理函数没有开线程;第二,ImageService的实现也有问题。调试了一大会儿


 136
136

 被折叠的 条评论
为什么被折叠?
被折叠的 条评论
为什么被折叠?
 到【灌水乐园】发言


