


一,简单的动静分离
整体思路
1,动静分离只有在安装网页程序后实现的
2,通过nfs共享将两台httpd服务的网页数据都有mariadb共享,然后安装网页,等安装成功后将nfs共享的数据复制到本地httpd服务器上
然后关闭nfs共享
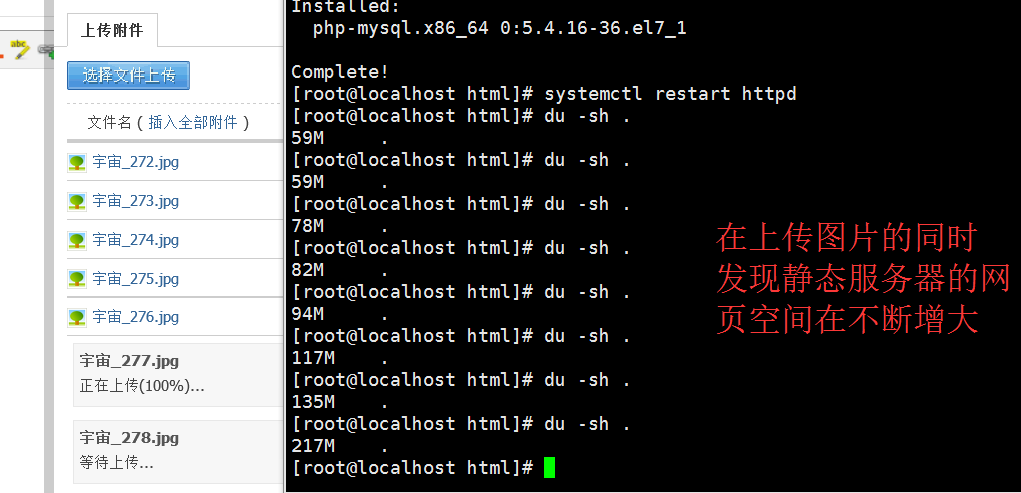
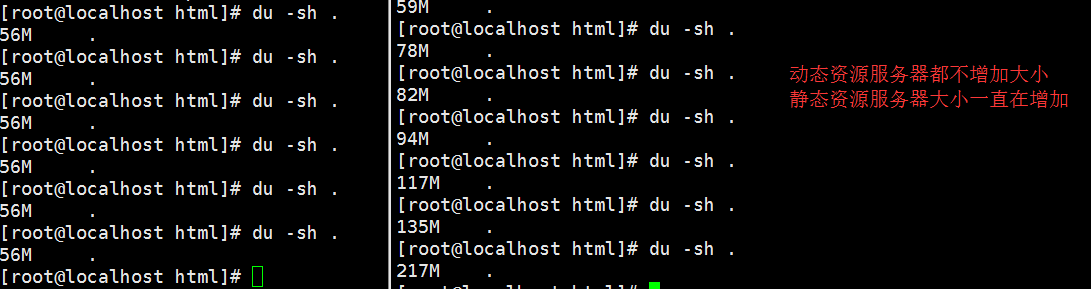
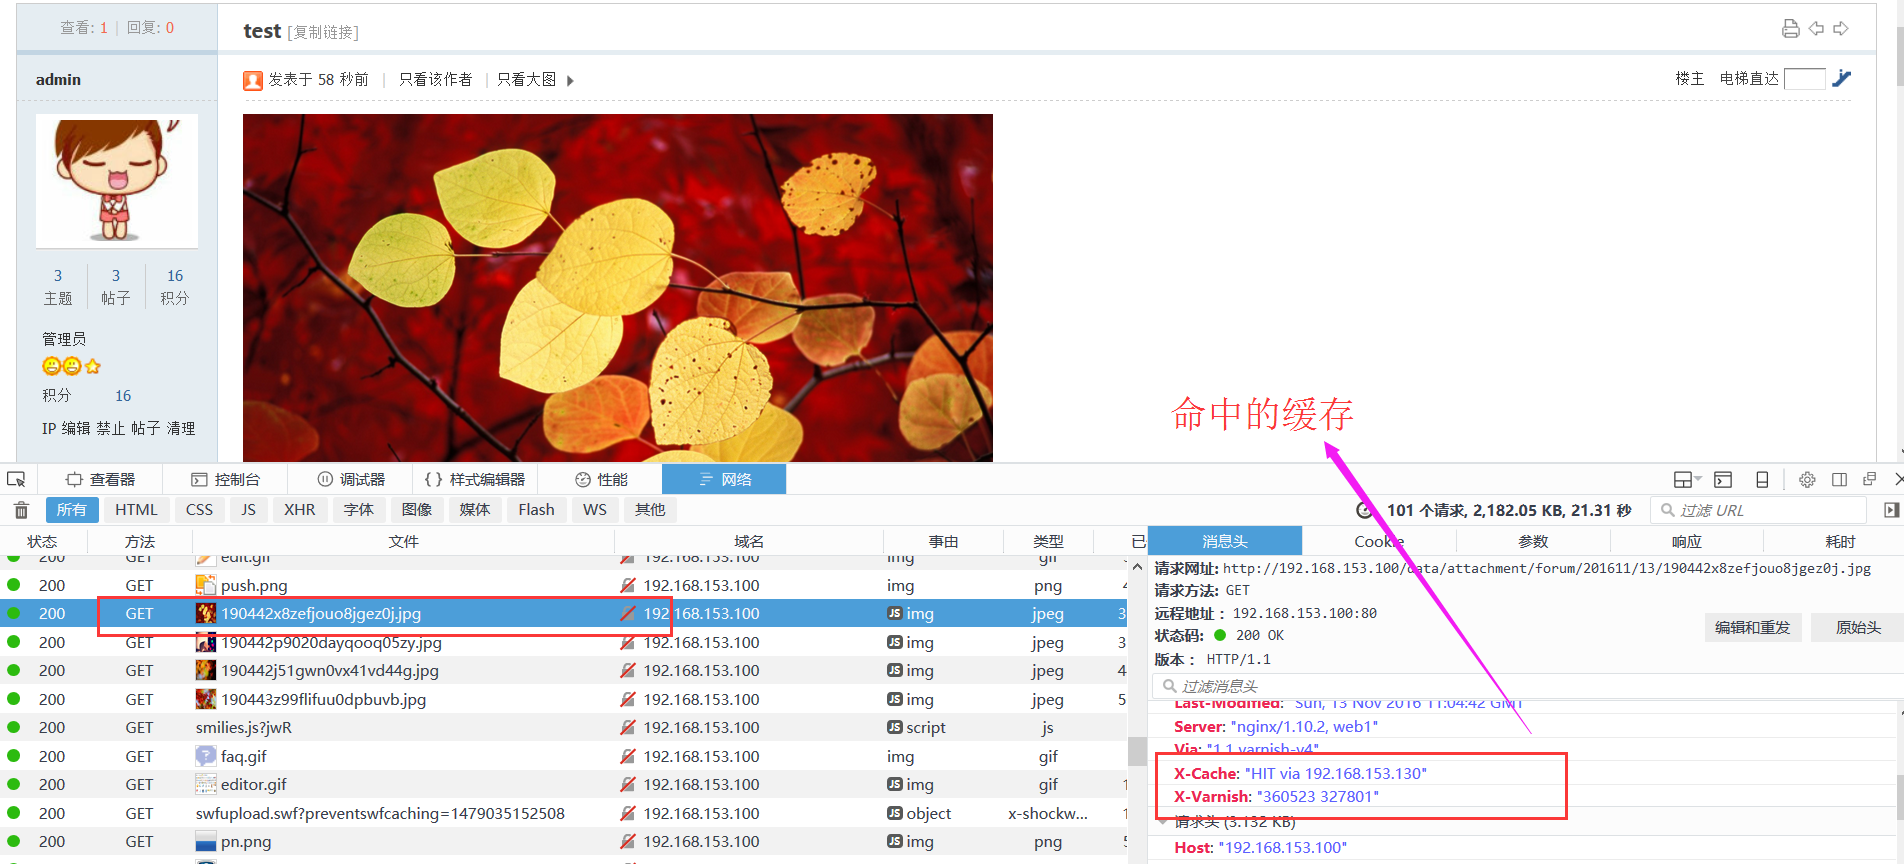
3,就可以测试了,可以发现静态资源的目录大小在不断增加,而动态资源一般不会增加
4,请关闭防火墙和selinux
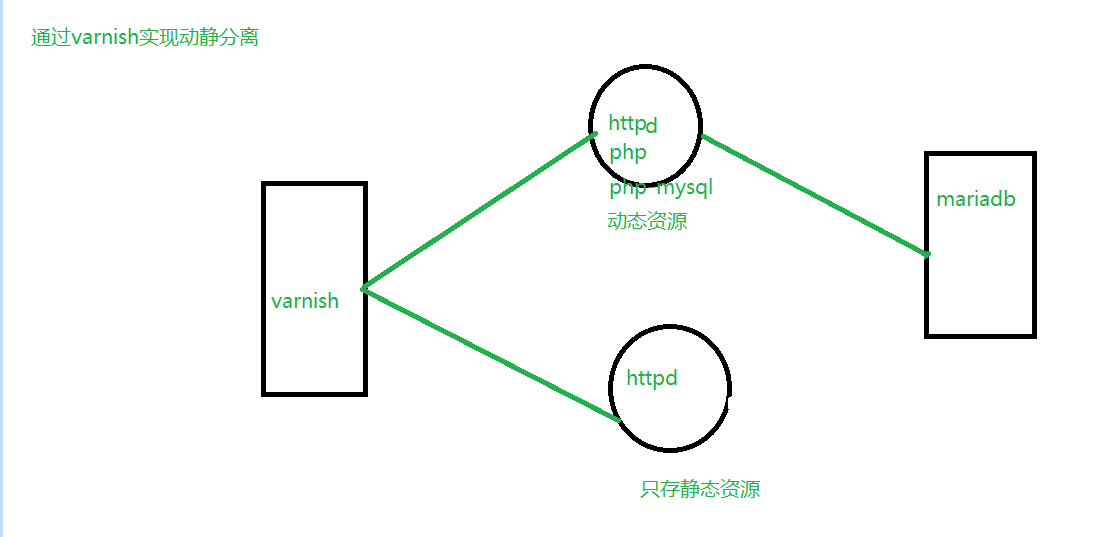
架构图
操作如下:
先配置mariadb和nfs
yum install mariadb-server nfs-utils
id apache || useradd -r -g 48 apache
mkdir /web/apps/dz
systemctl start nfs
vim /etc/exports
#增加
/web/apps/dz 192.168.153.0/24(rw,sync)cp /share/lamp/Discuz_X3.2_SC_UTF8.zip .
unzip Discuz_X3.2_SC_UTF8.zip
mv upload/* /web/apps/dz/
setfacl -R -m u:apache:rwx /web/apps/dz/
touch /web/apps/dz/.check #varnish 健康检查文件create database dz;
grant all on dz.* to 'dzuser'@'192.168.153.%' identified by 'dzpass';
flush privileges;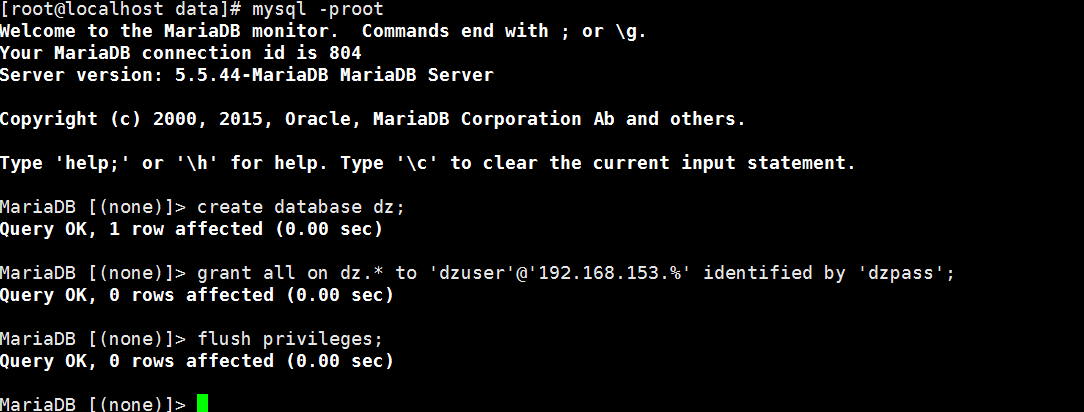
2,配置http动态服务器
iptables -F
setenforce 0
yum install httpd php php-mysql nfs-utils
mount -t nfs 192.168.153.133:/web/apps/dz /var/www/html/
systemctl start httpd3,配置静态资源服务器
iptables -F
setenforce 0
yum install httpd nfs-utils php php-mysql
mount -t nfs 192.168.153.133:/web/apps/dz /var/www/html/
systemctl start httpd4,配置varnish
yum install varnishvim /etc/varnish/varnish.params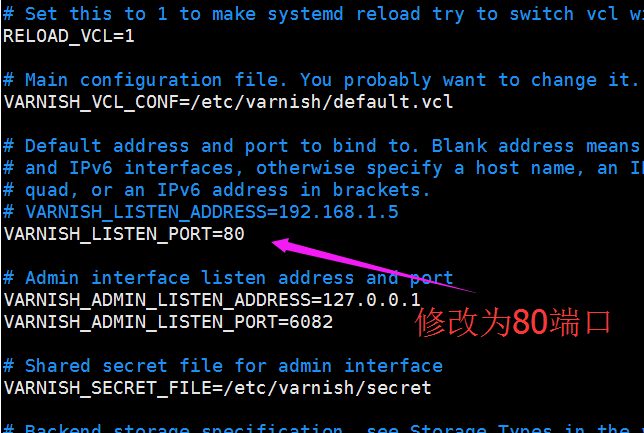
vim /etc/varnish/default.vcl# new 4.0 format.
vcl 4.0;
# Default backend definition. Set this to point to your content server.
backend default {
.host = "127.0.0.1";
.port = "8080";
}
import directors;
probe healthcheck {
.url = "/.check";
.window = 3;
.threshold = 3;
.interval = 1s;
.timeout = 1s;
}
backend one {
.host = "192.168.153.131";
.port = "80";
.probe = healthcheck;
}
backend two {
.host = "192.168.153.132";
.port = "80";
.probe = healthcheck;
}
sub vcl_recv {
# Happens before we check if we have this in cache already.
#
# Typically you clean up the request here, removing cookies you don't need,
# rewriting the request, etc.
if(req.url ~ "(?i)\.php$"){
set req.backend_hint = one;
} else {
set req.backend_hint = two;
}
}
sub vcl_backend_response {
# Happens after we have read the response headers from the backend.
#
# Here you clean the response headers, removing silly Set-Cookie headers
# and other mistakes your backend does.
if (beresp.http.cache-control !~ "s-maxage"){
if(bereq.url ~ "(?i)\.(jpg|jpeg|png|gif|css|js)$"){
unset beresp.http.Set-Cookie;
set beresp.ttl = 3600s;
}
}
}
sub vcl_deliver {
# Happens when we have all the pieces we need, and are about to send the
# response to the client.
#
# You can do accounting or modifying the final object here.
if(obj.hits>0){
set resp.http.X-Cache ="HIT via"+" "+server.ip;
} else {
set resp.http.X-Cache = "MISS via"+" "+server.ip;
}
}5安装网页


动态服务器操作如下
cd
cp -a /var/www/html/ .
systemctl stop httpd
umount /var/www/html/
rm -rf /var/www/html/*
cp -a html/ /var/www/
systemctl start httpd静态服务器操作如下
cd
cp /var/www/html/ .
systemctl stop httpd
umount /var/www/html/
rm -rf /var/www/html/*
cp -a html/ /var/www/
systemctl start httpdmariadb 数据库
systemctl stop nfs再次进行测试


二,haproxy+keepalived+varnish实现动静分离
动静分离discuzx,动静都要基于负载均衡实现;
本实验环境centos7.2
实验之前请先关闭防火墙和SELinux
拓扑图如下:
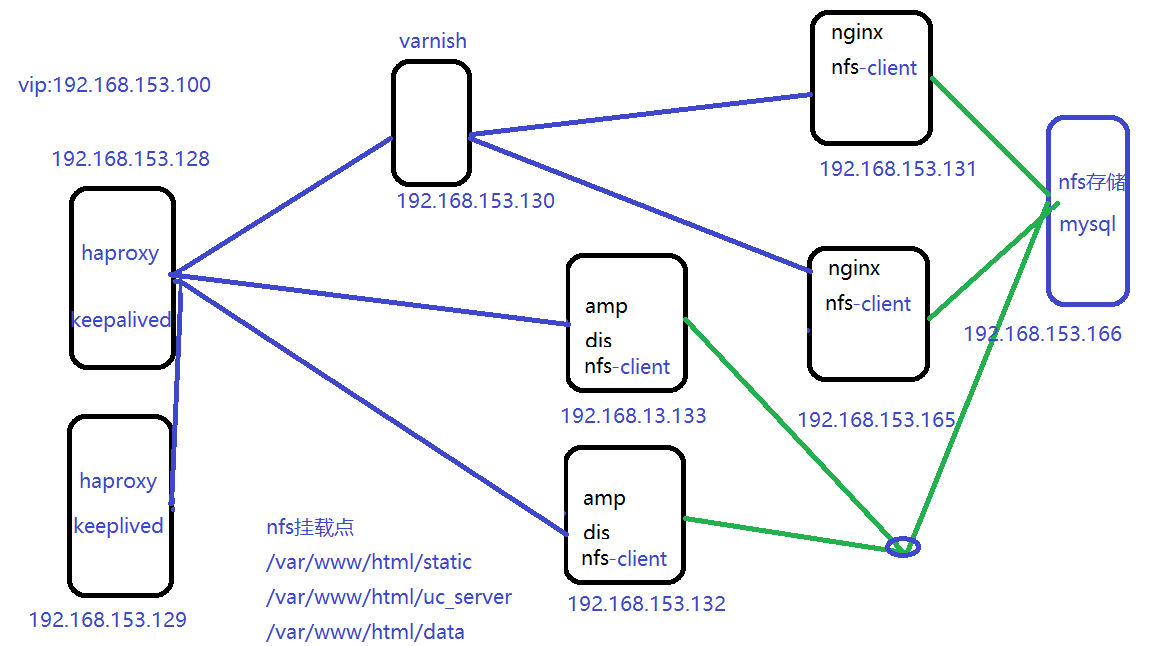
数据库操作(192.168.153.166)
yum install nfs-utils mariadb-server -y #安装nfs共享和数据库程序
sed -i "/mysqld]/ainnodb_file_per_table=ON\nskip_name_resolve=ON" /etc/my.cnf #数据库配置
systemctl start mariadb运行 mysql_secure_installation 对数据库进行初始化
创建安装dz所需要的数据库
create database dz;
grant all on dz.* to 'dzuser'@'192.168.153.%' identified by 'dzpass';
flush privileges;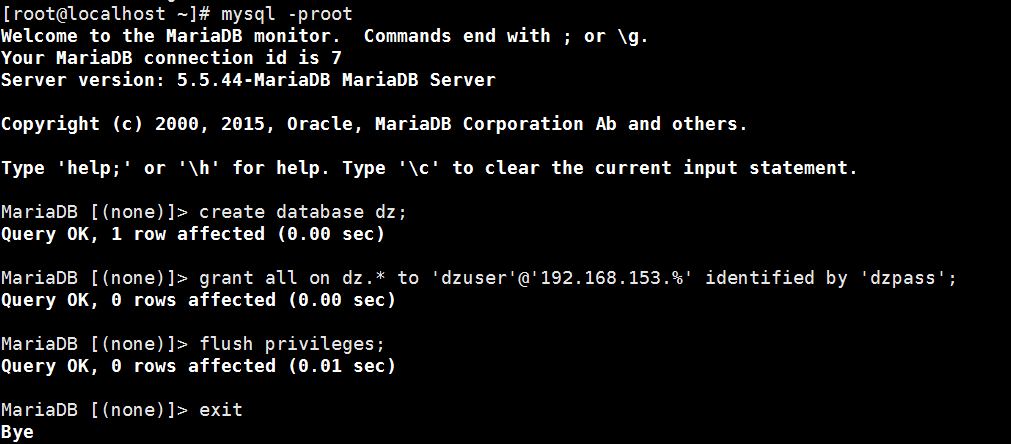
mkdir /var/www/html/{static,data,uc_server,install} -pv #创建文件目录,用于挂载资源
vim /etc/exports
# 内容如下
/var/www/html/data       192.168.153.0/24(rw,sync,no_root_squash)
/var/www/html/static      192.168.153.0/24(rw,sync,no_root_squash)
/var/www/html/uc_server     192.168.153.0/24(rw,sync,no_root_squash)
/var/www/html/install       192.168.153.0/24(rw,sync,no_root_squash)
iptables -F
setenforce 0
systemctl start rpcbind
systemctl start nfs
nginx(192.168.153.131,192.168.153.165)配置
yum install /share/nginx-1.10.2-1.el7.ngx.x86_64.rpm nfs-utils -y
mkdir /usr/share/nginx/html/{static,data,uc_server,install} -pv
systemctl start rpcbind        #开启rpcbind否则nfs共享可能会失败
挂载一些静态的目录
mount -t nfs 192.168.153.166:/var/www/html/uc_server/ /usr/share/nginx/html/uc_server/
mount -t nfs 192.168.153.166:/var/www/html/data/ /usr/share/nginx/html/data/
mount -t nfs 192.168.153.166:/var/www/html/static/ /usr/share/nginx/html/static/
mount -t nfs 192.168.153.166:/var/www/html/install/ /usr/share/nginx/html/install/
touch /usr/share/nginx/html/.healthfile #varnish 健康检查文件iptables -F
setenforce 0
systemctl start nginxamp(192.168.153.132,192.168.153.133)配置
mastr,backup:
yum install httpd php php-mysql nfs-utils -y
mkdir /var/www/html/{static,data,uc_server,install} -pv
systemctl start rpcbind
mount -t nfs 192.168.153.166:/var/www/html/uc_server/ /var/www/html/uc_server/
mount -t nfs 192.168.153.166:/var/www/html/data/ /var/www/html/data/
mount -t nfs 192.168.153.166:/var/www/html/static/ /var/www/html/static/
mount -t nfs 192.168.153.166:/var/www/html/install/ /var/www/html/install/master:(192.168.153.132)主动态服务器,备用动态服务器需要在网站安装成功后,然后通过nfs共享复制到备动态服务器,因为动态资源一般的不会改变的
cd
cp /share/lamp/Discuz_X3.2_SC_UTF8.zip . #复制网站源码
unzip Discuz_X3.2_SC_UTF8.zip #解压源码
/bin/cp -a upload/* /var/www/html/ #将源码复制到网页根目录
vim /etc/exports
/var/www/html/ 192.168.153.0/24(rw,sync,no_root_squash) #(备份先不配置,先配置其他服务器,等网站可以访问后,在进行配置)master,backup
iptables -F
setenforce 0
systemctl start httpdvarnish(192.168.153.130)
yum install -y varnishvim /etc/varnish/default.vcl #varnish 配置文件
# 内容如下
vcl 4.0;
import directors;
probe chkhealth {
.url = "/.healthfile"; #健康检查的URL
.timeout = 1s; #检查超时时间
.window = 3; #总共检查三次
.threshold = 2; #检查三次中有2次成功就代表服务器健康
.interval = 2s; #每2秒检查一次
}
backend webstatic1 {
.host = "192.168.153.131"; #后端主机ip
.port = "80"; #后端主机端口
.probe = chkhealth; #健康检查
}
backend webstatic2 {
.host = "192.168.153.165";
.port = "80";
.probe = chkhealth;
}
sub vcl_init {
new webstatic = directors.round_robin(); #调度模式
webstatic.add_backend(webstatic1);
webstatic.add_backend(webstatic2);
}
sub vcl_recv {
set req.backend_hint = webstatic.backend();
}
sub vcl_backend_response {
unset beresp.http.Set-Cookie; #不设置cookie
set beresp.ttl = 3600s; #缓存失效时间为3600
}
sub vcl_deliver {
if(obj.hits>0){
set resp.http.X-Cache="HIT via"+" "+server.ip;
}else {
set resp.http.X-Cache="MISS via"+" "+server.ip;
}
}vim /etc/varnish/varnish.params
# 内容如下
VARNISH_LISTEN_PORT=80iptables -F
setenforce 0
systemctl start varnishhaproxy_keepalived(192.168.153.128,192.168.153.129)
yum install keepalived haproxy -y
mkdir /etc/haproxy/errorfiles #创建自定义错误目录及文件
echo 503 > /etc/haproxy/errorfiles/503
echo 502 > /etc/haproxy/errorfiles/502
echo 403 > /etc/haproxy/errorfiles/403vim /etc/haproxy/haproxy.cfg #修改haproxy配置文件
# 内容如下
global
log 127.0.0.1 local2
chroot /var/lib/haproxy
pidfile /var/run/haproxy.pid
maxconn 4000
user haproxy
group haproxy
daemon
# turn on stats unix socket
stats socket /var/lib/haproxy/stats
#---------------------------------------------------------------------
# common defaults that all the 'listen' and 'backend' sections will
# use if not designated in their block
#---------------------------------------------------------------------
defaults
mode http
log global
option httplog
option dontlognull
option http-server-close
option forwardfor except 127.0.0.0/8
option redispatch
retries 3
timeout http-request 10s
timeout queue 1m
timeout connect 10s
timeout client 1m
timeout server 1m
timeout http-keep-alive 10s
timeout check 10s
maxconn 3000
errorfile 403 /etc/haproxy/errorfiles/403 #自定义错误页
errorfile 502 /etc/haproxy/errorfiles/502
errorfile 503 /etc/haproxy/errorfiles/503
#---------------------------------------------------------------------
# main frontend which proxys to the backends
#---------------------------------------------------------------------
frontend main *:80
acl url_static path_beg -i /static /images /javascript /stylesheets
acl url_static path_end -i .jpg .gif .png .css .js
use_backend static if url_static
default_backend app
#---------------------------------------------------------------------
# static backend for serving up images, stylesheets and such
#---------------------------------------------------------------------
backend static
balance roundrobin
server web1 192.168.153.130:80 check
reqidel ^cookie.*
rspadd Server:web1
#---------------------------------------------------------------------
# round robin balancing between the various backends
#---------------------------------------------------------------------
backend app
balance roundrobin
cookie WEBSRV insert nocache indirect #插入自定义cookie
server web2 192.168.153.132:80 check cookie web2\ 132 #基于cook实现会话保持
server web3 192.168.153.133:80 check cookie web3\ 133
rspadd Server:webphp
listen stats *:9806 #haproxy服务器的管理接口
stats enable
stats realm haproxy\ aire
stats auth xixi:xixi
stats admin if TRUE
stats uri /hastatus
stats refresh 5svim /etc/keepalived/keepalived.conf
# 内容如下
! Configuration File for keepalived
global_defs {
notification_email {
root@localhost;
}
notification_email_from keepalived@localhost
smtp_server 127.0.0.1
smtp_connect_timeout 30
router_id LVS_DEVEL
vrrp_mcast_group4 224.0.0.41
}
vrrp_script chkhaproxy {
script "pidof haproxy &> /dev/null && exit 0 || exit 1"
interval 1
weight -20
}
vrrp_instance VI_1 {
state MASTER
interface eno33554984
virtual_router_id 41
priority 100
advert_int 1
authentication {
auth_type PASS
auth_pass ki889dff
}
virtual_ipaddress {
192.168.153.100/24
}
track_script {
chkhaproxy
}
}scp /etc/keepalived/keepalived.conf 192.168.153.129:/etc/keepalived/ #将主配置文件复制到备节点上,修改日志:
vim /etc/rsyslog.conf
local2.* /var/log/haproxy.log
systemctl restart rsyslog
iptables -F
setenforce 0
systemctl start haproxy
systemctl start keepalived安装网页
在nfs(192.168.153.166)操作
id apache || useradd -r -u 48 apache
id nginx || useradd -r -u 992 nginx
setfacl -R -m u:apache:rwx /var/www/html/
setfacl -R -m u:nginx:rwx /var/www/html/在主amp(192.168.153.132)操作
setfacl -R -m u:apache:rwx /var/www/html/config/
然后配置动态备服务器
先在主 amp:(192.168.153.132) 配置nfs共享
vim /etc/exports
# 内容如下
/var/www/html/ 192.168.153.0/24(rw,sync,no_root_squash)umount /var/www/html/uc_server #先卸载,要不然nfs共享会失败
umount /var/www/html/data/
umount /var/www/html/static/
umount /var/www/html/install/systemctl start rpcbind
systemctl start nfs在被amp挂载,并且负责整站到http根目录下
backup:(192.168.153.133)
mkdir /html
mount -t nfs 192.168.153.132:/var/www/html/ /html
/bin/cp -a /html/* /var/www/html/
umount /html然后主服务器关闭nfs共享,并重新挂载静态资源目录
master:(192.168.153.132)
systemctl stop nfs
mount -t nfs 192.168.153.166:/var/www/html/uc_server/ /var/www/html/uc_server/
mount -t nfs 192.168.153.166:/var/www/html/data/ /var/www/html/data/
mount -t nfs 192.168.153.166:/var/www/html/static/ /var/www/html/static/
mount -t nfs 192.168.153.166:/var/www/html/install/ /var/www/html/install/master,backup
iptables -F
setenforce 0
systemctl start httpd


 189
189


 被折叠的 条评论
为什么被折叠?
被折叠的 条评论
为什么被折叠?
 到【灌水乐园】发言


