


- 循环
dirs='d1 d2 d3'
# 或者 for dd in 'd1' 'd2' 'd3'
for dd in $dirs
do
	echo $dd
done
- 判断
for file in /etc/*
do
	if [ "${file}" == "/etc/resolv.conf" ]
	then
		countNameservers=$(grep -c nameserver /etc/resolv.conf)
		echo "Total  ${countNameservers} nameservers defined in ${file}"
		break
	fi
done
- 截取视频
# -ss: 起始时间,单位为s
# -t:持续时间,单位s
ffmpeg -ss 25 -t 30 -accurate_seek -i video.flv -codec copy out.mp4

# convert nv12 to png
ffmpeg  -s 1920x1280 -pix_fmt nv12 -i nv12.yuv -f image2 -pix_fmt rgb24 nv12.png

# convert jpg to nv12
ffmpeg -lavfi "scale=out_range=full" -i ./test.jpg  -pix_fmt nv12 nv12.yuv
- 删除无用的docker 镜像
安装镜像失败时经常会多出来一些临时镜像,白白占用空间
<none>                  <none>                        ef01ad2699be   2 weeks ago      1.33GB
<none>                  <none>                        9509efc2d4a7   2 weeks ago      990MB
那么可以尝试使用下面的命令一键删除:
docker images | grep 'none' | sed -nE 's/<none>\s+<none>\s+(\w+)\s+.*/\1/p' | xargs -i docker image rm {} -f
docker images
文件下载
- curl
- 代理设置
export HTTP_PROXY="http://127.0.0.1"
curl -x ${HTTP_PROXY}  test.out
用户及权限
- 添加用户
# -u用来制定用户id, -g设置该user所属组, -d设置该user的home目录,如果不设置则默认不生成目录
 useradd -d /home/tt  -g root -u 123 tt
- 获取group的id
$ getent group sudo
遍历文件
for file in $(find ./ -name "*.json";
do
echo "find file $file"
done
也可以这样
# 这里-I可以指定将前面管道输出的内容用{}替换.
find ./ -name "*.json" | xargs -I {} echo {}
# 也可以更复杂, 调用bash
find ./ -name "*.json" | xargs -I {} bash -c " echo {}"
开机启动
sudo systemctl enable httpd # add config in /usr/lib/systemd/system
sudo systemctl start httpd
sudo systemctl status httpd
 sudo systemctl stop httpd.service
 sudo systemctl kill httpd.service
 sudo systemctl restart httpd.service
镜像操作
- 写镜像
sudo dd if=2021-10-30-raspios-bullseye-armhf.img of=/dev/sdX bs=4M conv=fsync
# 进度条版本
 sudo dd if=2021-10-30-raspios-bullseye-armhf.img of=/dev/sdX bs=4M conv=fsync status=progress
# zip文件写入硬盘
unzip -p 2021-10-30-raspios-bullseye-armhf.zip | sudo dd of=/dev/sdX bs=4M conv=fsync
# 将硬盘中的内容保存为镜像
sudo  dd if=/dev/sdX of=from-sd-card.img bs=4M count=xxx
# 删除镜像无用空间
truncate --reference 2021-10-30-raspios-bullseye-armhf.img from-sd-card.img
组操作
将用户添加到某组
sudo usermod -a -G video <username>
进程操作
- 让进程后台运行
./a.out &
- 查看已经后台运行的程序
jobs
打印如下:
# 第一列为job id
[1]   Stopped                 vim
[2]-  Stopped                 bash
[3]+  Stopped                 vim 23
- 将后台程序转为前台运行
fg %job_id
- 停止这个后台程序
# kill -STOP %job_id
kill -STOP %3
- 守护进程
如果想让一个进程挂掉后能够自动启动,可以这么操作. 这里以一个python命令为例.
- 生成一个名为
always_run.sh的脚本,脚本内入如下:
#! /bin/sh
# usage: set PRO_NAME and then `chmod 777 always_run.sh;  nohup ./always_run.sh &'
# kill by name: ps -ef | grep raft | grep -v grep | awk '{print $2}' | xargs --no-run-if-empty kill
PRO_NAME='python ipcam/run.py'

while true ; do
     # get process number
     NUM=`ps aux | grep -w ${PRO_NAME} | grep -v grep |wc -l`
     #echo $NUM
     # if num less than 1, restart the process
     if [ "${NUM}" -lt "1" ];then
         echo "${PRO_NAME} was killed"
         ${PRO_NAME} -d
    # if greater than 1, then kill all process and restart it
    elif [ "${NUM}" -gt "1" ];then
        echo "more than 1 ${PRO_NAME},killall ${PRO_NAME}"
         killall -9 $PRO_NAME
        ${PRO_NAME} -d
     fi
     #kill dead process
     NUM_STAT=`ps aux | grep -w ${PRO_NAME} | grep T | grep -v grep | wc -l`
     if [ "${NUM_STAT}" -gt "0" ];then
         killall -9 ${PRO_NAME}
         ${PRO_NAME} -d
    fi
     sleep 5s
 done

 exit 0
其中PRO_NAME设置为你要运行的命令.
- 设置脚本权限并运行
chmod 777 always_run.sh
nohup ./always_run.sh &
字符串操作
用法:
sed s/pattern/replacement/flags your_string
将your_string中满足pattern的部分替换为replacement.
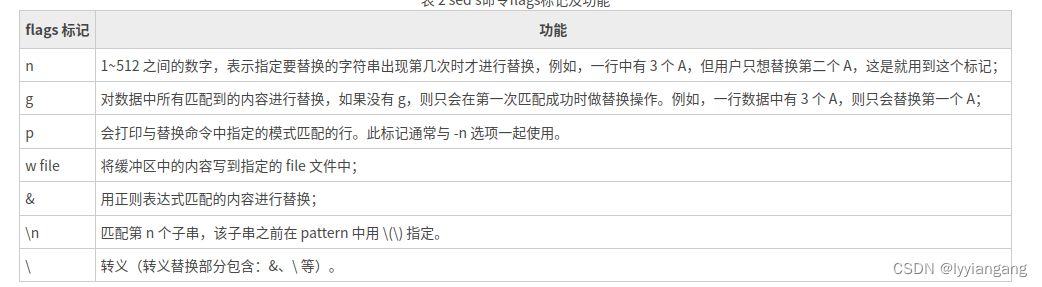 注意,
注意,\d是不支持的,sed里需要用[0-9]表示数字。
eg.:
echo "age:30"  | sed -nE "s/.*:([0-9])/\1/p"
# 30
- 字符串替换
# 将abc原地替换为efg
sed -i 's/abc/efg/g' *.txt
- sed字符串分割
echo "12|23|11" | awk '{split($0,a,"|"); print a[3],a[2],a[1]}'
# 打印11 23 12

 echo "US/Central - 10:26 PM (CST)" |  sed 's/.*\- *\([0-9]\{2\}:[0-9]\{2\}\).*/\1/'
 # 打印10:26
- 使用grep 正则进行字符串分割
echo "US/Central - 10:26 PM (CST) 11:33 " | grep -oP "\-\s+\K\d{2}:\d{2}"
# 打印10:26
# -o:只打印匹配项. -P:使用perl类型的正则
- 判断文件中是否存在某个字符串
if grep -q 'target_str' a.txt; then
	echo "find str in a.txt"
fi
- 在文件中搜索所有包含指定字符的文件
 grep  "hello" *.txt
 #t2.txt:hello_ abc
 #t2.txt:hello2_ lyy
 # -R表示Recursively搜索.
 grep -R "hello" *.txt
 # 只搜索指定后缀的文件
 grep -R --include="*.cxx"  "ToSearchString"  .
- 使用正则搜索字符串
# 满足pattena或者pattenb的字符
grep -E 'pattena|pattenb' *.txt
# 或者使用下面的命令, 因为|在bash中为管道的意思, 这里用\来将|转意, 而这是等效的.
grep 'pattena\|pattenb' *.txt
- 统计某个字符串出现次数
grep -c 'warning\|error' /var/log/bootstrap.log
# 53
图像处理
- 视频逆时针旋转90度
ffmpeg -i bst_1654754527158.mp4 -vf "transpose=2" output.mp4
GPG签名错误
sudo apt-key adv --keyserver keyserver.ubuntu.com --recv-keys 3F01618A51312F3F
定时任务
可以通过crontab命令来创建定时任务
crontab -e
在出现的界面上添加定时执行的命令, 比如每天晚上20:50定时执行test.sh
50 20 * * * bash /home/abc/test.sh
修改退出后一分钟生效(系统每分钟读取配置文件来刷新定时任务).
crontab配置文件的格式:

文件挂载
- 本地文件mount
# 修改目录读写权限
mount -o rw,remount /
- mount网络共享文件夹
# 安装cifs支持
apt install cifs-common -y
# mount 远程文件夹到本地(有密码)
sudo mount -t cifs -o user=user_allen,password=abc,vers=1.0  //192.168.50.1/share /home/abc/remote_disk

# 匿名身份mount
sudo mount -t cifs -o guest,vers=1.0  //192.168.50.1/share /home/abc/remote_disk

//192.168.0.2/share_with_server /home/Data
sudo mount -t nfs -o rw 192.168.0.2:/volume1/Data /home/Data/
注意对于老的smb共享目录需要指定vers=1.0, 否则会失败。
如果mount失败,可以使用dmesg命令查看错误log
函数
# define in func.bashrc
myfunc()
{
  echo  'input is ' $1
}

#user in your script
source func.bashrc
myfunc('hello')
docker增加sudo权限
 sudo groupadd docker
 sudo gpasswd -a $USER docker
 newgrp docker
 docker run hello-world
播放yuv
ffplay  -pixel_format nv12 -video_size 1600x1300 -i ./1_camera_2311.yuv
# pixel_format 可以是nv12,yuv420p等
获取图像尺寸
ffmpeg -i input.png
转换图片到yuv
ffmpeg -i input.png -s 368x249 -pix_fmt yuv420p test.yuv
卸载程序
以卸载nvidia驱动为例
# 查看所有已安装包
dpkg -l | grep -i nvidia
# 卸载所有nvidia-开头的包
sudo apt-get remove --purge '^nvidia-.*'
xfce terminal 快捷键设置
为了让xfce terminal支持快捷键复制粘贴,可以使用下列配置:
 vi ~/.config/xfce4/terminal/accels.scm
# add following lines
(gtk_accel_path "<Actions>/terminal-window/paste" "<Primary><Shift>v")
(gtk_accel_path "<Actions>/terminal-window/copy" "<Primary><Shift>c")
切换docker image 安装目录
# 查看安装位置,默认是/var/lib/docker
docker info | grep "Docker Root Dir"

systemctl stop docker
rsync -avzP /var/lib/docker  NEW_DIR
ln -s  NEW_DIR/docker /var/lib/docker
systemctl start docker
apt 源设置
- ubuntu18
echo "\
    deb http://mirrors.aliyun.com/ubuntu/ bionic main restricted universe multiverse\n\
    deb http://mirrors.aliyun.com/ubuntu/ bionic-security main restricted universe multiverse\n\
    deb http://mirrors.aliyun.com/ubuntu/ bionic-updates main restricted universe multiverse\n\
    deb http://mirrors.aliyun.com/ubuntu/ bionic-proposed main restricted universe multiverse\n\
    deb http://mirrors.aliyun.com/ubuntu/ bionic-backports main restricted universe multiverse\n\
    " > /etc/apt/sources.list
rm -rf /etc/apt/sources.list.d && apt update -y
``


 7万+
7万+


 被折叠的 条评论
为什么被折叠?
被折叠的 条评论
为什么被折叠?
 到【灌水乐园】发言


