


今天的学习内容为:项目开发流程介绍、文件上传、文件下载
在公司中,项目经理主要负责技术支持,如版本管理等。产品经理职责主要是与客户交流,理解客户需求。
项目开发流程:
需求分析 $\Rightarrow$ 数据库设计(周期较长)$\Rightarrow$ 页面原型(RP软件)$\Rightarrow$ UML建模 $\Rightarrow$ 测试(主要是布局、数值)$\Rightarrow$反编译、License
1.文件上传
为复习Springboot,这里我使用springboot+thymeleaf实现文件上传
新建Springboot项目,引入相关jar包,pom.xml如下:
<?xml version="1.0" encoding="UTF-8"?>
<project xmlns="http://maven.apache.org/POM/4.0.0" xmlns:xsi="http://www.w3.org/2001/XMLSchema-instance"
         xsi:schemaLocation="http://maven.apache.org/POM/4.0.0 https://maven.apache.org/xsd/maven-4.0.0.xsd">
    <modelVersion>4.0.0</modelVersion>
    <parent>
        <groupId>org.springframework.boot</groupId>
        <artifactId>spring-boot-starter-parent</artifactId>
        <version>2.1.7.RELEASE</version>
        <relativePath/> <!-- lookup parent from repository -->
    </parent>
    <groupId>com.lzq</groupId>
    <artifactId>demo</artifactId>
    <version>0.0.1-SNAPSHOT</version>
    <name>demo</name>
    <description>Demo project for Spring Boot</description>

    <properties>
        <java.version>1.8</java.version>
    </properties>

    <dependencies>
        <dependency>
            <groupId>org.springframework.boot</groupId>
            <artifactId>spring-boot-starter-thymeleaf</artifactId>
        </dependency>
        <dependency>
            <groupId>org.springframework.boot</groupId>
            <artifactId>spring-boot-starter-web</artifactId>
        </dependency>
        <dependency>
            <groupId>org.mybatis.spring.boot</groupId>
            <artifactId>mybatis-spring-boot-starter</artifactId>
            <version>2.1.0</version>
        </dependency>

        <dependency>
            <groupId>org.springframework.boot</groupId>
            <artifactId>spring-boot-devtools</artifactId>
            <scope>runtime</scope>
            <optional>true</optional>
        </dependency>
        <dependency>
            <groupId>mysql</groupId>
            <artifactId>mysql-connector-java</artifactId>
            <scope>runtime</scope>
        </dependency>
        <dependency>
            <groupId>org.springframework.boot</groupId>
            <artifactId>spring-boot-starter-test</artifactId>
            <scope>test</scope>
        </dependency>
    </dependencies>

    <build>
        <plugins>
            <plugin>
                <groupId>org.springframework.boot</groupId>
                <artifactId>spring-boot-maven-plugin</artifactId>
            </plugin>
        </plugins>
    </build>

</project>
在resources/templates中新建一个html文件,文件内容如下:
<!-- upload.html -->
<!DOCTYPE html>
<html xmlns="http://www.w3.org/1999/xhtml" xmlns:th="http://www.thymeleaf.org" xmlns:sec="http://www.thymeleaf.org/thymeleaf-extras-springsecurity3">
<head>
    <meta charset="UTF-8" />
    <title>Insert title here</title>
</head>
<body>
<h1 th:inlines="text">文件上传</h1>
<form action="fileUpload" method="post" enctype="multipart/form-data">
    <p>选择文件: <input type="file" name="fileName"/></p>
    <p><input type="submit" value="提交"/></p>
</form>
</body>
</html>
新建一个Controller,注意在接收文件上传的Controller中,不能在类上加@RestController注解,而应使用@Controller:
// UploadFileController.java
package com.lzq.controller;

import org.springframework.stereotype.Controller;
import org.springframework.ui.Model;
import org.springframework.web.bind.annotation.*;
import org.springframework.web.multipart.MultipartFile;

import javax.servlet.http.HttpServletRequest;
import java.io.File;
import java.util.Map;

@Controller
public class UploadFileController {

    @RequestMapping("upload")
    public String goUpload(Map<String, Object> paramMap){
        return "upload";
    }

    @PostMapping("fileUpload")
    @ResponseBody
    public String fileUpload(HttpServletRequest req, @RequestParam("fileName")MultipartFile file, Model m) throws Exception{
        //2.不根据时间戳创建新的文件名,使用原始文件名
        String fileName = file.getOriginalFilename();
        //3.通过req.getServletContext().getRealPath("") 获取当前项目的真实路径,然后拼接前面的文件名
        String destFileName = req.getServletContext().getRealPath("") + "file" + File.separator + fileName;
        System.out.println("文件存放路径:" + destFileName);
        //4.第一次运行的时候,这个文件所在的目录往往是不存在的,这里需要创建一下目录(创建到了webapp下uploaded文件夹下)
        File destFile = new File(destFileName);
        destFile.getParentFile().mkdirs();
        //5.把浏览器上传的文件复制到希望的位置
        file.transferTo(destFile);
        //6.把文件名放在model里,以便后续显示用
        m.addAttribute("fileName", fileName);
        return "上传成功!";
    }

}
修改配置文件
# application.yml
spring:
thymeleaf:
cache: false
prefix: classpath:/templates/
mode: HTML5
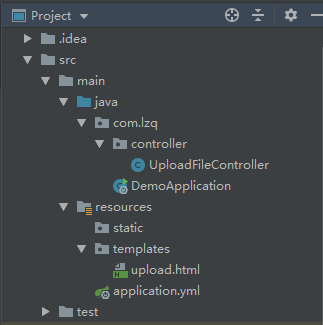
encoding: UTF-8项目结构:
2.文件下载
新建Controller写入代码
// DownFileController
package com.lzq.controller;


import org.springframework.web.bind.annotation.RequestMapping;

import javax.servlet.http.HttpServletResponse;
import java.io.*;

public class DownFileController {

    @RequestMapping("/download")
    public String downLoad(HttpServletResponse response) throws UnsupportedEncodingException {
        String filename="1.docx";
        String filePath = "D:/download" ;
        File file = new File(filePath + "/" + filename);
        if(file.exists()){ //判断文件父目录是否存在
            response.setContentType("application/vnd.ms-excel;charset=UTF-8");
            response.setCharacterEncoding("UTF-8");
            // response.setContentType("application/force-download");
            response.setHeader("Content-Disposition", "attachment;fileName=" +   java.net.URLEncoder.encode(filename,"UTF-8"));
            byte[] buffer = new byte[1024];
            FileInputStream fis = null; //文件输入流
            BufferedInputStream bis = null;

            OutputStream os = null; //输出流
            try {
                os = response.getOutputStream();
                fis = new FileInputStream(file);
                bis = new BufferedInputStream(fis);
                int i = bis.read(buffer);
                while(i != -1){
                    os.write(buffer);
                    i = bis.read(buffer);
                }

            } catch (Exception e) {
                // TODO Auto-generated catch block
                e.printStackTrace();
            }
            System.out.println("----------file download---" + filename);
            try {
                bis.close();
                fis.close();
            } catch (IOException e) {
                // TODO Auto-generated catch block
                e.printStackTrace();
            }
        }
        return null;
    }
}
3.大数据之Kettle入门
Kettle是一个基于JAVA、开源的、绿色的ETL(Extract-Transform-Load)工具。企业或行业应用经常会遇到各种数据的处理,转换,迁移,ELT工具将这些工作进行简化,大大减少了研发工作量。
注:此工具需要JDK环境
- 准备工作
为便于学习理解Kettle的工作内容,首先新建一个数据库kettle,并插入一些数据
-- 在MySQL客户端或Navicat中执行
create database kettle;
use kettle;
create table stu1 (id int ,name varchar(20),age int);
create table stu2 (id int ,name varchar(20));
insert into stu1 values(1001,"zhangsan",20),(1002,"lisi",18),(1003,"wangwu",23);
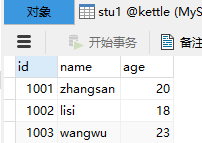
insert into stu2 values(1001,"wukong");stu1表:
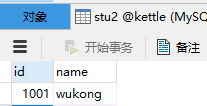
stu2表:
下面通过一个案例来了解它最基本的转换
-
案例一
把stu1的数据按id同步到stu2,stu2有相同id则更新数据
操作步骤
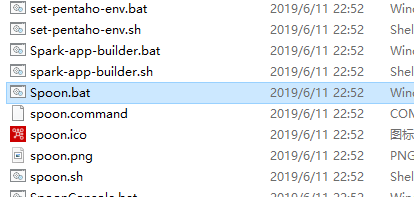
双击Spoon.bat,启动图形化界面工具
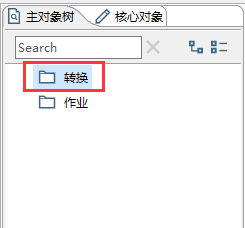
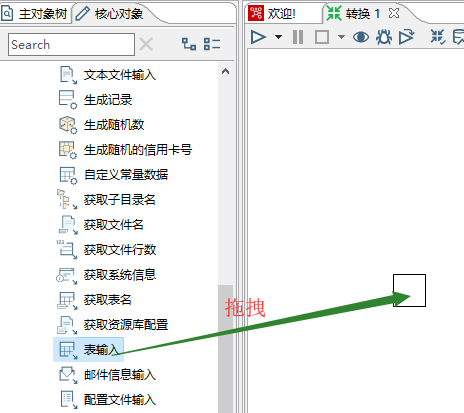
双击图中“转换”到核心对象界面,点击左侧“输入”,将下面“表输入”拖拽到中间
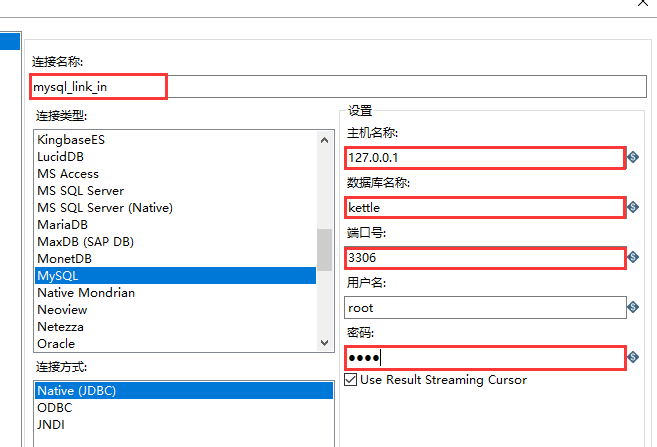
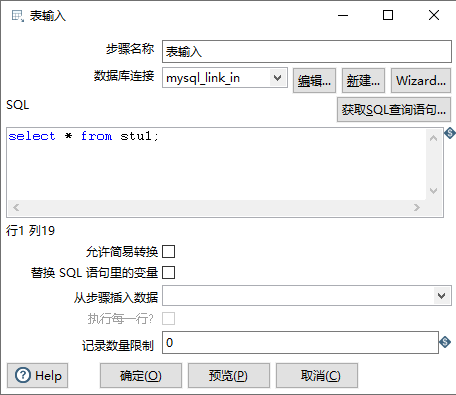
双击表输入,点击“新建”按钮,进行mysql数据库练级配置(注意jar包mysql-connector-java-5.1.34-bin.jar要放在kettle的lib文件夹中),然后点击“确认”
输入SQL语句
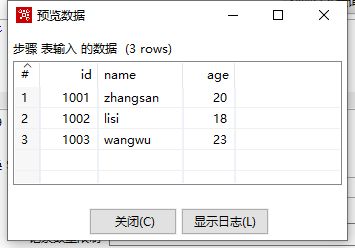
select * from stu1;点击确定
点击“预览”可以看到数据
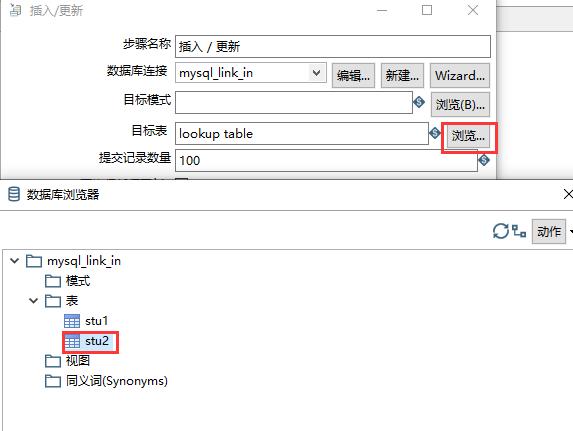
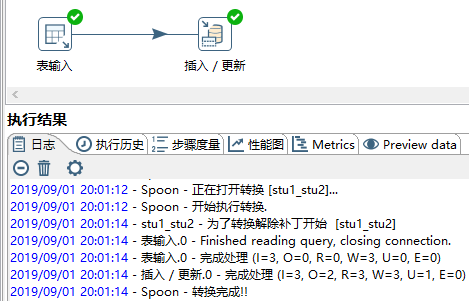
在左侧“输出”中找到“插入/更新”组件拖拽到中间,鼠标放在“表输入”上按住shift+鼠标左键连接到插入/更新组件上

双击“插入/更新”,点击目标表浏览,选择stu2
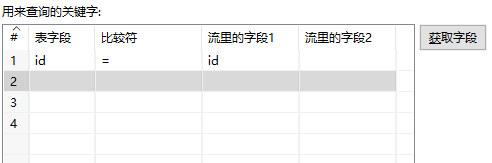
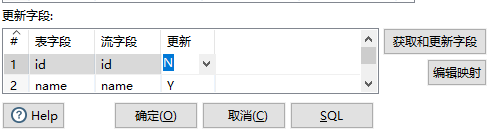
点击获取字段获取到3个字段,由于stu1与stu2通过id关联,故删除另2个字段,只留ID
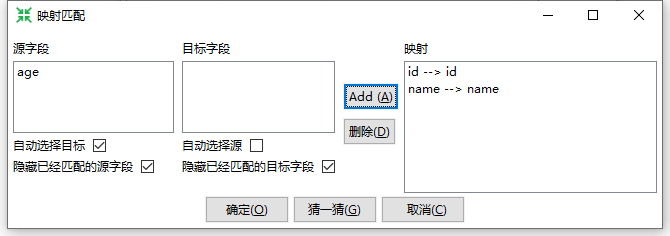
然后点击编辑映射,编辑2个表之间的映射
更新处,修改id的属性为n,确定
保存运行,成功截图如下。然后到数据库中查看结果。
-
案例二
使用作业执行上述转换,并且额外在表stu2中添加一条数据
新建一个作业
操作步骤
双击“作业”进入作业编辑界面
 、
、
在左侧中找到“Start”、“转换”和“SQL”组件,拖拽至作业编辑面板中

然后按住Shift+鼠标左键将三个组件连接
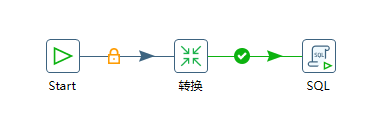
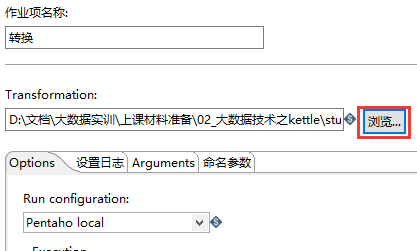
双击“转换”,点击“浏览”将选择案例一中所保存的文件
双击“SQL”编辑数据库连接,然后在SQL脚本中输入。点击确定
insert into stu2 values(1005,'stu2');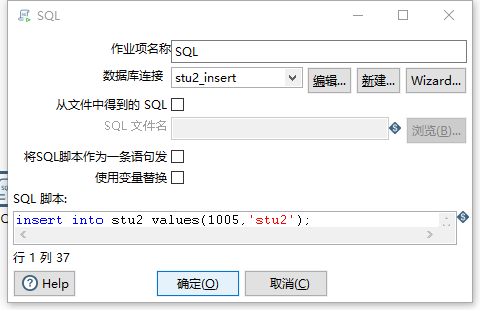
然后Ctrl+S保存,点击三角按钮运行即可。
-
案例三
将hr数据库中的employees表,经过ETL过程,导入到scott数据库中;将列FIRST_NAME和LAST_NAME相连,中间用空格隔开,取名为“NAME”;将列PHONE_NUMBER中的区号加上括号(例如515.123.4567改为(515)123.4567),列名不变;在scott数据库中,该表的列名不变,表名改为dw_dim_employees。
数据: hr.sql scott.sql
操作步骤
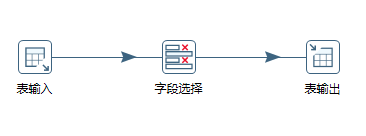
同样地,双击“转换”在左侧找到“表输入”、“字段选择”、“表输出”三个控件拖拽至中间,并按如图所示连接
双击“表输入”,点“新建”配置数据库连接,数据库名为hr

在SQL框中输入以下SQL语句:
SELECT
EMPLOYEE_ID
, CONCAT(FIRST_NAME,' '
, LAST_NAME) AS NAME
, EMAIL
, CONCAT('(',SUBSTR(PHONE_NUMBER,1,3),')',SUBSTR(PHONE_NUMBER,5)) AS PHONE_NUMBER
, HIRE_DATE
, JOB_ID
, SALARY
, COMMISSION_PCT
, MANAGER_ID
, DEPARTMENT_ID
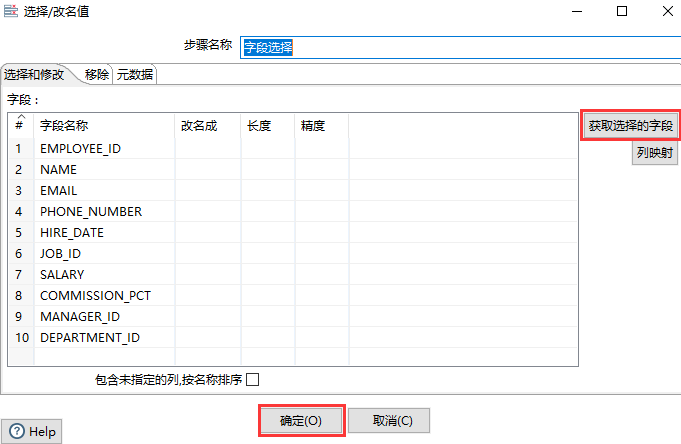
FROM employees双击字段选择,点击获取选择的字段,得到10个字段后点击确定
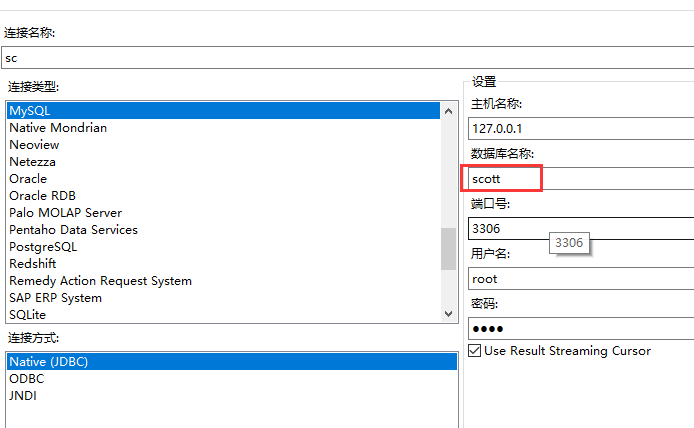
双击“表输出”配置数据库连接,数据库名为scott
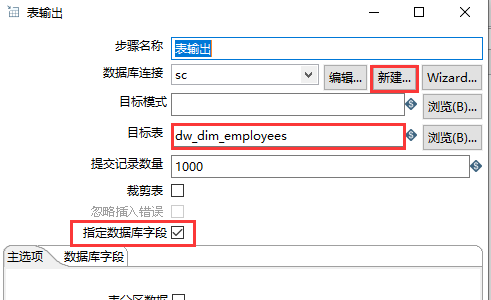
回到表输出界面,在目标表中填写表名:dw_dim_employees,勾选“指定数据库字段”
点击下面“数据库字段”,点击“获取字段”。
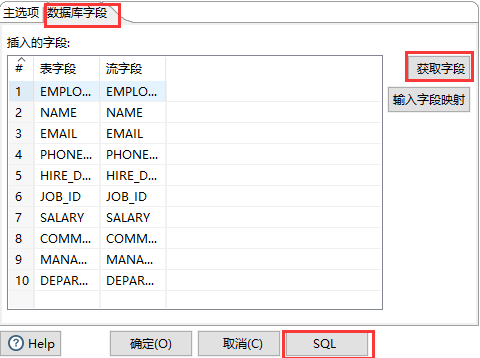
点击右下角SQL按钮,执行,确定。
最后点击三角按钮运行


 1万+
1万+

 被折叠的 条评论
为什么被折叠?
被折叠的 条评论
为什么被折叠?
 到【灌水乐园】发言


