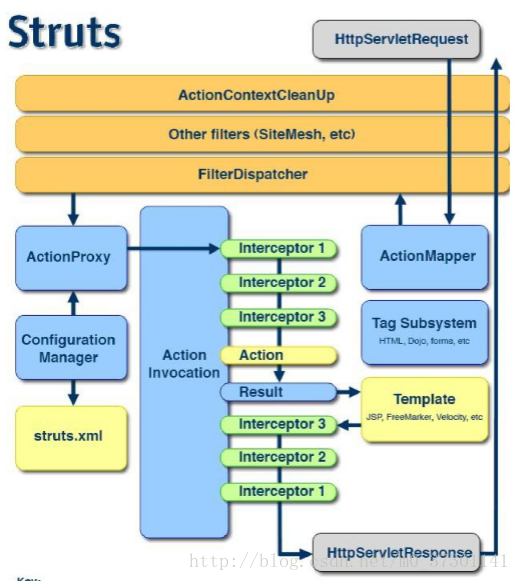
1.自定义拦截器
(1)架构
(2)拦截器创建
创建方式1:
package cn.itheima.a_interceptor;
import com.opensymphony.xwork2.ActionInvocation;
import com.opensymphony.xwork2.interceptor.Interceptor;
public class MyInterceptor1 implements Interceptor{
public void destroy() {
}
public void init() {
}
public String intercept(ActionInvocation arg0) throws Exception {
return null;
}
}
创建方式2:
package cn.itheima.a_interceptor;
import com.opensymphony.xwork2.ActionInvocation;
import com.opensymphony.xwork2.interceptor.AbstractInterceptor;
public class MyInterceptor2 extends AbstractInterceptor{
@Override
public String intercept(ActionInvocation invocation) throws Exception {
return null;
}
}
创建方式3:
package cn.itheima.a_interceptor;
import com.opensymphony.xwork2.ActionInvocation;
import com.opensymphony.xwork2.interceptor.Interceptor;
import com.opensymphony.xwork2.interceptor.MethodFilterInterceptor;
/**
* 继承MethodFilterInterceptor,方法过滤器
* 功能:定制拦截器拦截的方法
* 定制拦截器需要拦截哪些方法
* 定制拦截器不需要拦截哪些方法
* @author dell-111
*
*/
public class MyInterceptor3 extends MethodFilterInterceptor{
@Override
protected String doIntercept(ActionInvocation invocation) throws Exception {
System.out.println("MyInterceptor3前处理");
invocation.invoke();
System.out.println("MyInterceptor3后处理");
return "";
}
}
(3)拦截器api
1.放行
invocation.invoke();
2.前后处理
System.out.println("MyInterceptor3前处理")
//放行
invocation.invoke()
System.out.println("MyInterceptor3后处理")
3.不放行,直接跳转到下一个结果页面
  不执行后续的拦截器以及Action,直接交给Result处理结果.进行页面跳转
return "success";
(4)拦截器配置
步骤1:注册拦截器
<interceptor name="myInter3" class="cn.itheima.a_interceptor.MyInterceptor3"></interceptor>
步骤2:配置拦截器栈
<interceptor-stack name="myStack">
<interceptor-ref name="myInter3">
<param name="includeMethods">add,delete</param>
</interceptor-ref>
<interceptor-ref name="defaultStack"></interceptor-ref>
</interceptor-stack>
步骤3:指定包中默认拦截器栈
<default-interceptor-ref name="myStack"></default-interceptor-ref>
<action name="Demo1Action_*" class="cn.itheima.a_interceptor.Demo1Action" method="{1}">
<result name="success" type="dispatcher">/hello.jsp</result>
</action>
如何定制拦截方法
<param name="includeMethods">add,delete</param>
全局结果集

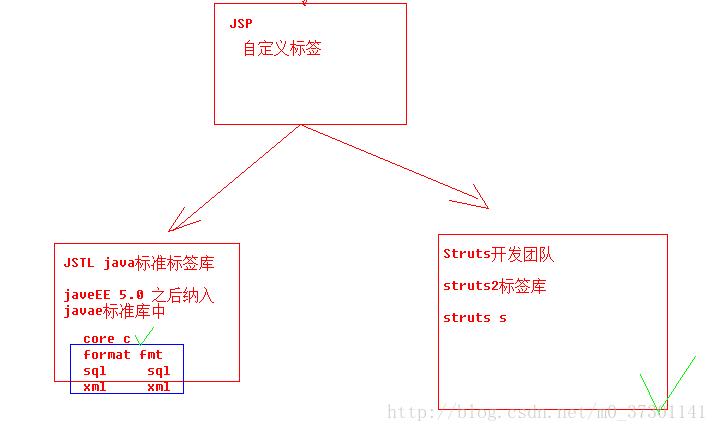
2.struts2标签(了解)
(1)标签体系
(2)struts2标签体系
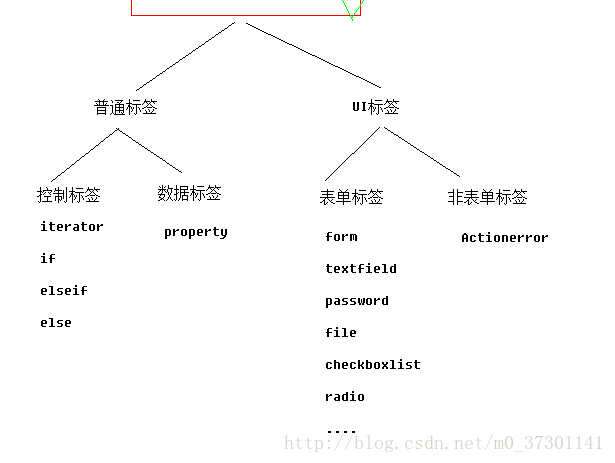
(3)控制标签
<br>
<s:iterator value="#list">
<s:property/><br>
</s:iterator>
<br>
<s:iterator value="#list" var="name">
<s:property value="#name"/><br>
</s:iterator>
<br>
<s:iterator begin="1" end="100" step="1">
<s:property/>|
</s:iterator>
(4)数据标签
<s:property value="#list.size()"/>
<s:property value="#session.user.name"/>
(5)表单标签
<s:form action="Demo3Action" namespace="/" theme="xhtml">
<s:textfield name="name" label="用户名"></s:textfield>
<s:password name="password" label="密码"></s:password>
<s:radio list="{'男','女'}" name="gender" label="性别"></s:radio>
<s:radio list="#{1:'男',0:'女'}" name="gender1" label="性别"></s:radio>
<s:checkboxlist list="#{2:'苹果',1:'梨',0:'香蕉'}" name="hobby" label="爱好"></s:checkboxlist>
<s:select list="#{2:'本科',1:'研究生',0:'博士' }" headerKey="" headerValue="---请选择---" name="edu" label="学历"></s:select>
<s:file name="photo" label="照片"></s:file>
<s:textarea name="desc" label="个人简介"></s:textarea>
<s:submit value="提交"></s:submit>
</s:form>
(6)非表单标签
this.addActionError("大哥错了");
取出错误信息
<s:actionerror/>


 3753
3753


 被折叠的 条评论
为什么被折叠?
被折叠的 条评论
为什么被折叠?
 到【灌水乐园】发言


