


文章目录
一、html+css+js 填写表单实现下一步上一步操作
来源:https://blog.csdn.net/qq_37591637/article/details/88983516
<!DOCTYPE html>
<html>
<head>
<meta charset="utf-8">
<title>Bootstrap 实例 - 带语境色彩的面板</title>
<link rel="stylesheet" href="https://cdn.staticfile.org/twitter-bootstrap/3.3.7/css/bootstrap.min.css">
<script src="https://cdn.staticfile.org/jquery/2.1.1/jquery.min.js"></script>
<script src="https://cdn.staticfile.org/twitter-bootstrap/3.3.7/js/bootstrap.min.js"></script>
</head>
<style>
#step1{
display : block;
}
#step2,#step3{
display: none;
}
#step1,#step2,#step3{
position: absolute;
width: 100%;
height: 40%;
left: 2%;
top:10%;
}
</style>
<body>
<!-- 下一步,下一步 -->
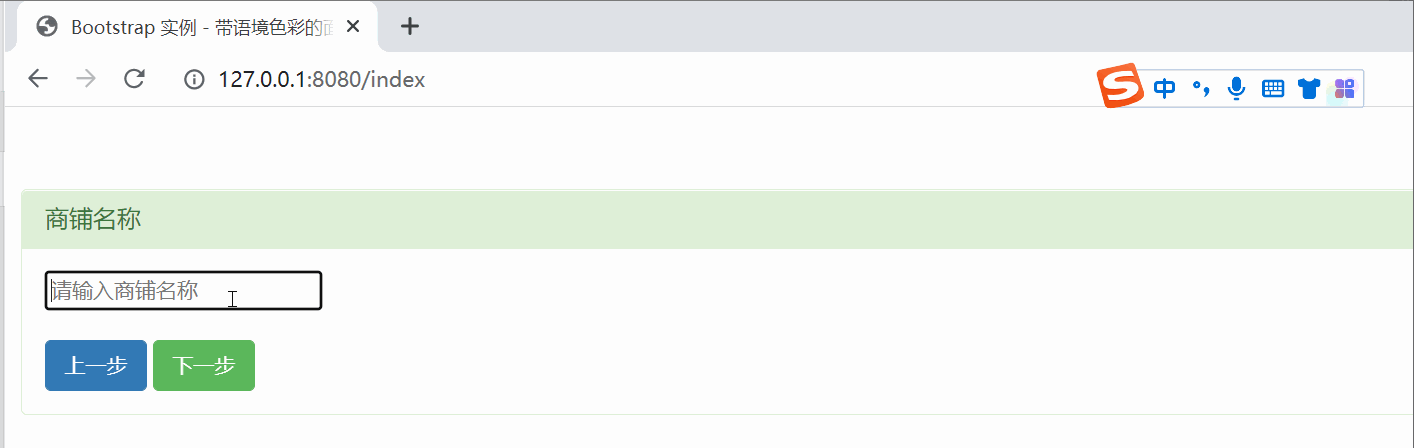
<div id="step1" >
<div class="panel panel-success">
<div class="panel-heading">
<h3 class="panel-title">商铺名称</h3>
</div>
<div class="panel-body">
<input type="text" placeholder="请输入商铺名称"/><br><br>
<button type="button" class="btn btn-primary">上一步</button>
<button type="button" class="btn btn-success" onclick="getnext('step2')" >下一步</button>
</div>
</div>
</div>
<div id="step2">
<div class="panel panel-info">
<div class="panel-heading">
<h3 class="panel-title">手机号码</h3>
</div>
<div class="panel-body">
<input type="text" placeholder="手机号码"/><br><br>
<button type="button" class="btn btn-primary" onclick="getnext('step1')">上一步</button>
<button type="button" class="btn btn-success" onclick="getnext('step3')">下一步</button>
</div>
</div>
</div>
<div id="step3">
<div class="panel panel-info">
<div class="panel-heading">
<h3 class="panel-title">实体店地址</h3>
</div>
<div class="panel-body">
<input type="text" placeholder="地址"/><br><br>
<button type="button" class="btn btn-primary" onclick="getnext('step2')">上一步</button>
</div>
</div>
</div>
<!-- 下一步,下一步 -->
</body>
<script>
function getnext(i){
alert(i);
var sz=new Array("step1","step2","step3");
for(var j=0;j<sz.length;j++){
if(i==sz[j]){
document.getElementById(i).style.display="block";
}else{
document.getElementById(sz[j]).style.display="none";
}
}
}
</script>
</html>
二、JavaScript 中 style.display 属性
来源:https://www.pxcodes.com/Codes/158683783591873.html
<!DOCTYPE html>
<html>
<head>
    <title></title>
    <meta charset="utf-8">
</head>
<body>
<img id="style1" src="2022-11/0de335f7c3584b10bd3aad7ca457a2c320220925151003.jpg" width="150" height="150">
<br>
<input type="button" value="Hide" onclick="hide();"/>
<br>
<input type="button" value="Show" onclick="show();"/>

</body>
<script>
    function hide() {
        var e = document.getElementById("style1");
        e.style.display = "none";
    }
    function show(){
        var e = document.getElementById("style1");
        e.style.display = "block";
    }
</script>
</html>

三、html 静态页面传值的几种方法
来源:https://www.cnblogs.com/1998xujinren/p/11153912.html
当然有一种方式是在页面跳转前,先发个请求到后台将值存储到session中,跳转后再发个请求到后台取出。这种方式不仅仅慢而且还特别耗费资源。
以下有其他的几种方式:
方式1:使用拼接地址的方法。就是在跳转地址后面拼接参数。如下:
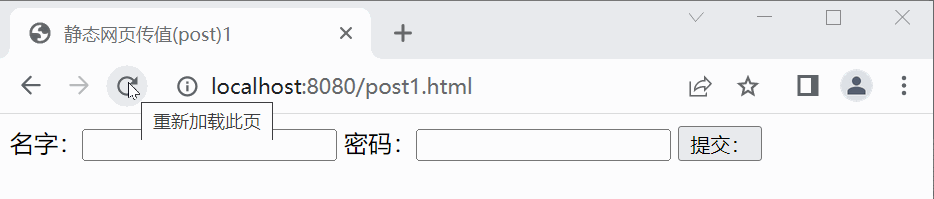
post1.html:
<!doctype html>
<html>
<head>
<meta charset="utf-8">
<title>静态网页传值(post)1</title>
<script>
    function click1(){
        var name = escape(document.getElementById("name").value);    //escape方法是改变编码
        var pwd = escape(document.getElementById("pwd").value);
        var url = "get1.html?"  + "name=" + name + "&pwd=" + pwd ; //进行拼接传值
        location.href=url;
    }
</script>
</head>
<body>
    名字:<input type="text" id="name"/>
    密码:<input type="text" id="pwd"/>
    <input type="button"  onclick="click1()" value="提交:"/>
</body>
</html>
get1.html:
<!doctype html>
<html>
<head>
<meta charset="utf-8">
<title>静态网页传值(get)1</title>
<script>
    function click1(){
        var url = location.search; //这一条语句获取了包括问号开始到参数的最后,不包括前面的路径
        var params = url.substr(1);//去掉问号
        var pa = params.split("&");
        var s = new Object();
        for(var i = 0; i < pa.length; i ++){
            s[pa[i].split("=")[0]] = unescape(pa[i].split("=")[1]);
        }
        document.getElementById("name").value =s.name;
        document.getElementById("pwd").value = s.pwd;
    }
    /*
        这种传值的方式很方便,而且简单有效,但是缺点是受到url长度的限制,由于每个浏览器对url长度的限制不同,这里不好给出一个确定的限制,
        只知道这个传值传的数据量不能太大。
    */
</script>

</head>

<body>
    名字:<input type="text" id="name"/>
    密码:<input type="text" id="pwd"/>
    <input type="button"  onclick="click1()" value="获取:"/>
</body>
</html>
这种方法简单有效,但是数据量有限制。
从地址栏获取参数的手段,但是还有其他的手段。
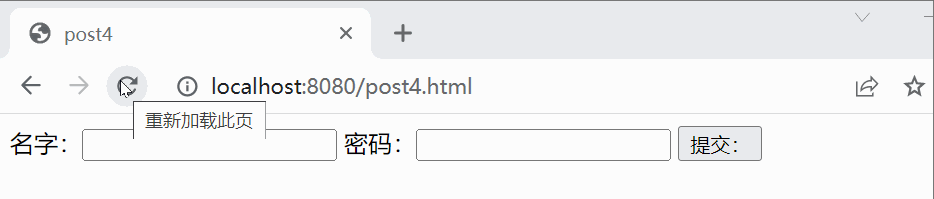
post4.html:
<!doctype html>
<html>
<head>
    <meta charset="utf-8">
    <title>post4</title>

    <script>
        function click1(){
            var name = document.getElementById("name").value;
            var pwd = document.getElementById("pwd").value;
            //如果这里传了中文,而且传的时候没有编码,怎么办?get页面接收的时候会乱码的。如何处理?详见get4.html
            //注意:这里拼接的是用#号
            location.href="get4.html#name=" + name + "&pwd=" + pwd;
        }
    </script>
</head>

<body>
名字:<input type="text" id="name"/>
密码:<input type="text" id="pwd"/>
<input type="button"  onclick="click1()" value="提交:"/>
</body>
</html>
get4.html:
<!doctype html>
<html>
<head>
    <meta charset="utf-8">
    <title>get4</title>
    <script>
        function click1(){
            var data = location.hash; //location.hash获取的是#号开始的所有字符串,包括#号,hash 属性是一个可读可写的字符串,      //该字符串是 URL 的锚部分(从 # 号开始的部分)。
            //如果传过来的是中文不经过编码的话,这里就会出现乱码。如何解决?如下:
            data = decodeURI(data);
            var str_data = data.split("&");
            var name;
            var pwd ;

            name = str_data[0].split("=")[1];
            pwd = str_data[1].split("=")[1];

            document.getElementById("name").value = name;
            document.getElementById("pwd").value = pwd;
        }
    </script>
</head>
<body>
名字:<input type="text" id="name"/>
密码:<input type="text" id="pwd"/>
<input type="button"  onclick="click1()" value="获取:"/>
</body>
</html>
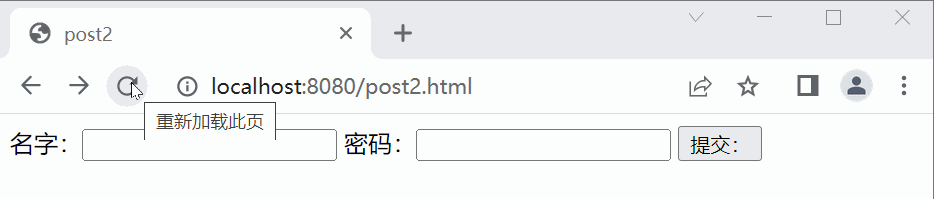
方式2:使用本地存储的cookie。
post2.html:
<!doctype html>
<html>
<head>
    <meta charset="utf-8">
    <title>post2</title>
    <script>
        function click1(){
            var name = document.getElementById("name").value;
            var pwd = document.getElementById("pwd").value;
            document.cookie = "name:" + name + "&pwd:" + pwd;
            location.href="get2.html";
        }
        /*
            关于cookie,要特别处理传过来的字符串,其次,还有些浏览器不支持cookie的,但目前来说,一般浏览器都支持cookie
        */
    </script>
</head>

<body>
名字:<input type="text" id="name"/>
密码:<input type="text" id="pwd"/>
<input type="button"  onclick="click1()" value="提交:"/>
</body>
</html>
get2.html:
<!doctype html>
<html>
<head>
    <meta charset="utf-8">
    <title>get2</title>
    <script>
        function click1(){
            var params= document.cookie;
            var pa = params.split("&");
            var s = new Object();
            for(var i = 0; i < pa.length; i ++){
                s[pa[i].split(":")[0]] = pa[i].split(":")[1];
            }
            document.getElementById("name").value =s.name;
            document.getElementById("pwd").value = s.pwd;
        }

    </script>
</head>
<body>
名字:<input type="text" id="name"/>
密码:<input type="text" id="pwd"/>
<input type="button"  onclick="click1()" value="获取:"/>
</body>
</html>
关于cookie就是要注意有些浏览器是不支持的,同时还需要注意cookie的时效的问题,cookie是可以设置失效时间的。关于cookie的解析也要注意一下。
方式3:localStorage
post3.html:
<!doctype html>
<html>
<head>
    <meta charset="utf-8">
    <title>post3</title>

    <script>
        function click1(){
            var name = document.getElementById("name").value;
            var pwd = document.getElementById("pwd").value;
            localStorage.setItem("name",name);
            localStorage.setItem("pwd",pwd);
            location.href="get3.html";
        }
    </script>
</head>

<body>
名字:<input type="text" id="name"/>
密码:<input type="text" id="pwd"/>
<input type="button"  onclick="click1()" value="提交:"/>
</body>
</html>
get3.html:
<!doctype html>
<html>
<head>
    <meta charset="utf-8">
    <title>get3</title>
    <script>
        function click1(){
            document.getElementById("name").value = localStorage.getItem("name");
            document.getElementById("pwd").value = localStorage.getItem("pwd");
        }
        /*
            方便简单, 但是要考虑浏览器的版本支持
        */
    </script>
</head>
<body>
名字:<input type="text" id="name"/>
密码:<input type="text" id="pwd"/>
<input type="button"  onclick="click1()" value="获取:"/>
</body>
</html>
这种方法简单有效,同时还不需要字符串解析。非常的有意思。但是要注意浏览器的版本支持,所以在使用前请判断是否支持。
sessionStorage 和 localStorage 的区别是:
1、localStorage的存储时间是永久的,若想要删除,需要人为删除;存储大小一般为5M;
2、sessionStorage针对一个session进行数据存储,生命周期与session相同,当用户关闭浏览器后,数据将被删除。
注意:如果application.property 配置了 spring.resources.static-locations 参数可能会导致访问静态页面不成功。
四、javascript 中的打印方法有几种
在JavaScript 中,我们通常会使用以下三种方式来打印数据:
- 使用 window.alert() 写入警告框
- 使用 document.write() 写入 HTML 输出
- 使用 console.log() 写入浏览器控制台
<!DOCTYPE html>
<html>
<head>
    <meta charset="utf-8">
    <title>测试1</title>
</head>
<body>
<script>
    window.alert(5 + 6);
    document.write(5 + 6);
    console.log(5 + 6);
</script>
</body>
</html>

五、获取th:each 索引值并拼接字符串
    <div th:each="bean:${page.list}">
        <a th:href="@{'/detailDocById/' + ${bean.id} + '.do'}">
<!--            <span th:utext="${bean.title}"></span>-->
            <span th:utext="@{'第 ' + (${beanStat.index}+1) + ' 行数据'"></span>-->
        </a>
        <br/>
        <td th:utext="${bean.describe}"></td>
        <br/>
    </div>
注:用 th:text 不会解析 html,用 th:utext 会解析 html,在页面中显示相应的样式。
六、如何让两个div合在一起
父div上面使用:float: left; position: relative;
子div上使用:position: absolute; top:0px; left:0px; float: left;
七、设置img水平翻转
设置 img 标签的 class 属性为 mypic。在 css 标签内,通过 class 属性设置图片的样式。再使用 transform 属性通过 rotateY 让图片在Y轴旋转180度,从而实现图片的翻转。
    <style>
        .mypic{
            transform: rotateY(180deg);
        }
    </style>

	<img class="mypic" src="dhk_select.png">
八、给button设置背景透明
- 设置背景透明,设置
background: none;或者设置background-color:transparent;都可以达到透明的效果。 - 如果不要边框,设置
border: none; - 如果设置全透明,设置
opacity: 0;
注意:虽然这样做会让 button,变透明,但也只是改变了它的样式,它依旧存在于文档流,占空间的。
<input style="background: none; border: none; font-size: 18px" type="button" value="宽表明细查询" onclick="show();"/>
九、Button 按钮按下会陷进去效果
<!DOCTYPE html>
<html lang="en">
<head>
    <title></title>
    <meta charset="utf-8">

    <style type="text/css">
        .sty1 { border: 2px inset}
        .sty2 { border-style: outset}
    </style>
</head>
<body>

<script>
    function changeSty(){
        if(document.all.b1.className=="sty1")
            document.all.b1.className="sty2"
        else
            document.all.b1.className="sty1"
        document.all.b1.focus();
    }
</script>

<input type="button" name="b1" id="b1" value="按钮" class="sty1">
<input type="button" name="Submit2" value="切换" onclick="changeSty();">
</body>
</html>


 273
273


 被折叠的 条评论
为什么被折叠?
被折叠的 条评论
为什么被折叠?
 到【灌水乐园】发言


