


目录
1.软件架构
Apache APISIX 是一个动态、实时、高性能的云原生 API 网关。它构建于 NGINX + ngx_lua 的技术基础之上,充分利用了 LuaJIT 所提供的强大性能。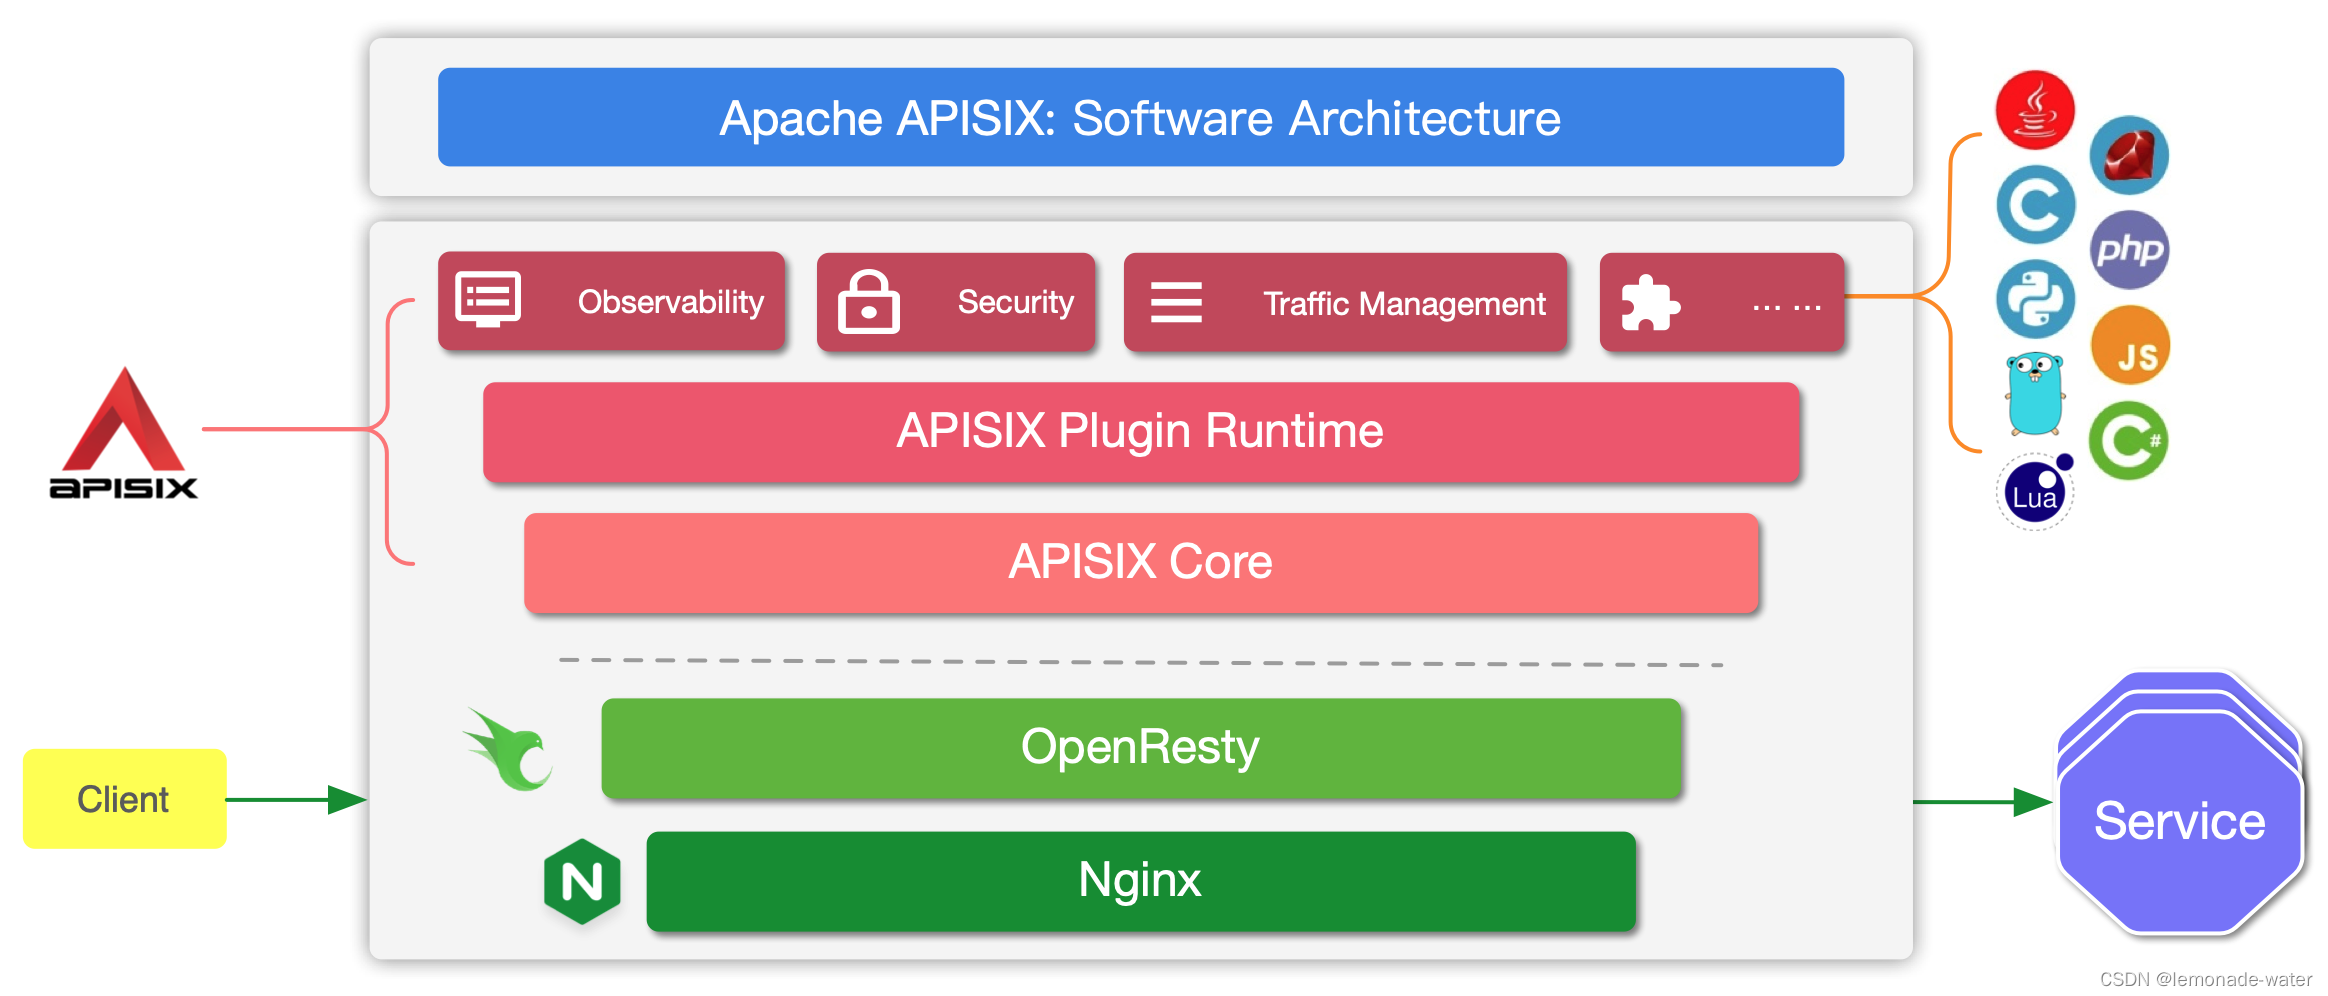
APISIX 主要分为两个部分:
1.APISIX 核心:包括 Lua 插件、多语言插件运行时(Plugin Runner)、Wasm 插件运行时等;
2.功能丰富的各种内置插件:包括可观测性、安全、流量控制等。
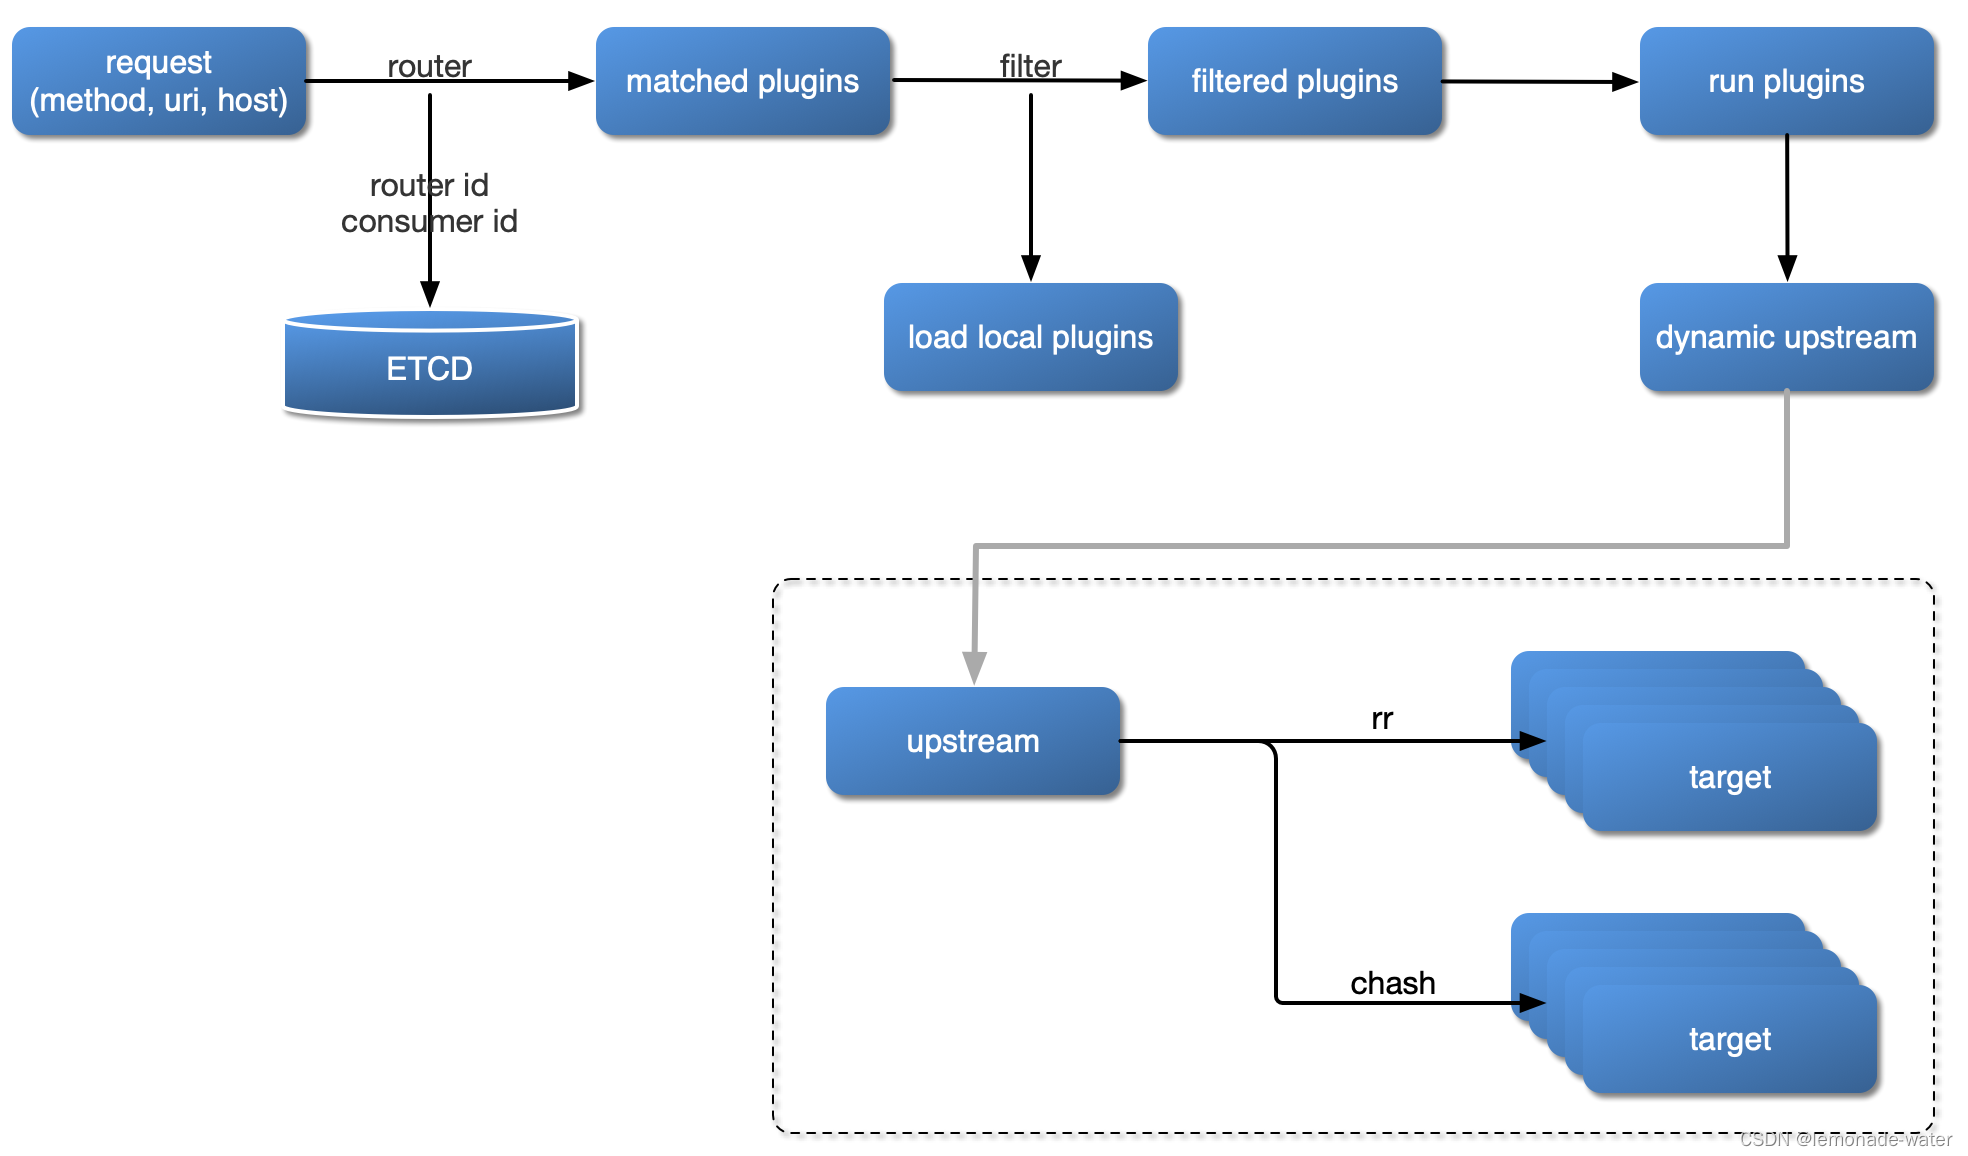
插件加载流程:
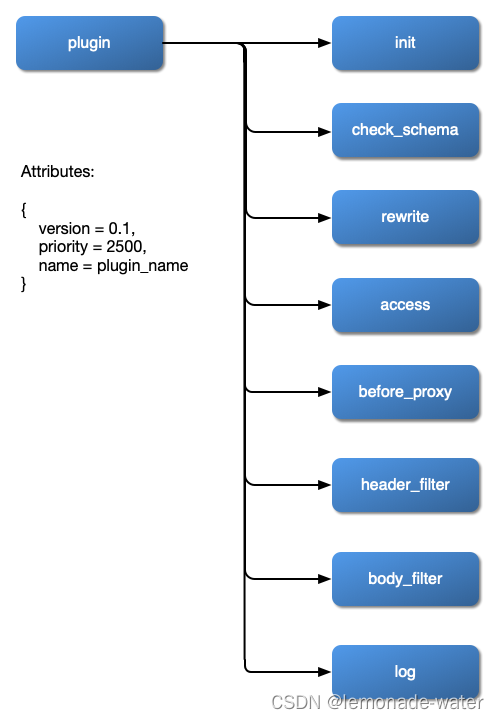
插件内部结构:
2.安装
前置条件:
需要linux服务器已经安装Docker。
快速安装
APISIX 可以借助 quickstart 脚本快速安装并启动:
curl -sL https://run.api7.ai/apisix/quickstart | sh
该命令启动 apisix-quickstart 和 etcd 两个容器,APISIX 使用 etcd 保存和同步配置。APISIX 和 etcd 容器使用 Docker 的 host 网络模式,因此可以从本地直接访问。
如果一切顺利,将输出如下信息:
✔ APISIX is ready!
经验建议
①先下载quickstart脚本,然后编辑一下apisix 的 静态资源数据卷
-v /datas/volume/apisix/apisix/html:/usr/local/apisix/html \
②quickstart脚本 需要判断一下apisix-quickstart-net是否存在
修改代码如下:
if docker network inspect "$DEFAULT_NET_NAME" > /dev/null 2>&1; then
echo "Docker network '$DEFAULT_NET_NAME' already exists."
else
docker network create -d bridge $DEFAULT_NET_NAME && echo_pass "network ${DEFAULT_NET_NAME} created" || {
echo_fail "Create network failed!"
return 1
}
fi
③先启动容器,为了后面的实践,需要把apisix容器的config.yaml通过docker cp 复制出来,方便 自定义 Nginx 配置
自定义 Nginx 配置 | Apache APISIX® – Cloud-Native API Gateway
④持久化etcd的配置。
1)先 授权数据卷
chown 1001:1001 /datas/volume/apisix/etcd/data
2)etcd, etcd.conf.yaml脚本:etcd/etcd.conf.yml.sample at main · etcd-io/etcd · GitHub
修改etcd.conf.yaml脚本,listen-client-urls 配置,修改为http://0.0.0.0:2379,信任所有ip
3)再修改quickstart脚本
增加了启动配置文件,–config-file,和持久化数据卷。
 docker run -d \
    --name ${DEFAULT_ETCD_NAME} \
    --network=$DEFAULT_NET_NAME \
    -e ALLOW_NONE_AUTHENTICATION=yes \
    -e ETCD_CONF_FILE=/opt/bitnami/etcd/conf/etcd.conf.yml \
    -v /datas/volume/apisix/etcd/data:/var/etcd \
    -v /datas/volume/apisix/etcd/conf/etcd.conf.yml:/opt/bitnami/etcd/conf/etcd.conf.yml \
    -e ETCD_ADVERTISE_CLIENT_URLS=http://${DEFAULT_ETCD_NAME}:${DEFAULT_ETCD_LISTEN_PORT} \
    ${DEFAULT_ETCD_IMAGE_NAME}:${DEFAULT_ETCD_IMAGE_TAG} /opt/bitnami/etcd/bin/etcd --config-file=/opt/bitnami/etcd/conf/etcd.conf.yml \
    && echo_pass "etcd is listening on ${DEFAULT_ETCD_NAME}:${DEFAULT_ETCD_LISTEN_PORT}" || {
    echo_fail "Start etcd failed!"
    return 1
  }
验证
可以通过 curl 来访问正在运行的 APISIX 实例。比如,你可以发送一个简单的 HTTP 请求来验证 APISIX 运行状态是否正常:
curl "http://127.0.0.1:9080" --head | grep Server
如果一切顺利,将输出如下信息:
Server: APISIX/Version
这里的 Version 是指你已经安装的 APISIX 版本,比如 APISIX/3.3.0。
现在,你已经成功安装并运行了 APISIX!
关键信息
请确保其他系统进程没有占用 9080、9180、9443 和 2379 端口。
9080:是访问网页端口
9180:是Admin api端口
注意防火墙对外开放端口!
3.初识
3.1.通过Admin API方式,创建一个路由
curl "http://127.0.0.1:9180/apisix/admin/routes/1" -X PUT -d '
{
  "methods": ["GET"],
  "host": "test.example.com",
  "uri": "/anything/*",
  "upstream": {
    "type": "roundrobin",
    "nodes": {
      "httpbin.org": 1
    }
  }
}'
该配置意味着,当请求满足下述的所有规则时,请求将被转发到上游服务(httpbin.org:80):
- 请求的 HTTP 方法为 GET。
- 请求头包含 host 字段,且它的值为 test.example.com。
- 请求路径匹配 /anything/, 意味着任意的子路径,例如 /anything/foo?arg=10。
- roundrobin表示轮询负载均衡方式
当路由创建完成后,可以通过以下命令访问上游服务:
curl -i -X GET "http://127.0.0.1:9080/anything/foo?arg=10" -H "Host: test.example.com"
该请求将被 APISIX 转发到 http://httpbin.org:80/anything/foo?arg=10。
3.2.通过Admin API方式,使用上游服务创建路由
你可以通过以下命令创建一个上游,并在路由中使用它,而不是直接将其配置在路由中:
curl "http://127.0.0.1:9180/apisix/admin/upstreams/1" -X PUT -d '
{
  "type": "roundrobin",
  "nodes": {
    "httpbin.org": 1
  }
}'
该上游配置与上一节配置在路由中的上游相同。同样使用了 roundrobin 作为负载均衡机制,并设置了 httpbin.org 为上游服务。为了将该上游绑定到路由,此处需要把 upstream_id 设置为 “1”。更多字段信息,请参考 Admin API。
上游服务创建完成后,可以通过以下命令绑定到指定路由:
curl "http://127.0.0.1:9180/apisix/admin/routes/1" -X PUT -d '
{
  "uri": "/get",
  "host": "httpbin.org",
  "upstream_id": "1"
}'
我们已经创建了路由与上游服务,现在可以通过以下命令访问上游服务:
curl -i -X GET "http://127.0.0.1:9080/get?foo1=bar1&foo2=bar2" -H "Host: httpbin.org"
3.3使用 APISIX Dashboard
(1).安装
docker pull apache/apisix-dashboard:2.13-alpine
docker run -d --name apisix-dashboard --network apisix-quickstart-net -p 9000:9000 -v <CONFIG_FILE>:/usr/local/apisix-dashboard/conf/conf.yaml apache/apisix-dashboard:2.13-alpine
!!请修改 <CONFIG_FILE> 目录为本地数据卷位置。
创建conf.yaml文件
#
# Licensed to the Apache Software Foundation (ASF) under one or more
# contributor license agreements.  See the NOTICE file distributed with
# this work for additional information regarding copyright ownership.
# The ASF licenses this file to You under the Apache License, Version 2.0
# (the "License"); you may not use this file except in compliance with
# the License.  You may obtain a copy of the License at
#
#     http://www.apache.org/licenses/LICENSE-2.0
#
# Unless required by applicable law or agreed to in writing, software
# distributed under the License is distributed on an "AS IS" BASIS,
# WITHOUT WARRANTIES OR CONDITIONS OF ANY KIND, either express or implied.
# See the License for the specific language governing permissions and
# limitations under the License.
#

# yamllint disable rule:comments-indentation
conf:
  listen:
    # host: 127.0.0.1     # the address on which the `Manager API` should listen.
                          # The default value is 0.0.0.0, if want to specify, please enable it.
                          # This value accepts IPv4, IPv6, and hostname.
    port: 9000            # The port on which the `Manager API` should listen.

  # ssl:
  #   host: 127.0.0.1     # the address on which the `Manager API` should listen for HTTPS.
                          # The default value is 0.0.0.0, if want to specify, please enable it.
  #   port: 9001            # The port on which the `Manager API` should listen for HTTPS.
  #   cert: "/tmp/cert/example.crt" # Path of your SSL cert.
  #   key:  "/tmp/cert/example.key"  # Path of your SSL key.

  allow_list:             # If we don't set any IP list, then any IP access is allowed by default.
  etcd:
    endpoints:            # supports defining multiple etcd host addresses for an etcd cluster
      #注意这里要修改!!!!!!
      - http://etcd-quickstart:2379
                          # yamllint disable rule:comments-indentation
                          # etcd basic auth info
    # username: "root"    # ignore etcd username if not enable etcd auth
    # password: "123456"  # ignore etcd password if not enable etcd auth
    mtls:
      key_file: ""          # Path of your self-signed client side key
      cert_file: ""         # Path of your self-signed client side cert
      ca_file: ""           # Path of your self-signed ca cert, the CA is used to sign callers' certificates
    # prefix: /apisix       # apisix config's prefix in etcd, /apisix by default
  log:
    error_log:
      level: warn       # supports levels, lower to higher: debug, info, warn, error, panic, fatal
      file_path:
        logs/error.log  # supports relative path, absolute path, standard output
                        # such as: logs/error.log, /tmp/logs/error.log, /dev/stdout, /dev/stderr
                        # such as absolute path on Windows: winfile:///C:\error.log
    access_log:
      file_path:
        logs/access.log  # supports relative path, absolute path, standard output
                         # such as: logs/access.log, /tmp/logs/access.log, /dev/stdout, /dev/stderr
                         # such as absolute path on Windows: winfile:///C:\access.log
                         # log example: 2020-12-09T16:38:09.039+0800    INFO    filter/logging.go:46    /apisix/admin/routes/r1    {"status": 401, "host": "127.0.0.1:9000", "query": "asdfsafd=adf&a=a", "requestId": "3d50ecb8-758c-46d1-af5b-cd9d1c820156", "latency": 0, "remoteIP": "127.0.0.1", "method": "PUT", "errs": []}
  max_cpu: 0             # supports tweaking with the number of OS threads are going to be used for parallelism. Default value: 0 [will use max number of available cpu cores considering hyperthreading (if any)]. If the value is negative, is will not touch the existing parallelism profile.
  # security:
  #   access_control_allow_origin: "http://httpbin.org"
  #   access_control_allow_credentials: true          # support using custom cors configration
  #   access_control_allow_headers: "Authorization"
  #   access_control-allow_methods: "*"
  #   x_frame_options: "deny"
  #   content_security_policy: "default-src 'self'; script-src 'self' 'unsafe-eval' 'unsafe-inline'; style-src 'self' 'unsafe-inline'; img-src 'self' data:; frame-src xx.xx.xx.xx:3000"  # You can set frame-src to provide content for your grafana panel.

authentication:
  secret:
    secret              # secret for jwt token generation.
                        # NOTE: Highly recommended to modify this value to protect `manager api`.
                        # if it's default value, when `manager api` start, it will generate a random string to replace it.
  expire_time: 3600     # jwt token expire time, in second
  users:                # yamllint enable rule:comments-indentation
    - username: admin   # username and password for login `manager api`
      password: admin
    - username: user
      password: user

oidc:
  enabled: false
  expire_time: 3600
  client_id: dashboard
  client_secret: dashboard
  auth_url: http://172.17.0.1:8080/auth/realms/master/protocol/openid-connect/auth
  token_url: http://172.17.0.1:8080/auth/realms/master/protocol/openid-connect/token
  user_info_url: http://172.17.0.1:8080/auth/realms/master/protocol/openid-connect/userinfo
  redirect_url: http://127.0.0.1:9000/apisix/admin/oidc/callback
  scope: openid

plugins:
  - api-breaker
  - authz-casbin
  - authz-casdoor
  - authz-keycloak
  - aws-lambda
  - azure-functions
  - basic-auth
  # - batch-requests
  - clickhouse-logger
  - client-control
  - consumer-restriction
  - cors
  - csrf
  - datadog
  # - dubbo-proxy
  - echo
  - error-log-logger
  # - example-plugin
  - ext-plugin-post-req
  - ext-plugin-post-resp
  - ext-plugin-pre-req
  - fault-injection
  - file-logger
  - forward-auth
  - google-cloud-logging
  - grpc-transcode
  - grpc-web
  - gzip
  - hmac-auth
  - http-logger
  - ip-restriction
  - jwt-auth
  - kafka-logger
  - kafka-proxy
  - key-auth
  - ldap-auth
  - limit-conn
  - limit-count
  - limit-req
  - loggly
  # - log-rotate
  - mocking
  # - node-status
  - opa
  - openid-connect
  - opentelemetry
  - openwhisk
  - prometheus
  - proxy-cache
  - proxy-control
  - proxy-mirror
  - proxy-rewrite
  - public-api
  - real-ip
  - redirect
  - referer-restriction
  - request-id
  - request-validation
  - response-rewrite
  - rocketmq-logger
  - server-info
  - serverless-post-function
  - serverless-pre-function
  - skywalking
  - skywalking-logger
  - sls-logger
  - splunk-hec-logging
  - syslog
  - tcp-logger
  - traffic-split
  - ua-restriction
  - udp-logger
  - uri-blocker
  - wolf-rbac
  - zipkin
  - elasticsearch-logge
  - openfunction
  - tencent-cloud-cls
  - ai
  - cas-auth
【解决问题】:运行报错:docker: Error response from daemon: failed to create task for container: failed to create shim task: OCI runtime create failed: runc create failed: unable to start container process: error during container init: error mounting “/datas/volume/apisix/dashboard/conf/conf.yaml” to rootfs at “/usr/local/apisix-dashboard/conf/conf.yaml”: mount /datas/volume/apisix/dashboard/conf/conf.yaml:/usr/local/apisix-dashboard/conf/conf.yaml (via /proc/self/fd/6), flags: 0x5000: not a directory: unknown: Are you trying to mount a directory onto a file (or vice-versa)? Check if the specified host path exists and is the expected type.
这是创建文件的失误,错误很明显,宿主机的config.yaml是一个文件夹,而容器内的conf.yaml是一个文件。
【解决问题】:docker 启动报错:panic: runtime error: invalid memory address or nil pointer dereference
[signal SIGSEGV: segmentation violation code=0x1 addr=0x10 pc=0xd33b7c]
解决办法:请把这个文件apisix-dashboard/api/conf/conf.yaml at master · apache/apisix-dashboard · GitHub 配置到服务器。如果出现报错:etcd get failed: context deadline exceeded。
参考地址:apisix-dashboard/api/conf/conf.yaml at master · apache/apisix-dashboard · GitHub
etcd启动时增加 --listen-client-urls ‘http://:2379’,示例是:apisix-quickstart-net
apisix启动配置etcd的地址改为上述地址即可
4.配置静态资源
4.1.apisix设置静态资源路由
1.quickstart脚本 需要配置一下apisix 的 静态资源数据卷,如果按照上面的建议已修改,请忽略!
-v /datas/volume/apisix/apisix/html:/usr/local/apisix/html \
2.在config.yaml中添加自定义路由(apisix会根据config.yaml配置最终生成nginx.conf)
下面文本注意缩进格式!!
nginx_config:
  error_log: "/dev/stderr"
  error_log_level: "debug"
  # warn,error
  worker_rlimit_nofile: 20480
  http_server_configuration_snippet: |
    location ~* \.(html|js|css|flash|media|jpg|png|gif|ico|lcov|json|txt)${
      root /usr/local/apisix/html;
    }
  http:
    access_log: "/dev/stdout"
    keepalive_timeout: 60s
    client_header_timeout: 60s
把这个文件复制到apisix-quickstart容器
docker cp ./config.yaml apisix-quickstart:/usr/local/apisix/conf/config.yaml
重启一下apisix-quickstart
docker restart apisix-quickstart
在数据卷下面建一个test.html,测试验证
curl http:/<APISIX_IP>:9080/test.html
4.插件优先级
Plugin 也称之为插件,它是扩展 APISIX 应用层能力的关键机制,也是在使用 APISIX 时最常用的资源对象。插件主要是在 HTTP 请求或响应生命周期期间执行的、针对请求的个性化策略。插件可以与路由、服务或消费者绑定。
注意
如果 路由、服务、插件配置 或消费者都绑定了相同的插件,则只有一份插件配置会生效,插件配置的优先级由高到低顺序是:消费者 > 路由 > 插件配置 > 服务。同时在插件执行过程中也会涉及 6 个阶段,分别是 rewrite、access、before_proxy、header_filter、body_filter 和 log。
上面的插件的优先级具体实践,可以体验 key-auth 插件,分别在消费者和路由新建都配置key,会发现消费者的key优先级更高。
5.更多实践
5.1. 反向代理
(1).proxy-rewrite插件
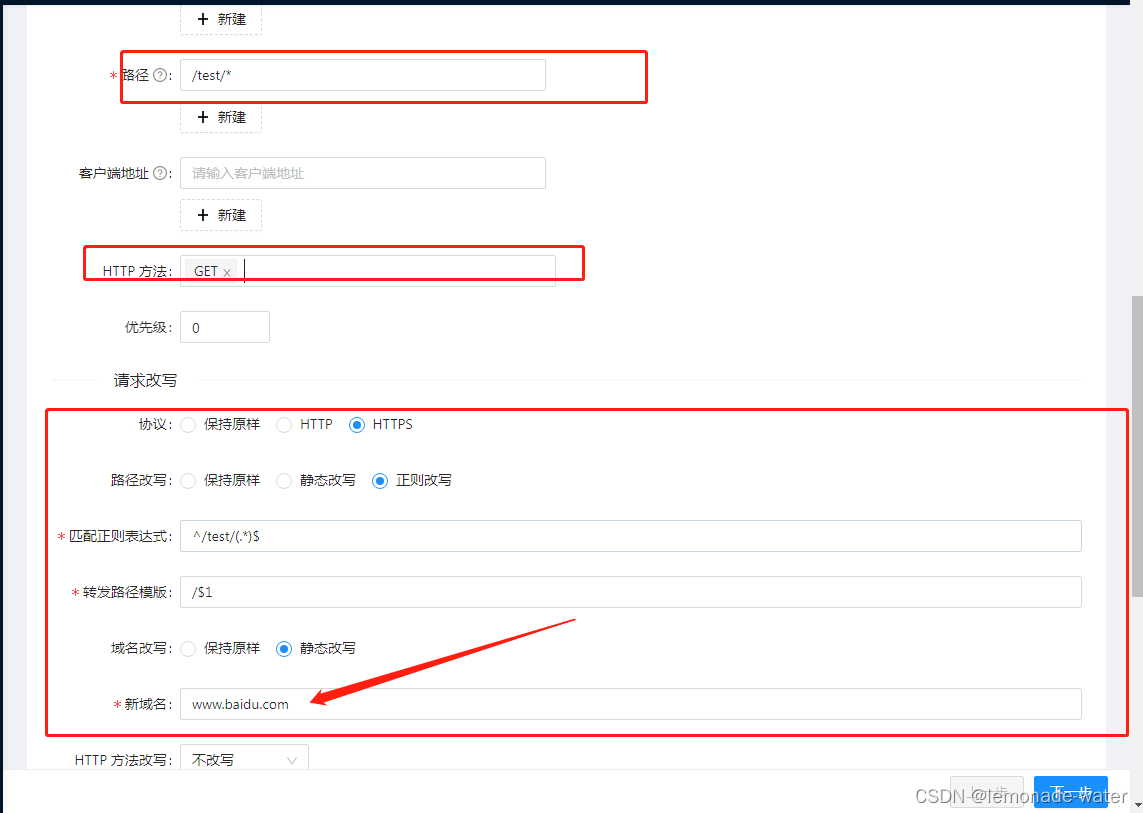
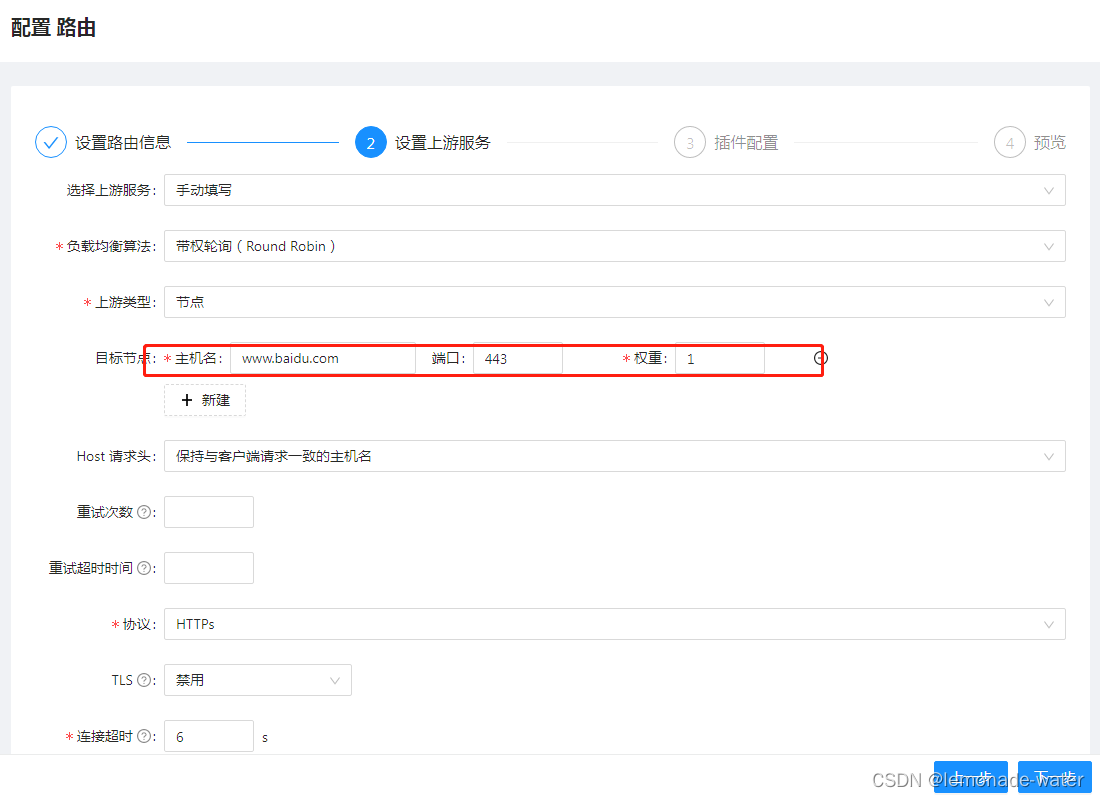
验证:
访问 http://:9080/test/index.html#/login 会转发到 www.baidu.com
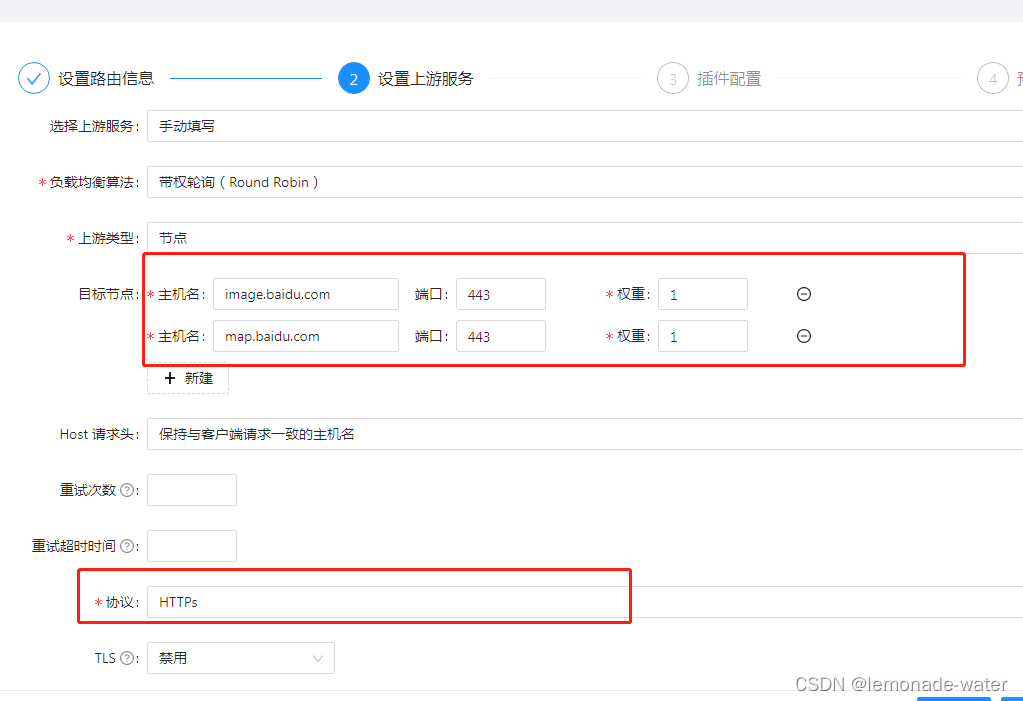
5.2. 负载均衡
通过请求 /test/ 负载均衡到 百度图片和百度地图

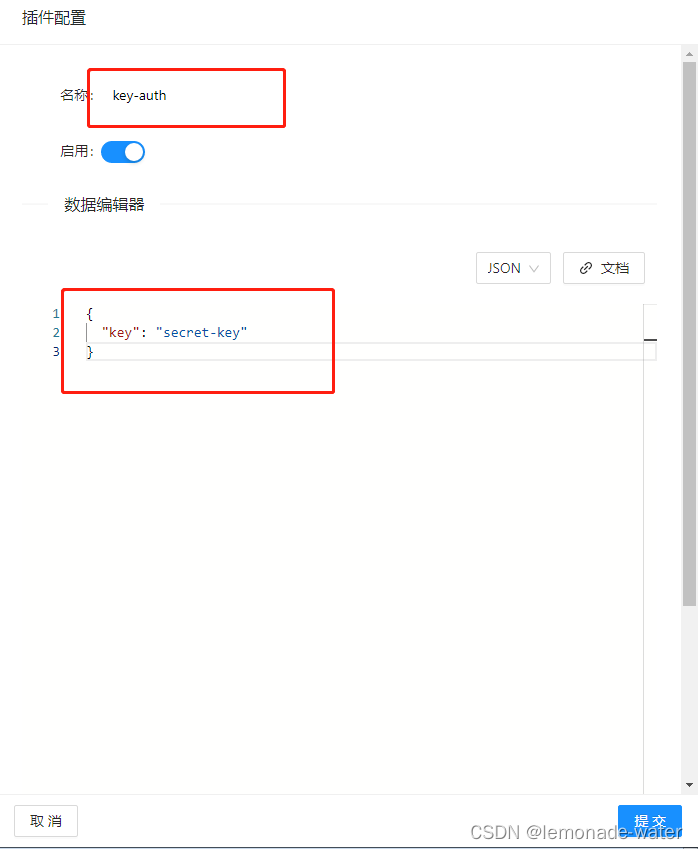
5.3. key-auth插件
API 网关主要作用是连接 API 消费者和提供者。出于安全考虑,在访问内部资源之前,应先对消费者进行身份验证和授权。
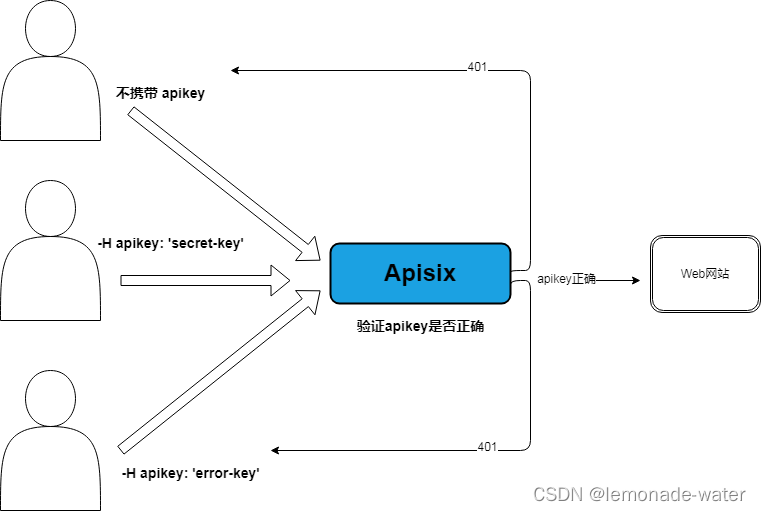
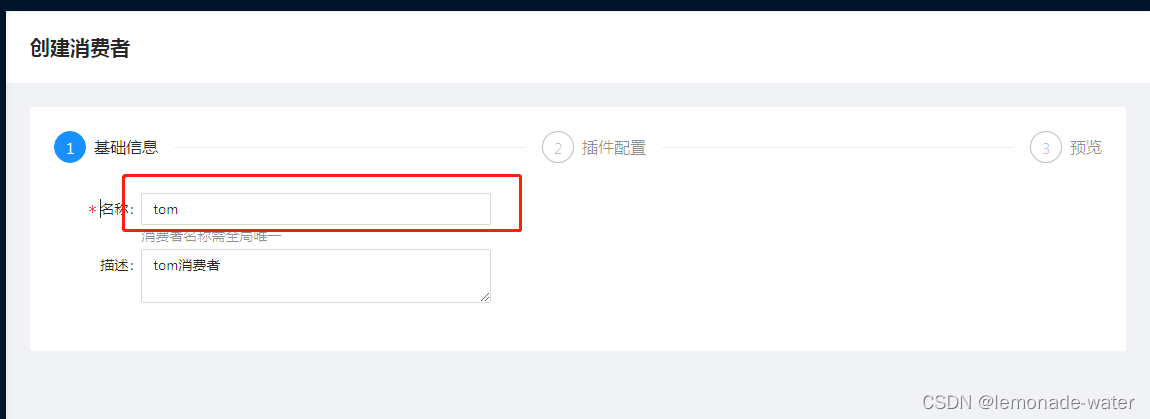
创建一个名为 tom 的消费者,并启用 key-auth 插件,密钥设置为 secret-key。所有携带密钥 secret-key 的请求都会被识别为消费者 tom。
选择key-auth插件,并且编辑如下json并保存。
注意:key-auth 需要配合 consumer 进行使用的!!!
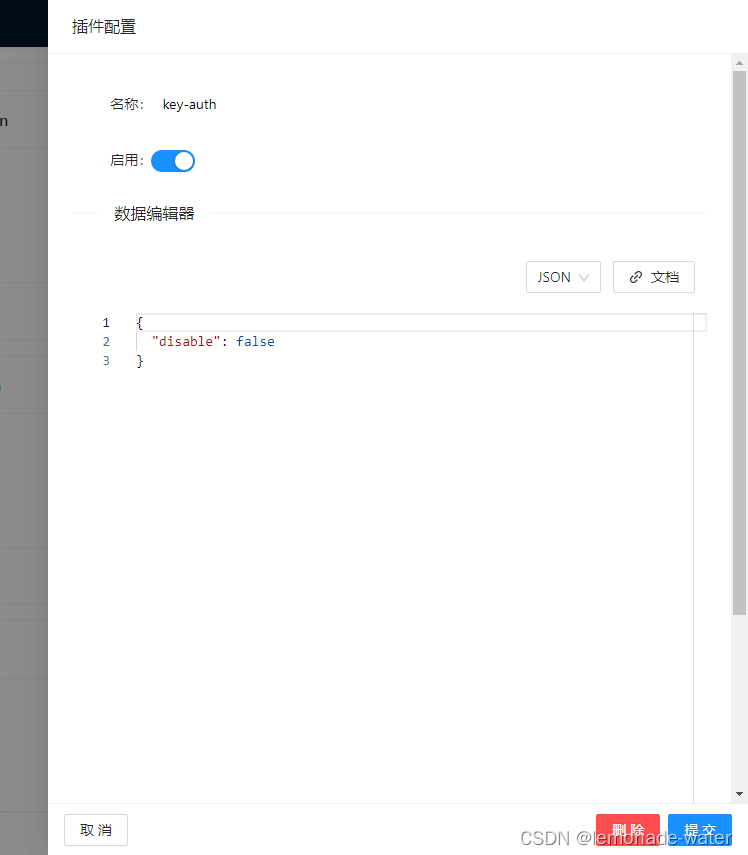
 给前面 /baidu 路由配置插件
通过请求 curl -i http://<APISIX_IP>:9080/baidu/ -H ‘apikey: secret-key’,能够进入百度首页。
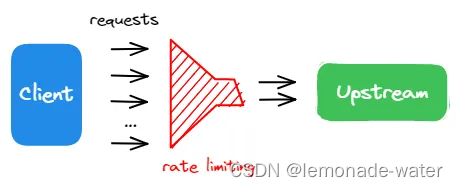
5.4. 流量控制插件
APISIX 是一个统一的控制中心,它管理 API 和微服务的进出流量。除了客户端发来的合理的请求,还可能存在网络爬虫产生的不必要的流量,此外,网络攻击(比如 DDos)也可能产生非法请求。
APISIX 提供限速功能,通过限制在规定时间内发送到上游服务的请求数量来保护 APIs 和微服务。请求的计数在内存中完成,具有低延迟和高性能的特点。
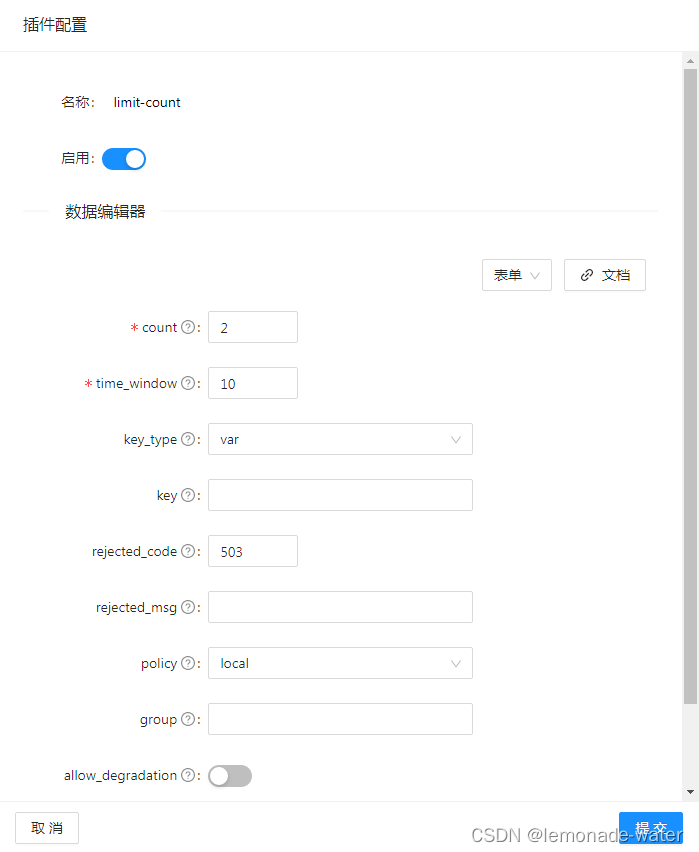
(1). limit-count插件
在本教程中,你将启用 limit-count 插件来限制传入流量的速率,limit-count主要用于在指定的时间范围内,限制每个客户端总请求个数。
给/baidu路由 添加如下插件配置,下列配置将传入流量的速率限制为每 10 秒最多 2 个请求,否则返回503。
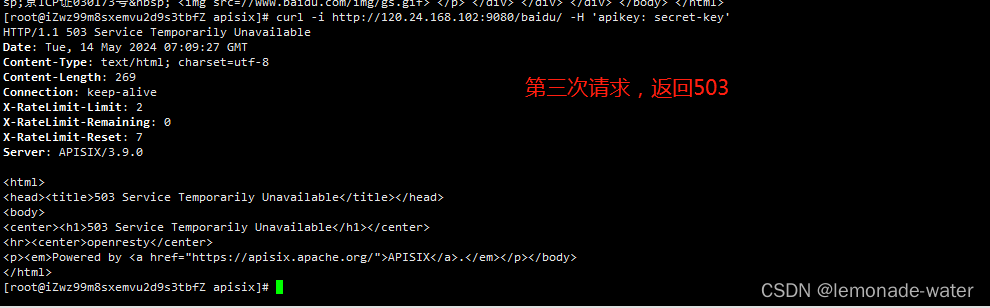
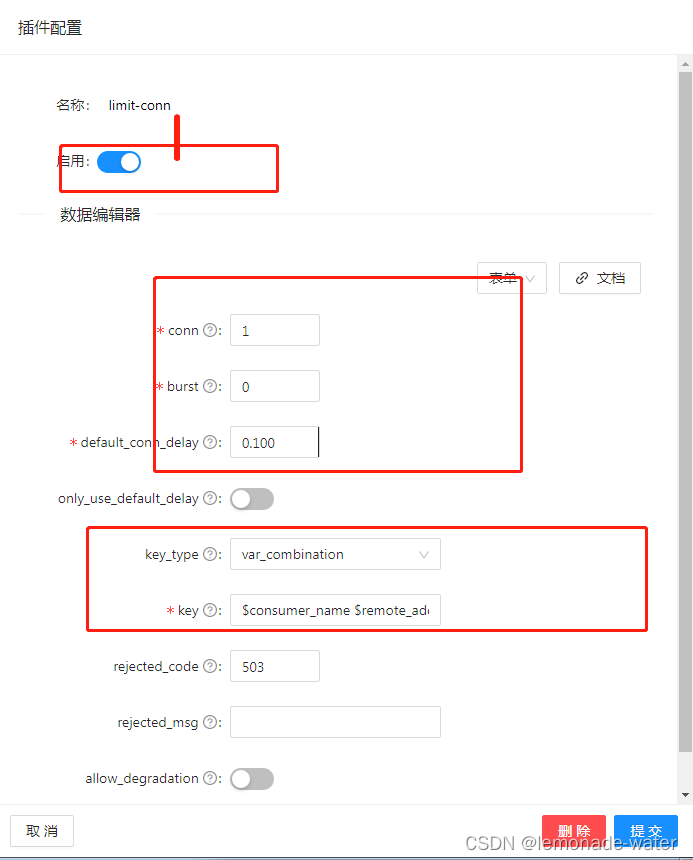
(2). limit-conn插件
limit-conn 插件主要用于限制客户端对服务的并发请求数。
两个请求一起,curl http://<APISIX_IP>:9080/baidu/?sleep=20 & curl http://<APISIX_IP>:9080/baidu/
就会出现503错误。
(3). client-control插件
该插件能够通过设置客户端请求体大小的上限来动态地控制 NGINX 处理客户端的请求。
描述
client-control 插件能够通过设置客户端请求体大小的上限来动态地控制 NGINX 处理客户端的请求。
重要
此插件需要 APISIX 在 APISIX-Runtime 环境上运行。更多信息请参考 apisix-build-tools。
6.参考文章
官网:https://apisix.apache.org/zh/
Apache APISIX v3.9 中文文档:https://www.bookstack.cn/read/apisix-3.9-zh/GettingStarted.md
Gihub:https://github.com/apache/apisix


 9228
9228

 被折叠的 条评论
为什么被折叠?
被折叠的 条评论
为什么被折叠?
 到【灌水乐园】发言


