


1 简介
1.1 架构
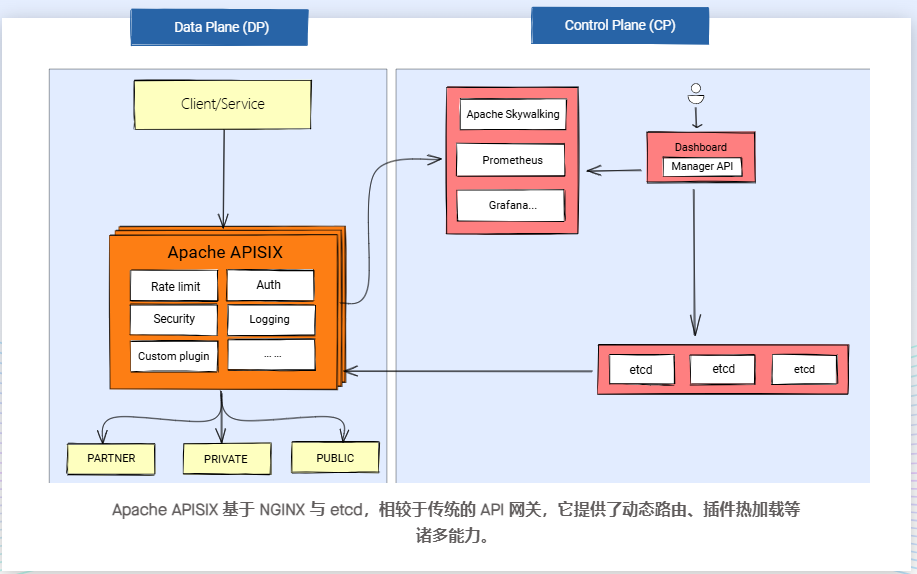
1.2 核心概念
- 上游(Upstream):可以理解为虚拟主机,对给定的多个目标服务按照配置规则进行负载均衡。
- 路由(Route):通过定义一些规则来匹配客户端的请求,然后对匹配的请求执行配置的插件,并把请求转发给指定的上游。
- 消费者(Consumer):作为API网关,有时需要知道API的消费方具体是谁,通常可以用来做身份认证。
- 服务(Service): 可以理解为一组路由的抽象。它通常与上游是一一对应的,路由与服务之间,通常是多对一的关系。
- 插件(Plugin):API网关对请求的增强操作,可以对请求增加限流、认证、黑名单等一系列功能。可以配置在消费者、服务和路由之上。
2 性能
2.1 同其它API网关的对比
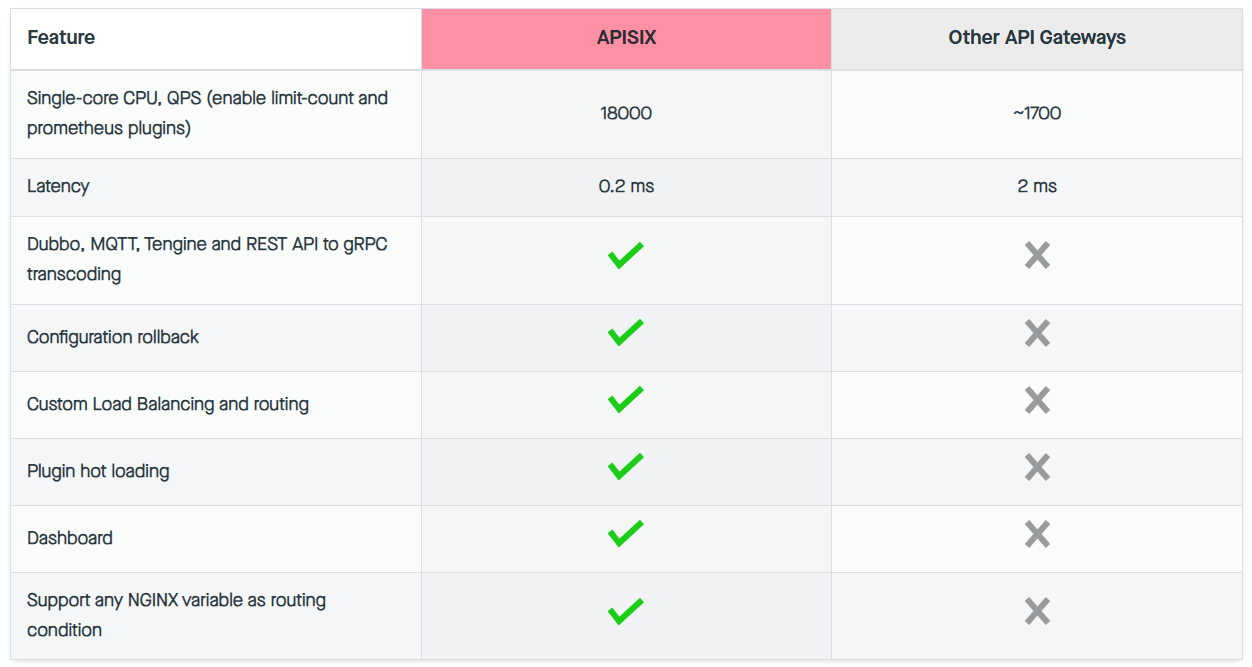
2.2 同Nginx的对比
-
根据一些测试结果,OpenResty社区成员分享提到,压力测试下,APISIX的性能下降大约15%。
2.3 扩展性
- 官方提供了 50 多个插件、常用的几个负载均衡选择器,以及对主流服务发现(如 Nacos 、Eureka和 DNS)的支持。
- 支持开发外部插件具体方法见官方文档
3 安装
- 本教程使用docker compose安装,请先安装docker和docker compose,具体教程不在本文范围。
- 24年6月份后可用的docker镜像地址推荐:https://docker.registry.cyou
- 注意:生产环境etcd请使用集群部署,并设置访问账号。
3.1 apisix 配置
./apisix/conf/config.yaml
# Licensed to the Apache Software Foundation (ASF) under one or more

# contributor license agreements.  See the NOTICE file distributed with

# this work for additional information regarding copyright ownership.

# The ASF licenses this file to You under the Apache License, Version 2.0

# (the "License"); you may not use this file except in compliance with

# the License.  You may obtain a copy of the License at

#

#     http://www.apache.org/licenses/LICENSE-2.0

#

# Unless required by applicable law or agreed to in writing, software

# distributed under the License is distributed on an "AS IS" BASIS,

# WITHOUT WARRANTIES OR CONDITIONS OF ANY KIND, either express or implied.

# See the License for the specific language governing permissions and

# limitations under the License.

#

# If you want to set the specified configuration value, you can set the new

# in this file. For example if you want to specify the etcd address:

#

# deployment:

#   role: traditional

#   role_traditional:

#     config_provider: etcd

#   etcd:

#     host:

#       - http://127.0.0.1:2379

#

# To configure via environment variables, you can use `${
   {VAR}}` syntax. For instance:

#

# deployment:

#   role: traditional

#   role_traditional:

#     config_provider: etcd

#   etcd:

#     host:

#       - http://${
   {ETCD_HOST}}:2379

#

# And then run `export ETCD_HOST=$your_host` before `make init`.

#

# If the configured environment variable can't be found, an error will be thrown.

#

# Also, If you want to use default value when the environment variable not set,

# Use `${
   {VAR:=default_value}}` instead. For instance:

#

# deployment:

#   role: traditional

#   role_traditional:

#     config_provider: etcd

#   etcd:

#     host:

#       - http://${
   {ETCD_HOST:=localhost}}:2379

#

# This will find environment variable `ETCD_HOST` first, and if it's not exist it will use `localhost` as default value.

#

apisix:

  node_listen: 9080

  enable_ipv6: false

  # enable_control: true

  # control:

  #   ip: 0.0.0.0

  #   port: 9091

  # ssl:

  #   enable: false

  #   listen:                                       # APISIX listening port for HTTPS traffic.

  #     - port: 9443

  #       enable_http2: true

      # - ip: 127.0.0.3                           # If not set, default to `0.0.0.0`.

      #   port: 9445

      #   enable_http2: true

    # ssl_trusted_certificate: /path/to/ca-cert   # Set the path to CA certificates used to verify client

                                                  # certificates in the PEM format.

    # ssl_protocols: TLSv1.2 TLSv1.3                # TLS versions supported.

deployment:

  role: traditional

  role_traditional:

    config_provider: etcd

  etcd:

    host:
	# 重要:改为自己etcd服务地址,生产环境需要配置多个节点地址
      - "http://172.18.1.55:2379"

    prefix: "/apisix"

    # user: apisix

    # password: apisix

    timeout: 30

  admin:

    admin_listen:

      port: 9180

    admin_key:

      - name: admin

        key: edd1c9f034335f136f87ad84b625c8f1  # using fixed API token has security risk, please update it when you deploy to production environment

        role: admin

      - name: viewer

        key: 42d1c9f034335f136f87ad84b625c8f1  # using fixed API token has security risk, please update it when you deploy to production environment

        role: viewer
# 插件配置
plugin_attr:
    log-rotate: # 日志管理配置
        interval: 3600    # 每间隔多长时间切分一次日志,以秒为单位。
        max_kept: 168     # 最多保留多少份历史日志,超过指定数量后,自动删除老文件。
        max_size: -1      # 日志文件超过指定大小时进行切分,单位为 Byte。如果 max_size 小于 0 或者根据 interval 计算的时间到达时,将不会根据 max_size 切分日志。
        enable_compression: false    # 当设置为 true 时,启用日志文件压缩。该功能需要在系统中安装 tar 。

# nginx配置
nginx_config:
	http:
		enable_access_log: true             # Enable HTTP proxy access logging.
		access_log: logs/access.log         # Location of the access log.
		access_log_buffer: 16384            # buffer size of access log.
		access_log_format: "$remote_addr - $remote_user [$time_local] $http_host \"$request\" $status $body_bytes_sent $request_time \"$http_referer\" \"$http_user_agent\" $upstream_addr $upstream_status $upstream_response_time \"$upstream_scheme://$upstream_host$upstream_uri\""
		# Customize log format: http://nginx.org/en/docs/varindex.html;自定义请求头$http_trace_id
		access_log_format_escape: default   # Escape default or json characters in variables.
		keepalive_timeout: 60s              # Set the maximum time for which TCP connection keeps alive.
		client_header_timeout: 60s          # Set the maximum time waiting for client to send the entire HTTP
											# request header before closing the connection.
		client_body_timeout: 60s            # Set the maximum time waiting for client to send the request body.
		client_max_body_si
最低0.47元/天 解锁文章


 8221
8221

 被折叠的 条评论
为什么被折叠?
被折叠的 条评论
为什么被折叠?
 到【灌水乐园】发言


