


设备驱动开发
1. Char 驱动框架
Step 1: 编写fops,确定驱动所需的函数
static struct file_operations hello_drv = {
	.owner	 = THIS_MODULE,
	.open    = hello_drv_open,
	.read    = hello_drv_read,
	.write   = hello_drv_write,
	.release = hello_drv_close,
};
Step 2: 编写fops里的函数及init和exit函数
fops函数:open/close/read/write
static ssize_t hello_drv_read (struct file *file, char __user *buf, size_t size, loff_t *offset)
{
	int err;
	printk("%s %s line %d\n", __FILE__, __FUNCTION__, __LINE__);
	err = copy_to_user(buf, kernel_buf, MIN(1024, size));
	return MIN(1024, size);
}

static ssize_t hello_drv_write (struct file *file, const char __user *buf, size_t size, loff_t *offset)
{
	int err;
	printk("%s %s line %d\n", __FILE__, __FUNCTION__, __LINE__);
	err = copy_from_user(kernel_buf, buf, MIN(1024, size));
	return MIN(1024, size);
}

static int hello_drv_open (struct inode *node, struct file *file)
{
	printk("%s %s line %d\n", __FILE__, __FUNCTION__, __LINE__);
	return 0;
}

static int hello_drv_close (struct inode *node, struct file *file)
{
	printk("%s %s line %d\n", __FILE__, __FUNCTION__, __LINE__);
	return 0;
}
init函数
//调用register_xxx获得major
major = register_chrdev(0, "hello", &hello_drv);  /* /dev/hello */
//调用class_create创造对应的class
hello_class = class_create(THIS_MODULE, "hello_class");
//调用device_create在/dev下创建相应设备节点
device_create(hello_class, NULL, MKDEV(major, 0), NULL, "hello"); /* /dev/hello */
完整代码
static int __init hello_init(void)
{
	int err;

	printk("%s %s line %d\n", __FILE__, __FUNCTION__, __LINE__);
	major = register_chrdev(0, "hello", &hello_drv);  /* /dev/hello */


	hello_class = class_create(THIS_MODULE, "hello_class");
	err = PTR_ERR(hello_class);
	if (IS_ERR(hello_class)) {
		printk("%s %s line %d\n", __FILE__, __FUNCTION__, __LINE__);
		unregister_chrdev(major, "hello");
		return -1;
	}

	device_create(hello_class, NULL, MKDEV(major, 0), NULL, "hello"); /* /dev/hello */

	return 0;
}
exit函数(和init全逆向)
static void __exit hello_exit(void)
{
	printk("%s %s line %d\n", __FILE__, __FUNCTION__, __LINE__);
	device_destroy(hello_class, MKDEV(major, 0));
	class_destroy(hello_class);
	unregister_chrdev(major, "hello");
}
注意:init和exit需要修饰才可以在module_init/exit中注册
Step 3: module_init 中注册init / module_exit中注册exit
module_init(hello_init);
module_exit(hello_exit);
MODULE_LICENSE("GPL");
major(主设备号)相当于fops数组的索引,当入口函数调用register_chardev()时,传入0系统会分配一个major号(其本质就是在fops数组里找到个空位存储新的fops),以便于索引fops数组。
2. LED 驱动
基本流程
Step 1:确定引脚,配置引脚模式
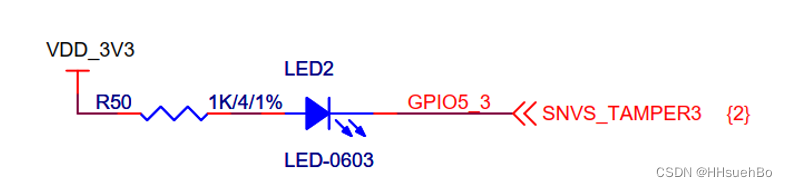
引脚:GPIO5_3
寄存器:IOMUXC_SNVS_SW_MUX_CTL_PAD_SNVS_TAMPER3
地址:0x02290000 + 0x14
赋值:寄存器后三位设为101则为GPIO模式

Step 2:配置引脚数据方向
寄存器:GPIO5_GDIR
地址:0x020AC004
赋值:第3位置1为OUTPUT模式

Step 3:R/W数据
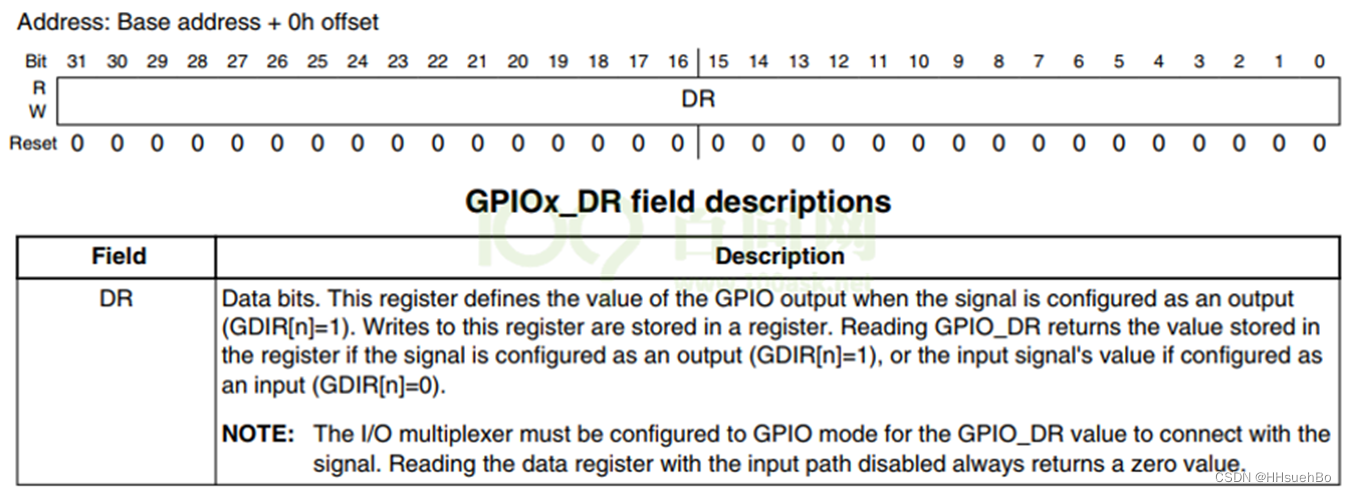
寄存器:GPIO5_DR
地址:0x020AC000
赋值:对第3位置1/0即可
代码-基础版
Step 1:定义寄存器
/* registers */
// IOMUXC_SNVS_SW_MUX_CTL_PAD_SNVS_TAMPER3 地址:0x02290000 + 0x14
static volatile unsigned int *IOMUXC_SNVS_SW_MUX_CTL_PAD_SNVS_TAMPER3;

// GPIO5_GDIR 地址:0x020AC004
static volatile unsigned int *GPIO5_GDIR;

//GPIO5_DR 地址:0x020AC000
static volatile unsigned int *GPIO5_DR;
Tips: 注意用volatile修饰,表示该变量不允许被编译器优化
Step 2:init / exit函数
功能:init 完成ioremap以及device create工作,exit完成逆操作
Tips: ioremap的 4 表示映射1页
/* 入口函数 */
static int __init led_init(void)
{
	printk("%s %s %d\n", __FILE__, __FUNCTION__, __LINE__);

	major = register_chrdev(0, "100ask_led", &led_fops);

	/* ioremap */
	// IOMUXC_SNVS_SW_MUX_CTL_PAD_SNVS_TAMPER3 地址:0x02290000 + 0x14
	IOMUXC_SNVS_SW_MUX_CTL_PAD_SNVS_TAMPER3 = ioremap(0x02290000 + 0x14, 4);

	// GPIO5_GDIR 地址:0x020AC004
	GPIO5_GDIR = ioremap(0x020AC004, 4);

	//GPIO5_DR 地址:0x020AC000
	GPIO5_DR  = ioremap(0x020AC000, 4);

	led_class = class_create(THIS_MODULE, "myled");
	device_create(led_class, NULL, MKDEV(major, 0), NULL, "myled"); /* /dev/myled */

	return 0;
}

static void __exit led_exit(void)
{
	iounmap(IOMUXC_SNVS_SW_MUX_CTL_PAD_SNVS_TAMPER3);
	iounmap(GPIO5_GDIR);
	iounmap(GPIO5_DR);

	device_destroy(led_class, MKDEV(major, 0));
	class_destroy(led_class);

	unregister_chrdev(major, "100ask_led");
}
Step 3: open/write函数
open功能:完成输出配置
static int led_open(struct inode *inode, struct file *filp)
{
	/* enable gpio5
	 * configure gpio5_io3 as gpio
	 * configure gpio5_io3 as output
	 */
	*IOMUXC_SNVS_SW_MUX_CTL_PAD_SNVS_TAMPER3 &= ~0xf;//清空后四位
	*IOMUXC_SNVS_SW_MUX_CTL_PAD_SNVS_TAMPER3 |= 0x5;//后四位置101

	*GPIO5_GDIR |= (1<<3);//第三位置1,表示数据方向为OUTPUT

	return 0;
}
write功能:完成写数据
Tips:
1) 从上层获取数据 copy_from_user ,传数据给上层 copy_to_user
2) 快速清零:&= ~(1<<n) 置1:|= (1<<n)
static ssize_t led_write(struct file *filp, const char __user *buf,
			 size_t count, loff_t *ppos)
{
	char val;
	int ret;

	/* copy_from_user : get data from app */
	ret = copy_from_user(&val, buf, 1);

	/* to set gpio register: out 1/0 */
	if (val)
	{
		/* set gpio to let led on */
		*GPIO5_DR &= ~(1<<3);
	}
	else
	{
		/* set gpio to let led off */
		*GPIO5_DR |= (1<<3);
	}
	return 1;
}
代码-板子分离
核心思想:针对不同的硬件编写不同的.c,对于操作LED,抽象出一个led_opr结构体,内部包含硬件相关的操作。之后在具体板子的.c文件中进行实现。
led_opr.h:结构体抽象
#ifndef _LED_OPR_H
#define _LED_OPR_H

struct led_operations {
	int (*init) (int which); /* 初始化LED, which-哪个LED */
	int (*ctl) (int which, char status); /* 控制LED, which-哪个LED, status:1-亮,0-灭 */
};

struct led_operations *get_board_led_opr(void);
#endif
board_demo.c:具体硬件实现
#include <linux/module.h>
#include <linux/fs.h>
#include <linux/errno.h>
#include <linux/miscdevice.h>
#include <linux/kernel.h>
#include <linux/major.h>
#include <linux/mutex.h>
#include <linux/proc_fs.h>
#include <linux/seq_file.h>
#include <linux/stat.h>
#include <linux/init.h>
#include <linux/device.h>
#include <linux/tty.h>
#include <linux/kmod.h>
#include <linux/gfp.h>
#include "led_opr.h"

static int board_demo_led_init (int which) /* 初始化LED, which-哪个LED */
{

	printk("%s %s line %d, led %d\n", __FILE__, __FUNCTION__, __LINE__, which);
	return 0;
}

static int board_demo_led_ctl (int which, char status) /* 控制LED, which-哪个LED, status:1-亮,0-灭 */
{
	printk("%s %s line %d, led %d, %s\n", __FILE__, __FUNCTION__, __LINE__, which, status ? "on" : "off");
	return 0;
}

static struct led_operations board_demo_led_opr = {
	.init = board_demo_led_init,
	.ctl  = board_demo_led_ctl,
};

struct led_operations *get_board_led_opr(void)
{
	return &board_demo_led_opr;
}
之后在leddrv.c的write和open函数中进行调用:
struct led_operations *p_led_opr;

static int __init led_init(void)
{
	...
	p_led_opr = get_board_led_opr();
	...
}

static int led_drv_open (struct inode *node, struct file *file)
{
	int minor = iminor(node);

	printk("%s %s line %d\n", __FILE__, __FUNCTION__, __LINE__);
	/* 根据次设备号初始化LED */
	p_led_opr->init(minor);

	return 0;
}

/* write(fd, &val, 1); */
static ssize_t led_drv_write (struct file *file, const char __user *buf, size_t size, loff_t *offset)
{
	int err;
	char status;
	struct inode *inode = file_inode(file);
	int minor = iminor(inode);

	printk("%s %s line %d\n", __FILE__, __FUNCTION__, __LINE__);
	err = copy_from_user(&status, buf, 1);

	/* 根据次设备号和status控制LED */
	p_led_opr->ctl(minor, status);

	return 1;
}
如此一来,当有板子ABCD时,只需要关注borad.c文件内部的实现即可。对于led_drv则不需要动,在编译的时候用哪个板子编哪个board文件即可。


 408
408


 被折叠的 条评论
为什么被折叠?
被折叠的 条评论
为什么被折叠?
 到【灌水乐园】发言


