


P69-前端基础项目开发-网页导航栏开发首页header头部导航下拉层
1.概述
这篇文章我们给首页header头部导航增加一个下拉层效果。
2.首页header头部导航下拉层
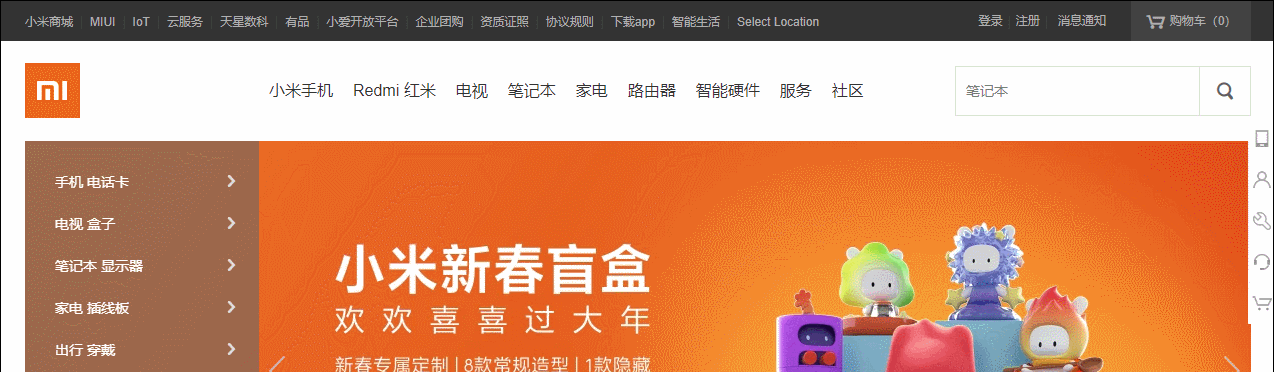
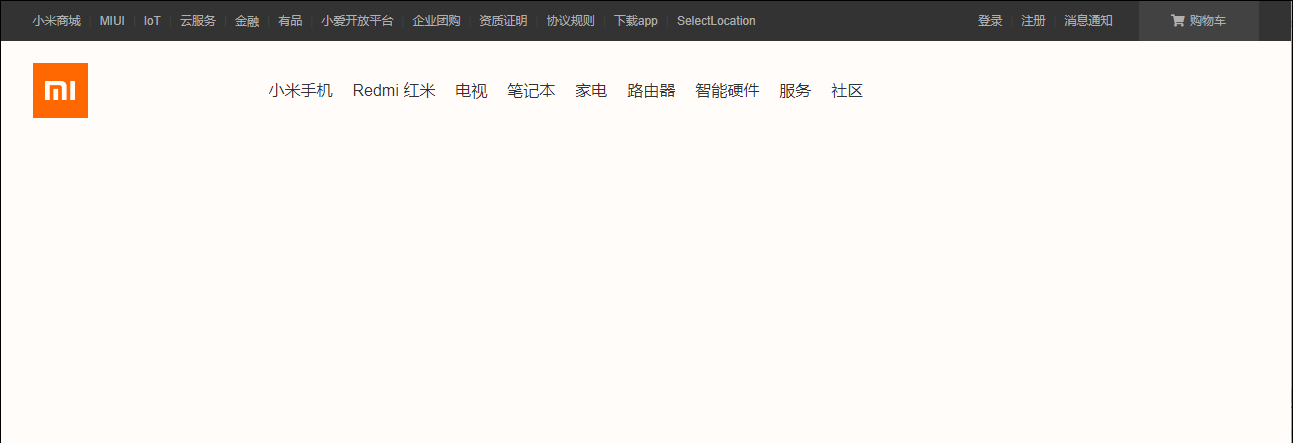
2.1.首页header头部导航下拉层需求样式
2.2.新增导航下拉结构
在index.html文件中增加下拉的内容

2.3.导航下拉样式设置
在index.css文件中添加下拉样式
/* 设置中间导航下拉层效果 */
/* 设置中间导航下拉尺寸 */
.nav .goods-info {
  /* height: 228px; */
  height: 0px;
  width: 100%;
  /* border: 1px red solid; */
  background-color: #fff;
  position: absolute;
  left: 0;
  top: 100px;
  /* 设置最高层级不被其他内容遮挡 */
  z-index: 9999;
}

/* 设置下拉hover效果 */
/* 分别设置商品列表.show-goods和下拉框.goods-info两个位置hover效果 */
.nav .show-goods:hover ~ .goods-info,
.goods-info:hover {
  height: 228px;
  /* 显示上边框 */
  border-top: 1px solid rgb(224, 224, 224);
  /* 设置阴影效果 */
  box-shadow: 0 5px 3px rgba(0, 0, 0, .2)
}
2.4.首页样式完整设置
/* 主页index.html的样式表 */

/* 顶部导航条的容器 */
.topbar-wrapper {
  /* 设置宽度全屏 */
  width: 100%;
  /* 设置高度和行高 */
  height: 40px;
  line-height: 40px;
  /* 设置背景颜色 */
  background-color: #333;
}

/* 设置超链接的颜色 */
.topbar a {
  font-size: 12px;
  color: #b0b0b0;
  display: block;
}

/* 设置鼠标放到文字上的hover效果 */
.topbar a:hover {
  color: #ffffff;
}

/* 设置中间分割线 */
.topbar .line {
  color: #424242;
  font-size: 12px;
  margin: 0 8px;
}


/* -----------------------设置顶部左侧导航栏浮动----------------------- */
.service, .topbar li {
  float: left;
}

/* 设置下载app的下拉   */
.app .qrcode {
  width: 124px;
  /* height: 148px; */
  background-color: silver;
  /* display: none; */
  /* 设置二维码容器绝对定位,让他浮动起来 */
  position: absolute;
  /* 调整二维码位置 */
  left: -40px;
  background-color: #fff;
  /* 设置二维码容器阴影效果 */
  box-shadow: 0 0 10px rgba(0, 0, 0, .3);
  /* 设置二维码下拉动态效果需要使用height的变化来实现:设置默认高度为0不显示二维码容器 */
  height: 0px;
  overflow: hidden;

  /* transition: 用于为样式设置过渡效果:设置二维码下拉效果 */
  transition: height 0.3s;

  /* 设置二维码文字样式 */
  line-height: 1;
  text-align: center;


}

/* 设置二维码图片尺寸 */
.app .qrcode img {
  width: 90px;
  margin: 17px;
  margin-bottom: 10px;
}

/* 设置二维码中的文字 */
.app .qrcode span {
  font-size: 14px;
  color: #000;
}

/* 设置app相对定位 */
.app {
  position: relative;
}
/* 设置app下的小三角 */
.app::after {
  content: '';
  position: absolute;
  width: 0;
  height: 0;
  border: 8px solid transparent;
  border-top: none;
  border-bottom-color: #fff;
  bottom: 0;
  left: 0;
  right: 0;
  margin: auto;

  /* 设置下拉小三角默认不显示 */
  display: none;
}

/* 设置二维码和下拉三角hover显示效果 */
.app:hover .qrcode,
.app:hover::after {
  display: block;
  height: 148px;
}


/* -----------------------设置顶部右侧导航栏浮动----------------------- */
.shop-cart, .user-info {
  float: right;
}

/* -----------------------设置购物车样式----------------------- */

/* 设置购物车左边距 */
.shop-cart {
  margin-left: 26px;
}

/* 设置购物车文字相关属性 */
.shop-cart a {
  width: 120px;
  background-color: #424242;
  text-align: center;
}

/* 设置购物车图标和文字间距 */
.shop-cart i {
  margin-right: 2px;
}

/* 设置购物车hover效果:注意hover要设置在父元素上,否则鼠标移到购物车子菜单会出现hover效果失效。 */
.shop-cart:hover a {
  background-color: #ffffff;
  color: #FF6700;
}


/* ---------------------------------设置首页header部分样式--------------------------------- */

.header-wrapper{
  /* background-color: red; */
  position: relative;
}

/* 设置首页header部分 */
.header {
  height: 100px;
  /* 调试时可以打开查看调试效果,调试完毕将他注释掉 */
  /* background-color: #FF67; */
}

/* 设置logo的h1文字 */
.header .logo {
  float: left;
  margin-top: 22px;
  width: 55px;
  height: 55px;
  position: relative;
  /* 设置超出logo宽和高的部分隐藏 */
  overflow: hidden;

  text-indent: -100px;
}

/* 统一设置logo的超链接 */
.header .logo a {
  /* 这里需要开启绝对定位,让a标签变为块元素。否则设置的宽高不生效,背景图片将不显示 */
  position: absolute;
  width: 55px;
  height: 55px;
  /* 设置logo图标默认显示位置左边0px位置 */
  left: 0px;
  background-color: #FF6700;
  background-image: url(../img/mi-logo.png);

  /* 设置背景图片对齐方式 */
  background-position: center;
  /* 设置两个logo图标左右滑动过度效果 */
  transition: left 0.3s;

}
/* 设置home图片 */
.header .logo .home {
  background-image: url(../img/mi-home.png);
  /* 设置home图标默认显示在左边55px位置 */
  left: -55px;
}

/* 设置鼠标移入以后两个图标的位置 */
.header .logo:hover .mi {
  left: 55px;
}

.header .logo:hover .home {
  left: 0;
}

/* -------设置header导航栏容器------------- */
.header .nav-wrapper {
  float: left;
  margin-left: 7px;
  /* 调试时可以打开查看调试效果,调试完毕将他注释掉 */
  /* background-color: aqua; */
}

/* 设置导航条下的li */
.nav li {
  float: left;
  /* 调试时可以打开查看调试效果,调试完毕将他注释掉 */
  /* background-color: #888888; */
}

/* 设置导航条尺寸 */
.header .nav {
  height: 100px;
  /* 设置和height一样的高度实现垂直居中显示 */
  line-height: 100px;
  padding-left: 58px;
}

/* 隐藏全部商品 */
.all-goods {
  /* 这里不能使用display隐藏,这种隐藏后就不在占据位置。我们希望隐藏后还保留位置。使用visibility: hidden */
  /* display: none; */
  visibility: hidden;
}

/* 设置导航条a标签的hover效果 */
.nav-wrapper li a:hover {
  color: #FF6700;
}

/* 设置导航栏内容样式 */
.nav-wrapper li a {
  font-size: 16px;
  /* 设置文字间距 */
  margin-right: 20px;
  /* 设置元素为块元素,使他hover区域辐射到整个a标签的所占的宽高尺寸 */
  display: block;
}

/* 设置中间导航下拉层效果 */
/* 设置中间导航下拉尺寸 */
.nav .goods-info {
  /* height: 228px; */
  height: 0px;
  width: 100%;
  /* border: 1px red solid; */
  background-color: #fff;
  position: absolute;
  left: 0;
  top: 100px;
  /* 设置最高层级不被其他内容遮挡 */
  z-index: 9999;
}

/* 设置下拉hover效果 */
/* 分别设置商品列表.show-goods和下拉框.goods-info两个位置hover效果 */
.nav .show-goods:hover ~ .goods-info,
.goods-info:hover {
  height: 228px;
  /* 显示上边框 */
  border-top: 1px solid rgb(224, 224, 224);
  /* 设置阴影效果 */
  box-shadow: 0 5px 3px rgba(0, 0, 0, .2)
}
3.首页header头部导航下拉层效果


 299
299


 被折叠的 条评论
为什么被折叠?
被折叠的 条评论
为什么被折叠?
 到【灌水乐园】发言


