


 本文介绍如何在Android应用中实现从服务器获取XML数据,并将其解析后展示在ListView上。首先,通过UI设计,创建包含ListView的MainActivity及ListView Item布局。接着,开启Tomcat服务器,将XML文件放在服务器上,确保数据可访问。然后,编写Java代码,包括MainActivity、自定义工具类XmlParserUtils、News Bean类和自定义View SmartImageView,用于解析XML数据并填充ListView。最后,注意需要INTERNET权限来实现网络访问。
*UI效果图如下:(这里主要是为了练习实现从服务器获取xml数据并解析到ListView上,因此UI只布置了ListView)*

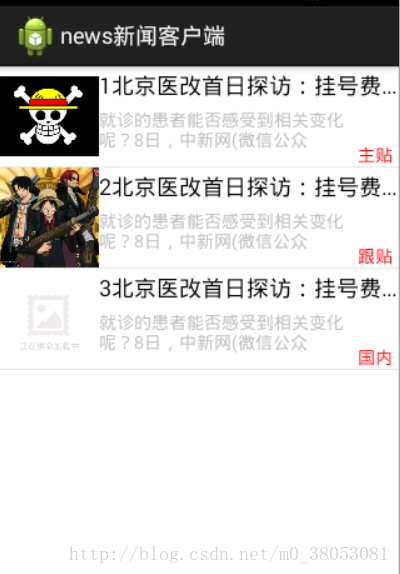
注意:这里ListView里面的数据 是从服务器中获取到的xml文件中解析的!
逻辑分析:
UI 根据以提供的UI样本 画出
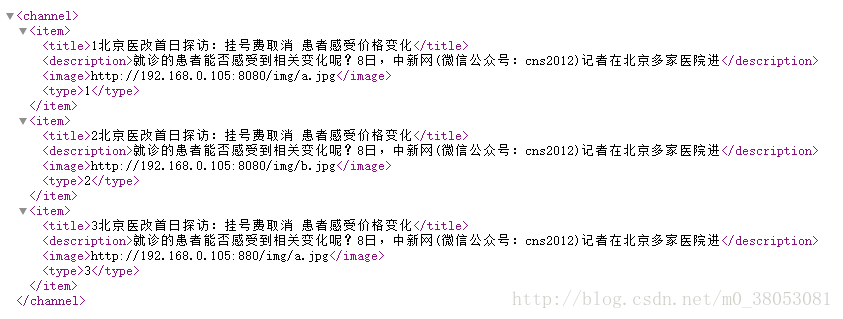
开启服务器(我用的是Tomcat 把自己准备的要获取的xml文件 放到服务器上).
这是我的xml文件 注意: 要确保 它 和 它image节点下的图片 的路径能够通过服务器访问到 http://192.168.0.105:8080/img/b.jpg http://192.168.0.105:8080/new.xml 确保路径能访问开启Tomcat 服务器的步骤 就不多说了 百度上有很多UI 跟 服务器上的xml文件都 完成了,接下来就是写java代码 实现到服务器 获取xml文件 然后解析 并显示到 ListView上 就完成了;
3.0、关于xml的数据 是服务器开发人员通过一定的技术手段返回的 对应我们Android开发人员 会解析就ok。
3.1、java代码逻辑:
应用启动加载MainActivity 在MainActivity 新开子线程(因为Android4.0以后不能在主线程访问网络等耗时操作)访问服务器xml文件的路径, 得到返回的流形式的文件, 利用自定义的工具类 把得到的流 转换为List 数组 存放到数组中. 创建自定义适配器 把对应数据显示到 对应的控件上
哎~~~~ 代码早就写完了 即使自己会用,但想要把它通过博客展示出来 我感觉好难只能理解到这了,下面看代码把。
通过java代码实现功能
一、画UI:
1.mainActivity 的UI中只有一个ListView:
<RelativeLayout xmlns:android="http://schemas.android.com/apk/res/android"
    xmlns:tools="http://schemas.android.com/tools" android:layout_width="match_parent"
    android:layout_height="match_parent"  tools:context=".MainActivity">
    <ListView
        android:id="@+id/listView"
        android:layout_width="match_parent"
        android:layout_height="match_parent">
        </ListView>
</RelativeLayout>
2.创建item.xml 来布置ListView中每个Item的布局效果(先使用假数据来查看布局效果):
注意!:这里的 smartImageView 控件 peewee.com.news.SmartImageView 为自定义的一个View继承了 ImageView ,是为了方便把直接把String类型的URL 设置到Image中 ,后面会说…
<?xml version="1.0" encoding="utf-8"?>
<RelativeLayout xmlns:android="http://schemas.android.com/apk/res/android"
    android:layout_width="match_parent"
    android:layout_height="80dp">
    <peewee.com.news.SmartImageView
        android:id="@+id/imageView"
        android:layout_width="80dp"
        android:layout_height="80dp"
        android:src="@drawable/ic_launcher"
        />
    <TextView
        android:id="@+id/tv_title"
        android:layout_width="match_parent"
        android:layout_height="wrap_content"
        android:singleLine="true"
        android:layout_marginTop="3dp"
        android:textSize="18sp"
        android:ellipsize="end"
        android:textColor="@android:color/black"
        android:text="是道具卡是分开撒谎的卡号是sadsadsadsadsadsa"
        android:layout_toRightOf="@+id/imageView"
        />
    <TextView
        android:id="@+id/t
最低0.47元/天 解锁文章


 147
147

 被折叠的 条评论
为什么被折叠?
被折叠的 条评论
为什么被折叠?
 到【灌水乐园】发言


