


目录
1.pipe函数
#include <unistd.h>
int pipe(int pipefd[2]);
功能:创建一个匿名管道,用来进程间通信
参数:int pipefd[2],这是数组是一个传出参数
pipefd[0] 对应的是管道的读端
pipefd[1] 对应的是管道的写端
返回值:
成功:0
失败:-1
管道默认是阻塞的:如果管道中没有数据,read阻塞;如果管道满了,write阻塞
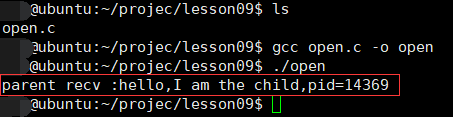
注意:匿名进程只能用于具有血缘关系的进程之间的通信(父子进程、兄弟进程等)程序示例1:子进程发送一次,父进程接收一次
#include <stdio.h>
#include <unistd.h>
#include <string.h>
//子进程发送数据给父进程,父进程读取到数据后输出
int main()
{
    //在fork之前创建管道
    int pipefd[2];
    int ret=pipe(pipefd);
    if(ret==-1)
    {
        perror("pipe");
        return -1;
    }

    //创建子进程
    pid_t pid=fork();
    if(pid>0)
    {
        //父进程 从管道的读取端读取数据
        char buf[1024]={0};
        int len=read(pipefd[0],buf,sizeof(buf));
        printf("parent recv :%s,pid=%d\n",buf,getpid());
    }
    else if(pid==0)
    {
        //子进程 向管道的写入端写入数据
        //sleep(10);  //如果有这句话,子进程会休眠10秒再写入,父进程会一直等待直到子进程将数据写入再读取
        char *str="hello,I am the child";
        write(pipefd[1],str,strlen(str));
    }
    return 0;
}
程序示例2:子进程不断发送,父进程不断接收
#include <stdio.h>
#include <unistd.h>
#include <string.h>
//子进程发送数据给父进程,父进程读取到数据后输出
int main()
{
    //在fork之前创建管道
    int pipefd[2];
    int ret = pipe(pipefd);
    if (ret == -1)
    {
        perror("pipe");
        return -1;
    }

    //创建子进程
    pid_t pid = fork();
    if (pid > 0)
    {
        printf("parent process,pid=%d\n", getpid());
        //父进程 从管道的读取端读取数据
        char buf[1024] = {0};
        while (1)
        {
            int len = read(pipefd[0], buf, sizeof(buf));
            printf("parent recv :%s,pid=%d\n", buf, getpid());
        }
    }
    else if (pid == 0)
    {
        //子进程
        printf("child process,pid=%d\n", getpid());
        while (1)
        { //向管道的写入端写入数据
            char *str = "hello,I am the child";
            write(pipefd[1], str, strlen(str));
            sleep(1);
        }
    }
    return 0;
}
程序示例3:子进程不断发送数据,父进程接收该数据;父进程也不断发送数据,子进程接收该数据
#include <stdio.h>
#include <unistd.h>
#include <string.h>
//子进程发送数据给父进程,父进程读取到数据后输出
int main()
{
    //在fork之前创建管道
    int pipefd[2];
    int ret = pipe(pipefd);
    if (ret == -1)
    {
        perror("pipe");
        return -1;
    }

    //创建子进程
    pid_t pid = fork();
    if (pid > 0)
    {
        printf("parent process,pid=%d\n", getpid());
        //父进程 从管道的读取端读取数据
        char buf[1024] = {0};
        while (1)
        {
            //读取数据
            int len = read(pipefd[0], buf, sizeof(buf));
            printf("parent recv :%s,pid=%d\n", buf, getpid());
            bzero(buf,1024);

            //写入数据
            char* str="hello,I am parent";
            write(pipefd[1],str,strlen(str));
            sleep(1);
        }
    }
    else if (pid == 0)
    {
        //子进程
        printf("child process,pid=%d\n", getpid());
        char buf[1024]={0};
        while (1)
        { //向管道的写入端写入数据
            char *str = "hello,I am child";
            write(pipefd[1], str, strlen(str));
            sleep(1);

            //读取数据
            read(pipefd[0],buf,sizeof(buf));
            printf("child recv :%s,pid=%d\n", buf, getpid());
            bzero(buf,1024);
        }
    }
    return 0;
}

//注:父进程和子进程的读写顺序要相反,不然两个都会阻塞,不能运行下去
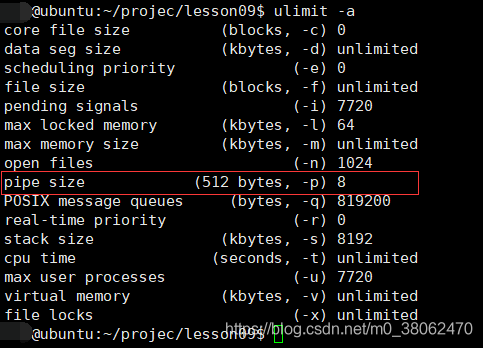
2.查看管道缓冲大小
命令方式:
从下图可知,为4K
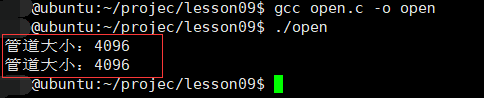
函数方式:
#include <stdio.h>
#include <unistd.h>
#include <string.h>

int main()
{
    int pipefd[2];
    pipe(pipefd);
    //获取管道的大小

    long ret=fpathconf(pipefd[0],_PC_PIPE_BUF);
    printf("管道大小:%ld\n",ret);
    ret=fpathconf(pipefd[0],_PC_PIPE_BUF);
    printf("管道大小:%ld\n",ret);

    return 0;
}
参考:牛客网 C++高薪求职项目《Linux高并发服务器开发》2.12父子进程通过匿名管道通信
专属优惠链接:
https://www.nowcoder.com/courses/cover/live/504?coupon=AvTPnSG


 3159
3159


 被折叠的 条评论
为什么被折叠?
被折叠的 条评论
为什么被折叠?
 到【灌水乐园】发言


