


目录
很多计算机专业大学生经常和我交流:毕业设计没思路、不会做、论文不会写、太难了......
针对这些问题,决定分享一些软、硬件项目的设计思路和实施方法,希望可以帮助大家,也祝愿各位学子,顺利毕业!

项目专栏:7天搞定毕业设计和论文
对计算机技术感兴趣的小伙伴请关注公众号:美男子玩编程,公众号优先推送最新技术博文,创作不易,请各位朋友多多点赞、收藏、关注支持~
1、项目概述
中药识别系统主要采用APP端拍照上传的方式,构建卷积神经网络(CNN)对图像进行识别,具有识别效率高,准确度高的特点。APP端的功能包括但不限于拍照识别、中药问答、检索查询、中药性状以及功效查看、方剂智能推荐等,本系统包含APP端以及服务器端。
项目资源下载请参考:https://download.csdn.net/download/m0_38106923/87577964
2、开发环境
1、medicine-app APP端
- Flutter开发
2、medicine-server服务器端工程
- Gradle构建
- SpringBoot框架,一键启动与部署
- 文档数据库:MongoDB
- 全文检索:Elasticsearch + IK分词器
- 数据库:MySQL
- 深度学习运行时架构:ONNX Runtime(ONNX Runtime is a cross-platform inference and training machine-learning accelerator)
3、m edicine-crawler爬虫工程
- 爬虫主要用来爬取训练集以及中药的详细信息,包含但不限于:中药名称、中药形态、图片、 别名、英文名、配伍药方、功效与作用、临床应用、产地分布、药用部位、 性味归经、药理研究、主要成分、使用禁忌、采收加工、药材性状等信息。
- 爬虫框架:WebMagic
- 数据持久化:MongoDB
- 数据结构(简略展示)
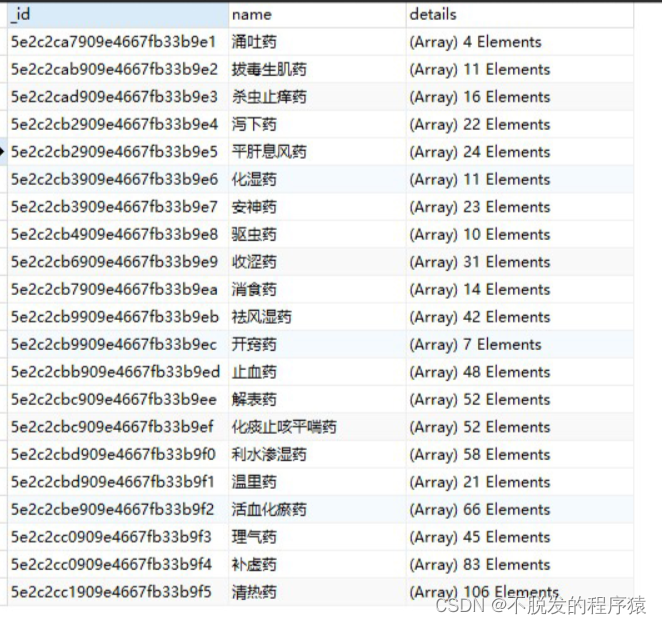
中药一级分类信息如下所示:
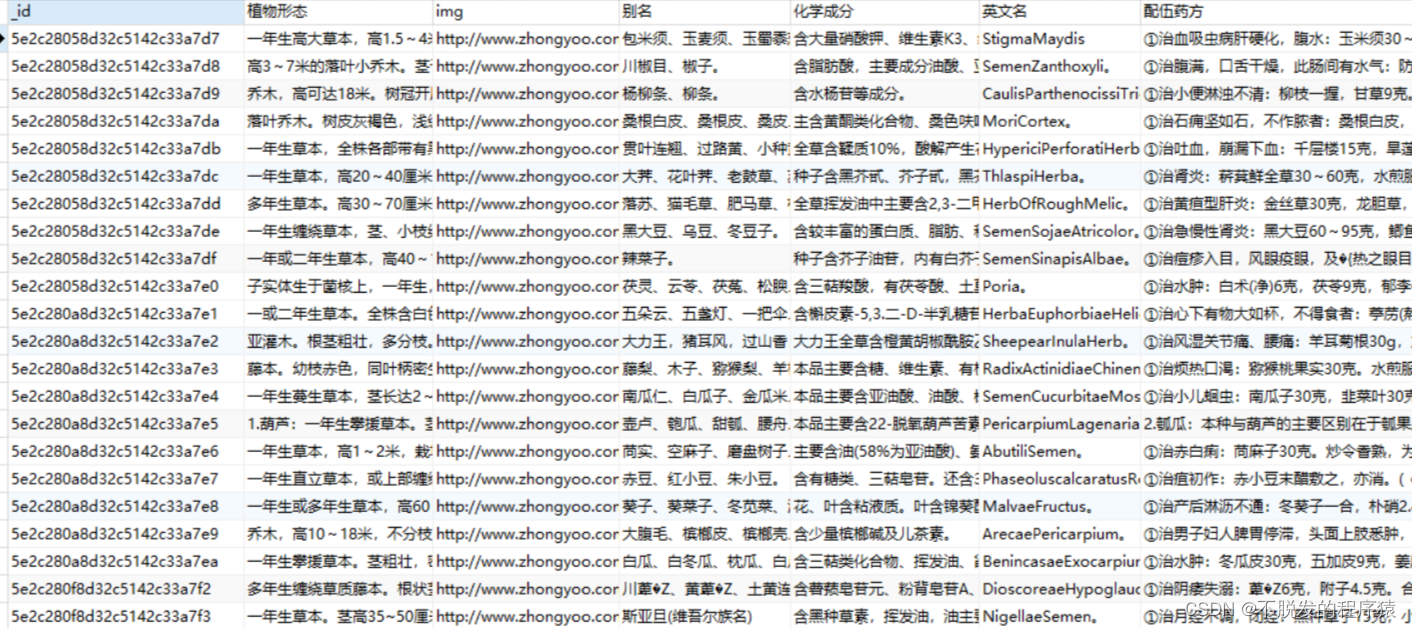
中药详细信息如下所示:
4、medicine-model卷积神经网络工程
- Language: Python
- 使用TensorFlow 深度学习框架,使用Keras会大幅缩减代码量
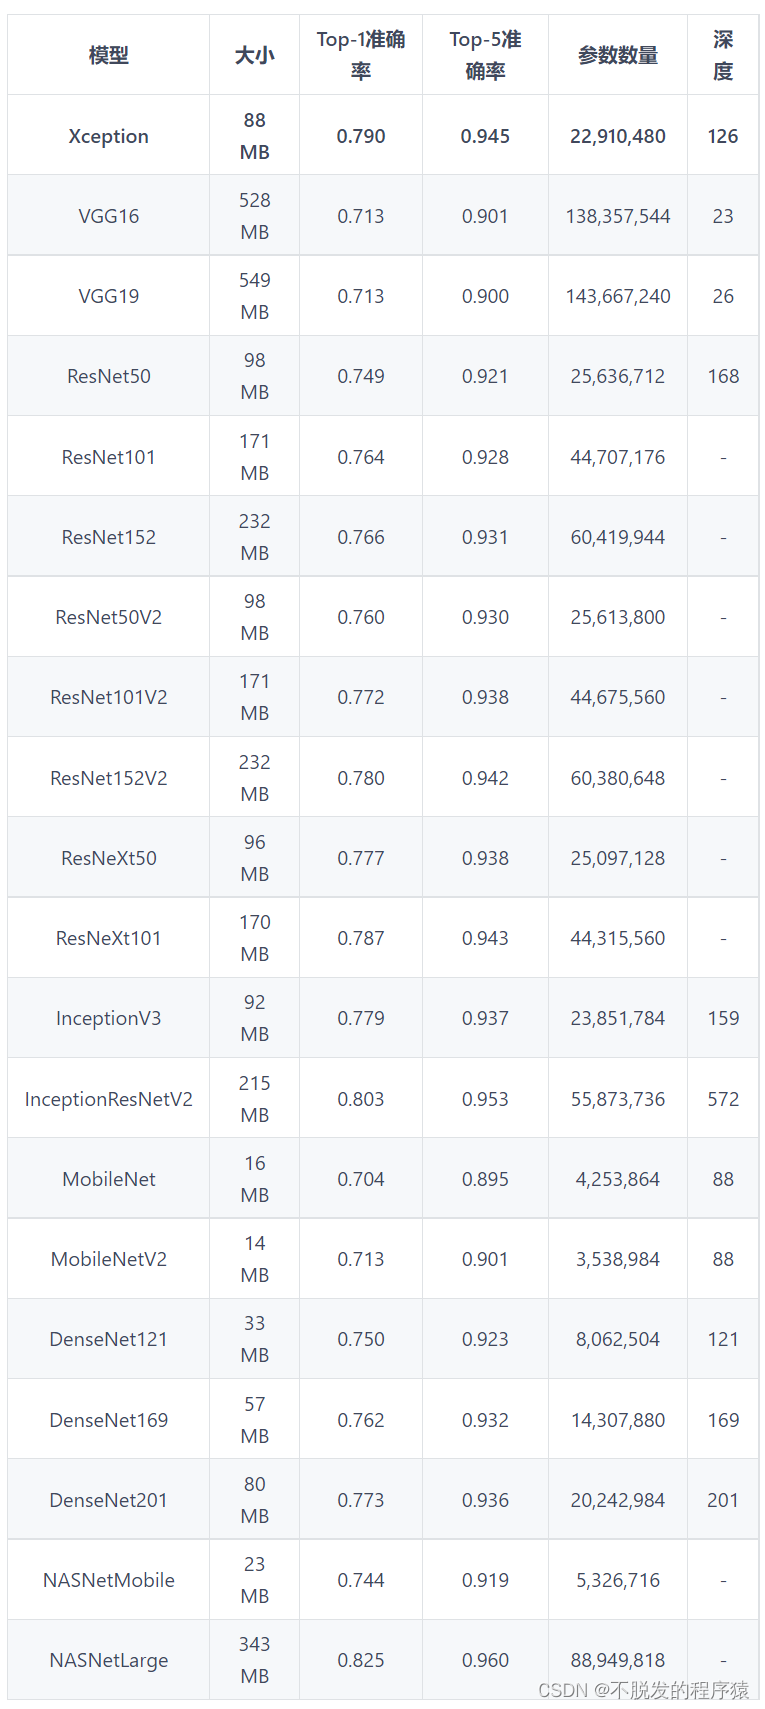
- 常用的卷积网络模型及在ImageNet上的准确率
3、项目架构
本项目包含六个模块:
- medicine-app:APP端
- medicine-server:服务器端
- medicine-crawler:爬虫工程
- medicine-model:卷积神经网络
- medicine-util:公用工具类
- medicine-dataset:数据集
4、项目实现
由于硬件条件限制,综合考虑模型的准确率、大小以及复杂度等因素,采用了Xception模型,该模型是134层(包含激活层,批标准化层等)拓扑深度的卷积网络模型。
Xception函数定义:
def Xception(include_top=True,
    weights='imagenet',
    input_tensor=None,
    input_shape=None,
    pooling=None,
    classes=1000,
    **kwargs)

# 参数
# include_top:是否保留顶层的全连接网络
# weights:None代表随机初始化,即不加载预训练权重。'imagenet’代表加载预训练权重
# input_tensor:可填入Keras tensor作为模型的图像输入tensor
# input_shape:可选,仅当include_top=False有效,应为长为3的tuple,指明输入图片的shape,图片的宽高必须大于71,如(150,150,3)
# pooling:当include_top=False时,该参数指定了池化方式。None代表不池化,最后一个卷积层的输出为4D张量。‘avg’代表全局平均池化,‘max’代表全局最大值池化。
# classes:可选,图片分类的类别数,仅当include_top=True并且不加载预训练权重时可用
设置Xception参数,迁移学习参数权重加载:xception_weights,如下所示:
# 设置输入图像的宽高以及通道数
img_size = (299, 299, 3)

base_model = keras.applications.xception.Xception(include_top=False,
                                                weights='..\\resources\\keras-model\\xception_weights_tf_dim_ordering_tf_kernels_notop.h5',
                                                input_shape=img_size,
                                                pooling='avg')

# 全连接层,使用softmax激活函数计算概率值,分类大小是628
model = keras.layers.Dense(628, activation='softmax', name='predictions')(base_model.output)
model = keras.Model(base_model.input, model)

# 锁定卷积层
for layer in base_model.layers:
  layer.trainable = False
全连接层训练如下所示:
from base_model import model

# 设置训练集图片大小以及目录参数
img_size = (299, 299)
dataset_dir = '..\\dataset\\dataset'
img_save_to_dir = 'resources\\image-traing\\'
log_dir = 'resources\\train-log'

model_dir = 'resources\\keras-model\\'

# 使用数据增强
train_datagen = keras.preprocessing.image.ImageDataGenerator(
    rescale=1. / 255,
    shear_range=0.2,
    width_shift_range=0.4,
    height_shift_range=0.4,
    rotation_range=90,
    zoom_range=0.7,
    horizontal_flip=True,
    vertical_flip=True,
    preprocessing_function=keras.applications.xception.preprocess_input)

test_datagen = keras.preprocessing.image.ImageDataGenerator(
    preprocessing_function=keras.applications.xception.preprocess_input)

train_generator = train_datagen.flow_from_directory(
    dataset_dir,
    save_to_dir=img_save_to_dir,
    target_size=img_size,
    class_mode='categorical')

validation_generator = test_datagen.flow_from_directory(
    dataset_dir,
    save_to_dir=img_save_to_dir,
    target_size=img_size,
    class_mode='categorical')

# 早停法以及动态学习率设置
early_stop = EarlyStopping(monitor='val_loss', patience=13)
reduce_lr = ReduceLROnPlateau(monitor='val_loss', patience=7, mode='auto', factor=0.2)
tensorboard = keras.callbacks.tensorboard_v2.TensorBoard(log_dir=log_dir)

for layer in model.layers:
    layer.trainable = False

# 模型编译
model.compile(optimizer='rmsprop', loss='categorical_crossentropy', metrics=['accuracy'])

history = model.fit_generator(train_generator,
                              steps_per_epoch=train_generator.samples // train_generator.batch_size,
                              epochs=100,
                              validation_data=validation_generator,
                              validation_steps=validation_generator.samples // validation_generator.batch_size,
                              callbacks=[early_stop, reduce_lr, tensorboard])
# 模型导出
model.save(model_dir + 'chinese_medicine_model_v1.0.h5')
对于顶部的6层卷积层,我们使用数据集对权重参数进行微调,如下所示:
 # 加载模型
 model=keras.models.load_model('resources\\keras-model\\chinese_medicine_model_v2.0.h5')

 for layer in model.layers:
    layer.trainable = False
 for layer in model.layers[126:132]:
    layer.trainable = True

 history = model.fit_generator(train_generator,
                               steps_per_epoch=train_generator.samples // train_generator.batch_size,
                               epochs=100,
                               validation_data=validation_generator,
                               validation_steps=validation_generator.samples // validation_generator.batch_size,
                               callbacks=[early_stop, reduce_lr, tensorboard])
 model.save(model_dir + 'chinese_medicine_model_v2.0.h5')
最后,服务器端,使用ONNX Runtime调用训练好的模型。
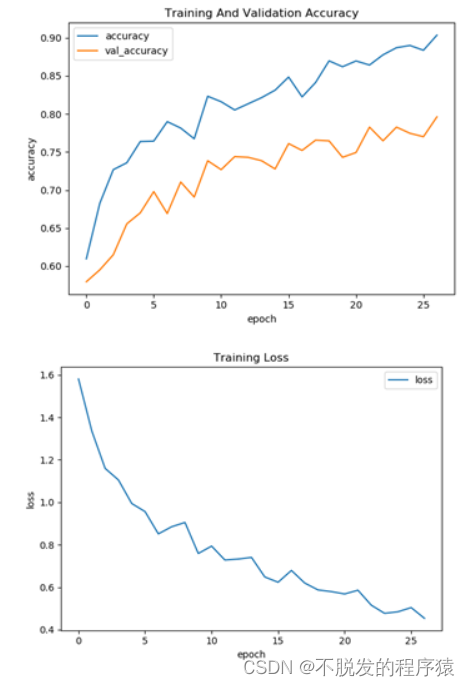
训练过程正确率以及损失函数可视化展示:
5、项目效果演示


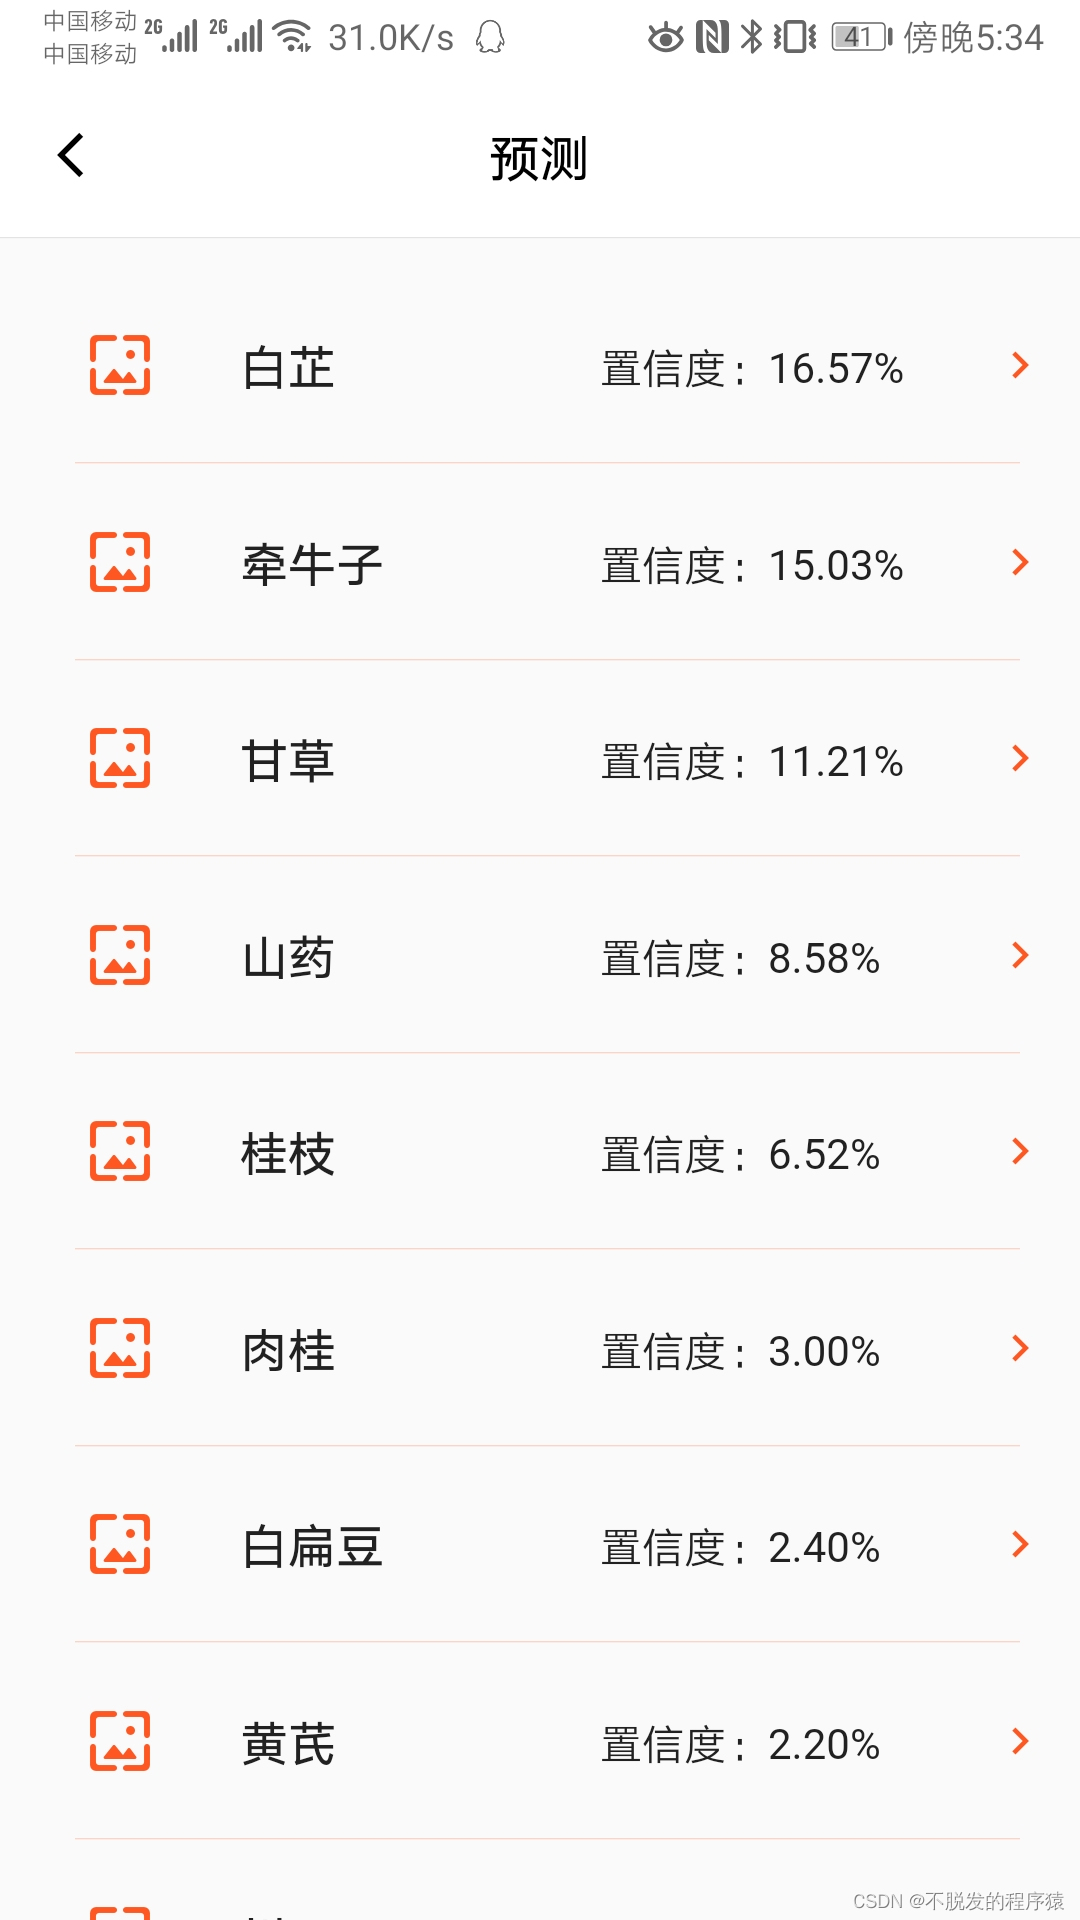
项目资源下载请参见:https://download.csdn.net/download/m0_38106923/87577964


 被折叠的 条评论
为什么被折叠?
被折叠的 条评论
为什么被折叠?
 到【灌水乐园】发言


