


Python爬虫技术系列-03requests库案例
参考
参考:https://blog.csdn.net/Faith_Lzt/article/details/124933765
https://www.bilibili.com/video/BV1Db4y1m7Ho?
1 Requests基本使用
Requests官方文档中关于Requests的介绍是:Requests是一个优雅而简单的Python HTTP库,是为人类构建的。
Requests可以完成,Keep-Alive,带Cookie的持久化session,SSL认证,文件上传下载等诸多功能,本小节主要介绍Requests库的安装与基本使用,尽管如此,也力求通过合适的案例,帮助读者完成对Requests的使用,更多高阶操作可以查看官网。
1.1 Requests库安装与使用
1.1.1 Requests库安装
安装Requests:
pip install requests==2.27.1 -i https://pypi.tuna.tsinghua.edu.cn/simple
1.1.2 Rrequests库介绍
Requests 是用Python语言编写,基于urllib,但是它比 urllib 更加方便,可以节约我们大量的工作,完全满足 HTTP 测试需求。本小节主要基于requests完成数据爬取的基本操作。
两个核心对象:
Requests库包括2个核心对象:Request和Response。Request用于发送请求,Response对象用于接受服务器返回的所有信息,也包含发送的Request请求信息。
r = requests.get(url)
上面代码中,requests.get(url)构造了一个向服务器请求资源的Request对象,返回的对象r就是一个包含服务器资源的Response的对象。
Response对象的属性如下所示:
 Response案例如下:
# 使用requests进行GET请求
import requests
response  = requests.get("https://www.baidu.com")
# response的类型
print('type(response)-->',type(response))
# 返回的HTTP状态码
print('response.status_code-->',response.status_code)
# 输出Response对象转换后的字符串,会乱码
print(response.text[310:352])
# 给Response设定编码,输出无乱码
response.encoding = 'utf-8'
print(response.text[310:352])
# 把Response对象转换为bytes数据,编码为UTF-8字符串,输出字符串
print(response.content.decode("UTF-8")[310:352])
输出结果如下:
type(response)--> <class 'requests.models.Response'>
response.status_code--> 200
<title>ç™¾åº¦ä¸€ä¸‹ï¼Œä½ å°±çŸ¥é“</title>
<title>百度一下,你就知道</title></head> <body link
<title>百度一下,你就知道</title></head> <body link
从输出结果可以看出,直接输出response.text会出现乱码,因为Response的默认encoding编码为ISO-8859-1,在设置response.encoding = 'utf-8’后,输出不再乱码。最后的先转变为content,在decode的方式也可以正常输出。
Response.text()的输出给如python爬虫系列的文章中的lxml或bs4解析,就完成了数据获取到数据解析的全部流程。
Requsts库常用方法有7种,如下表所示:
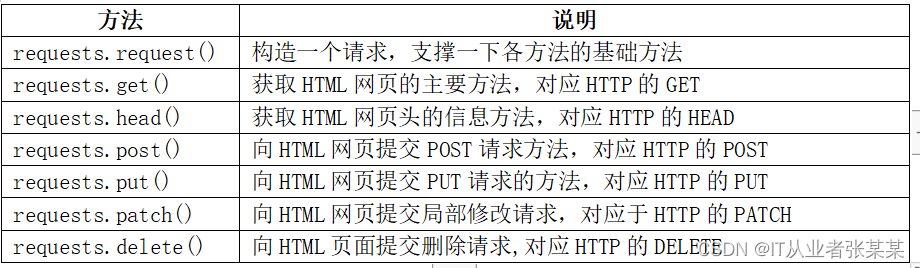 其中requests.requset(method,url,**kwargs)是核心方法,其它方法都是基于request(),当method的值为GET时,与get()方法等价。如下所示:
requests.request(‘GET’,url,**kwargs)
requests.get(url,**kwargs)
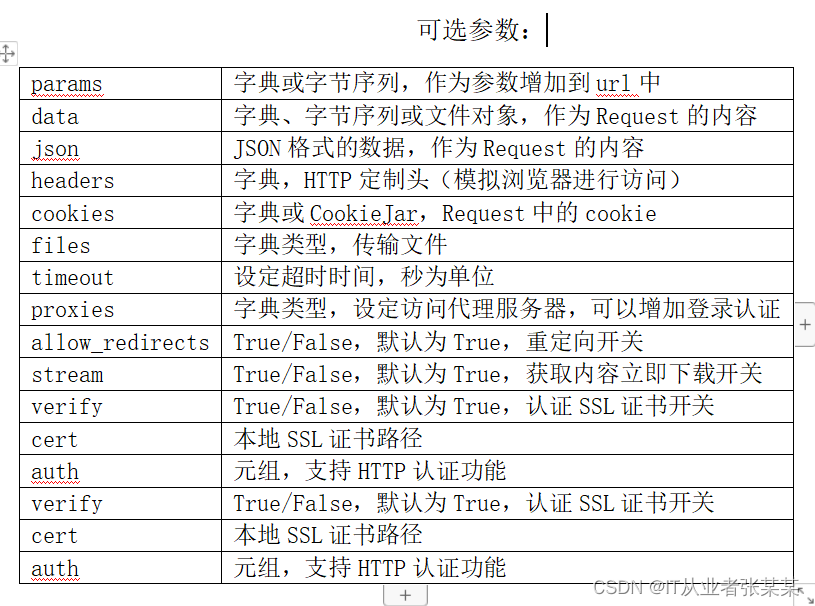
url参数为请求的路径。
**kwargs:控制访问参数,为可选项,具体含义如下所示:
POST请求
import requests
post1 = requests.post("http://httpbin.org/post")
print(post1.text)
print("*"*10)
输出为:
{
  "args": {},
  "data": "",
  "files": {},
  "form": {},
  "headers": {
    "Accept": "*/*",
    "Accept-Encoding": "gzip, deflate, br",
    "Content-Length": "0",
    "Host": "httpbin.org",
    "User-Agent": "python-requests/2.27.1",
    "X-Amzn-Trace-Id": "Root=1-6520bc5a-1890396b6d0ca83b3674482d"
  },
  "json": null,
  "origin": "120.194.158.180",
  "url": "http://httpbin.org/post"
}

**********
PUT请求
import requests
put1 = requests.put("http://httpbin.org/put")
print(put1.text)
print("*"*10)
输出为:
{
  "args": {},
  "data": "",
  "files": {},
  "form": {},
  "headers": {
    "Accept": "*/*",
    "Accept-Encoding": "gzip, deflate, br",
    "Content-Length": "0",
    "Host": "httpbin.org",
    "User-Agent": "python-requests/2.27.1",
    "X-Amzn-Trace-Id": "Root=1-6520bc5b-5d05ea907c9d15926a676af3"
  },
  "json": null,
  "origin": "120.194.158.180",
  "url": "http://httpbin.org/put"
}

**********
DELETE请求
import requests
delete1 = requests.delete("http://httpbin.org/delete")
print(delete1.text)
print("*"*10)
输出为:
{
  "args": {},
  "data": "",
  "files": {},
  "form": {},
  "headers": {
    "Accept": "*/*",
    "Accept-Encoding": "gzip, deflate, br",
    "Content-Length": "0",
    "Host": "httpbin.org",
    "User-Agent": "python-requests/2.27.1",
    "X-Amzn-Trace-Id": "Root=1-6520bc5b-0863e0b34612239b4ebf0c21"
  },
  "json": null,
  "origin": "120.194.158.180",
  "url": "http://httpbin.org/delete"
}

**********
GET请求
import requests
get1 = requests.get("http://httpbin.org/get")
print(get1.text)
print("*"*10)
输出为:
{
  "args": {},
  "headers": {
    "Accept": "*/*",
    "Accept-Encoding": "gzip, deflate, br",
    "Host": "httpbin.org",
    "User-Agent": "python-requests/2.27.1",
    "X-Amzn-Trace-Id": "Root=1-6520bc5c-7c53173b5cb5d0b936f01fe4"
  },
  "origin": "120.194.158.180",
  "url": "http://httpbin.org/get"
}

**********
1.1.3 使用Requests一般分为三个步骤
第一步,导入模块:
import requests
第二步,完成请求:
url = "http://httpbin.org/get"
r = requests.get(url=url)
http://httpbin.org是一个很好的测试网站, 其后台是基于 Python +Flask编写的 HTTP Request & Response Service。该服务主要用于测试 HTTP 库。 你可以向他发送请求,然后他会按照指定的规则将你的请求返回,也可以直接访问,本小节采用直接访问的方式测试。
第三步,输出获得的响应:
print("--查看请求头信息--")
print(r.text)
输出为:
--查看请求头信息--
{
  "args": {},
  "headers": {
    "Accept": "*/*",
    "Accept-Encoding": "gzip, deflate, br",
    "Host": "httpbin.org",
    "User-Agent": "python-requests/2.27.1",
    "X-Amzn-Trace-Id": "Root=1-62837c9a-6119e7f618e55b0f0de1d0d2"
  },
  "origin": "120.216.231.238",
  "url": "http://httpbin.org/get"
}
通过输出,可以看出我们在发送请求的时候,携带的User-Agent表明了发起请求的身份为requests库,这个也是在爬取数据时,会被服务器拦截的原因。
1.1.4 requests的公共方法
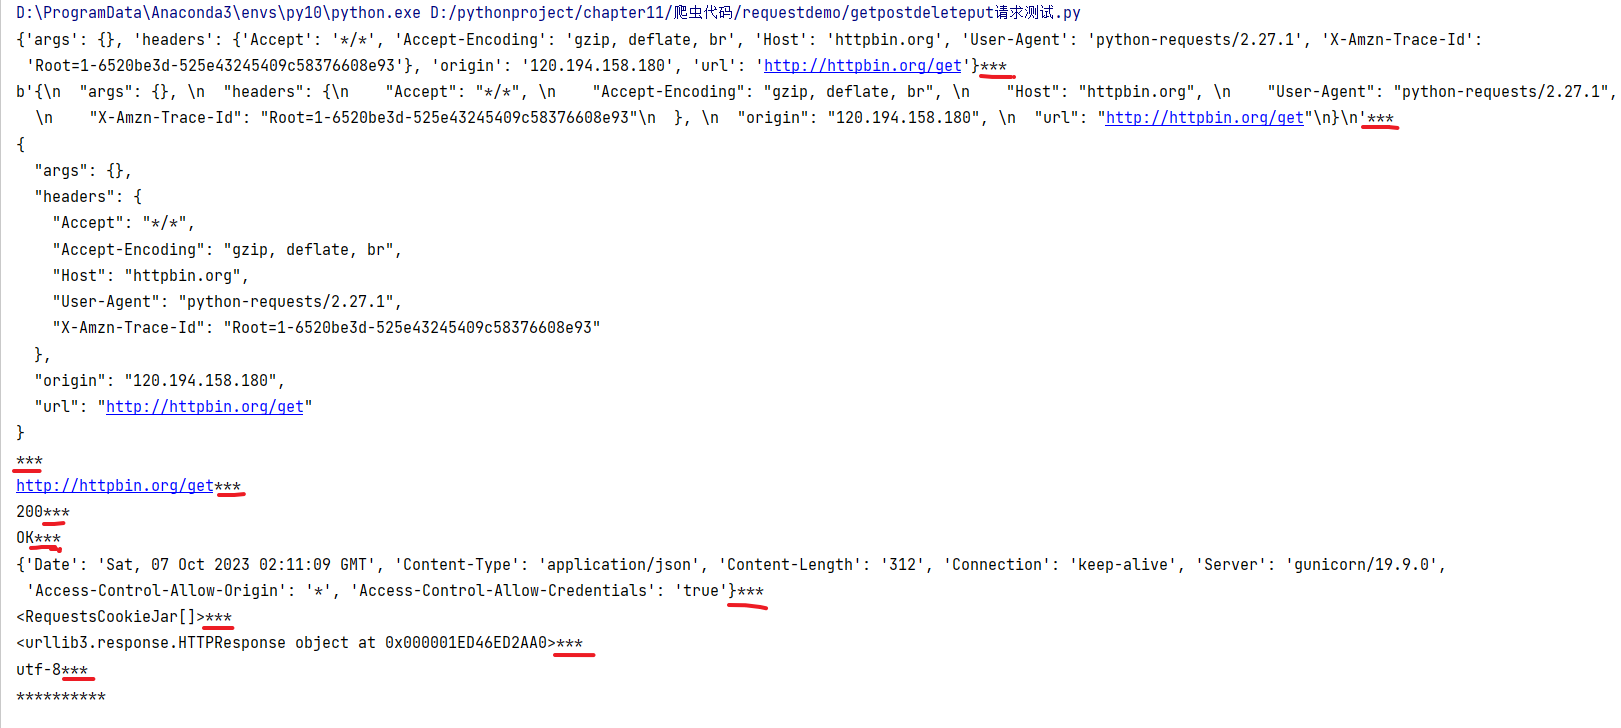
import requests
response = requests.get("http://httpbin.org/get")
print(response.json(),end="***\n")# 以json的形式返回响应内容,对象格式为dict
print(response.content,end="***\n")# 以二进制的形式返回响应内容,对象格式为bytes
print(response.text,end="***\n")# 以字符串的形式返回响应内容,对象格式为str
print(response.url,end="***\n")# 返回请求的url
print(response.status_code,end="***\n") # 返回本次请求的状态码
print(response.reason,end="***\n")# 返回状态码对应的原因
print(response.headers,end="***\n")# 返回响应头
print(response.cookies,end="***\n")# 返回cookice信息
print(response.raw,end="***\n")# 返回原始响应体
print(response.encoding,end="***\n")# 返回编码格式
print("*"*10)
输出为:
关于requests库,目前为止,是否有一定的理解了,多谢您的互动。
关于requests的基本使用,我们会通过一个案例进行介绍。
2 Requests库使用案例
在上一小节,完成了关于Requests库的Response对象的解析,与发送简单个get请求,本小节通过案例的方式进行Requests库的使用。
2.1 GET请求携带参数和headers
# urllib
# (1) 一个类型以及六个方法
# (2)get请求
# (3)post请求   百度翻译
# (4)ajax的get请求
# (5)ajax的post请求
# (6)cookie登陆 微博
# (7)代理


# requests
# (1)一个类型以及六个属性
# (2)get请求
# (3)post请求
# (4)代理
# (5)cookie  验证码


import requests

url = 'https://www.baidu.com/s'

headers = {
    'User-Agent': 'Mozilla/5.0 (Windows NT 10.0; Win64; x64) AppleWebKit/537.36 (KHTML, like Gecko) Chrome/92.0.4515.159 Safari/537.36'
}

data = {
    'wd':'北京'
}


# url  请求资源路径
# params 参数
# kwargs 字典
response = requests.get(url=url,params=data,headers=headers)

content = response.text

print(content[0:400])
print(response.content.decode("utf-8")[0:400])

# 总结:
# (1)参数使用params传递
# (2)参数无需urlencode编码
# (3)不需要请求对象的定制
# (4)请求资源路径中的?可以加也可以不加
输出为:
2.2 POST请求,写的参数和headers
import requests
import json
url = 'https://fanyi.baidu.com/sug'

headers = {
    'User-Agent': 'Mozilla/5.0 (Windows NT 10.0; Win64; x64) AppleWebKit/537.36 (KHTML, like Gecko) Chrome/92.0.4515.159 Safari/537.36'
}
data = {
    'kw': 'eye'
}
# url 请求地址
# data 请求参数
# kwargs 字典
response = requests.post(url=url,data=data,headers=headers)
content =response.text
print(content)
obj = json.loads(content)
print(obj)

# 总结:
# (1)post请求 是不需要编解码
# (2)post请求的参数是data
# (3)不需要请求对象的定制
输出为:

2.3 携带参数,设置User-Agent,发送POST请求,文件上传
import requests
data = {'city': 'beijing'} # 设置data
headers = {
    'User-Agent': 'Mozilla/5.0 (Windows NT 10.0; Win64; x64; rv:100.0) Gecko/20100101 Firefox/100.0' #设置User-Agent
}
files = {'file': open('01.gif', 'rb')} # 读取本地的一个图片
response = requests.post("http://httpbin.org/post", files=files,data=data, headers=headers) # 通过POST请求把文件,数据和header传递过去
print(response.text)
输出结果如下:
{
  "args": {},
  "data": "",
  "files": {
    "file": "data:application/octet-stream;base64,R0lGODl...HEgAA7"
  },
  "form": {
    "city": "beijing"
  },
  "headers": {
    "Accept": "*/*",
    "Accept-Encoding": "gzip, deflate, br",
    "Content-Length": "1176",
    "Content-Type": "multipart/form-data; boundary=92043b0ae4dec43bbb54919200f6033a",
    "Host": "httpbin.org",
    "User-Agent": "Mozilla/5.0 (Windows NT 10.0; Win64; x64; rv:100.0) Gecko/20100101 Firefox/100.0",
    "X-Amzn-Trace-Id": "Root=1-62848095-0a1878c6321f07ef5ccc9047"
  },
  "json": null,
  "origin": "120.216.231.238",
  "url": "http://httpbin.org/post"
}
输出结果表明,文件,数据和请求头都被服务端接受,并且图片在上传过程被采用base64编码方式传递。
2.4 获取cookie
import requests
response = requests.get("https://www.zhihu.com")
print(response.cookies)
for key, value in response.cookies.items():
    print(key + '=' + value)
输出结果如下:
<RequestsCookieJar[<Cookie _xsrf=pGKfNvOikSpo8NRnLCbNKfAuLOLWyhLb for .zhihu.com/>]>
_xsrf=pGKfNvOikSpo8NRnLCbNKfAuLOLWyhLb
输出结果中,通过response.cookies获取了知乎首页的cookie,这对需要登录注册才能访问的网站,可以替代手工获取cookie进行填充,是比较方便的一种方法。
2.5 保持session 实现模拟登录
import requests
session = requests.Session() #获取session
session.get('http://httpbin.org/cookies/set/name/123') # 通过会话设置cookie的值,为name=123
response = session.get('http://httpbin.org/cookies') # 使用session获取cookie
print(response.text) # 输出响应
输出为:
{
  "cookies": {
    "name": "123"
  }
}
输出结果表明,对于两次访问,通过session发送get请求,可以获取第一次请求时设置的cookie,如果对于浏览器来说,使用session进行访问,会被服务端认为是同一个用户在持续访问,使用于需要保持登录状态的数据爬虫场景。
2.6 模拟古诗词网
参考:https://www.bilibili.com/video/BV1Db4y1m7Ho
# 通过登陆 然后进入到主页面
# 通过找登陆接口我们发现 登陆的时候需要的参数很多
# _VIEWSTATE: /m1O5dxmOo7f1qlmvtnyNyhhaUrWNVTs3TMKIsm1lvpIgs0WWWUCQHl5iMrvLlwnsqLUN6Wh1aNpitc4WnOt0So3k6UYdFyqCPI6jWSvC8yBA1Q39I7uuR4NjGo=
# __VIEWSTATEGENERATOR: C93BE1AE
# from: http://so.gushiwen.cn/user/collect.aspx
# email: 465XXX@qq.com
# pwd: action
# code: PId7
# denglu: 登录
# 我们观察到_VIEWSTATE __VIEWSTATEGENERATOR code是一个可以变化的量
# 难点:(1)_VIEWSTATE __VIEWSTATEGENERATOR 一般情况看不到的数据 都是在页面的源码中
# 我们观察到这两个数据在页面的源码中 所以我们需要获取页面的源码 然后进行解析就可以获取了
# (2)验证码
import os
import requests
# 这是登陆页面的url地址
url = 'https://so.gushiwen.cn/user/login.aspx?from=http://so.gushiwen.cn/user/collect.aspx'
headers = {
'User-Agent': 'Mozilla/5.0 (Windows NT 10.0; Win64; x64) AppleWebKit/537.36 (KHTML, like Gecko) Chrome/92.0.4515.159 Safari/537.36'
}
# 获取页面的源码
response = requests.get(url = url,headers = headers)
content = response.text
# 解析页面源码 然后获取_VIEWSTATE __VIEWSTATEGENERATOR
from bs4 import BeautifulSoup
soup = BeautifulSoup(content,'lxml')
# 获取_VIEWSTATE
viewstate = soup.select('#__VIEWSTATE')[0].attrs.get('value')
# 获取__VIEWSTATEGENERATOR
viewstategenerator = soup.select('#__VIEWSTATEGENERATOR')[0].attrs.get('value')
# 获取验证码图片
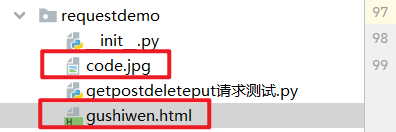
code = soup.select('#imgCode')[0].attrs.get('src')
code_url = 'https://so.gushiwen.cn' + code
# 有坑
# import urllib.request
# urllib.request.urlretrieve(url=code_url,filename='code.jpg')
# requests里面有一个方法 session() 通过session的返回值 就能使用请求变成一个对象
session = requests.session()
# 验证码的url的内容
response_code = session.get(code_url)
# 注意此时要使用二进制数据 因为我们要使用的是图片的下载
content_code = response_code.content
# wb的模式就是将二进制数据写入到文件
with open('./code.jpg','wb')as fp:
print(os.getcwd())
fp.write(content_code)
# 获取了验证码的图片之后 下载到本地 然后观察验证码 观察之后 然后在控制台输入这个验证码 就可以将这个值给
# code的参数 就可以登陆
code_name = input('请输入你的验证码')
# 点击登陆
url_post = 'https://so.gushiwen.cn/user/login.aspx?from=http%3a%2f%2fso.gushiwen.cn%2fuser%2fcollect.aspx'
data_post = {
'__VIEWSTATE': viewstate,
'__VIEWSTATEGENERATOR': viewstategenerator,
'from': 'http://so.gushiwen.cn/user/collect.aspx',
'email': '465XXX@qq.com',
'pwd': 'action',
'code': code_name,
'denglu': '登录',
}
response_post = session.post(url = url, headers = headers, data = data_post)
content_post = response_post.text
with open('gushiwen.html','w',encoding= ' utf-8')as fp:
fp.write(content_post)
# 难点
# (1) 隐藏域
# (2) 验证码
2.7 超级鹰打码平台
参考:https://www.bilibili.com/video/BV1Db4y1m7Ho?p=89
http://www.chaojiying.com/
#!/usr/bin/env python
# coding:utf-8

import requests
from hashlib import md5

class Chaojiying_Client(object):

    def __init__(self, username, password, soft_id):
        self.username = username
        password =  password.encode('utf8')
        self.password = md5(password).hexdigest()
        self.soft_id = soft_id
        self.base_params = {
            'user': self.username,
            'pass2': self.password,
            'softid': self.soft_id,
        }
        self.headers = {
            'Connection': 'Keep-Alive',
            'User-Agent': 'Mozilla/4.0 (compatible; MSIE 8.0; Windows NT 5.1; Trident/4.0)',
        }

    def PostPic(self, im, codetype):
        """
        im: 图片字节
        codetype: 题目类型 参考 http://www.chaojiying.com/price.html
        """
        params = {
            'codetype': codetype,
        }
        params.update(self.base_params)
        files = {'userfile': ('ccc.jpg', im)}
        r = requests.post('http://upload.chaojiying.net/Upload/Processing.php', data=params, files=files, headers=self.headers)
        return r.json()

    def ReportError(self, im_id):
        """
        im_id:报错题目的图片ID
        """
        params = {
            'id': im_id,
        }
        params.update(self.base_params)
        r = requests.post('http://upload.chaojiying.net/Upload/ReportError.php', data=params, headers=self.headers)
        return r.json()


if __name__ == '__main__':
	chaojiying = Chaojiying_Client('超级鹰用户名', '超级鹰用户名的密码', '96001')	#用户中心>>软件ID 生成一个替换 96001
	im = open('a.jpg', 'rb').read()													#本地图片文件路径 来替换 a.jpg 有时WIN系统须要//
	print(chaojiying.PostPic(im, 1902))											#1902 验证码类型  官方网站>>价格体系 3.4+版 print 后要加()
2.8 Requests结合lxml库
本案例采用Requests库读取百度新闻首页,F12打开浏览器,确定网页结构,然后通过lxml库进行解析,获取新闻标题和新闻链接,如下图所示:
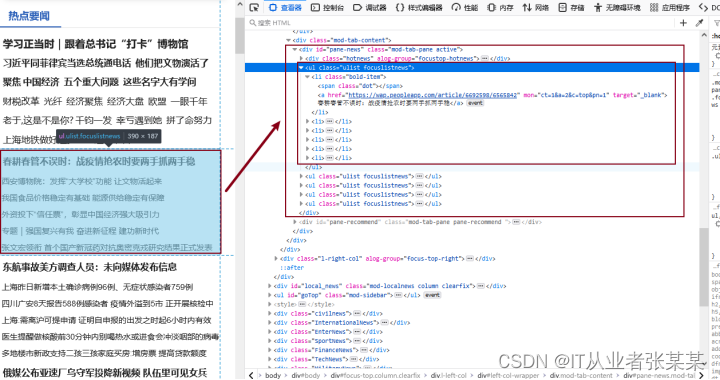
从图中可以看出,热点新闻都在id="pane-news"的div标签中,该标签下有多个ul标签,每个ul标签中都对应一些新闻。获取dive标签的第1个ul子节点,并获取其下得li标签。在li标签下有a标签,a标签中的文本为新闻标题,href为新闻连接。
代码如下:
import requests
from lxml import etree

response = requests.get('http://news.baidu.com/')  # 请求百度新闻
response.encoding='utf-8'  # 设置响应编码格式
selector = etree.HTML(response.text)  # 把响应数据传递给etree模块
bd_news = selector.xpath('//div[@id="pane-news"]/ul[1]/li')  # 解析获得新闻列表
for bd_new in bd_news:
    print(bd_new.xpath(".//a[1]/text()")[0])  # 输出新闻表题
    print(bd_new.xpath(".//a[1]/@href")[0])  #输出新闻链接
输出结果如下:
春耕春管不误时:战疫情抢农时要两手抓两手稳
https://wap.peoXXXXX692598/6565842
西安博物院:发挥“大学校”功能 让文物活起来
http://www.cnrXXXX18_525829518.shtml
…
张文宏领衔 首个国产新冠药对抗奥密克戎研究结果正式发表
http://baijiahXXXX8359231533
输出结果中可以看到,新闻标题和新闻连接均已获得。关于Requests还有更多的应用,本书不再进行拓展,读者可以自行研究。
2.9 爬取免费代理
from urllib import request,parse
import re,time,xlwt

# 这是登陆页面的url地址
url = 'https://so.gushiwen.cn/user/login.aspx?from=http://so.gushiwen.cn/user/collect.aspx'

headers = {
    'User-Agent': 'Mozilla/5.0 (Windows NT 10.0; Win64; x64) AppleWebKit/537.36 (KHTML, like Gecko) Chrome/92.0.4515.159 Safari/537.36'
}


url='https://www.kuaidaili.com/free/inha/'


def auto_index():
    s=1
    for loc in range(1,50):
        index=str(loc)+'/'
        time.sleep(2)#先休息2秒
        s=urllib_request(url,index,s)#得到行数 不断传进去 写入excel不断循环
    worksheet.save("代理ip.xls")


def urllib_request(url,index,rows):#请求url 返回html
    baseurl=url+index
    print(baseurl)
    rq = request.Request(baseurl, headers=headers)  # 添加请求
    resp = request.urlopen(rq)  # 访问
    html = resp.read().decode('utf-8')
    return compile_html(html,rows)#跳转

def compile_html(html,sheetLocation):
    style=re.compile(r"<tbody>\s(.*?)\s</table>",re.S) # ip表
    result=re.findall(style,html)[0] # 第一个数据
    # print(result)
    compile_c="<td data-title=\"IP\">(.*?)</td>"
    compile_p="<td data-title=\"PORT\">(.*?)</td>"
    compile_s="<td data-title=\"匿名度\">(.*?)</td>"
    compile_k="<td data-title=\"类型\">(.*?)</td>"
    compile_l="<td data-title=\"位置\">(.*?)</td>"
    compile_v="<td data-title=\"响应速度\">(.*?)</td>"
    compile_t="<td data-title=\"最后验证时间\">(.*?)</td>"
    #ip
    ipText=re.compile(compile_c,re.S)
    ip_text = re.findall(ipText, result)
    #端口
    portText = re.compile(compile_p,re.S)
    port_text= re.findall(portText, result)
    #匿名度
    securityText = re.compile(compile_s, re.S)
    s_text = re.findall(securityText, result)
    #协议
    kindText = re.compile(compile_k, re.S)
    k_text = re.findall(kindText, result)
    #位置
    locText = re.compile(compile_l, re.S)
    l_text = re.findall(locText, result)
    #速度
    vText = re.compile(compile_v, re.S)
    v_text = re.findall(vText, result)
    #更新时间
    tText = re.compile(compile_t, re.S)
    t_text = re.findall(tText, result)
    length=len(ip_text)
    for i in range(0,length):#左闭右开
        print(ip_text[i], port_text[i], s_text[i], l_text[i], k_text[i],v_text[i], t_text[i])
        print(sheetLocation,i)
        proxy_excel.write(sheetLocation,0,ip_text[i])
        proxy_excel.write(sheetLocation,1,port_text[i])
        proxy_excel.write(sheetLocation,2,s_text[i])
        proxy_excel.write(sheetLocation,3,l_text[i])
        proxy_excel.write(sheetLocation,4,k_text[i])
        proxy_excel.write(sheetLocation,5,v_text[i])
        proxy_excel.write(sheetLocation,6,t_text[i])
        sheetLocation+=1#写完一行加1
    return sheetLocation#返回列
    # print(ip_text,port_text,s_text,l_text,k_text,t_text)

def write_excel(worksheet):#创建文件
    proxy_excel = worksheet.add_sheet("proxySheet")
    proxy_excel.write(0, 0, 'ip')
    proxy_excel.write(0, 1, 'port')
    proxy_excel.write(0, 2, '安全性')
    proxy_excel.write(0, 3, '地区')
    proxy_excel.write(0, 4, '协议')
    proxy_excel.write(0, 5, '速度')
    proxy_excel.write(0, 6, '更新时间')
    return proxy_excel
worksheet = xlwt.Workbook(encoding='utf-8')
proxy_excel=write_excel(worksheet)
auto_index()
2.10 代理ip设置
import requests
from bs4 import BeautifulSoup
header={'User-Agent':'Mozilla/5.0 (Windows NT 10.0; WOW64) AppleWebKit/537.36 (KHTML, like Gecko) Chrome/69.0.3497.100 Safari/537.36'}
url_p='60.182.35.230'
port_p='8888'
proxies = {'http': url_p+':'+port_p,
           'https': url_p+':'+port_p
           }
url="http://www.httpbin.org/get"
header={'User-Agent':'Mozilla/5.0 (Windows NT 10.0; WOW64) AppleWebKit/537.36 (KHTML, like Gecko) Chrome/69.0.3497.100 Safari/537.36'}
req=requests.get(url,headers=header,proxies=proxies)
html=req.text
soup=BeautifulSoup(html,'lxml')
print(soup.text)


 649
649


 被折叠的 条评论
为什么被折叠?
被折叠的 条评论
为什么被折叠?
 到【灌水乐园】发言


