


应用程序
39章
UI项目我的通讯录
功能需求分析,界面搭建
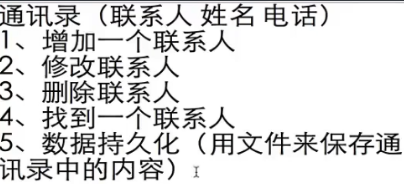
界面设计:刷新按钮不需要,只有多用户需要同步的时候才需要。
//Application.m
#import "RootTableViewController.m"
RootTableViewController * root=[[RootTableViewController alloc]initWithStyel:UITableStyleGrouped];//Plain
UINavigationController * nav=[[UINavigationController alloc]initWithRootViewController:root];
self.window.rootViewController=nav;
#import "NewViewController.h"
#import "MFPerson.h"
#import "ShowViewController.h"
@interface RootViewTableViewController:UITableViewController<PassValue,UISearchBarDelegate>
@property(strong,nonatomic)NSMutableDictionary * data;//当前数据
@property(strong,nonatomic)NSMutableDictionary * currentData;//当前数据
@property(strong,nonatomic)NSArray * keys;//当前数据对应
@property(strong,nonatomic)NSMutableArray * persons;//保存联系人数据
@property(strong,nonatomic)NSIndexPath * selectRow;//索引路径,记住选择的单元
//RootTableViewController.m
#import "NewViewController.h"
-(instancetype)initWithStyle:(UITableViewStyle)style{
self=[super initWithStyle:style];
if(self){
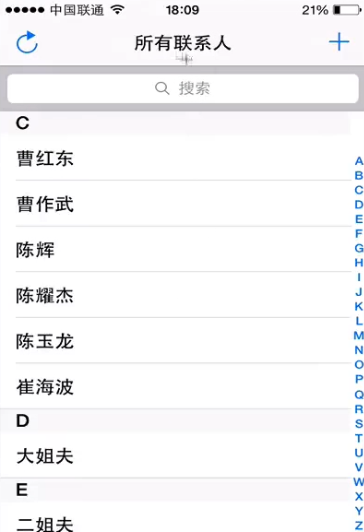
self.title=@"所有联系人";
//创建导航栏+号按钮
UIBarButtonItem * bbi=[[UIBarButtonSystemItem alloc]initWithBarButtonSystemItem:UIBarButtonSystemItemAdd target:self action:@selector(addTap:)];
//根视图能看到导航栏
self.navigationItem.rightBarButtonItem=bbi;
}
return self;
}
-(void)viewDidLoad{
[super viewDidLoad];
self.persons=[[NSMutableArray alloc]initWithCapacity:100];
self.data=[[NSMuatableDictionary alloc]initWithCapacity;100];
[self copyData];
self.currentData=[[NSMuatableDictionary alloc]initWithCapacity;100];
self.keys=[[self.currentData allKeys]sortedArrayUsingSelector:@selector(compare:)];
//添加搜索栏
UISearchBar * searchBar=[[UISearchBar alloc]initWithFrame:CGRectMake(0,0,320,40)];
searchBar.autocapitalizationType==UITextAuutocapitalizationTypeNo;
searchBar.autocorrecttionType=UITextAutocorrectionTypeNo;
searchBar.delegate=self;
self.tableView.tableHeaderView=searchBar;
}
//数据拷贝
-(void)copyData{
//清空
[self.currentData removeAllObjects];
NSArray * allkey=[self.data allKeys];
for(NSString * str in allkey){
NSArray * arr=[self.data objectForKey:str];
[self.currentDate setValue:arr forKey:str];
}
}
#pragma mark -搜索栏的事件
-(void)searchBarSearchButtonClickedd:(UISearchBar *)searchBar{//获得焦点
[self.currentData removeAllObjects];
NSString * searchstr=searchBar.text;
NSArray * allkey=[self.data allKeys];
for(NSString * str in allkey){
NSMuatbleArray * persons=[[NSMuatbleArray alloc]init];
NSArray * arr=[self.data objectForKey:str];
for(MFPerson * p in arr){
if([p.name rangOfString:searchstr].location!=NSNotFound){
[persons addObject:p];
}
}
if(persoons.count>0){
[self.currentData setValue:persons forKey:str];
}
}
//显示数据
self.keys=[self.currentData allKeys];
[self.tableView reloadData];
}
-(void)searchBarTextDidBeginEditing:(UISearchBar *)searchBar{//编辑获取焦点
searchBar.showCancelButton=YES;
}
-(void)searchBarCancelButtonClicked:(UISearchBar *)searchBar{
searchBar.showCancelButton=NO;
[searchBar resignFirstResponder];//失去焦点
[self copyData];
self.keys=[self.currentData allKeys];
[self.tableView reloadData];
}
#pragma mark -Table view data source
//显示分组标题
-(NSString *)tableView:(UITabelView *)tableView titleForHeaderInSection:(NSInteger)section{
return self.keys[section];
}
//提供分区索引
-(NSArray *)sectionIndexTitlesForTableView:(UITableView *)tableView{
return self.keys;
}
//分区数
-(NSInteger)numberOfSectionsInTableView:(UITableView * )tableView{
//return 1;
return self.keys.count;
}
//行数
-(NSInteger)tableView:(UITableView *)tableView numberOfRowsInSection:(NSInteger)Section{
//return self.persons.count;
NSString * str=self.keys[section];
//NSArray * arr=[self.data objectForKey:str];
NSArray * arr=[self.currentData objectForKey:str];
return arr.count;
}
//单元格
-(UITableViewCell *)tableView:(UITableView *)tableView cellForRowAtIndexPath:(NSIndexPath *)indexPath{
static NSString cellId=@"mycell";
//dequeueReusableCellWithIdentifier 每行可重复使用的单元格标识
UITableViewCell * cell=[tableView dequeueReusableCellWithIdentifier:cellId forIndexPath:indexPath];
if(cell==nil){
cell=[[UITableViewCell alloc]initWithStyle:UITableViewCellStyleSubtitle reuseIdentifier:cellId];//UITableViewCellStyleDefault 默认样式不显示子标签
}
NSString * str=self.keys[indexPath.section];
// NSArray * arr=[self.data objectForKey:str];
NSArray * arr=[self.currentData objectForKey:str];
MFPerson p=arr[indexPath.row];
cell.textLabel.text=p.name;
cell.accessoryType=UITableViewCellAccessoryDisclosureIndicator;//展示附件
cell.textLabel.text=p.py;
return cell;
}
//选中某一行
-(void)tabView:(UITableView *)tableView didSelectRowAtIndexPath:(NSIndexPath *)indexPath{
ShowViewController * show=[[ShowViewCOntroller alloc]init];
NSString * str=self.keys[indexPath.section];
NSArray * arr=[self.currentData objectForKey:str];
MFPerson p=arr[indexPath.row];
//MFPerson p=self.persons[indexPath.row];
show.strName=p.name;
show.strTel=p.tel;
show.delegate=self;//传过去
self.selecRow=indexPath;
[self.navigationController pushViewController:show animated:YES];
}
//汉字转拼音
-(NSStirng *)hanziToPinyYin:(NSString *)str{
NSMutableString *ms=[[NSMutableString alloc]initWithString:str];
if(CFStringTransform((_bridge CFMutableStringRef)ms,0,kCFStringTransformMandarrinLatin,NO)){
NSLog(@"Pingying:%@",ms);//带声标
}
if(CFStringTransfrom((_bridge CFMutableStringRef)ms,0,kCFStringTransformStripDiacritics,NO)){
NSLog(@"Pingying:%@",ms);//不带声标
}
return ms;
}
-(void)addName:(NSString *)name andTel:(NSString *)tel{
MFPerson * person=[[MFPerson alloc]init];
person.name=name;
person.tel=tel;
person.py=[self hanziToPinyin:name];
NSString * firstChar=[person.py subStringToIndex:1];
firstChar=[firstChar uppercaseString];
NSArray * array=[self.data objectForKey:firtChar];
NSMutableArray * array2;
if(array==nil){
array2=[[NSMutableArray alloc]initWithObject:person];
}else{
array2=[NSMutableArray arrayWithArray:array];
[array2 addObject:person];
}
[self.data setObejcet:array2 forKey:firstChar];
[self copyData];
self.keys=[[self.currentData allKeys]sortedArrayUsingSelector:@selector(compare:)];//更新关键字
//[self.persons addObject:person];
[self.tableView reloadData];
}
-(void)updateName:(NSString *)name andTel:(NSString *)tel{
UITableViewCell * cell=[self.tableView cellForRowAtIndexPath:self.selectRow];
NSString * str=self.keys[self.selectRow.section];
NSMutableArray * arr=[self.data objectForKey:str];
MFPerson p=arr[indexPath.row];
//MFPerson * person=self.persons[self.selectRow.row];
p.name=name;
p.tel=tel;
cell.textLabel.text=name;
}
-(void)deletePerson{
//[self.persons removeObjectAtIndex:self.selectRow.row];
NSString * str=self.keys[self.selectRow.section];
NSMutableArray * arr=[self.data objectForKey:str];
[arr removeObjectAtIndex:self.selectRow.row];
if(arr.count==0){
[self.currentData removeObjectForKey:str];
}
//[self.tableView deleteRowsAtIndexPaths:[NSArray arrayWihtObject:self.selectRow]withRowAnimation:UITableViewRowAnimationAutomatic];
[self copyData];
self.keys=[[self.currentData allKeys]sortedArrayUsingSelector:@selector(compare:)];
[self.tableView reloadData];
}
-(void)addTap:(UIBarButtonItem *)sender{
NewViewCOntroller * new=[[NewViewController alloc]init];
new.delegate=self;//使用self来代理new视图来调用行为操作数据
[self.navagationController pushViewController:new animated:YES];//显示
}
数据验证功能实现,修改联系人,拼音显示分组,搜索
添加数据到表视图:
添加完数据之后,数据需要传递回主视图进行显示,数据传送有两种方式:代理和属性。属性是一个固定数据,根视图无法处理。而代理可以通过调用行为的方式对数据进行处理。
@protocol PassValue
-(void)addName:(NSString *)name andTel:(NSString *)tel;
-(void)updateName:(NSString *)name andTel:(NSString *)tel;
-(void)deletePerson;
@end
@interface NewViewController:UIViewController<UIActionSheetDelegate>
{
BOOL bFlag;//标识是否保存了
}
@property(strong,nonatomic)UITextField * name;
@property(strong,nonatomic)UITextField * tel;
@property(strong,nonatomic)id<PassValue> delegate;
//NewViewController.m
@synthesize name,tel;
-(instancetype)initWithNiName:(NSString *)nibNameOrNil bundle:(NSBundle *)niBundleOrNil{
self=[super initWithNibName:nibNameOrNil bundle:niBundleOrNil];
if(self){
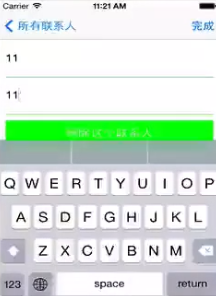
self.title=@"新联系人";
UIBarButtonItem * bbi=[[UIBarButtonItem alloc]initWithTile:@"完成" style:UIBarButtonItemSytleDone target:self action:@selector(finishTap:)];
UIBarButtonItem * bbi2=[[UIBarButtonItem alloc]initWithTile:@"取消" style:UIBarButtonItemSytleDone target:self action:@selector(cancelTap:)];
self.navigationItem.rightBarButtonItem=bbi;
self.navigationItem.rightBarButtonItem=bbi2;
name=[[UITextField alloc]initWithFrame:CGRectMake(10,74,300,40)];
// name.backgroundColor=[UIColor greenColor];
name.placeholder=@"姓名";
//要想文本框关闭键盘只需要实现一个事件即可
[name addTarger:self action:@selector(onExit:) forControlEvents:UIControlEventEditingDidEndOnExit];
//取消首字母大写
name.autocapitalizationType=UITextAutocapitalizationTypeNone;
[self.view addSubview:name];
//分割线
UIView * line=[[UIView alloc]initWithFrame:CGrectMake(10,124,300,1)];
[self.view addSubView:line];
tel=[[UITextField alloc]initWithFrame:CGRectMake(10,134,300,40)];
tel.placeholder=@"电话";
[tel addTarger:self action:@selector(onExit:) forControlEvents:UIControlEventEditingDidEndOnExit];
tel.autocapitalizationType=UITextAutocapitalizationTypeNone;
[self.view addSubview:tel];
UIView * line2=[[UIView alloc]initWithFrame:CGrectMake(10,184,300,1)];
[self.view addSubView:line2];
}
return self;
}
-(void)viewWillappear:(BOOL)animated{
bFlag=NO;
}
//添加视图将要消失的时候询问是否要保存数据
//-(void)viewWillDisappear:(BOOL)animated{
// if(!bFlag){
/*
UIActionSheet * sheet[[UIActionSheet alloc]initWihtTitle:@"是否保存",delegate:self cancelButtonTitle:@"否" destructiveButtonTitle:@"是" otherButtonTitles:nil,nil];
[sheet showInView:self.view];
*/
/*
//验证输入数据
NSString * str1=name.text;
NSString * str2=tel.text;
//剔除两端空格
str1=[str1 stringByTrimmingCharactersInSet:[NSCharacterSet whitespaceCharacterSet]];
str2=[str1 stringByTrimmingCharactersInSet:[NSCharacterSet whitespaceCharacterSet]];
if(!bFlag&&(![str1 isEqualToString:@""]||![str2 isEqualToString:@""])){
UIAlertView * alert=[[UIAlertView alloc]initWithTitle:@"友情提示" message:@"是否保存" delegate:self cancelButtonTitle:@"知道" otherButtonTitles:nil,nil];
[alert show];
return ;
}
*/
//都出现了bug说明返回按钮无法操作警报或者操作表,需修改代码自定义按钮
// }
// bFlag=YES;
//}
-(void)cancelTap:(id)sender{
/*bug:
NSString * str1=name.text;
NSString * str2=tel.text;
str1=[str1 stringByTrimmingCharactersInSet:[NSCharacterSet whitespaceCharacterSet]];
str2=[str1 stringByTrimmingCharactersInSet:[NSCharacterSet whitespaceCharacterSet]];
if(!bFlag&&(![str1 isEqualToString:@""]||![str2 isEqualToString:@""])){
UIAlertView * alert=[[UIAlertView alloc]initWithTitle:@"友情提示" message:@"是否保存" delegate:self cancelButtonTitle:@"知道" otherButtonTitles:nil,nil];
[alert show];
}
*/
[self.navigationController popViewCOntrollerAnimated:YES];
}
-(void)onExit:(id)sender{
}
-(void)finishTap:(id)sender{
//验证输入数据
NSString * str1=name.text;
NSString * str2=tel.text;
//剔除两端空格
str1=[str1 stringByTrimmingCharactersInSet:[NSCharacterSet whitespaceCharacterSet]];
str2=[str1 stringByTrimmingCharactersInSet:[NSCharacterSet whitespaceCharacterSet]];
if([str1 isEqualToString:@""]){
UIAlertView * alert=[[UIAlertView alloc]initWithTitle:@"友情提示" message:@"姓名不能为空" delegate:self cancelButtonTitle:@"知道" otherButtonTitles:nil,nil];
[alert show];
name.text=@"";
//获得焦点
[name becomeFirstResponder];
return ;
}
if([str2 isEqualToString:@""]){
UIAlertView * alert=[[UIAlertView alloc]initWithTitle:@"友情提示" message:@"电话不能为空" delegate:self cancelButtonTitle:@"知道" otherButtonTitles:nil,nil];
[alert show];
tel.text=@"";
[tel becomeFirstResponder];
return ;
}
//代理 传输数据->rootView
[self.delegate addName:str1 andTel:str2];
bFlag=YES://数据已经保存
[self.navigationController popViewControllerAnimated:YES];//弹出视图
}
@interface MFPerson:NSObject
@property (strong,nonatomic)NSString * name;
@property (strong,nonatomic)NSString * tel;
@property (strong,nonatomic)NSString * py;
//MFPerson.m
@synthesize name,tel,py;
添加联系人
#import "NewViewController.h"//导入删除协议的头文件
@interface ShowViewController:UIViewController<UIAlertViewDelegate,UIActionSheetDelegate,PassValue>
@property(strong,nonatomic)UITextField * name;
@property(strong,nonatomic)UITextField * tel;
@property(strong,nonatomic)NSString * strName;
@property(strong,nonatomic)NSString * strTel;
@property(strong,nonatomic)UIButton * btnDelete;
@property(strong,nonatomic)id<PassValue> delegate;
//ShowViewController.m
@synthesize name,tel,strName,strTel,btnDelete;
-(instancetype)initWithNiName:(NSString *)nibNameOrNil bundle:(NSBundle *)niBundleOrNil{
    self=[super initWithNibName:nibNameOrNil bundle:niBundleOrNil];
    if(self){
        UIBarButtonItem * bbi=[[UIBarButtonItem alloc]initWithTile:@"编辑" style:UIBarButtonItemSytleDone target:self action:@selector(editTap:)];
        self.navigationItem.rightBarButtonItem=bbi;
        name=[[UITextField alloc]initWithFrame:CGRectMake(10,74,300,40)];
        name.placeholder=@"姓名";
        [name addTarger:self action:@selector(onExit:) forControlEvents:UIControlEventEditingDidEndOnExit];
        name.enabled=NO;
        name.autocapitalizationType=UITextAutocapitalizationTypeNone;
        [self.view addSubview:name];
        UIView * line=[[UIView alloc]initWithFrame:CGrectMake(10,124,300,1)];
        [self.view addSubView:line];
        tel=[[UITextField alloc]initWithFrame:CGRectMake(10,134,300,40)];
        tel.placeholder=@"电话";
        [tel addTarger:self action:@selector(onExit:) forControlEvents:UIControlEventEditingDidEndOnExit];
        tel.enabled=NO;
        tel.autocapitalizationType=UITextAutocapitalizationTypeNone;
        [self.view addSubview:tel];
        UIView * line2=[[UIView alloc]initWithFrame:CGrectMake(10,184,300,1)];
        [self.view addSubView:line2];
        btnDelete=[[UIButton alloc]initWithFrame:CGRectMake(10,194,300,40)];
        btnDelete.backgroundColor=[UIColor redColor];
        [btn setTitle:@"删除" forState:UIControlStaeteNormal];
        [btenDelete.hidden=YES];
        [btnDelete addTargrt:self action:@selector(deleTap:) forControlEvents:UIControlEventTouchUpInside];
        [self.view addSubview:btnDelete];
    }
    return self;
}
//添加代理后可实现
-(void)actionSheet:(UIActionSheet *)actionSheet clickedButtonAtIndex:(NSIneger)buttonIndex{
    if(buttonIndex==0){
        [self.delegate deletePerson];
        [self.navigationController popViewControllerAnimated:YES];//Animated动画
    }
}
/*
-(void)alertView:(UIAlertView *)alertView clickedButtonAtIndex:(NSIneger)buttonIndex{
    if(buttonIndex==0){
        [self.delegate deletePerson];
        [self.navigationController popViewControllerAnimated:YES];//Animated动画
    }
}
*/
-(void)deleTap:(UIButton *)sender{
    /*
    UIAlertView * alert=[[UIAlertView alloc]initWithTitle:@"提示" message@"确定删除" delegate:self cancelButtonTitle:@"是",otherButtonTitles:@"否",nil];
    */
    UIActionSheet * as=[[UIActionSheet alloc]initWithTitle:@"提示",delegate:self cancelButtonTitle:@"否",destructiveButtonTitle:@"是",otherButtnTitles:nil,nil];
    [as showInView:self.view];
}
-(void)onExit:(id)sender{}
-(void)editTap:(UIBarButtonItem *)sender{
    NSString * title=sender.title;
    if([title isEquealToString:@"编辑"]){
        name.enabled=YES:
        tel.enabled=YES:
        btnDelete.hidden=NO;
        //让当前编辑编程完成
        sender.title=@"完成";
    }
    else{
        NSString * str1=name.text;
        NSString * str2=tel.text;
        str1=[str1 stringByTrimmingCharactersInSet:[NSCharacterSet whitespaceCharacterSet]];
        str2=[str1 stringByTrimmingCharactersInSet:[NSCharacterSet whitespaceCharacterSet]];
        if([str1 isEqualToString:@""]){
            UIAlertView * alert=[[UIAlertView alloc]initWithTitle:@"友情提示" message:@"姓名不能为空" delegate:nil cancelButtonTitle:@"知道" otherButtonTitles:nil,nil];
            [alert show];
            name.text=@"";
            [name becomeFirstResponder];
            return ;
        }
        if([str2 isEqualToString:@""]){
            UIAlertView * alert=[[UIAlertView alloc]initWithTitle:@"友情提示" message:@"电话不能为空" delegate:nil cancelButtonTitle:@"知道" otherButtonTitles:nil,nil];
            [alert show];
            tel.text=@"";
            [tel becomeFirstResponder];
            return ;
        }
        [self.delegate updateName:strName andTel:strTel];
        [self.navigationControl popViewCOntrollerAnimated:nil];
    }

}
-(void)viewDidAppear:(BOOL)animated{
    name.text=self.strName;
    tel.text=self.strTel;
//    self.title=self.strName;
}
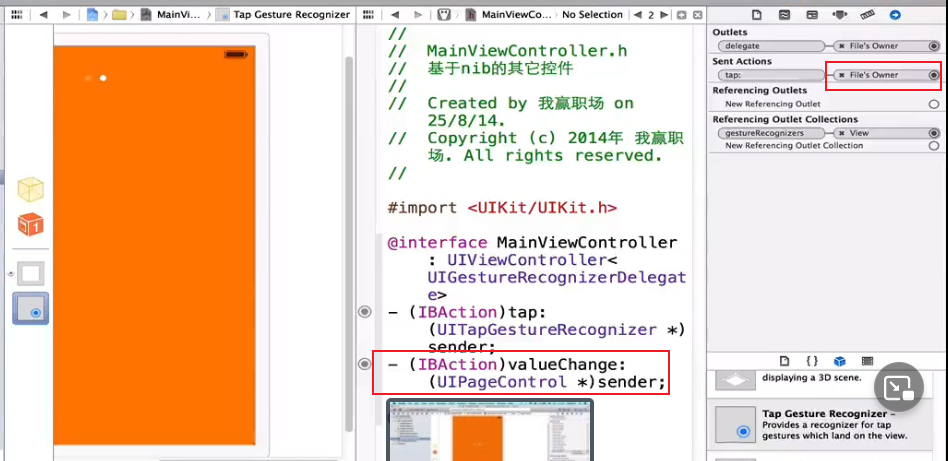
40章
手势识别。
UIGestureRecognizer
//AppDelegate.m
#import MainViewController.h
MainViewController * main=[[MainViewControlller alloc]init];
self.window.rootViewController=main;
//MainViewController.m
-(void)viewDidLoad{
    [super viewDidLoad];
    self.backgroundColor=[UIColor greenColor];
}
//触摸有四个事件
-(void)touchesBegan:(NSSet *)touches withEvent:(UIEvent *)event{
    NSLog(@"%d",[touches.count]);//手指头的个数
    UITouch * touch=[touches anyObject];//手指对象
    touch.tapCount;//点击次数
}
-(void)touchesMoved:(NSSet *)touches withEvent:(UIEvent *)event{
        UITouch * touch=[touches anyObject];
        CGPoint point=[touch locationInView:self.view];
}
-(void)touchesCanceled:(NSSet *)touches withEvent:(UIEvent *)event{

}
-(void)touchesEnded:(NSSet *)touches withEvent:(UIEvetn *)event{

}
UITapGestureRecognizer
点击事件
//AppDelegate.m
#import MainViewController.h
MainViewController * main=[[MainViewControlller alloc]init];
self.window.rootViewController=main;
//MainViewController.m
-(void)viewDidLoad{
    [super viewDidLoad];
    self.backgroundColor=[UIColor greenColor];
    //点击识别器对象
    UITapGestureRecognizer * tgr1=[[UITapGestureRecognizer alloc]initWithTarget:self action:@selector(tap1:)];
    tgr1.numberOfTapRequied=1;//单击事件,点击次数,双击=2
    [self.view addGestureRecognizer:tgr1];//放在视图上
    UITapGestureRecognizer * tgr2=[[UITapGestureRecognizer alloc]initWithTarget:self action:@selector(tap2:)];
    tgr1.numberOfTapRequied=2;
    [self.view addGestureRecognizer:tgr2];
    //区别单击和双击,双击识别失败才检测单击
    [tgr1 requireGestureRecognizerToFail:tgr2];
}
-(void)tap1:(id)sender{
    NSLog(@"tap1");
}
-(void)tap2:(id)sender{
     NSLog(@"tap2");
}
UISwipeGestureRecognizer
滑动:上下左右滑动
//AppDelegate.m
#import MainViewController.h
MainViewController * main=[[MainViewControlller alloc]init];
self.window.rootViewController=main;
//MainViewController.m
-(void)viewDidLoad{
    [super viewDidLoad];
    self.backgroundColor=[UIColor greenColor];
    //创建滑动识别器对象
    UISwipeGestureRecognizer * sgr1=[[UISwipeGestureRecognizer alloc]initWithTarget:self action:@selector(swipe1:)];
    //设置滑动方向
    [sgr1 setDirection:UISwipeGestureRecignizerDirectionLeft];
    [self.view addGestureRecognizer:sgr1];

    UISwipeGestureRecognizer * sgr2=[[UISwipeGestureRecognizer alloc]initWithTarget:self action:@selector(swipe3:)];
    [sgr2 setDirection:UISwipeGestureRecignizerDirectionRight];
    [self.view addGestureRecognizer:sgr2];

    UISwipeGestureRecognizer * sgr3=[[UISwipeGestureRecognizer alloc]initWithTarget:self action:@selector(swipe3:)];
    [sgr3 setDirection:UISwipeGestureRecignizerDirectionUp];
    [self.view addGestureRecognizer:sgr3];

    UISwipeGestureRecognizer * sgr4=[[UISwipeGestureRecognizer alloc]initWithTarget:self action:@selector(swipe4:)];
    [sgr4 setDirection:UISwipeGestureRecignizerDirectionDown];
    [self.view addGestureRecognizer:sgr4];
}
-(void)swipe1:(id)sender{
    NSLog(@"左滑动");
}
-(void)swipe2:(id)sender{
    NSLog(@"右滑动");
}
-(void)swipe3:(id)sender{
    NSLog(@"上滑动");
}
-(void)swipe4:(id)sender{
    NSLog(@"下滑动");
}
UILongPressGestureRecognizer
长按
//AppDelegate.m
#import MainViewController.h
MainViewController * main=[[MainViewControlller alloc]init];
self.window.rootViewController=main;
//MainViewController.m
-(void)viewDidLoad{
    [super viewDidLoad];
    self.backgroundColor=[UIColor greenColor];
    UILongPressGestureRecognizer * lgr=[[UILongPressGestureRecognizer alloc]initWithTarget:self action:(longPress:)];
    //设定时间
    lgr.minimumPressDuration=4;
    [self.view addGestureRecognizer:lgr];
}
-(void)longPress:(UILongPressGestureRecognizer *)sender{//响应两次
    //NSLog(@"长按");
    //按下到了4秒
    if(sender.state==UIGestureRecognizerStateBegan){
        NSLog(@"长按开始");
    }
    //抬起手指
    if(sender.state==UIGestureRecognizerStateEnded){
        NSLog(@"长按结束");
    }
}
捏合和旋转
//AppDelegate.m
#import MainViewController.h
MainViewController * main=[[MainViewControlller alloc]init];
self.window.rootViewController=main;
//MainViewController.m
-(void)viewDidLoad{
    [super viewDidLoad];
    self.backgroundColor=[UIColor greenColor];
    UIPinchGestrueRecognizer * pgr=[[UIPinchGestureRecognizer alloc]initWithTarget:sefl action:@selector(pinch:)];
    [self.view addGestureRecognizer:pgr];
    UIRotationGestrueRecognizer * rgr=[[UIRotationGestureRecognizer alloc]initWithTarget:sefl action:@selector(rotation:)];
    [self.view addGestureRecognizer:pgr];
}
//模拟器模拟捏合 按住alt键
-(void)pinch:(UIPinchGestrueRecognizer *)sender{
    NSLog(@"缩放值:%d",sender.scale);
}
-(void)rotation:(UIRotationGestrueRecognizer *)sender{
    NSLog(@"旋转弧度增量:%d",sender.rotation);
    NSLog(@"旋转角度:%g",sender.rotation*180/M_PI);
}
UIPanGestureRecognizer
拖拽
//AppDelegate.m
#import MainViewController.h
MainViewController * main=[[MainViewControlller alloc]init];
self.window.rootViewController=main;
//MainViewController.m
-(void)viewDidLoad{
    [super viewDidLoad];
    self.backgroundColor=[UIColor greenColor];
    UIPanGestrueRecognizer * pgr=[[UIPanGestureRecognizer alloc]initWithTarger:self action:@selector(pan:)];
    [self.view addGestureRecognizer:pgr];
}
-(void)pan:(UIPanGestureRecognizer *)sender{
    NSLog(@"拖拽视图");
    CGPoint point=[sender translationInView:self.view];//移动点到前一点变化值
    sender.view.center=CGPointMake(sender.view.center.x+point.x,sender.view.center.y+point.y);
    //复位,为下次准备
    [sender setTranslation:CGPointZero inView:self.view];

}
/*
用touch实现拖拽,相对复杂
-(void)touchesBegan:(NSSet *)touches withEvent:(UIEvent *)event{
    //记录位置
}
-(void)touchesMoved:(NSSet *)touches withEvent:(UIEvent *)event{
   //每次得到移动位置
   //计算和前一次位置距离
   //移动控件
   //记录当前位置
}
-(void)touchesCanceled:(NSSet *)touches withEvent:(UIEvent *)event{

}
-(void)touchesEnded:(NSSet *)touches withEvent:(UIEvetn *)event{

}
*/
41-42章
动画
Transform
//Appdelegate.m
#import "MainViewController.h"
MainViewController * main=[[MainViewController alloc]init];
self.window.rootViewController=main;
[self.window makeKeyAndVisible];
@interface
{
    UILabel * label;
}
//MainViewController.m
-(void)viewDidLoad{
    [super viewDidLoad];
    self.view.backgroundColor=[UIColor greenColor];
    label=[[UILabel alloc]initWithFrame:CGRectMake(60,60,200,40)];
    label.backgroundColor=[UIColor blueColor];
    label.text=@"动画";
    label.textColor=[UIColor whiteCoor];
    label.textAlignment=NSTextAlignmentCenter;
    [self.view addSubview:label];

    UIButton * move=[[UIButton alloc]initWithFrame:CGRectMake(10,300,80,40)];
    move.backgroundColor=[UIColor blackColor];
    [move setTitle:@"移动" forState:UIControlStateNomal];
    [move addTarget:self action:@selector(move) forControlEvents:UIControlEventTouchUpInside];
    [self.view addSubview:move];

    UIButton * scale=[[UIButton alloc]initWithFrame:CGRectMake(110,300,80,40)];
    scale.backgroundColor=[UIColor blackColor];
    [scale setTitle:@"缩放" forState:UIControlStateNomal];
    [scale addTarget:self action:@selector(scale) forControlEvents:UIControlEventTouchUpInside];
    [self.view addSubview:scale];

    UIButton * rotation=[[UIButton alloc]initWithFrame:CGRectMake(210,300,80,40)];
    rotation.backgroundColor=[UIColor blackColor];
    [rotation setTitle:@"旋转" forState:UIControlStateNomal];
    [rotation addTarget:self action:@selector(rotation) forControlEvents:UIControlEventTouchUpInside];
    [self.view addSubview:rotation];
}
-(void)move{
    //NSString * old=NSStringFromCGPoint(lable.center);
    NSString * old=NSStringFromCGRect(lable.frame);
    NSLog(@"%@",old);
    label.transform=CGAffineTransformMakeTranslation(50,50);
    old=NSStringFromCGPoint(lable.frame);
    NSLog(@"%@",old);//中心点没有变化,frame+增量
}
-(void)scale{
    label.transform=CGAffineTransformMakeScale(2,2);//x,y
}
-(void)rotation{
    label.transform=CGAffineTransFormMakeRoatation(90*M_PI/180);
}
适配
界面适配
//Appdelegate.m
#import "MainViewController.h"
MainViewController * main=[[MainViewController alloc]init];
self.window.rootViewController=main;
[self.window makeKeyAndVisible];
@interface
//动态尺寸
#define SCREENWIDTH [[UIScreen mainScreen] bounds].size.width
#define SCREENHEIGHT [[UIScreen mainScreen] bounds].size.height;
//MainViewController.m
-(void)viewDidLoad{
    [super viewDidLoad];
    NSLog(@"w=%g,h=%g",SCREENWIDTH,SCREENHEIGHT);
    self.view.backgroundColor=[UIColor greenColor];
    //上下都是距离20,无论在那个尺寸手机
    UITextField * text=[[UITextField alloc]initWithFrame:CGRectMake(20,20,SCREENWIDTH-20*2,50)];
    [self.view addSubview:text];
    UIButton * btn=[[UIButton alloc]initWithFrame:CGRectMake(20,20,SCREENHEIGHT-20-50,SCREENWIDTH-20*2,50)];
    btn.backgroundColor=[UIColor redColor];
    [self.view addSubvie:btn];
}
转屏适配
//Appdelegate.m
#import "MainViewController.h"
MainViewController * main=[[MainViewController alloc]init];
self.window.rootViewController=main;
[self.window makeKeyAndVisible];
@interface
#define SCREENWIDTH [[UIScreen mainScreen] bounds].size.width
#define SCREENHEIGHT [[UIScreen mainScreen] bounds].size.height;
{
    UIButton * btn;
    float * w;
    float * h;
}
//MainViewController.m
-(void)viewDidLoad{
    [super viewDidLoad];
    NSLog(@"w=%g,h=%g",SCREENWIDTH,SCREENHEIGHT);
    w=SCREENWIDTH;
    h=SCREENHEIGHT;
    self.view.backgroundColor=[UIColor greenColor];
    UITextField * text=[[UITextField alloc]initWithFrame:CGRectMake(20,20,SCREENWIDTH-2*20,50)];
    [self.view addSubview:text];
    btn=[[UIButton alloc]initWithFrame:CGRectMake(20,20,SCREENHEIGHT-20-50,200,50)];
    btn.backgroundColor=[UIColor redColor];
    [self.view addSubvie:btn];
    //注册通知
    [[NSNotificationCenter defaultCenter]addObsever:self selector:@selector(change) name: UIDevieOrientationDidChangeNotification object:nil]
}
-(void)change{
    //检测转屏的方向
    if([[UIDivce currentDivce]orientation]==UIDeviceOrientationPortrait){
        /*
        CGRect rect=self.view.frame;
        NSString * str=NSStringFromCGRect(rect);
        NSLog(@"%@",str);
        NSLog(@"home在下");
        */
//        NSLog(@"w=%g,h=%g",SCREENWIDTH,SCREENHEIGHT);会改变
        self.view.bounds=CGRextMake(0,0,w,h);
        btn=[[UIButton alloc]initWithFrame:CGRectMake(20,20,SCREENHEIGHT-20-50,200,50)];
    }
    if([[UIDivce currentDivce]orientation]==UIDeviceOrientationLandscapeLeft){
        /*
        CGRect rect=self.view.frame;
        NSString * str=NSStringFromCGRect(rect);
        NSLog(@"%@",str);
        NSLog(@"home在左");
        */
//        self.view.bounds=CGRextMake(0,0,h,w);
        btn=[[UIButton alloc]initWithFrame:CGRectMake(20,20,w-20-50,200,50)];
    }
    if([[UIDivce currentDivce]orientation]==UIDeviceOrientationLandscapeRight){
        /*
        CGRect rect=self.view.frame;
        NSString * str=NSStringFromCGRect(rect);
        NSLog(@"%@",str);
        NSLog(@"home在右");
        */
//        self.view.bounds=CGRextMake(0,0,h,w);
        btn=[[UIButton alloc]initWithFrame:CGRectMake(20,20,w-20-50,200,50)];
    }
    if([[UIDivce currentDivce]orientation]==UIDeviceOrientationUpsideDown){
        /*
        CGRect rect=self.view.frame;
        NSString * str=NSStringFromCGRect(rect);//frame坐标四方向相同,不改变
        NSLog(@"%@",str);
        NSLog(@"home在上");
        */
        //self.view.bounds=CGRextMake(0,0,w,h);
        //不允许home键在上的
    }
}
/*
//旧方法:检测转屏
-(void)willAnimateRotationToInterfaceOrientation:(UIInterfaceOrientation)toInterfaceOrientation duration:(NSTimeInterval)duration{
    NSLog(@"转屏了!");
}
*/
//新方法:注册中心通知技术
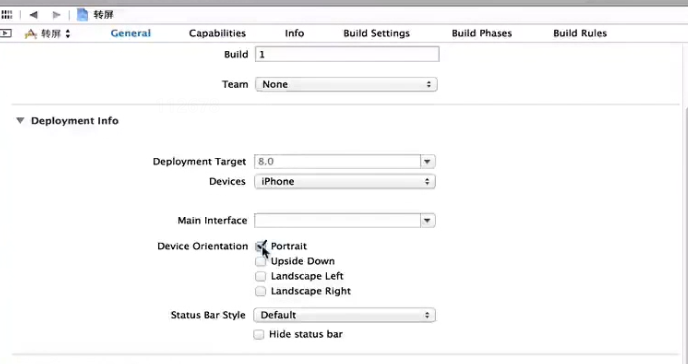
自动转屏适配调节
//Appdelegate.m
#import "MainViewController.h"
MainViewController * main=[[MainViewController alloc]init];
self.window.rootViewController=main;
[self.window makeKeyAndVisible];
@interface
#define SCREENWIDTH [[UIScreen mainScreen] bounds].size.width
#define SCREENHEIGHT [[UIScreen mainScreen] bounds].size.height;
{
    UIButton * btn;
    UITextField * text;
}
//MainViewController.m
-(void)viewDidLoad{
    [super viewDidLoad];
    NSLog(@"w=%g,h=%g",SCREENWIDTH,SCREENHEIGHT);
    //自动调节
    self.view.backgroundColor=[UIColor greenColor];
    //距离左右距离固定
    text=[[UITextField alloc]initWithFrame:CGRectMake(20,20,SCREENWIDTH-2*20,50)];
  text.autoresizeingMask=UIViewAutoresizeingFLexibleRightMargin|UIViewAutoresizingFlexibleLefgMargin|UIViewAutoresizeingFlexibleWidth;//距离左右距离不变,宽度自动变化

    [self.view addSubview:text];
    btn=[[UIButton alloc]initWithFrame:CGRectMake(20,20,SCREENHEIGHT-20-50,SCREENWIDTH-2*20,50)];
    btn.backgroundColor=[UIColor redColor];
  btn.autoresizeingMask=UIViewAutoresizeingFLexibleRightMargin|UIViewAutoresizingFlexibleLefgMargin|UIViewAutoresizeingFlexibleWidth|UIViewAutoresizeingTopMargin;
    [self.view addSubvie:btn];
}
第三种解决转屏的方案:交换视图
//APPdelegate.m
#import "MainViewController.h"
MainViewController * main=[[MainViewController alloc]init];
self.window.rootVieController=main;
[self.window makeKeyAndVisible];
#import "Portrait.h"
#import "Landscape.h"
@interface
{
    Portrait * v;
    Landscape * h;
    float width,height;
}
//MainViewController.m
-(void)viewDidLoad{
    [super viewDidLoad];
    self.backgroundColor=[UIColor greenColor];
    v=[[Portrait alloc]init];
    h=[[Landscape alloc]init];
    width=[[UIScreen mainScreen]bounds].size.width;
    height=[[UIScreeen mainScreen]bounds].size.height;
    //得到屏幕转向
    [[NSNotificationCenter defaultCenter]addObserver:self selector:@selector(change) name:UIDeviceOrientationDidChangeNotification object:nil];
}
-(void)change{
    NSLog(@"转屏");
    if([[UIDevice currentDevice]orientation]==UIDeviceOrientationPortrait){
         self.view=v;
         self.view.frame=CGRectMake(0,0,width,height);
    }
    else if([[UIDevice currentDevice]orientation]==UIDeviceOrientationLeft){
        self.view=h;
        self.view.frame=CGRectMake(0,0,height,width);
    }
    else if([[UIDevice currentDevice]orientation]==UIDeviceOrientationRight){
        self.view=h;
        self.view.frame=CGRectMake(0,0,height,width);
    }
    //还有一个上边,这个事件不应该进行处理
}
//Portrait.m 肖像竖着  继承UIView
-(instancetype)initWithFrame:(CGRect)frame{
    self=[super initWithFrame:frame];
    if(self){
        self.backgroundColor=[UIColor redColor];
    }
    return self;
}
//Lanscape.m 景观横着 继承UIView
-(instancetype)initWithFrame:(CGRect)frame{
    self=[super initWithFrame:frame];
    if(self){
        self.backgroundColor=[UIColor blueColor];
    }
    return self;
}
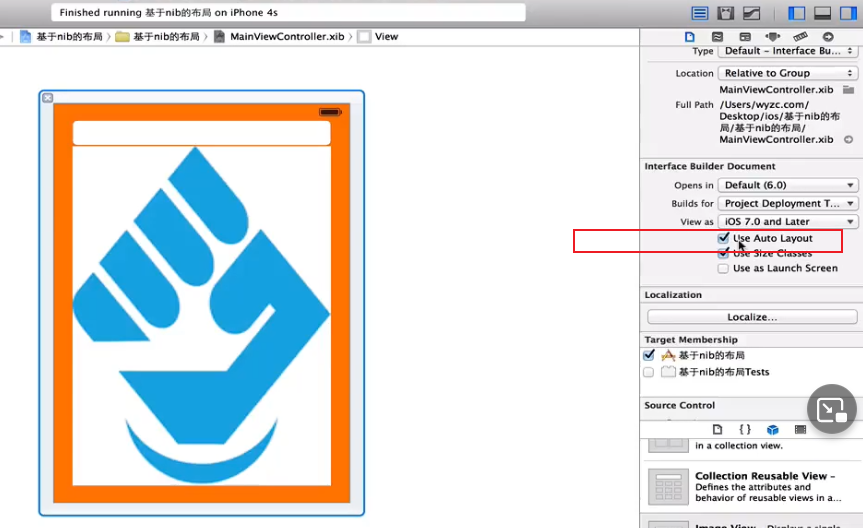
Auto Layout
大屏幕适配自动布局:新技术,采用约束
使用代码进行约束自动布局
//APPdelegate.m
[self.window makeKeyAndVisible];
@interface
//ViewController.m
-(void)viewDidLoad{
    [super viewDidLoad];
    //UIView * left=[[UIView alloc]initWithFrame:CGRectMake(20,20,100,100)];
    UIView * left=[[UIView alloc]init];
    left.translatesAutoresizingMaskIntoConstraints=NO;//关闭系统自带约束
    left.backgroundColor=[UIColor redColor];
    [self.view addSubview:left];
   // UIView * right=[[UIView alloc]initWithFrame:CGRectMake(self.view.frame.size-20-100,20,100,100)];
    UIView * right=[[UIView alloc]init];
    right.translatesAutoresizingMaskIntoConstraints=NO;
    right.backgroundColor=[UIColor greenColor];
    [self.view addSubview:right];
    NSLayoutConstraint * constraint;
    //约束 离左20 离上20 高度20 宽度20
    //左约束 NSLayoutAttributeLeading
    constraint=[NSLayoutConstraint constraintWithItem:left attribute:NSLayoutAttributeLeading relatedBy:NSLayoutRelationEqual toItem:self.view attribute:NSLayoutAttributeLeading multiplier:1.0 constant:20.0];
    [self.view addSubview:constraint];
     //上约束 NSLayoutAttributeTop
    constraint=[NSLayoutConstraint constraintWithItem:left attribute:NSLayoutAttributeTop relatedBy:NSLayoutRelationEqual toItem:self.view attribute:NSLayoutAttributeTop multiplier:1.0 constant:20.0];
    [self.view addSubview:constraint];
     //宽度约束
    constraint=[NSLayoutConstraint constraintWithItem:left attribute:NSLayoutAttributeWidth relatedBy:NSLayoutRelationEqual toItem:nil attribute:NSLayoutAttributeNoAnAttribute multiplier:1.0 constant:100.0];
    [self.view addSubview:constraint];
     //高度约束
    constraint=[NSLayoutConstraint constraintWithItem:left attribute:NSLayoutAttributeHeight relatedBy:NSLayoutRelationEqual toItem:nil attribute:NSLayoutAttributeNoAnAttribute multiplier:1.0 constant:100.0];
    [self.view addSubview:constraint];

    //右约束
    constraint=[NSLayoutConstraint constraintWithItem:right attribute:NSLayoutAttributeTrailing relatedBy:NSLayoutRelationEqual toItem:self.view attribute:NSLayoutAttributeTrailing multiplier:1.0 constant:-20.0];
    [self.view addSubview:constraint];
     //上约束 NSLayoutAttributeTop
    constraint=[NSLayoutConstraint constraintWithItem:right attribute:NSLayoutAttributeTop relatedBy:NSLayoutRelationEqual toItem:self.view attribute:NSLayoutAttributeTop multiplier:1.0 constant:20.0];
    [self.view addSubview:constraint];
     //宽度约束
    constraint=[NSLayoutConstraint constraintWithItem:right attribute:NSLayoutAttributeWidth relatedBy:NSLayoutRelationEqual toItem:nil attribute:NSLayoutAttributeNoAnAttribute multiplier:1.0 constant:100.0];
    [self.view addSubview:constraint];
     //高度约束
    constraint=[NSLayoutConstraint constraintWithItem:right attribute:NSLayoutAttributeHeight relatedBy:NSLayoutRelationEqual toItem:nil attribute:NSLayoutAttributeNoAnAttribute multiplier:1.0 constant:100.0];
    [self.view addSubview:constraint];
}
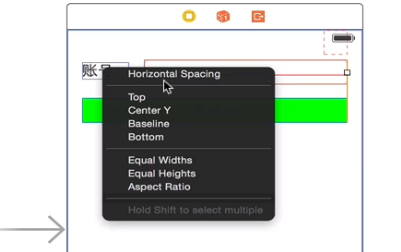
基于界面的约束自动布局
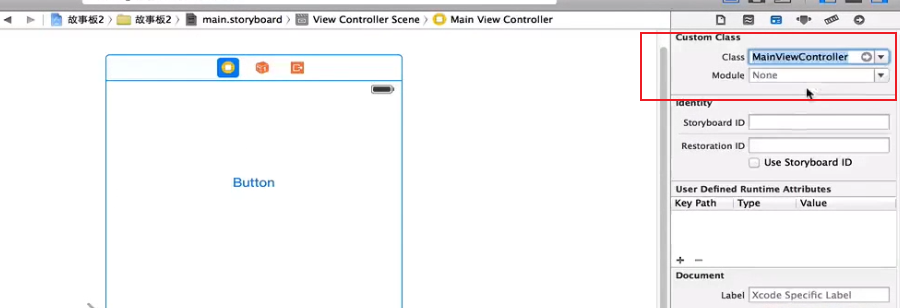
Main.storyboard View Controller
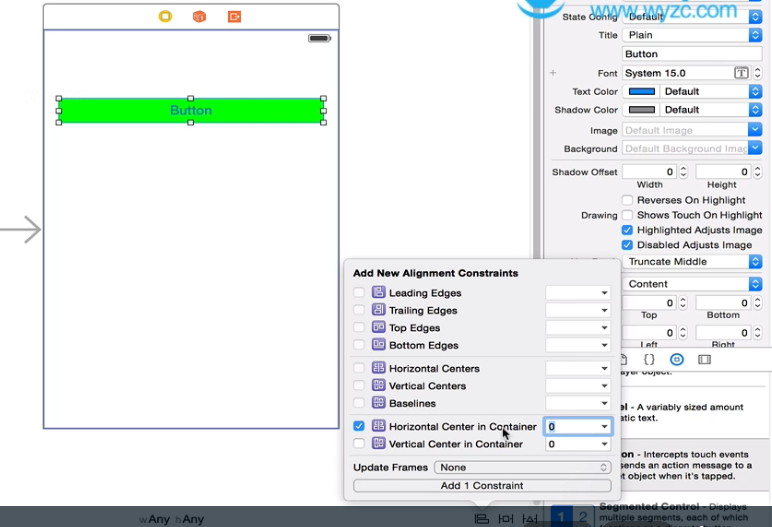
设置左右距离一定:
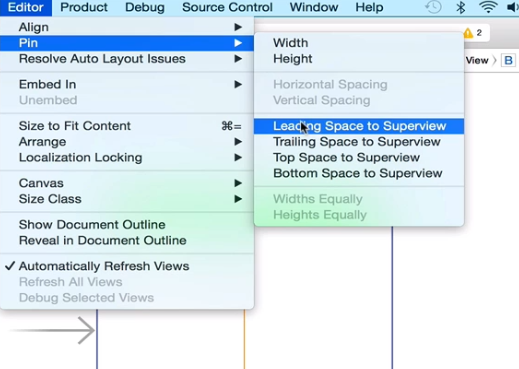
两控件左对齐:
两控件相对距离:command键连选,拖拽
43章
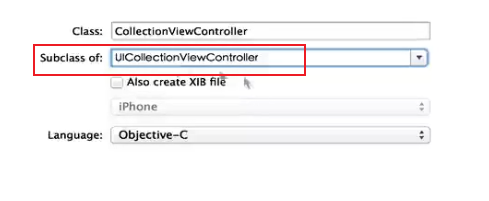
UISplitViewController
分割和弹出视图UISplitViewController:用于ipad上
//Appdelegate.m
#import "MenuTableViewController.h"
#import "DetailViewController.h"
MenuViewController * menu=[[MenuViewController alloc]init];
DetailViewCOntroller * detail=[[DetailViewController alloc]init];

menu.delegate=detail;//设置传值代理

UINavigationController * menuNav=[[UINavigationController alloc]initWithRootViewController:menu];
UINavigationController * detailNav=[[UINavigationController alloc]initWithRootViewCOntroller:detail];
NSArray * vcs=[[NSArray alloc]initWithObejects:menuNav,detailNav,nil];
UISplitViewController * svc=[[UISplitViewController alloc]init];
[svc setViewControllers:vcs];
self.window.rootViewController=svc;
[self.window makeKeyAndVisible];
#import "DetailViewController.h"//导入才能看到协议
@interface
@property (strong,onatomic)  NSArray * strs;
@property (strong,onatomic)  id<PassValue> delegate;//实现协议的对象
//MenuTableViewController.m
-(void)viewLoad{
    [super viewLoad];
    self.strs=[NSArray arrayWithObjects:@"11",@"22",@"33",@"44",@"55",@"66",nil];
}
-(NSInteger)numberOfSectionsInTableView:(UITableView *)tableView{
    return 1;
}
-(NSInteger)tableView:(UITableView *)tableView numberOfRowsInSection:(NSInteger)section{
    return self.strs.count;
}
-(UITableViewCell *)tableView:(UITableView *)tableView cellForRowAtIndexPath:(NSIndexPath *)indexPath{
    static NSString * cellid=@"mycell";
    UITableViewCell * cell=[tableView dequeueReusableCellWithIdentifier:cellid];//从可使用单元获取一个单元
    if(cell==nil){
        cell=[[UIatableViewCell alloc]initWithStyle:UITableViewCellStyleDefault resueIdentifier:cellid];
    }
    cell.textLabel.text=self.strs[indexPath.row];
    return cell;
}
-(void)tableView:(UITableView *)tableView didDeselectRowAtIndexpath:(NSIndexPath *)indexPath{
    NSString * str=self.strs[indexPath.row];
    [self.delegate setString:str];
}
//理论上应该单独创建一个协议文件
@protocol PassValue
-(void)setString:(NSString *)str;
@end
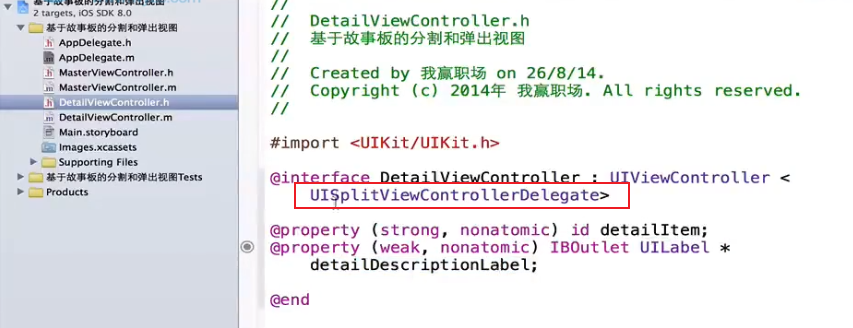
@interface DetailViewController:UIViewController<PassValue>
{
UILabel * label;
}
//DetailViewController.m
-(void)viewLoad{
[super viewLoad];
self.view.backgroundColor=[UIColor orangeColor];
label=[[UILabel alloc]initWihtFrame:CGRectMake(300,100,200,40)];
label.backgroundColor=[UICoor greenColor];
label.text=@"显示选中";
[self.view addSubview:label];
}
-(void)setString:(NSString *)str{
self.label.text=str;
}
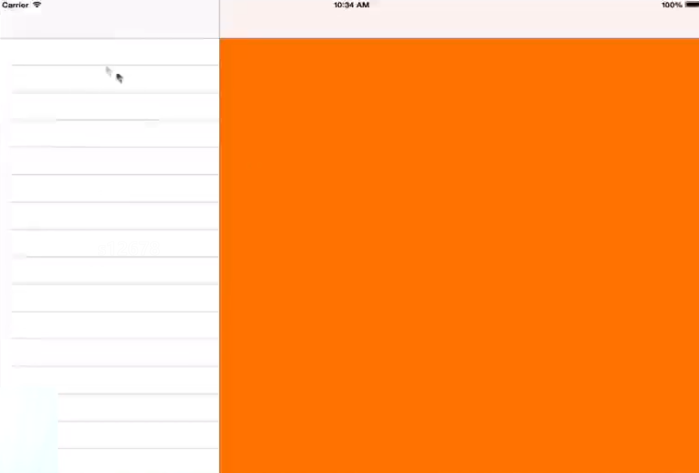
竖向隐藏详细视图(拖拽才显示),横向显示。
前面介绍的都是基于代码的开发方式。(团队开发程序)
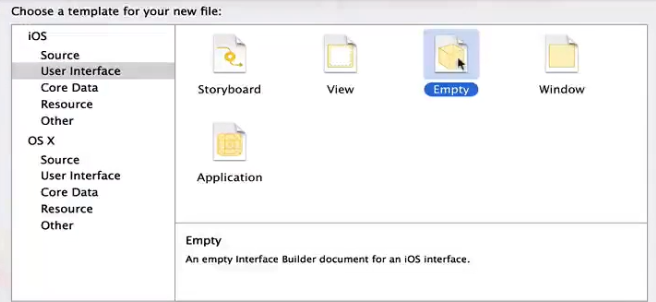
接来下介绍的是基于nib的界面设计开发方式。
最后还有一种苹果主推的一种开发方式:基于故事版。(快速开发程序)
44-45章
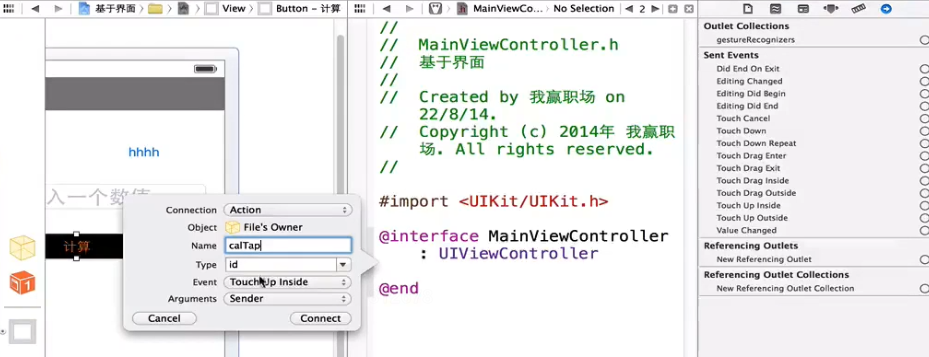
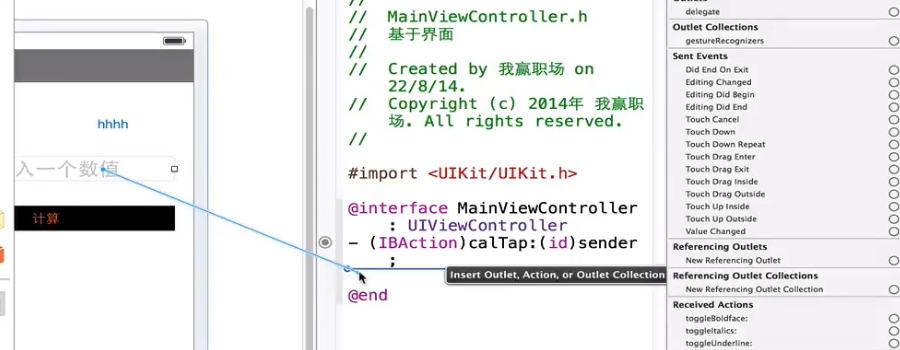
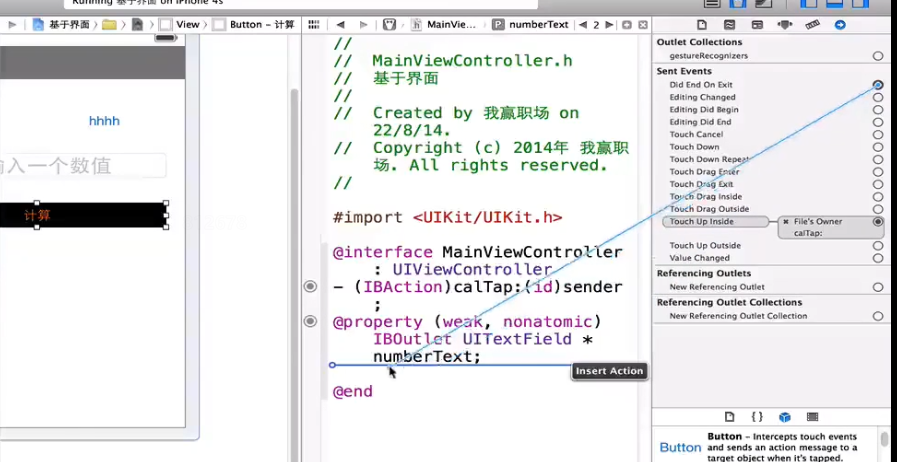
nib介绍
//AppDelegate.m
#import "MainViewController.m"
Main.window.background * main=[[MainViewCOntroller alloc]initWithNibName:@"MainViewController" bundle:nil];//视图有xib文件时候可以采用基于xib创建
self.window.rootViewController=main;
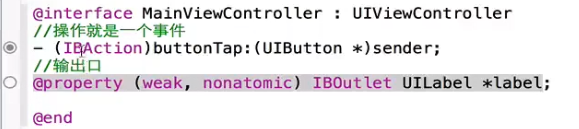
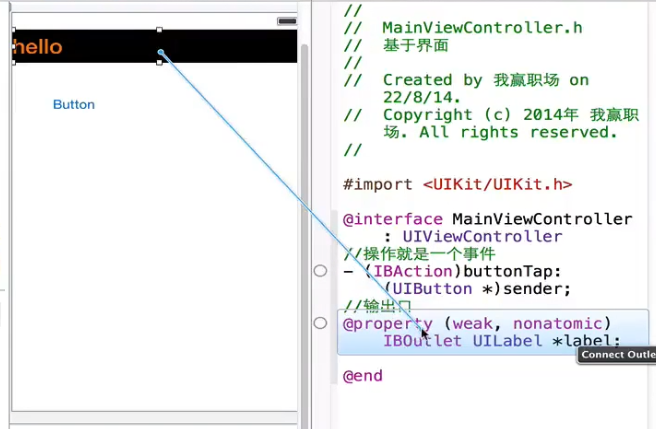
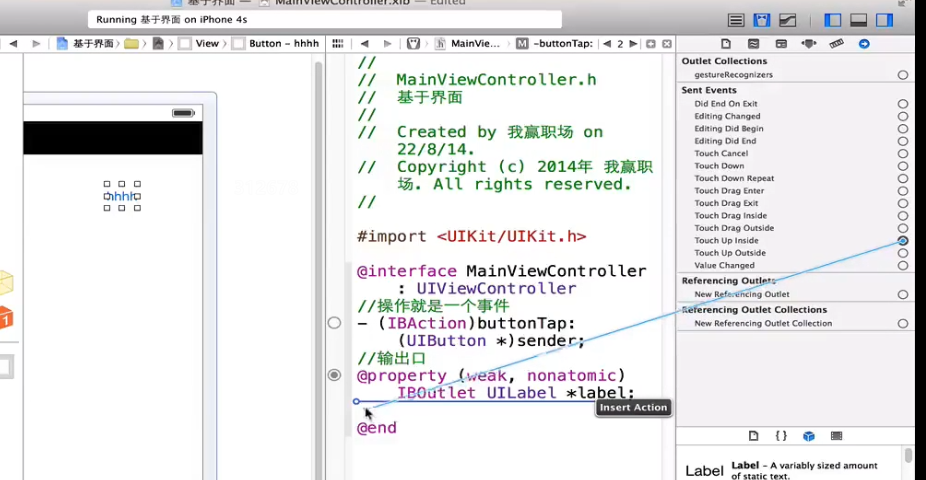
//MainViewController.h
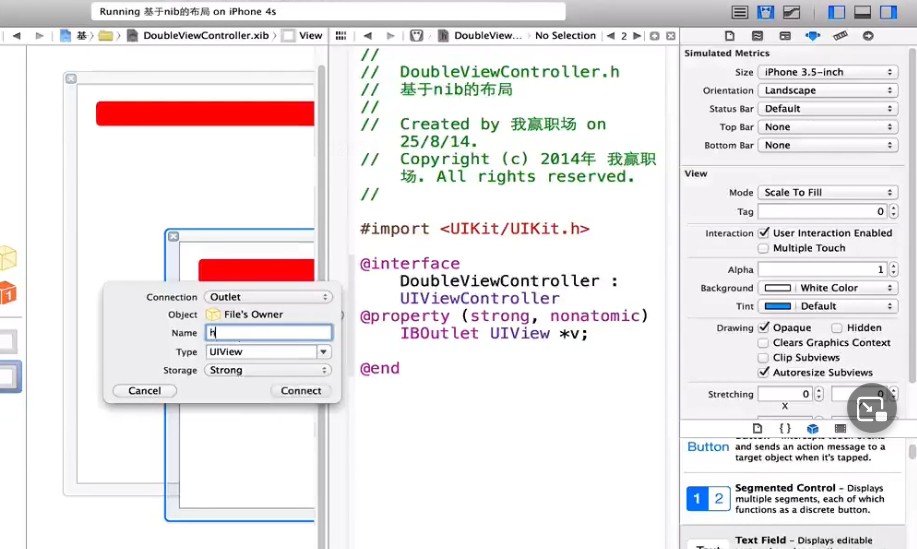
-(IBAction)buttonTap:(UIButton *)sender;//操作就是一个事件
@property (weak,nonatomic)IBOutlet UILabel * label;//输出口
-(IBAction)calTap:(id)sender;
@property(weak,nonatomic)IBOutlet UITextField * numberText;
-(IBAction)closeKeyboard:(id)sender;
//MainViewController.m xib文件创建视图控制器对应的视图界面
-(void)loadView{
//首先加载视图,然后再调用viewDidLoad,混合编程
}
-(void)viewDidLoad{
[super viewDidLoad];
/*
UIButton * btn=[[UIButtton alloc]initWithFrame:CGRectMake(0,200,200,40)];
btn.backgroundColor=[UIColor greenColor];
[self.view addSubview:btn];
*/
}
-(IBAction)buttonTap:(UIButton *)sender{
NSLog(@"this is tap!");
self.label.text=@"访问到我了!";
}
-(IBAction)calTap:(id)sender{
NSString * str=self.numberText.text;
int num=[str intValue];//如果输入一个非数值型字符串,转换为0
int sum=0;
for(int i=1;i<=num;i++) sum+=i;
self.numberText.text=[NSSstring stringWithFromat:@"%d",sum];
}
-(IBAction)closeKeyboard:(id)sender{
//[self.numberText resignFirstResponder];可以不写
}
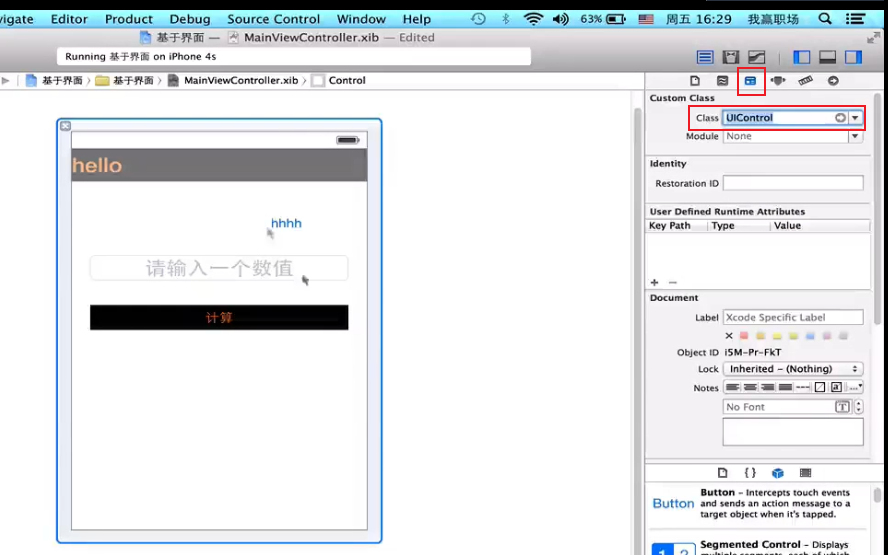
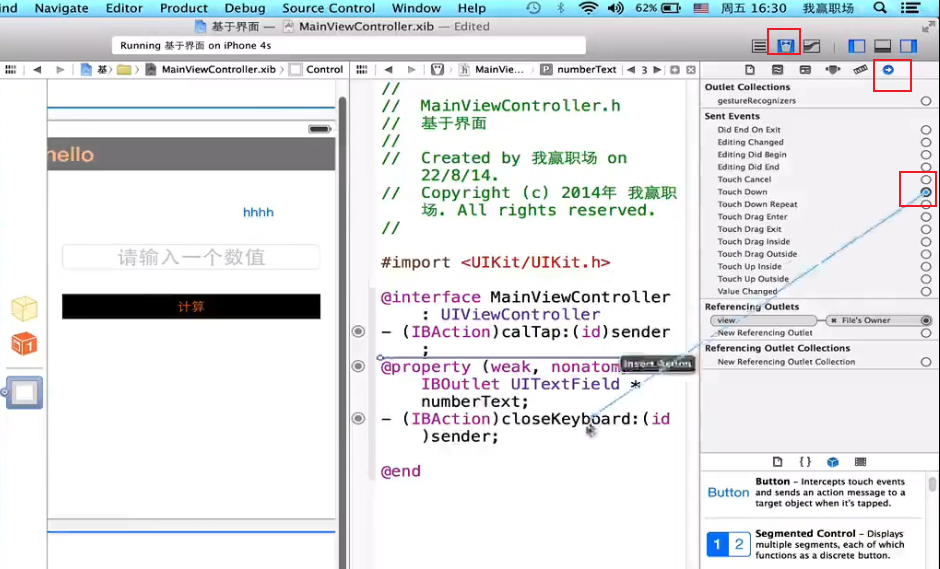
属性检查器。对象库。父类。尺寸检查器。
2)基于nib的界面设计输出口和操作
拖拽方式实现target事件。

基本编辑样式,助手编辑样式,版本编辑样式。
助手编辑状态下拖拽(按住comand键),将代码窗口和界面窗口放在一起,选中头文件。
要想访问某个控件用output,要想响应某个事件用action。
删除。连接检查器。
空心代表已经不和界面上的东西关联在一起了。
重新关联。直接拖拽(按住[外链图片转存失败,源站可能有防盗链机制,建议将图片保存下来直接上传(img-Mm5vXYJP-1654594428640)(F:\Learn of iOS\Image\Image00\image-20220528105816894.png)]command键)。
另一种添加方式:
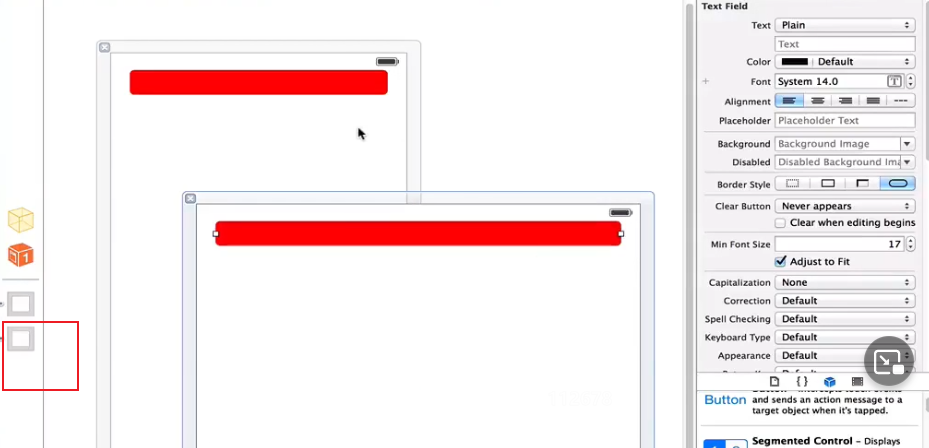
3)基于nib的界面设计控件
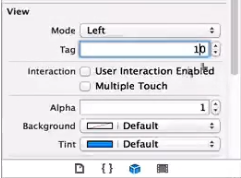
ALpha:控件的透明度。
按钮:定制图片展示Custom。在父类进行背景颜色设置。
Capitalizetion:有无大小写
Correction:有无拼写检查
Keyboard Type:键盘选择 Return key:回车样式 go
结束退出输入关闭键盘:
另一种关闭方法点击视图空白处关闭键盘:选中视图,选择标识检查器。
4)基于nib的界面设计控件
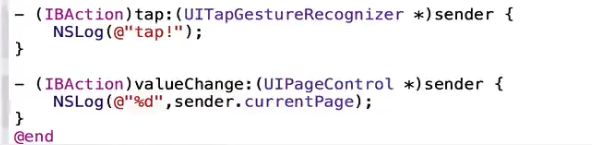
分段控件:
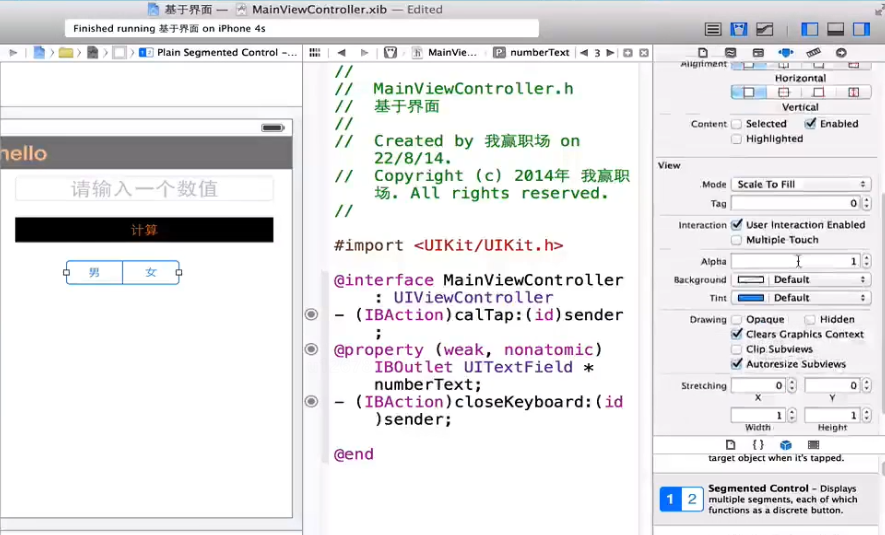
Tint:选中时渲染的颜色。Selected:默认选中。
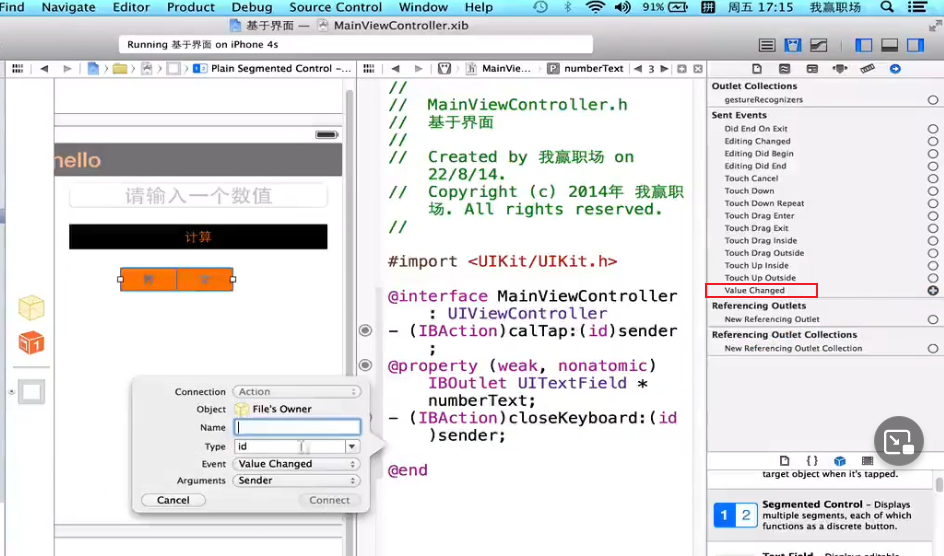
-(IBAction)setgChang:(UISegmentedControl *)sender;
//MainViewControler.m
-(IBAction)setgChang:(UISegmentedControl *)sender{
    NSLog(@"%d",sender.selectedSegmentIndex);
}
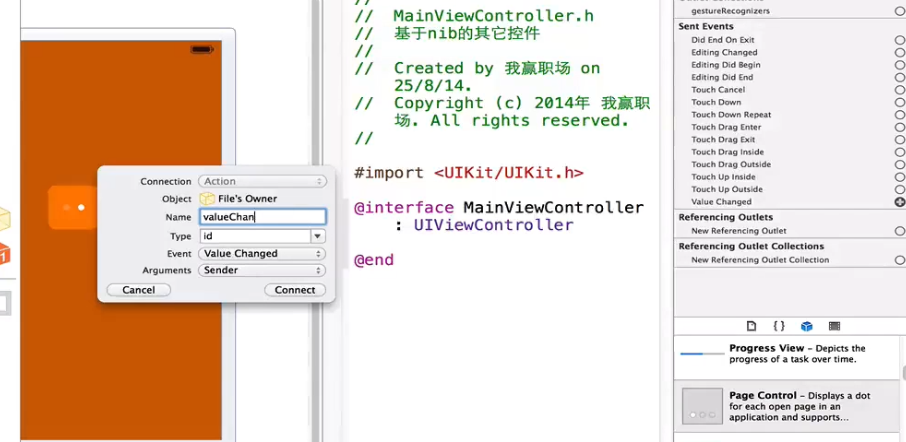
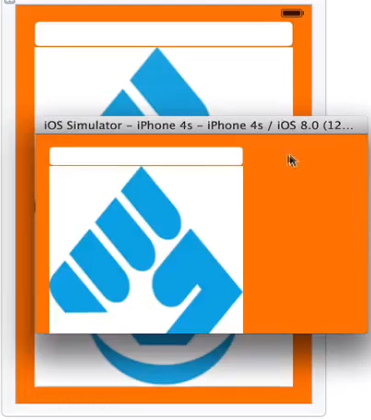
滑块控件:
开关控件:valueChange事件
活动指示器控件:Animating旋转
进度条控件:
文件所有者(MainViewController),第一响应者(指视图上谁正在获得焦点),视图。
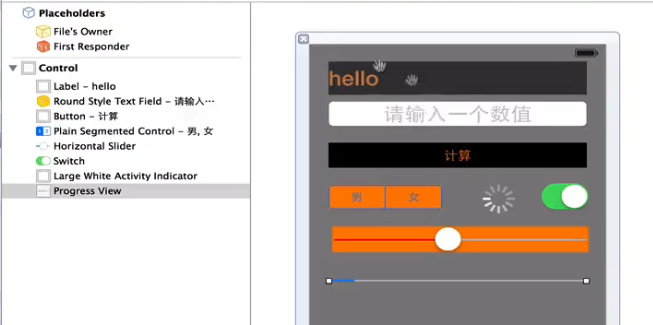
表控件:
//Appliaction.m
//创建ViewController视图,勾选xib文件,首先拖拽
MainViewController * main=[[MainViewController alloc]initWithNibName:MainViewController bundle:nil];
self.window.rootViewController=main;
-(IBAction)setgChang:(UISegmentedControl *)sender;
@interface MainViewController:UIViewController<UITableViewDataSource,UITableViewDelegate>
//MainViewControler.m
-(IBAction)setgChang:(UISegmentedControl *)sender{
    NSLog(@"%d",sender.selectedSegmentIndex);
}
-(NSInteger)numberOfSectionInTableView:(UITableView *)tableView{
    return 1;
}
-(NSInteger)tableView:(UITableView *)tableView numberOfRowsInSection:(NSInteger)section{
    return 10;
}
-(UITableViewCell *)tableView:(UITableView *)tableView cellForRowAtIndexPath:(NSIndexPath *)indexPath{
    static NSString * cellid=@"mycell";
    UITableViewCell * cell=[tableVieww dequeueReusableCellWithIdentifier:cellid];
    if(cell==nil){
        cell=[[UITableViewCell alloc]initWithStyle:UITableViewCellStyleDefault resuseIdentifier:cellid];
    }
    cell.textLabel.text=@"hello";
    return cell;
}
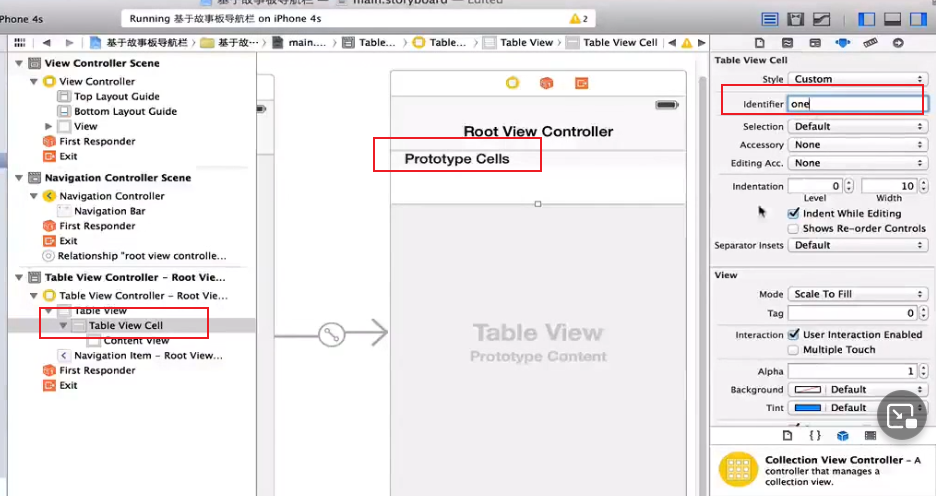
要想使用界面定制表格还需要关联:
5)基于nib的界面设计控件-表格单元的定制
表控件:
//Appliaction.m
//创建ViewController视图,勾选xib文件,首先拖拽
MainViewController * main=[[MainViewController alloc]initWithNibName:MainViewController bundle:nil];
self.window.rootViewController=main;
#import "TableViewCell.h"
@interface MainViewController:UIViewController<UITableViewDataSource,UITableViewDelegate>
@property (weak,nonatomic)IBOutlet UITableView * tableView;
//MainViewControler.m
-(void)viewDidLoad{
[super viewDidLoad];
//加载xib 到内存
UINib * nib=[[UINib alloc]initWithNibName:@"TableCell" bundle:nil];//bundle表示在那个树里面,当前树的话用nil
//注册xib到表视图
[ self.tableView registerNib:nib forCellReuseIdentifier:@"one"];
UINib * nib2=[[UINib alloc]initWithNibName:@"OtherTableCell" bundle:nil];
[ self.tableView registerNib:nib2 forCellReuseIdentifier:@"two"];
}
//实现UITableViewDataSource和UIableViewDelegate两个协议后至需要实现三个协议
-(NSInteger)numberOfSectionInTableView:(UITableView *)tableView{
return 1;
}
-(NSInteger)tableView:(UITableView *)tableView numberOfRowsInSection:(NSInteger)section{
return 10;
}
-(UITableViewCell *)tableView:(UITableView *)tableView cellForRowAtIndexPath:(NSIndexPath *)indexPath{
//static NSString * cellid=@"mycell";
//UITableViewCell * cell=[tableView dequeueReusableCellWithIdentifier:cellid];
/*已经加载进来了
if(cell==nil){
cell=[[UITableViewCell alloc]initWithStyle:UITableViewCellStyleDefault resuseIdentifier:cellid];
}
cell.textLabel.text=@"hello";
*/
// UILabel *label=(UILabel *)[cell viewWithTag:10];
//label.text=@"hello";//另外一种访问方式,新建一个类UITableViewCell
int row=indexPath.row;
TableViewCell * cell;
if(row%2==0){
cell=[tableView dequeueReusableCellWithIdentifier:@"one"];
cell.label.text=@"hello1";
}
else{
cell=[tableView dequeueReusableCellWithIdentifier:@"two"];
}
return cell;
}
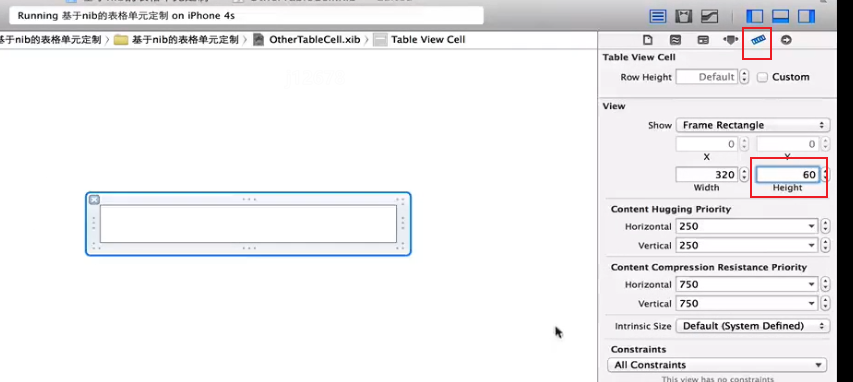
//调节高度
-(CGFloat)tableView:(UITableView *)tableView heightForRowAtIndexPath:(NSIndexPath *)indexPath{
return 60;
}
@interface TableViewCell:UITableViewCell
@property(weak,nonatomic)IBOutlet UILabel * label;
-(IBAction)btnTap:(id)sender;
//TableViewCell.m
-(IBAction)btnTap:(id)sender{
    NSLog(@"xxxx");
}
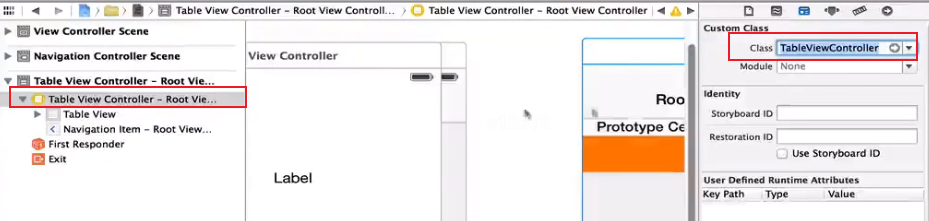
关联界面表格单元和创建的类TableViewCell
创建输出口:
添加一个按钮:拖拽操作事件
创建空的xib文件。TableCell.xib
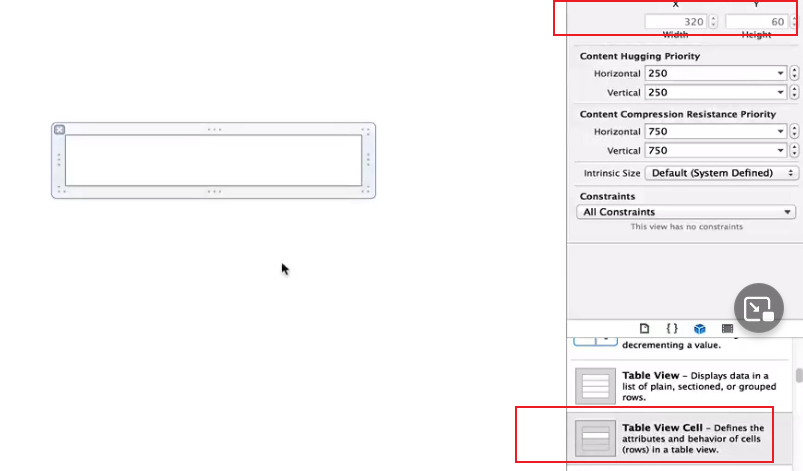
首先要设置下单元的标识id。one。

创建表格的输出口。
6)基于nib的界面设计控件
基于上一个工程:
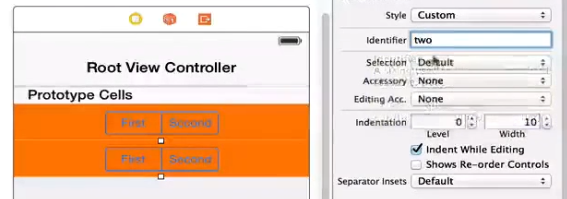
新建OtherTableViewCell.xib文件:
贯穿线:
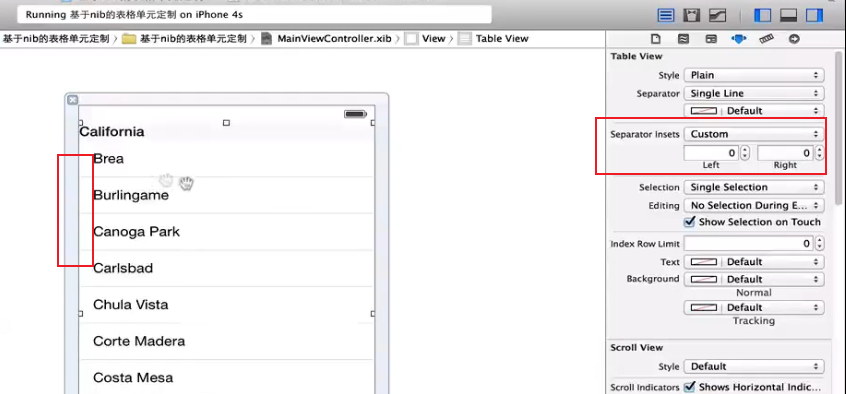
separator:分隔符
Bouncs:蹦蹦跳跳
基于nib的其他控件:
//AppDelegate.m
#import "MainViewController.h"
MainViewContorller * main=[[MainViewController alloc]initWithNibName:@"MainViewController" bundle:nil];
self.window.rootViewController=main;
//MainViewController.m .xib

图片控件:
多行文本框。
时间日期选择器。
手势识别。点击几次,几个手指。

需要实现:
布局管理
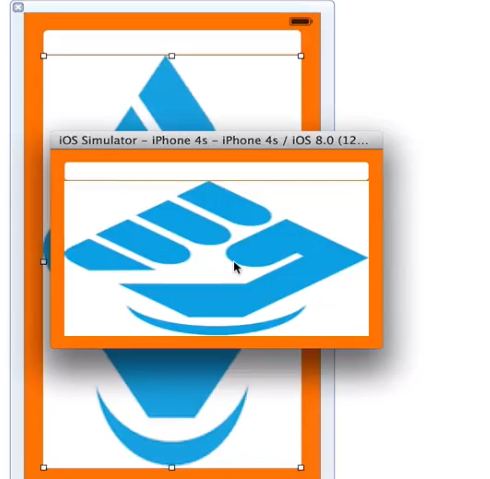
基于nib的布局和转屏处理
//AppDelegate.m
#import "MainViewController.h"
#import "DoubleViewController.h"
//MainViewController * main=[[MainViewController alloc]init];
DoubleViewController * main=[[DoubleViewController alloc]init];
self.window.rootViewController=main;
//MainViewController.m .xib
双视图切换:
@interface
@property(strong,nonatomic)IBOutLet UIView *v;
@property(strong,nonatomic)IBOutLet UIView *h;
//DoubleViewController.m .xib
-(void)viewDidLoad{
    [super viewDidLoad];
    //监听转屏
    [[NSNotificationCenter defacultCenter]addObsever:slef selector:@selector(change) name:UIDeviceOritationDidChangeNotification object:nil]
}
-(void)change{
    if([[UIDevice currentDevice]orienttation]==UIInterfaceOrientationPortrait){
        self.view=self.v;
    }
    else if([[UIDevice currentDevice]orienttation]==UIInterfaceOrientationLeft){
        self.view=self.h;
    }
    else if([[UIDevice currentDevice]orienttation]==UIInterfaceOrientationRight){
        self.view=self.h;
    }
}
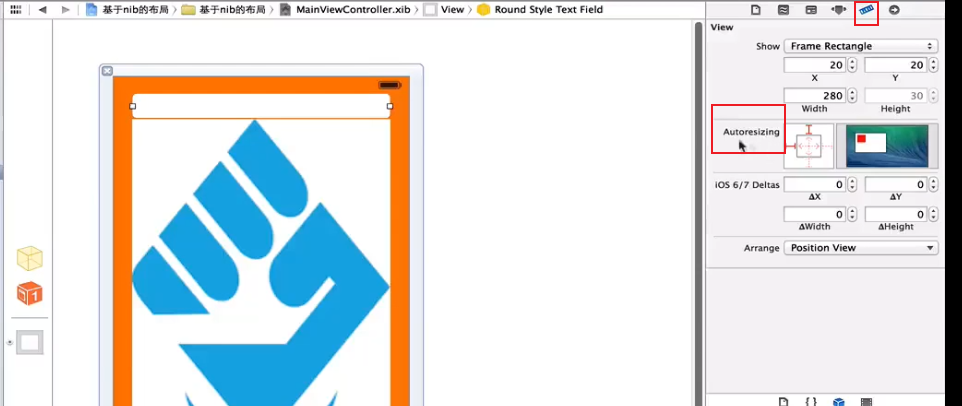
按住option键拖拽创建另外一个视图。
创建输出口:
//自动适配方案。
选中视图,文件检查器中取消自动布局。选中控件,尺寸检查器。Autoresizing自动约束,选择距离。
46-50章
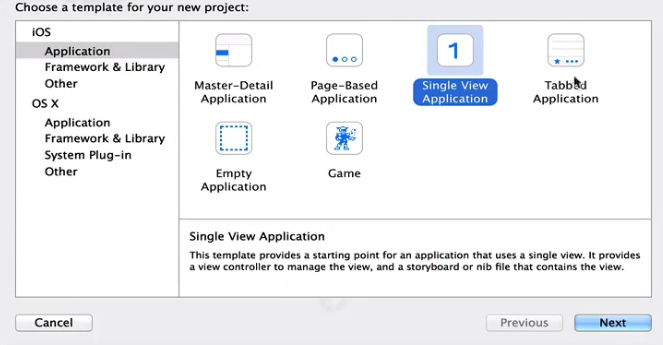
Storyborad
故事板:可以多视图开发,不适合大项目团队开发。
创建Single View Application 项目:有了Main.storyboard在创建应用程序时就不在需要创建主视图了。
新建空项目:
指定主接口。创建其类:
关联:
助手编辑状态:
界面切换:再拖拽一个,并创建关联的类OherViewControll.m。进入助手编辑状态,响应事件。

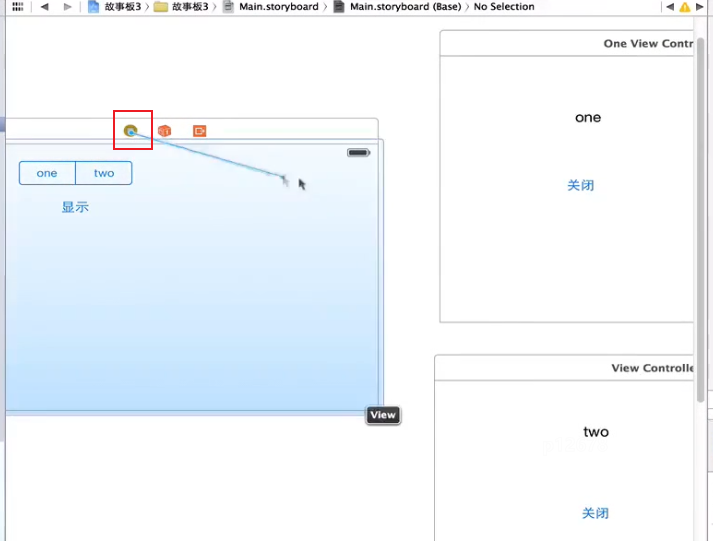
直接连线:
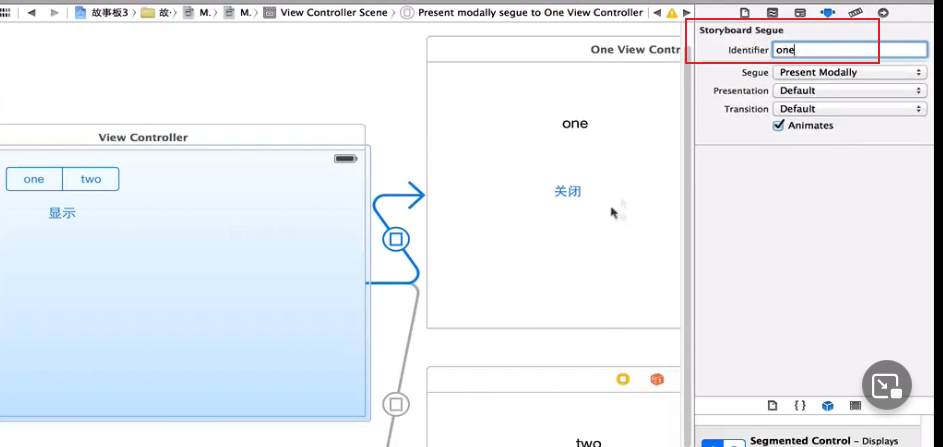
导航视图用进栈push,视图切换用模态modal。
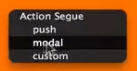
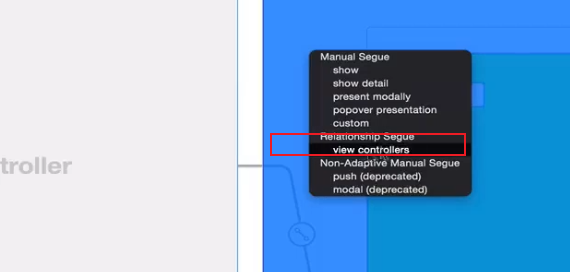
Tabbled Application基于故事板的标签栏的应用程序。Single View Application创建基本应用程序。基于页的应用程序Page-Based Application 。分割视图Master-Detail Application。

show指进栈,show detail指替换,present modally指模态切换,popover presentation弹出。custom定制。

视图切换包含逻辑:登录比如。
不能按钮连线链接了。要通过视图连线。
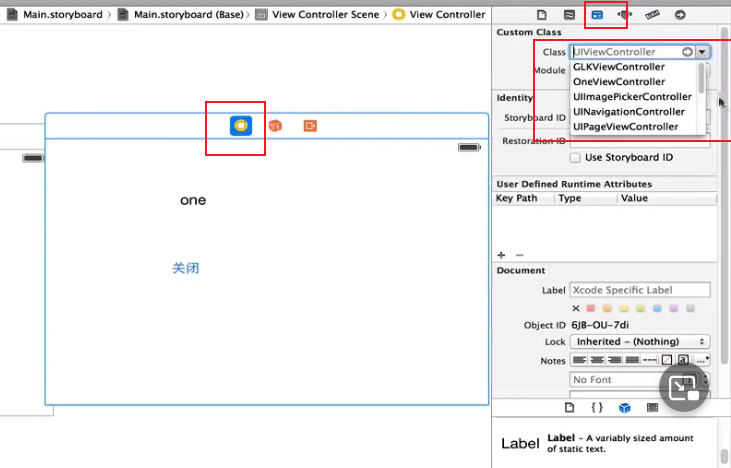
标识:
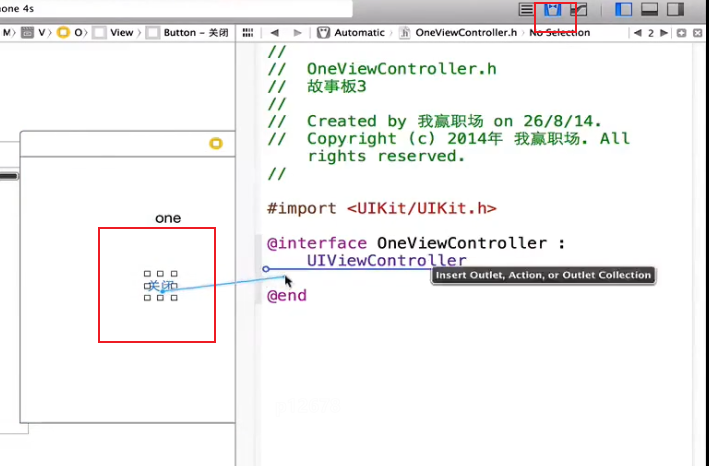
创建buttton的单击事件:

#impoer "OneViewController.h"
//准备连线
-(void)prepareForSegue:(UIStoryboardSegue *)segue sender:(id)sender{
//得到目标视图控制器
OneViewController * one=[segue destinationViewController];
if(self.seg.selectedSegmentIndex==0)
one.str=@"1";//传值
else
one.str=@"2";
}
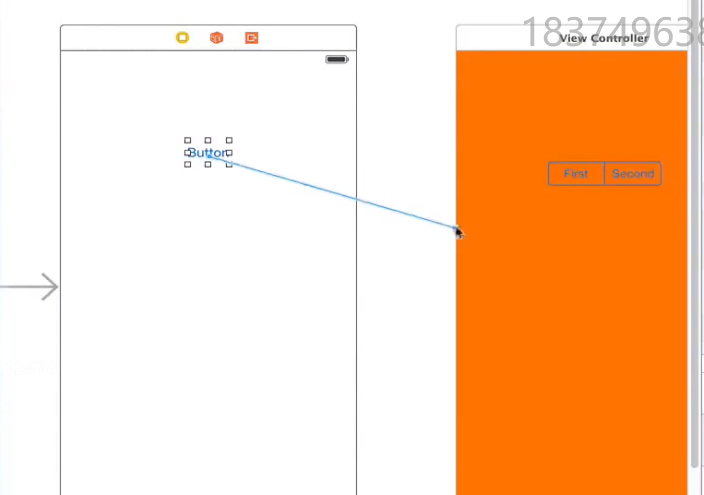
-(IBAction)showTap:(id)sender{
if(self.seg.selectedSegmentIndex=0)
[self performSegueWithIdentifier:@"one" sender:self];
else
[self performSegueWithIdentifier:@"two" sender:self];
}
切换视图后如何传递数据?之前传递数据采用属性或者代理的方式。
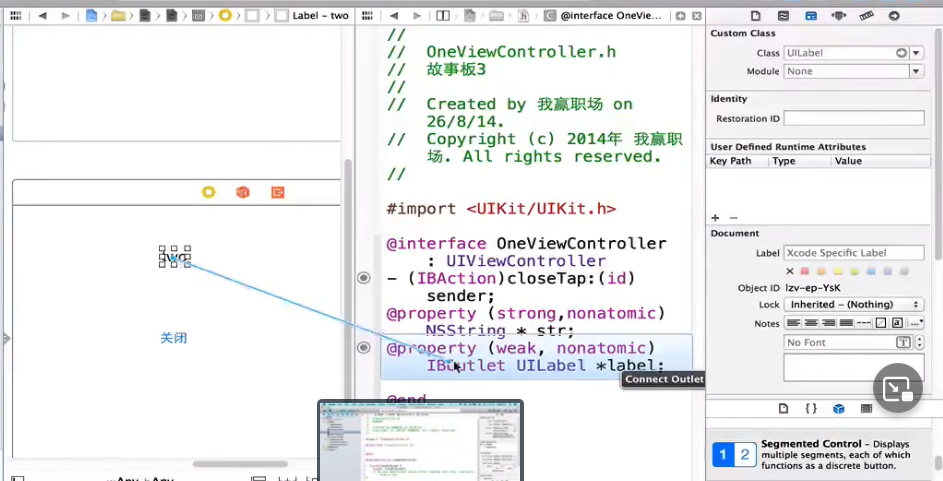
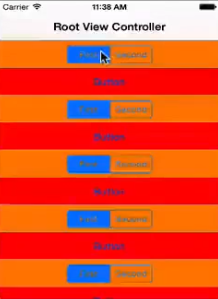
@interface
-(IBAction)closeTap:(id)sender;
@property(weak,nonatomic)IBOutlet UILabel * label;
@property(strong,nonatomic)NSString * str;
//OneViewController.m 采用属性传递
-(void)viewWillAppear:(BOOL)animated{
    self.label.text=self.str;
}
视图2也与OneviewController相关联。将label和button指向。共享。
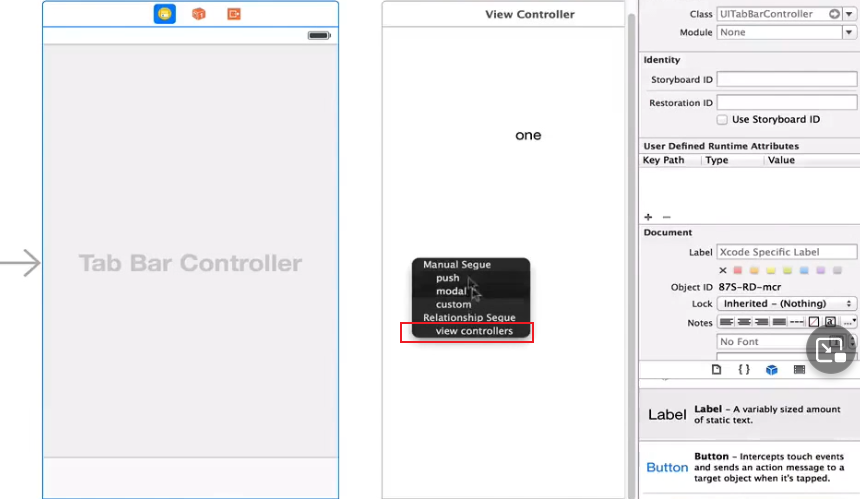
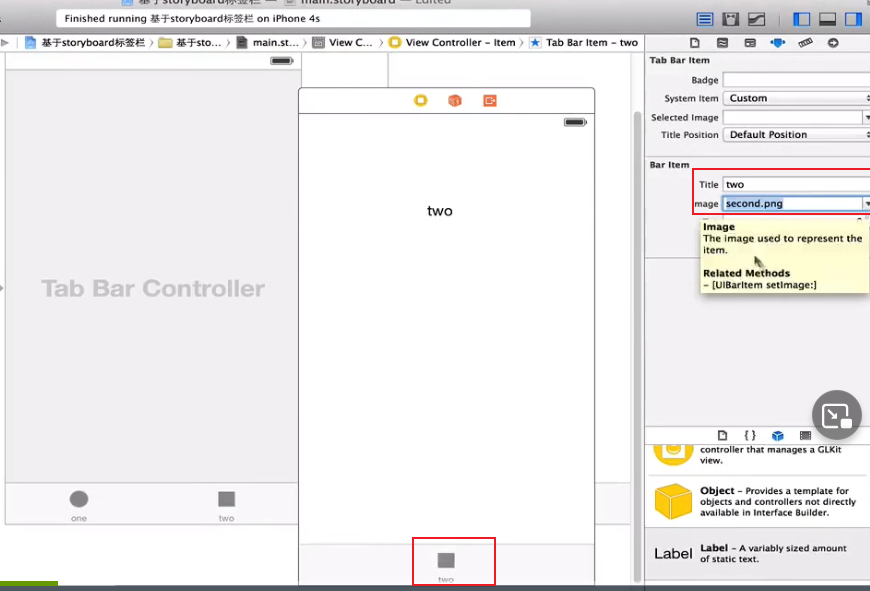
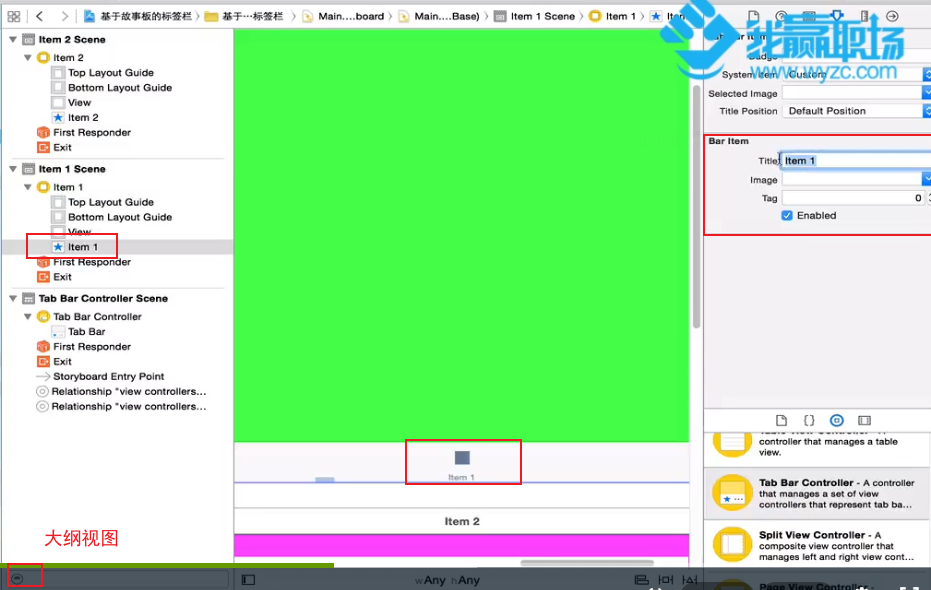
基于故事板的标签栏项目:
创建空的:注释发射代码,Main interface指向main.storyboard。
拖拽一个Tab Bar Controller。
创建基于页的应用程序,Page-Based Application。滚动视图类似。MVC风格。
针对iPad上的应用程序。主细应用程序:Master-Detail Application。

将分割视图的代理指向详细视图:
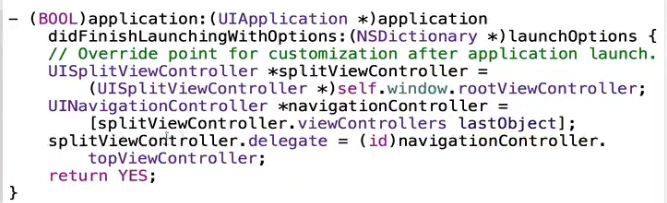
详细视图实现了分割视图的代理:
主要有两个事件:

-(void)viewWillAppear:(BOOL)animated{
    [super viewWillAppear:YES];
}
空项目,基于故事板的导航栏项目:
剪头表示项目的启动项,可以拖拽:

定制表格单元:
创建显示表格数据的类:UITableViewControll,选中故事板的表视图与其关联到一起。
//TableViewCOntroller.m
-(NSInteger)numberOfSectionsInTableView:(UITableView *)tableView{
    return 1;
}
-(NSInteger)tableView:(UITableView *)tableView numberOfRowsInSection:(NSInteger)section{
    return 10;
}
-(UITableViewCell *)tableView:(UITableView *)tableView cellForRowAtIndexPath:(NSIndexPath *)indexPath{
   //表格单元故事板已经加载了
    UITableViewCell * cell;
    int row=indexPath.row;
    if(row%2==0)
    UITableViewCell * cell=[tableView dequeueReusableCellWithIndentifier:@"one"];
    else
    UITableViewCell * cell=[tableView dequeueReusableCellWithIndentifier:@"two"];
    return cell;
}
基于故事板静态的表格单元:基于上一个项目着手。
动态:
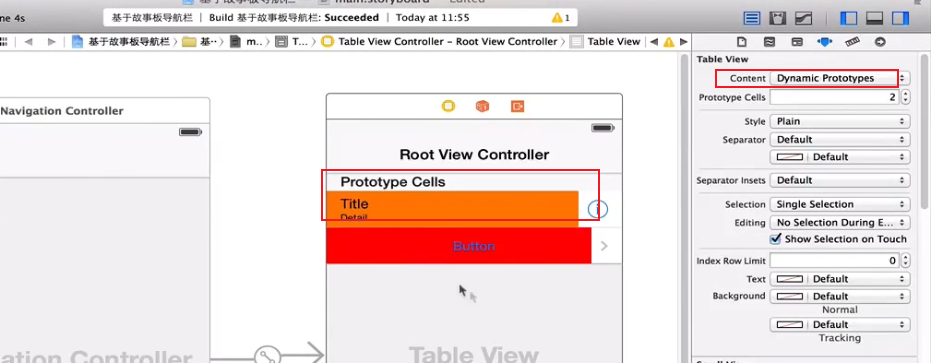
点击进入视图:
新建新项目:单视图应用程序 Single View Application。
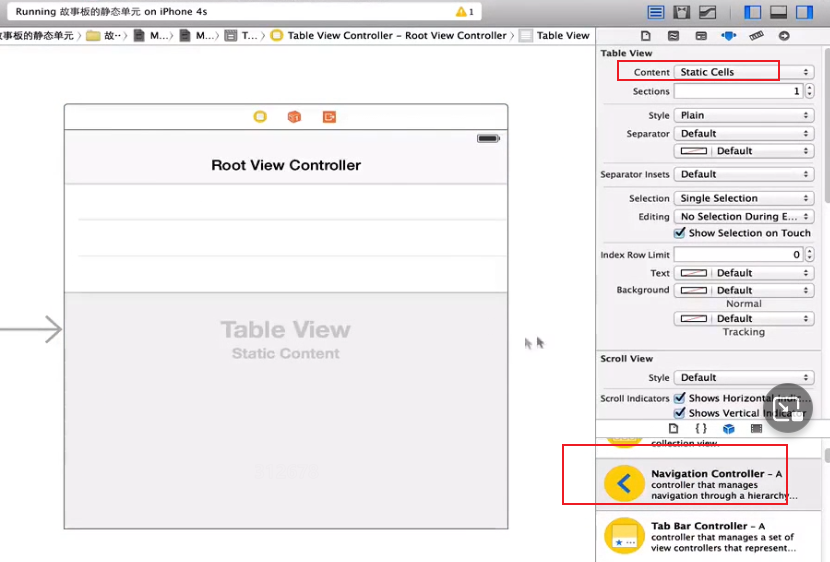
设置分组样式:
基本样式:
添加附件:
如何跳转:
iOS8故事板Storyborad开发变化:
Deployment Info发布信息。
创建自己的故事板要设置初始启动:
//MyViewController.m My.storyboard
关联:
创建输出口:
iOS8故事板Storyboard开发之标签栏变化:
新建单视图应用程序,删除原先的Main故事板视图。
勾选初始化。
修改图标:
OneViewController.m 关联。助手编辑,创建输出口。
增加栏目:

iOS8的Storyboard故事板的引用
叠加视图:
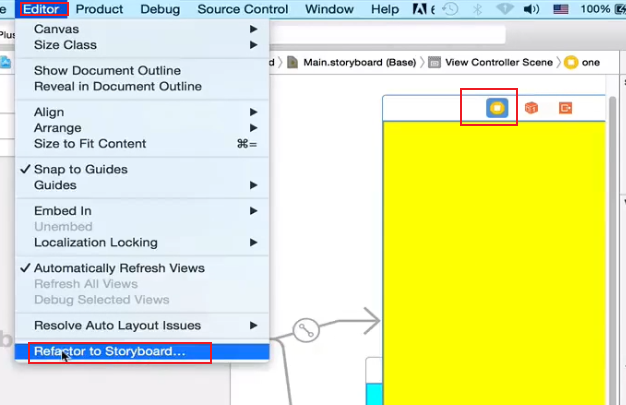
工程中如果所有视图都放到一个故事板上,会很不方便。
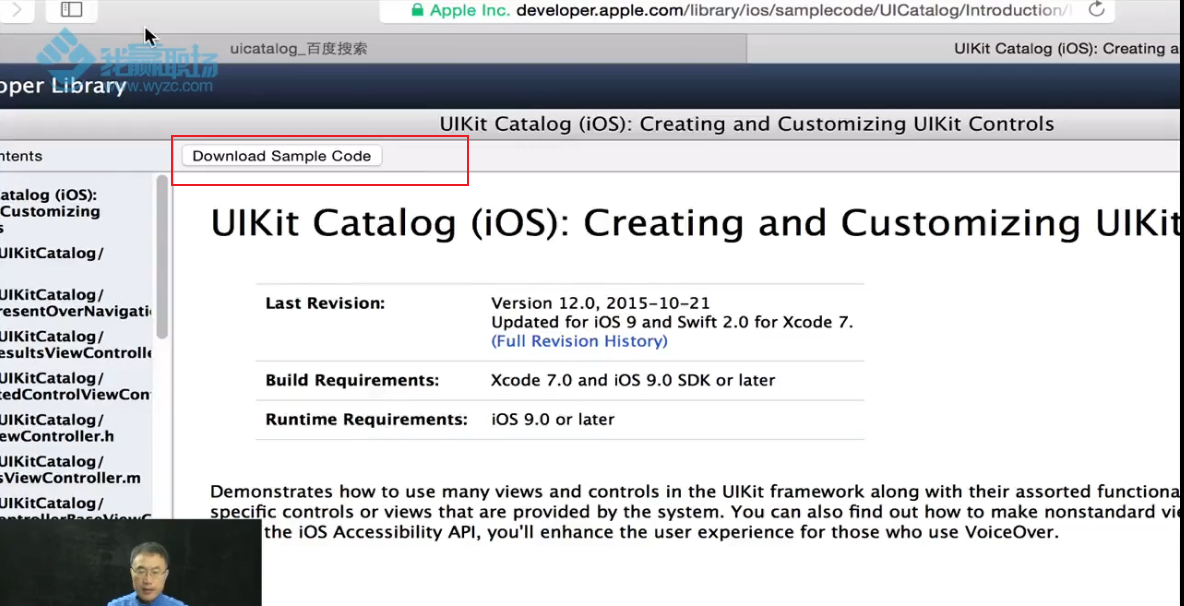
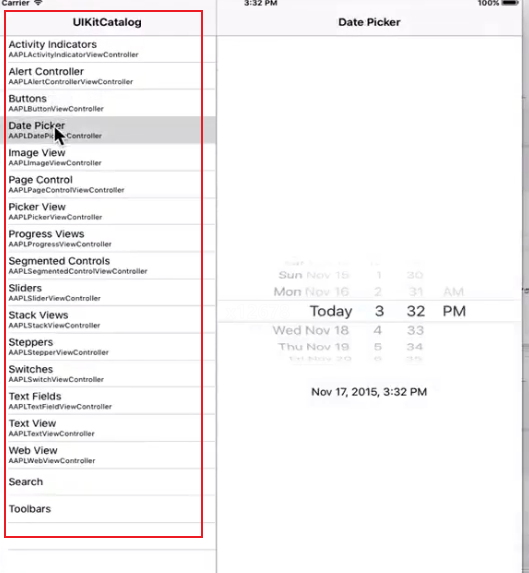
百度:uicatalog
项目运用分割技术,所以采用ipad运行。
界面太多:
创建单视图项目:将项目改造成基于标签栏的工程。
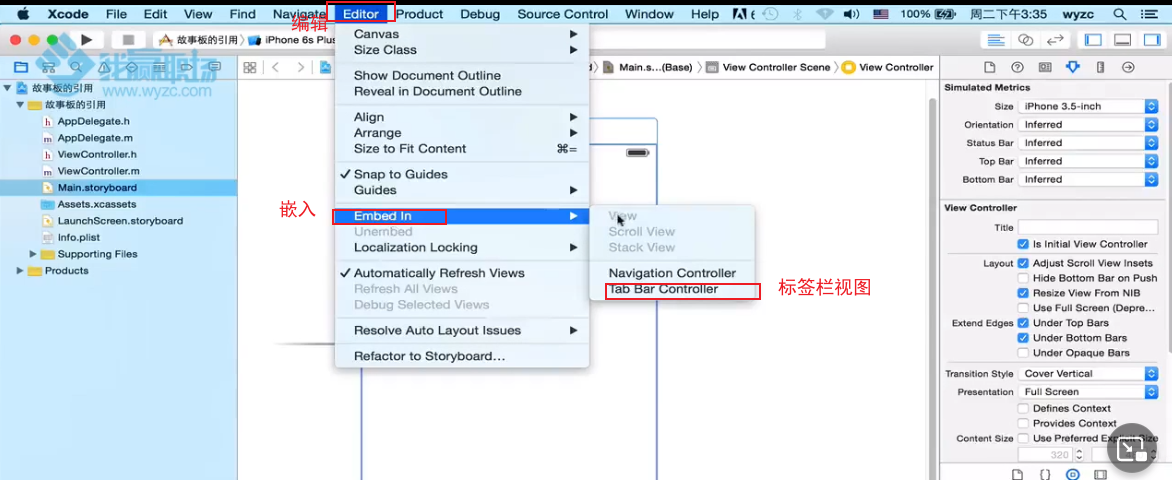
再拖拽一个视图控制器:
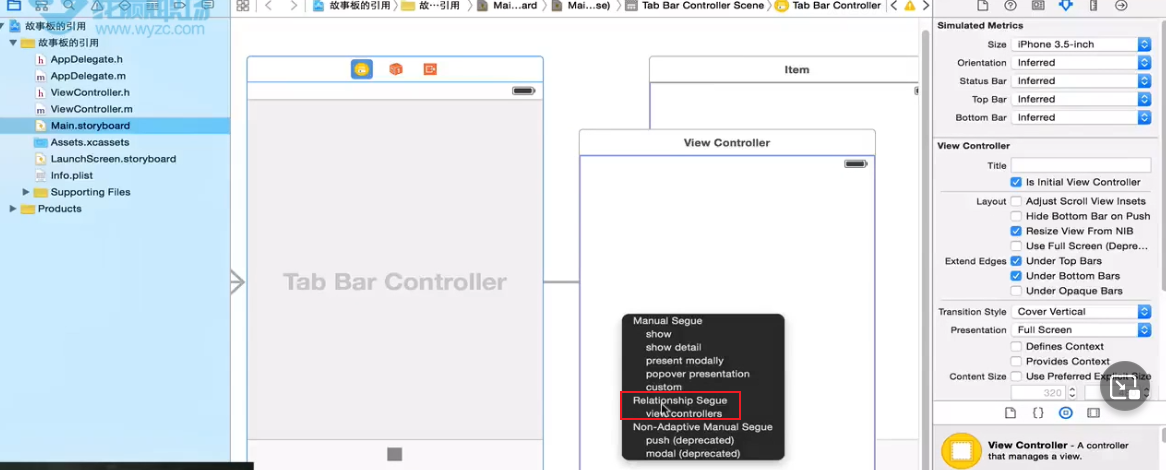
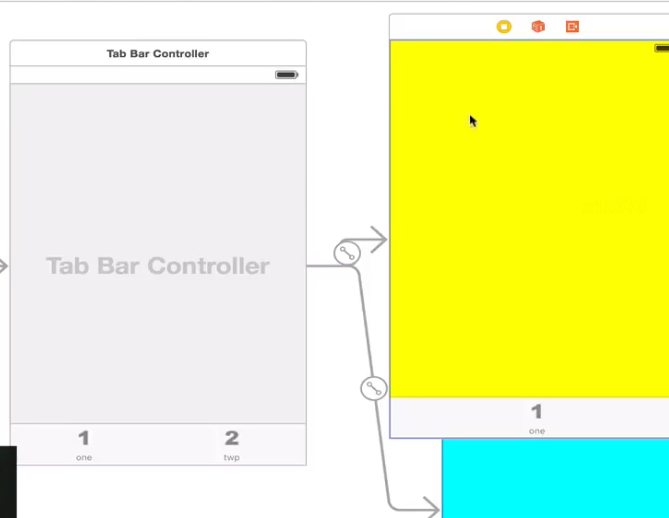
重构到不同故事板。
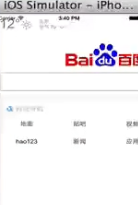
UIWebView
网页视图。创建基于故事板的单视图应用程序,Single View Application。
需要提供访问站点。创建输出口。
//ViewController.h webview有三个事件可以使用。
@interface ViewController:UIViewController<UIWebViewDelegate>
@property (weak,nonatomic)IBOutlet UIWebView * webView;
//ViewController.m
-(void)viewDidLoad{
    [super viewDidLoad];
    NSURL * url=[NSURL URLWithString:@"www.baidu.com"];
    NSURLRequest * request=[NSURLRequest requestWithURL:url];
    self.webView.delegate=self;
    [self.webView loadRequest:request];
}
//开始加载webView
-(void)webViewDidStartLoad:(UIWebView *)webView{

}
//加载完成
-(void)webViewDidFinishLoad:(UIWebView *)webView{

}
//加载过程出现错误
-(void)webView:(UIWebView *)webView didFailLoadWirhError:(NSErroe *)error{

}
网页适应屏幕尺寸:

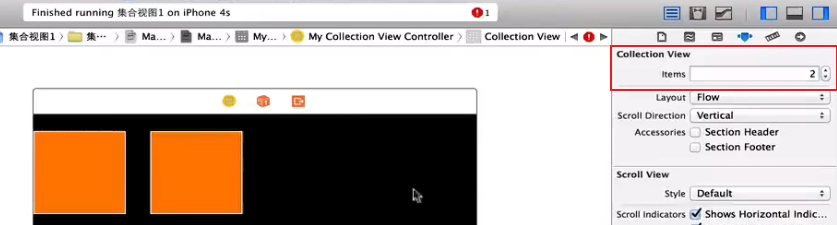
UICollectionView
集合视图。和表视图有些类似。
//Appdelegate.m
#import "CollectionViewController.h"
-(BOOL)appliaction:(UIAppliaction *)appliaction didFinishLaunchingWithOptions:(NSDictionary *)launchOptions{
self.window=[[UIWindow alloc]initWithFrame:[[UIScreen mainScreen]bounds]];
self.window.backgroundColor=[UIColor whiteColor];
//集合视图必须要有一个布局
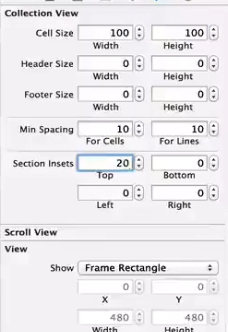
UICollectionViewFlowLayout * layout=[[UICollectionViewFlowLayout alloc]init];
//单元大小
layout.itemSize=CGSizeMake(100,100);
//滚动方向
layout.scrollDirection=UICollectionViewScrollDirectionHorizontal;
//设置边界
layout.sectionInset=UIEdgeInsetMakes(20,0,0,0);
CollectionViewController * main=[[CollectionViewController alloc]init];
self.window.rootViewController=main;
[self.window makeKeyAndVisible];
return YES:
}
//CollectionViewController.m
#import "CollectionViewCell.h"
static NSString * const reuseIdenifer=@"Cell";//复用标识
-(void)viewDidLoad{
    [super viewDidLoad];
    //Register cell classes
    [self.collectionView registerClass:[CollectionViewCell class]forCellWithReuseIdentifier:reuseIdentifier];
}
-(NSInteger)numberOfSectionsInCollectionView:(UICollectionView *)collectionView{
    return 1;
}
-(NSInteger)collectionView:(UICollectionView *)collectionView numberOfItemsInSection:(NSInteger)section{
    return 100;
}
-(UICollectionViewCell *)collectionView:(UICollectionView *)collectionView cellForItemAtIndexPath:(NSIndexPath *)indexPath{
    CollectionViewCell * cell=[CollectionView dequeueReusableCellWithReuseIdentifier: reuseIdenifer forIndexPath:indexPath];
    cell.label.text=[NSString stringWithFormat:@"%d",indexPaht.row];
    return cell;
}
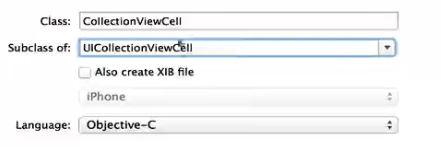
创建集合单元:
@interface
@property (strong,nonatomic)UILabel * label;
//CollectionViewCell.m
@synthesize label;
-(instancetype)initWithFrame:(CGRect)frameRect{
    self=[super initWithFrame:frameRect];
    if(self){
        self.backgroundColor=[UIColor greenColor];
        label=[[UILabel alloc]initWithFrame:CGRectMake(30,30,50,40)];
        label.backgroundColor=[UIColor redColor];
        [self addSunview:label ];
    }
    return self;
}
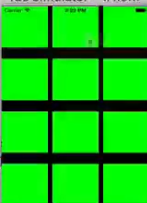
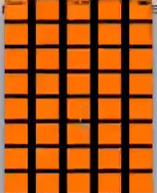
水平:Horizontal 垂直:Vertical
集合试图1。拖拽,删除。
需要定制集合视图的类。


视图中单元设置:
点击单元视图,选择多项:
//MyCollectionViewController.m
#import "MyCollectionViewCell.h"
static NSString * const reuseIdenifer=@"Cell";//复用标识
-(void)viewDidLoad{
    [super viewDidLoad];
    //Register cell classes
    //[self.collectionView registerClass:[CollectionViewCell class]forCellWithReuseIdentifier:reuseIdentifier];
}
-(NSInteger)numberOfSectionsInCollectionView:(UICollectionView *)collectionView{
    return 1;
}
-(NSInteger)collectionView:(UICollectionView *)collectionView numberOfItemsInSection:(NSInteger)section{
    return 100;
}
-(UICollectionViewCell *)collectionView:(UICollectionView *)collectionView cellForItemAtIndexPath:(NSIndexPath *)indexPath{
    int row=indexPath.row%2;
   MyCollectionViewCell * cell;
    if(row==0){
            cell=[CollectionView dequeueReusableCellWithReuseIdentifier: reuseIdenifer forIndexPath:indexPath];
        cell.label.text=[NSString stringWithFormat:@"%d",indexPath.row];
    }

    else
    cell=[CollectionView dequeueReusableCellWithReuseIdentifier: @"Cell2" forIndexPath:indexPath];
    //cell.label.text=[NSString stringWithFormat:@"%d",indexPaht.row];
    return cell;
}
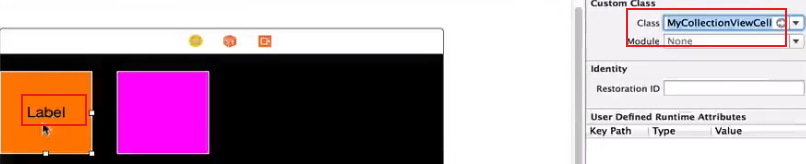
定制label相对应的类:
//MyCollectionViewCell.m
@interface
@property (strong,nonatomic)UILabel * label;
@synthesize label;
-(instancetype)initWithFrame:(CGRect)frameRect{
    self=[super initWithFrame:frameRect];
    if(self){

    }
    return self;
}
绘图
//Appdelegate.m
#import "MainViewController.h"
-(BOOL)application:(UIApplication *)appliaction didFinishLaunchingWihtOptions:(NSDictionary *)launchOptions{
    self.window=[[UIWindow alloc]initWithFrame:[[UIScreen mainScreen]bounds]];
    self.window.backgroundColor=[UIColor whiteColor];
    self.window.rootViewController=main;
    [self.window makeKeyAndVisible];
    return YES;
}
//MainViewController.m主视图控制器
#import "MainView.h"
-(void)viewDidLoad{
    [super viewDidiLoad];
    //self.view.backgroundColor=[UIColor greenColor];
    MainView * view=[[MainView alloc]init];
    self.view=view;
}
@interface
{
    UIImage * img;
}
//MainView.m 视图类UIView
-(instancetype)initWithFrame:(CGRect)frame{
    self=[super initWithFrame:frame];
    if(self){
        self.backgroundColor=[UIColor greenColor];
        img=[UIImage imageNamed:@"a.png"];
    }
    return self;
}
//当前视图的绘制行为
-(void)drawRect:(CGRect)rect{
    //获得设备上下文,将视图作为画布
    CGContextRef context=UIGrapicsGetCurrentContext();
    //线
    //移动画笔到线的起点
    CGContextMoveToPoint(context,0,0);
    CGContextAddLineToPoint(context,100,100);//到线的另外一点
    CGContextStrokePath(context);
    //矩形
//    CGContextAddRect(context,CGRectMake(0,0,100,100));
    CGContextStrokeRect(context,CGRectMake(0,0,100,100));
    //实心矩形
    CGContextFillRect(context,CGRectMake(150,150,100,100));
    CGContextStrokeElliseInRect(context,CGRectMake(100,150,100,100));
 CGContextFillElliseInRect(context,CGRectMake(100,150,100,100));
    //文字
    NSString * str=@"我在这里";
    [str drawAtPoint:CGPointMake(200,300) withAttributes:nil];
    //图片
// [img drawAsPatternInRect:CGRectMake(100,300,100,100)];  填充
    [img drawAtPow:CGPointMake(100,300)];//定点
    CGContextDrawImage(context,CGRectMake(100,300,100,100),[img CGImage]);//缩放
}
动画
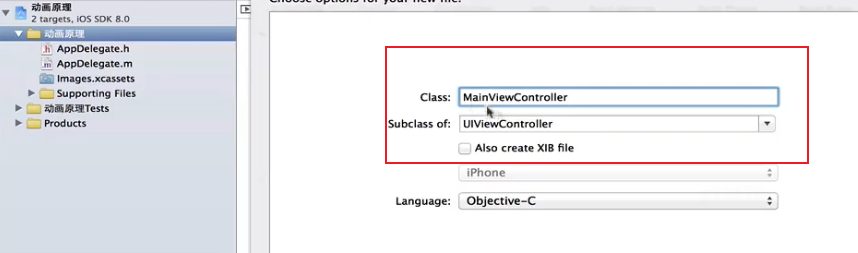
新建视图控制器和视图:MainViewControll.m MainView.m
//AppDelegate.m
#import "MainViewController.h"
#import "MainView.h"

MainViewControoler * main=[[MainViewController alloc]init];
self.window.rootViewController=main;
//MainViewController.m
#import "MainView.h"
-(void)viewDidLoad{
    [super viewDidLoad];
    MainView * view=[[MainView alloc]init];
    self.view=view;
    UIButton * btn=[[UIButton alloc]initWithFrame:CGRectMake(10,20,100,40)];
    [btn addTarget:self action:@selector(move)forControlEvents:UIControlEventTouchUpInside];
    btn.backgroundColor=[UIColor blackColor];
    [self.view addSubview:btn];
    //创建定时器,定时产生事件
    [NSTimer scheduledTimerWithTimeInterval:1 target:self selector:@selector(onTimer:) userInfo:nil repeats:YES]
}
-(void)onTimer:(NSTimer *)sender{
//    [sender invalidate];//停止
     [self.view setNeedDisplay];
}
-(void)move{
    //擦除画布
    [self.view setNeedDisplay];
}
@interface
{
    CGPoint point;
}
//MainView.m
-(instancetype)initWithFrame:(CGRect)frame{
    self=[super iniWithFrame:frame];
    if(self){
        self.backgroundColor=[UIColor greenColor];
        point.x=50;
        point.y=50;
    }
    return self;
}
-(void)drawRect:(CGRect)rect{
    NSLog(@"clears!");
    point.y+=5;//擦除画布后下次再重新绘制图像
    CGContextRef context=UIGraphicsGetCurrentContext();
    CGContextSetStrokeColorWithColor(context,[[UIColor redColor]CGColor]);
    CGContextStrokeEllipseInRect(context,CGRectMake(point.x,point.y,100,100));
}
51-52章
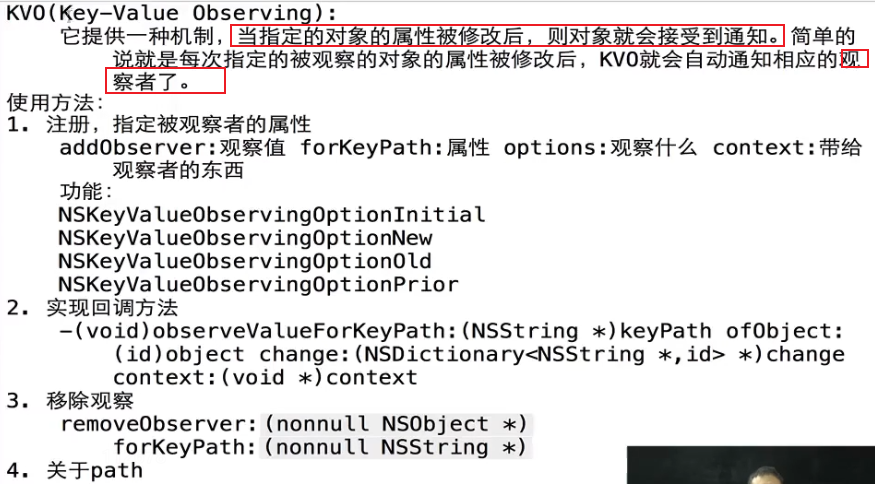
KVC
KVC键值转换设计模式的应用。KVC键值转换是访问对象属性的另一种更加灵活的方法。
新建单视图应用程序工程。
#import "MFPerson.h"
#import "MFCard.h"
-(void)viewDidLoad{
    [super viewDidLoad];
    MFPerson * mf=[[MFPerson alloc]init];
    //mf.name=@"妈符";
    //mf.age=12;
    MFCard * card=[[MFCard alloc]init];
    //card.number=@123456;

    //id * mf=[[MFPerson alloc]init];
    NSDictionary * propertys=[NSDictionary dictionaryWithObjectsAndKeys:@"山上",@"name",@22,@"age",card,@"card",nil];
   [mf setValuesForKeysWithDictionary:propertys];
    //单独给卡号赋值
    [mf setValue:@123456 forKeyPath:@"card.number"];

    //kvc可以通过键值方式赋值
    //[mf setValue:@"符" forKey:@"name"];
    //[mf setValue:@12 forKey:@"age"];
   // NSLog(@"%@",[mf valueForKey:@"name"]);
     NSLog(@"%@",mf);
}
#import "MFCard.h"
@interface
@property(strong,nonatomic)NSString * name;
@property(assign,nonatomic)int age;
@property(strong,nonatomic)MFCard * card;
//MFPerson.m 新建一个自定义类:
@synthesize name,age;
//重写输出
-(NSString *)description{
    return [NSString stringWithFromat:@"name=%@,age=%d,card=%@",name,age,card.number];
}
@interface
@property (strong,nonatomic) NSNumber * number;
//MFCard.m
KVO
KVO键值转换设计模式的应用。
新建单视图应用程序工程。
@interface
{
MFPerson * mf;//类的实例变量才能观察
}
//ViewController.m
#import "MFPerson.h"
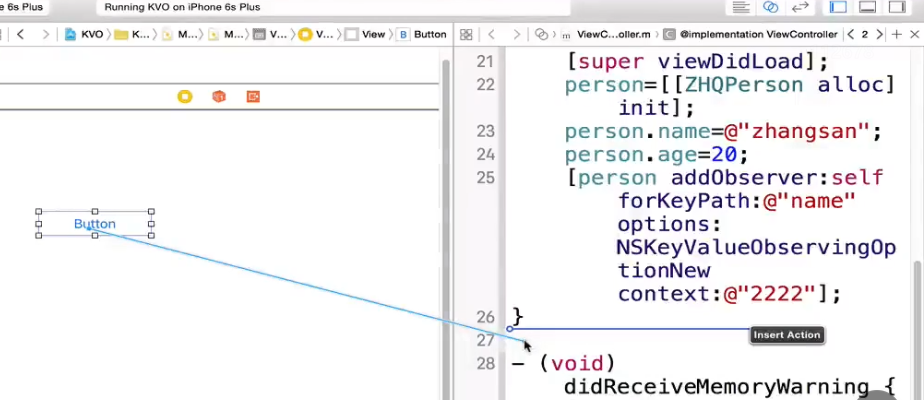
-(void)viewDidLoad{
[super viewDidLoad];
mf=[[MFPerson alloc]init];
mf.name=@"符";
mf.age=12;
//[mf addObserver:self forKeyPath:@"name" options:NSKeyValueObservingOptionInitial context:@"2222"];
[mf addObserver:self forKeyPath:@"name" options:NSKeyValueObservingOptionNew |NSKeyValueObservingOptionOld context:@"2222"];
NSLog(@"%@",mf);
}
//回调函数
-(void)observeValueForKeyPath:(NSString *)keyPath ofObject:(id) object change:(NSDictionary<NSString *,id>*)change context:(void *)context{
NSString * name_new=[change objectForKey:@"new"];
NSLog(@"name_new=%@",name_new);
NSLog(@"key=%@,change=%@,context=%@",keyPath,change,context);
}
-(void)btnTap:(id)sender{
mf.name=@"赛";
//[mf removeObserver:mf forKeyPath:@"age"];
}
@interface
@property(strong,nonatomic)NSString * name;
@property(assign,nonatomic)int age;
//MFPerson.m 新建一个自定义类:
@synthesize name,age;
//重写输出
-(NSString *)description{
    return [NSString stringWithFromat:@"name=%@,age=%d",name,age];
}
飞机大战
//AppDelegate.m
#import "MainViewController.h"

MainViewController * main=[[MainViewController alloc]init];
self.window.rootViewController=main;
#import "MainView.h"
@interface MainViewController:UIViewController
{
    MainView * drawView;
}
//MainViewController.m
-(void)viewDidLoad{
    [super viewDidLoad];
    drawView=[[MainView alloc]init];
    self.view=drawView;
    [NSTimer scheduledTimerWithTimeInterval:0.05 targer:self selector:@selector(onTime:)userInfo:nil repeats:YES];
}
-(void)onTimer:(NSTimer *)sender{
    //子弹运行,调整坐标
    for(MFSprite * s in self.view drawView.zidans){
        s.y-=5;
        if(s.y<0){
            s.isUsed=NO;
        }
    }

    static int c=0;//记录次数
    c++;
    if(c==5){
        for(MFSprite * s in self.view drawView.direns){
            s.y+=5;
            if(s.y>480){
                s.isUsed=NO;
            }
        }
        //产生敌人 39x34
        int x=arc4random()%310;
        MFSprite * dr=[[MFSprite alloc]init];
        dr.x=x;
        dr.y=y;
        dr.isUsed=YES;
        [drawView.direns addObject:dr];
        c==0;
    }

    //碰撞检测,两矩形是否相交
    for(MFSprite * zd in self.view drawView.zidans){
        //每个子弹矩形范围 16x16 39x34
        CGRect zdRect=CGRectMake(zd.x,zd.y,16,16);
        for(MFSprite * dr in self.view drawView.direns){
            CGRect drRect=CGRectMake(dr.x,dr.y,39,34);
		   if(CGRectIntersectsRect(zdRect,drRect)){
               zd.isUsed=NO;
               dr.isUsed=NO;
               //产生爆炸
               MFSprite * bz=[[MFSprite alloc]init];
               bz.x=dr.x;
               bz.y=dr.y;
               bz.isUsed=YES;
               [drawView.baozhas addObject:bz];
           }
        }
    }

    [self.view setNeedDisplay];
}
//触摸开始
-(void)touchesBegan:(NSSet *)touches withEvent:(UIEvent *)event{
    UITouch * touch=[touches anyObject];//触摸对象
    CGPoint p=[touch loactionInView:self.view];//触摸坐标
    drawView.zdjPoint=p;//设置战斗机位置
    if(p.y>400){
        MFSprite * zd=[[MFSprite alloc]init];
        zd.x=x+62/2-5;
        zd.y=y;
        zd.isUsed=YES;
        [drawView.zidans addObject:zd];//将子弹放到子弹集合
    }
    [self.view setNeedDisplay];
}
@interface MainView:UIView
{
    UIImage * zidanImage;
    UIImage * direnImage;
    UIImage * baozhaImage;
    UIImage * zdjImage;
}
@property(strong,nonatomic)NSMutableArray * zidans;
@property(strong,nonatomic)NSMutableArray * direns;
@property(strong,nonatomic)NSMutableArray * baozhas;
@property(assign,nonatomic)CGPoint zdjPoint;
//MainView.m
#import "MFSprite.h"
-(instancetype)initWithFrame:(CGRect)frame{
    self=[super initWithFrame:frame];
    if(self){
        self.backgroundColor=[UIColor grayColor];
        zidanImage=[UIImage imageNamed:@"zd.png"];//加载到内存
        direnImage=[UIImage imageNamed:@"dr.png"];
        baozhaImage=[UIImage imageNamed:@"bz.png"];
        zdjImage=[UIImage imageNamed:@"zdj.png"];

        zidans=[[NSMutableArray alloc]initWithCapacity:100];
        direns=[[NSMuatbleArray alloc]initwithCapacity:100];
        baozhas=[[NSMuatbleArray alloc]initwithCapacity:100];
        zdjPoint=CGPointMake(320/2-62-2,480/2-74/2);//62x74
    }
    return self;
}
-(void)drawRect:(CGRect)rect{

    [zdjImage drawedatPoint:self.zdjPoint];

    //先统计有多少要移除子弹
    NSMutableArray * arr=[[NSMutableArray alloc]initWithCapacity:100];
    //点击视图发射子弹
    for(MFSprite * s in self.zidans){
        if(s.isUsed=YES){
            [zidanImage drawAtPoint:CGPointMake(s.x,s.y)];
        }
        else{
           // [self.zidans removeObject:s];//有bug,循环回到for找不到下一个
            [arr addObject:s];
        }
    }
    [self.zidans removeObjectsInArray:arr];
    NSLog(@"集合子弹总数=%d",[self.zidans count]);
    //[arr removeAllObjects]
    //处理敌人
    NSMutableArray * arr2=[[NSMutableArray alloc]initWithCapacity:100];
    for(MFSprite * s in self.direns){
        if(s.isUsed=YES) [direnImage drawAtPoint:CGPointMake(s.x,s.y)];
        else [arr2 addObject:s];
    }
    [self.direns removeObjectsInArray:arr2];
    NSLog(@"集合敌人总数=%d",[self.direns count]);

    NSMutableArray * arr3=[[NSMutableArray alloc]initWithCapacity:100];
    for(MFSprite * s in self.baozhas){
         [baozhaImage drawAtPoint:CGPointMake(s.x,s.y)];
         [arr3 addObject:s];
    }
    [self.baozhas removeObjectsInArray:arr2];
}
@propetty (assign,nonatomic)int x;
@propetty (assign,nonatomic)int y;
@propetty (assign,nonatomic)BOOL isUsed;
//MFSprite.m


 18万+
18万+


 被折叠的 条评论
为什么被折叠?
被折叠的 条评论
为什么被折叠?
 到【灌水乐园】发言


