


 本文详细介绍了如何在VScode中安装和配置LaTeX插件,包括设置自动编译、IntelliSense支持,以及如何配置SumatraPDF进行PDF预览和实现反向搜索功能。
(1) vscode + Latex的安装不过多解释,主要就是Latex的配置。
在右下角的设置中,输入set,上下翻找,找到红框标出的json文件,点击打开就行,即使里面有一些配置内容,也不用担心!
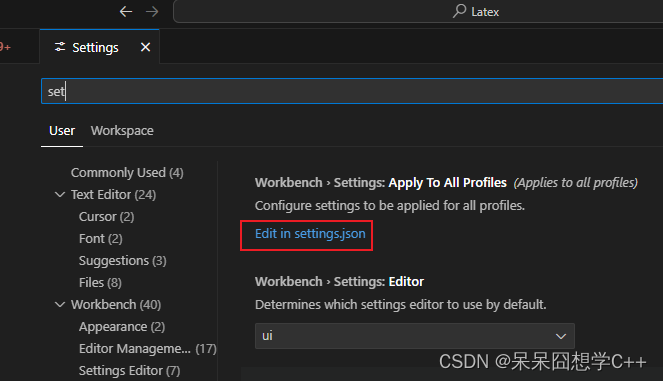
其中setting.json中关于latex的配置如下,记住,假如文件已经有配置,直接复制到最外层大括号里(很多教程给的文件包括了大括号,要去掉,假如是空文件需要最外层加大括号)。
//------------------------------LaTeX 配置----------------------------------
       // 设置是否自动编译
       "latex-workshop.latex.autoBuild.run":"onFileChange",
       //右键菜单
       "latex-workshop.showContextMenu":true,
       //从使用的包中自动补全命令和环境
       "latex-workshop.intellisense.package.enabled": true,
       //编译出错时设置是否弹出气泡设置
       "latex-workshop.message.error.show": false,
       "latex-workshop.message.warning.show": false,
       // 编译工具和命令
       "latex-workshop.latex.tools": [
           {
               "name": "xelatex",
               "command": "xelatex",
               "args": [
                   "-synctex=1",
                   "-interaction=nonstopmode",
                   "-file-line-error",
                   "%DOCFILE%"
               ]
           },
           {
               "name": "pdflatex",
               "command": "pdflatex",
               "args": [
                   "-synctex=1",
                   "-interaction=nonstopmode",
                   "-file-line-error",
                   "%DOCFILE%"
               ]
           },
           {
               "name": "latexmk",
               "command": "latexmk",
               "args": [
                   "-synctex=1",
                   "-interaction=nonstopmode",
                   "-file-line-error",
                   "-pdf",
                   "-outdir=%OUTDIR%",
                   "%DOCFILE%"
               ]
           },
           {
               "name": "bibtex",
               "command": "bibtex",
               "args": [
                   "%DOCFILE%"
               ]
           }
       ],
       // 用于配置编译链
       "latex-workshop.latex.recipes": [
           {
               "name": "XeLaTeX",
               "tools": [
                   "xelatex"
               ]
           },
           {
               "name": "PDFLaTeX",
               "tools": [
                   "pdflatex"
               ]
           },
           {
               "name": "BibTeX",
               "tools": [
                   "bibtex"
               ]
           },
           {
               "name": "LaTeXmk",
               "tools": [
                   "latexmk"
               ]
           },
           {
               "name": "xelatex -> bibtex -> xelatex*2",
               "tools": [
                   "xelatex",
                   "bibtex",
                   "xelatex",
                   "xelatex"
               ]
           },
           {
               "name": "pdflatex -> bibtex -> pdflatex*2",
               "tools": [
                   "pdflatex",
                   "bibtex",
                   "pdflatex",
                   "pdflatex"
               ]
           }
       ],
       //文件清理。此属性必须是字符串数组
       "latex-workshop.latex.clean.fileTypes": [
           "*.aux",
           "*.bbl",
           "*.blg",
           "*.idx",
           "*.ind",
           "*.lof",
           "*.lot",
           "*.out",
           "*.toc",
           "*.acn",
           "*.acr",
           "*.alg",
           "*.glg",
           "*.glo",
           "*.gls",
           "*.ist",
           "*.fls",
           "*.log",
           "*.fdb_latexmk"
       ],
       //设置为onFaild 在构建失败后清除辅助文件
       "latex-workshop.latex.autoClean.run": "onFailed",
       // 使用上次的recipe编译组合
       "latex-workshop.latex.recipe.default": "lastUsed",
       // 用于反向同步的内部查看器的键绑定。ctrl/cmd +点击(默认)或双击
       "latex-workshop.view.pdf.internal.synctex.keybinding": "double-click",
我的文件最终样式如图:

(2)关于SumatraPdf的配置,感觉无足轻重了,因为VScode编码本来就有预览pdf,还可以点击到浏览器预览,我是看网上好多推荐这个pdf浏览工具就下载配置了,有时候强迫症是种病。
安装很简单,直接跳到关于配置文件的地方,直接在上面的json文件后面添加关于pdf的配置,文件内容如下,记住,里面的路径都换成自己的文件路径,下面的命令行都是。
 //使用 SumatraPDF 预览编译好的PDF文件
       // 设置VScode内部查看生成的pdf文件
       "latex-workshop.view.pdf.viewer": "external",
       // PDF查看器用于在\ref上的[View on PDF]链接
       // "latex-workshop.view.pdf.ref.viewer":"auto",
       // 使用外部查看器时要执行的命令。此功能不受官方支持。
       "latex-workshop.view.pdf.external.viewer.command": "E:/Program Files/SumatraPDF/SumatraPDF.exe", // 注意修改路径
       // 使用外部查看器时,latex-workshop.view.pdf.external.view .command的参数。此功能不受官方支持。%PDF%是用于生成PDF文件的绝对路径的占位符。
       "latex-workshop.view.pdf.external.viewer.args": [

           "-forward-search",
           "%TEX%",
           "%LINE%",
           "-reuse-instance",
           "-inverse-search",
           "\"E:\\Program Files\\Microsoft VS Code\\Code.exe\" \"E:\\Program Files\\Microsoft VS Code\\resources\\app\\out\\cli.js\" -gr \"%f\":\"%l\"",
           "%PDF%"
       ],
       // 将synctex转发到外部查看器时要执行的命令。此功能不受官方支持。
       "latex-workshop.view.pdf.external.synctex.command": "E:/Program Files/SumatraPDF/SumatraPDF.exe", // 注意修改路径
       // latex-workshop.view.pdf.external.synctex的参数。当同步到外部查看器时。%LINE%是行号,%PDF%是生成PDF文件的绝对路径的占位符,%TEX%是触发syncTeX的扩展名为.tex的LaTeX文件路径。
       "latex-workshop.view.pdf.external.synctex.args": [
           "-forward-search",
           "%TEX%",
           "%LINE%",
           "-reuse-instance",
           "-inverse-search",
           "\"E:\\Program Files\\Microsoft VS Code\\Code.exe\" \"E:\\Program Files\\Microsoft VS Code\\resources\\app\\out\\cli.js\"  -gr \"%f:%l\"",

           "%PDF%"
],第二个难点就是关于反向搜索的问题了,明明vscode自带的就可以反向搜索,反向搜索就是双击pdf上的内容可以直接跳转到代码上。其中百度上有说设置反向搜索命令行和高级选项的。
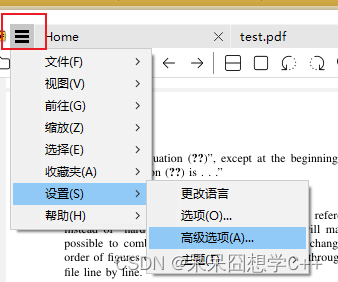
a. 关于设置反向搜索命令行,要运行tex文件,预览pdf打开,然后选择三-》设置-》选项-》才会出现这个内容,如图,需要填上跳转命令;
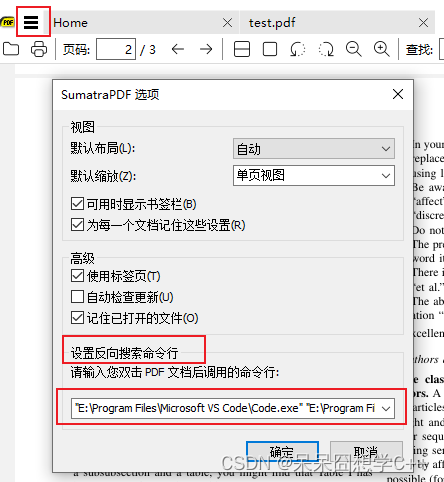
"E:\Program Files\Microsoft VS Code\Code.exe" "E:\Program Files\Microsoft VS Code\resources\app\out\cli.js" -gr "%f":"%l"b. 高级选项的设置,注意刚才是需要编译生成的pdf后,用vscode打开SumatraPdf,才能找到设置反向搜索命令行,这里是直接找到SumatraPdf.exe打开,点开设置,选择了高级选项,结果才会跳到vscode,有两个提示性语句文件,根本没啥命令行,就让人很蒙,但是我还是尝试性的两个文件都输入了两个命令,反正最后可以反向搜索了。
vscode打开的文件
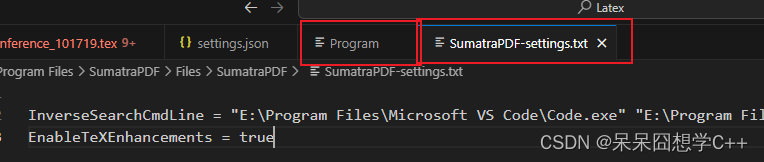
命令:
InverseSearchCmdLine = "E:\Program Files\Microsoft VS Code\Code.exe" "E:\Program Files\Microsoft VS Code\resources\app\out\cli.js"  --ms-enable-electron-run-as-node -r -g "%f:%l"
EnableTeXEnhancements = true
最后我在SumatraPdf安装目录看到了SumatraPdf-setting.txt文件,写入了我上面的两个命令,任务完成!


 701
701

 被折叠的 条评论
为什么被折叠?
被折叠的 条评论
为什么被折叠?
 到【灌水乐园】发言


