const viewer = new Cesium.Viewer("cesiumContainer");
const redPolygon = viewer.entities.add({
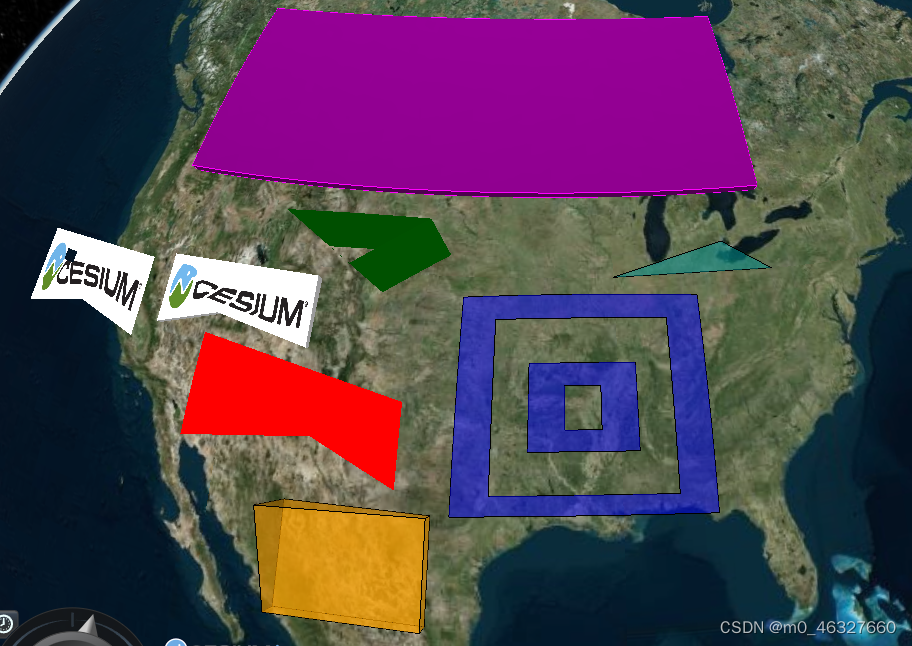
name: "Red polygon on surface",
polygon: {
hierarchy: Cesium.Cartesian3.fromDegreesArray([
-115.0,
37.0,
-115.0,
32.0,
-107.0,
33.0,
-102.0,
31.0,
-102.0,
35.0,
]),
material: Cesium.Color.RED,
},
});
const greenPolygon = viewer.entities.add({
name: "Green extruded polygon",
polygon: {
hierarchy: Cesium.Cartesian3.fromDegreesArray([
-108.0,
42.0,
-100.0,
42.0,
-104.0,
40.0,
]),
extrudedHeight: 500000.0,
material: Cesium.Color.GREEN,
closeTop: false,
closeBottom: false,
},
});
const texturedPolygon = viewer.entities.add({
name:
"Extruded textured polygon with per-position heights and custom texture coordinates",
polygon: {
hierarchy: Cesium.Cartesian3.fromDegreesArrayHeights([
-118.4,
40.4,
50000,
-118.4,
37,
30000,
-114.2,
38.0,
35000,
-108.0,
37,
30000,
-108.0,
40.4,
50000,
]),
textureCoordinates: {
positions: [
new Cesium.Cartesian2(0, 1),
new Cesium.Cartesian2(0, 0),
new Cesium.Cartesian2(0.5, 0),
new Cesium.Cartesian2(1, 0),
new Cesium.Cartesian2(1, 1),
],
},
perPositionHeight: true,
extrudedHeight: 0,
material: "../images/Cesium_Logo_Color.jpg",
},
});
const texturedPolygonWithHoles = viewer.entities.add({
name:
"Textured polygon with per-position heights, holes and custom texture coordinates",
polygon: {
hierarchy: {
positions: Cesium.Cartesian3.fromDegreesArrayHeights([
-130,
40.0,
50000,
-130,
36.0,
30000,
-125,
37,
35000,
-120,
36.0,
30000,
-120,
40.0,
50000,
]),
holes: [
{
positions: Cesium.Cartesian3.fromDegreesArrayHeights([
-128,
39.2,
46000,
-128,
38.6,
42000,
-127,
38.6,
42000,
-127,
39.2,
46000,
]),
},
],
},
textureCoordinates: {
positions: [
new Cesium.Cartesian2(0, 1),
new Cesium.Cartesian2(0, 0),
new Cesium.Cartesian2(0.5, 0),
new Cesium.Cartesian2(1, 0),
new Cesium.Cartesian2(1, 1),
],
holes: [
{
positions: [
new Cesium.Cartesian2(0.2, 0.8),
new Cesium.Cartesian2(0.2, 0.6),
new Cesium.Cartesian2(0.4, 0.6),
new Cesium.Cartesian2(0.4, 0.8),
],
},
],
},
perPositionHeight: true,
material: "../images/Cesium_Logo_Color.jpg",
},
});
const orangePolygon = viewer.entities.add({
name: "Orange polygon with per-position heights and outline",
polygon: {
hierarchy: Cesium.Cartesian3.fromDegreesArrayHeights([
-108.0,
25.0,
100000,
-100.0,
25.0,
100000,
-100.0,
30.0,
100000,
-108.0,
30.0,
300000,
]),
extrudedHeight: 0,
perPositionHeight: true,
material: Cesium.Color.ORANGE.withAlpha(0.5),
outline: true,
outlineColor: Cesium.Color.BLACK,
},
});
const bluePolygon = viewer.entities.add({
name: "Blue polygon with holes",
polygon: {
hierarchy: {
positions: Cesium.Cartesian3.fromDegreesArray([
-99.0,
30.0,
-85.0,
30.0,
-85.0,
40.0,
-99.0,
40.0,
]),
holes: [
{
positions: Cesium.Cartesian3.fromDegreesArray([
-97.0,
31.0,
-97.0,
39.0,
-87.0,
39.0,
-87.0,
31.0,
]),
holes: [
{
positions: Cesium.Cartesian3.fromDegreesArray([
-95.0,
33.0,
-89.0,
33.0,
-89.0,
37.0,
-95.0,
37.0,
]),
holes: [
{
positions: Cesium.Cartesian3.fromDegreesArray([
-93.0,
34.0,
-91.0,
34.0,
-91.0,
36.0,
-93.0,
36.0,
]),
},
],
},
],
},
],
},
material: Cesium.Color.BLUE.withAlpha(0.5),
height: 0,
outline: true,
},
});
const cyanPolygon = viewer.entities.add({
name: "Cyan vertical polygon with per-position heights and outline",
polygon: {
hierarchy: Cesium.Cartesian3.fromDegreesArrayHeights([
-90.0,
41.0,
0.0,
-85.0,
41.0,
500000.0,
-80.0,
41.0,
0.0,
]),
perPositionHeight: true,
material: Cesium.Color.CYAN.withAlpha(0.5),
outline: true,
outlineColor: Cesium.Color.BLACK,
},
});
const purplePolygonUsingRhumbLines = viewer.entities.add({
name: "Purple polygon using rhumb lines with outline",
polygon: {
hierarchy: Cesium.Cartesian3.fromDegreesArray([
-120.0,
45.0,
-80.0,
45.0,
-80.0,
55.0,
-120.0,
55.0,
]),
extrudedHeight: 50000,
material: Cesium.Color.PURPLE,
outline: true,
outlineColor: Cesium.Color.MAGENTA,
arcType: Cesium.ArcType.RHUMB,
},
});
viewer.zoomTo(viewer.entities);


 4415
4415


 被折叠的 条评论
为什么被折叠?
被折叠的 条评论
为什么被折叠?
 到【灌水乐园】发言


