


前言
在搭建网络或者训练、测试的过程中,经常要对一些变量进行维度上的变换,而且大部分情况下往往只需要了解tensor或者numpy数组维度的变换过程,就可以了解和掌握一个网络具体实现的步骤。因此,本文着重介绍tensor或者numpy数组常见的维度变换方法,对整个维度变换操作做一个简单的整理,方便自己以后理解网络的中间变换过程会有帮助。
一、常见转换操作
1、升维 / 降维
Pytorch
(1) unsqueeze()方法
- 给指定位置加上维数为1的维度
- 语法:
torch.unsqueeze(input, dim)或者tensor.unsqueeze(dim) - 示例:
a = torch.rand([2,3,4])
b = torch.unsqueeze(a,0)
c = torch.unsqueeze(a,2)
d = a.unsqueeze(1)
print(a.shape)
print(b.shape)
print(c.shape)
print(d.shape))

>>>torch.Size([2, 3, 4])
>>>torch.Size([1, 2, 3, 4])
>>>torch.Size([2, 3, 1, 4])
>>>torch.Size([2, 1, 3, 4])
unsqueeze_()方法:可以直接对原始张量进行赋值
a = torch.rand([2,3,4])
print(a.shape)
a.unsqueeze_(2)
print(a.shape)

>>>torch.Size([2, 3, 4])
>>>torch.Size([2, 3, 1, 4])
(2) squeeze()方法
- 和
unsqueeze()方法相反,除去数值为1的维度。 - 示例:
a = torch.rand([1,3,1])
b = torch.squeeze(a,0)
c = torch.squeeze(a,1)
d = a.squeeze(2)
print(a.shape)
print(b.shape)
print(c.shape)
print(d.shape)

>>>torch.Size([1, 3, 1])
>>>torch.Size([3, 1])
>>>torch.Size([1, 3, 1])
>>>torch.Size([1, 3])
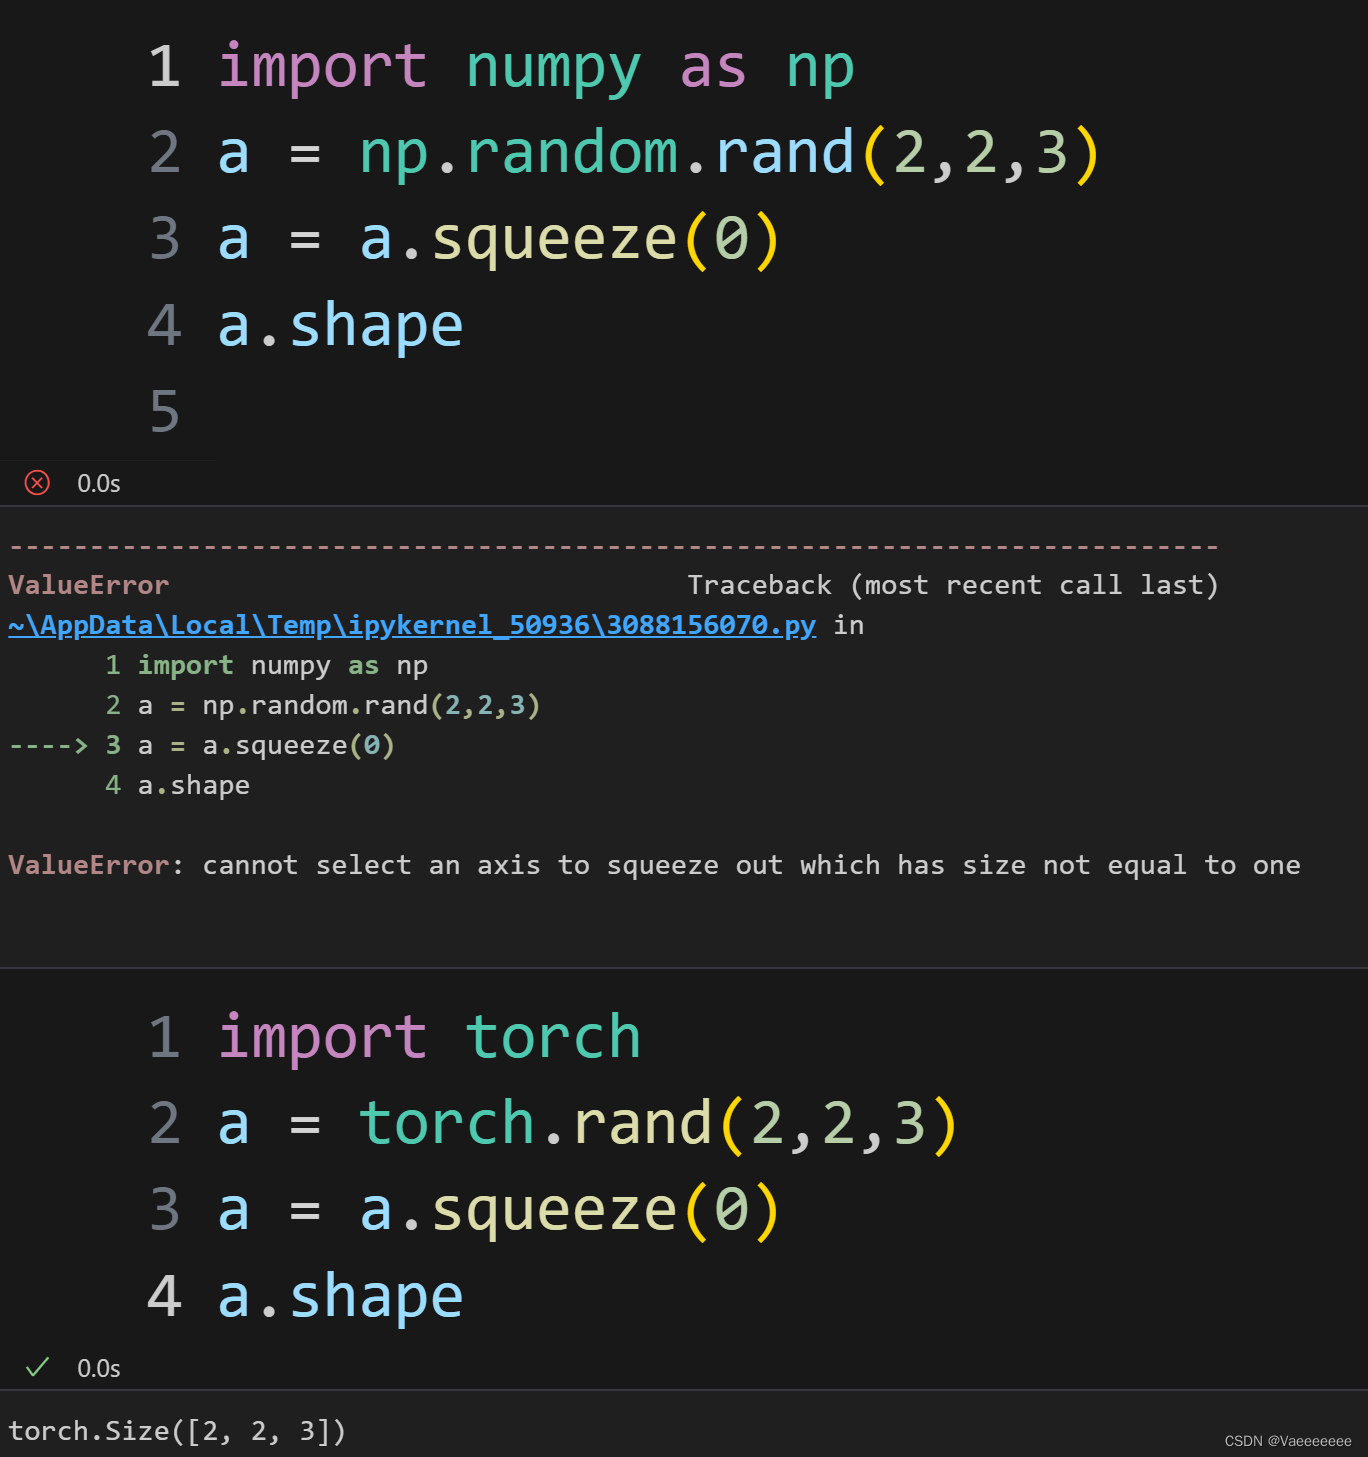
- 上面方法也可以用
reshape()方法替代。 - 注意,数组的第一个维度不为1时,在numpy中使用squeeze会报错,但是在torch中不会报错。
Numpy
(1) np.expand_dims()
- 在指定位置插入一个新的维度
- 语法:
np.expand_dims(a, axis) - 示例:
a = np.random.randn(2,3,4)
b = np.expand_dims(a,0)
c = np.expand_dims(a,2)
print(a.shape)
print(b.shape)
print(c.shape)

>>>(2, 3, 4)
>>>(1, 2, 3, 4)
>>>(2, 3, 1, 4)
(2) np.squeeze()
- 删除输入数组a中维度为1的维度,并返回新的数组
- 示例:
a = np.random.randn(1,2,3)
b = np.squeeze(a,0)
c = a.squeeze(0)
print(a.shape)
print(b.shape)
print(c.shape)

>>>(1, 2, 3)
>>>(2, 3)
>>>(2, 3)
2、扩维 / 缩维
Pytorch
(1)repeat()方法
- 用于对张量进行重复的操作。它可以用来在指定的维度上复制张量的元素。
- 语法:
tensor.repeat(*sizes),sizes参数用于指定每个维度上的重复次数 - 示例:
a = torch.rand([2,3,4])
b = a.repeat(6,4,3)
c = a.unsqueeze(0).repeat(2,1,1,1)
print(a.shape)
print(b.shape)
print(c.shape)

>>>torch.Size([2, 3, 4])
>>>torch.Size([12, 12, 12])
>>>torch.Size([2, 2, 3, 4])


d = torch.tensor([[1,2],[3,4],[5,6]])
e = d.repeat(2,3)
print(d)
print(e)

>>>tensor([[1, 2],
           [3, 4],
           [5, 6]])
>>>tensor([[1, 2, 1, 2, 1, 2],
       	   [3, 4, 3, 4, 3, 4],
           [5, 6, 5, 6, 5, 6],
           [1, 2, 1, 2, 1, 2],
           [3, 4, 3, 4, 3, 4],
           [5, 6, 5, 6, 5, 6]])
(2)narrow()方法
- 用于在张量的指定维度上进行切片操作。通过指定起始索引和长度,可以获取张量在指定维度上的一个子张量。
- 语法:
narrowed_tensor = tensor.narrow(dim, start, length)dim表示要切片的维度,start表示切片的起始索引,length表示切片的长度 - 示例:
a = torch.tensor([[1, 2, 3],
                  [4, 5, 6],
                  [7, 8, 9]])
b = a.narrow(0, 1, 2)
print(a.shape)
print(b)
print(b.shape)

>>>torch.Size([3, 3])
>>>tensor([[4, 5, 6],
           [7, 8, 9]])
>>>torch.Size([2, 3])
Numpy
(1)np.tile()
- 与PyTorch中的
tensor.repeat()方法类似,用于在指定维度上对数组进行平铺复制。 - 语法:
tiled_array = numpy.tile(A, reps)
A:要平铺复制的输入数组;reps:一个整数或整数元组,用于指定每个维度上的重复次数。 - 示例:
a = np.arange(12).reshape(2,3,2)
b = np.tile(a,(2,1,2))
print(a.shape)
print(b.shape)
print(a)
print(b)

>>>(2, 3, 2)
>>>(4, 3, 4)
>>>[[[ 0  1]
  [ 2  3]
  [ 4  5]]
 [[ 6  7]
  [ 8  9]
  [10 11]]]
>>>[[[ 0  1  0  1]
  [ 2  3  2  3]
  [ 4  5  4  5]]
 [[ 6  7  6  7]
  [ 8  9  8  9]
  [10 11 10 11]]
 [[ 0  1  0  1]
  [ 2  3  2  3]
  [ 4  5  4  5]]
 [[ 6  7  6  7]
  [ 8  9  8  9]
  [10 11 10 11]]]
(2)np.repeat()
- 用于在指定维度上对数组进行重复
- 语法:
repeated_array = np.repeat(array, repeats, axis=None)
array:要重复的输入数组,
repeats:一个整数或整数数组,用于指定重复的次数
axis:一个整数,表示要在哪个维度上进行重复。如果不指定axis参数,则会将数组展平后进行重复。 - 示例:
a = np.arange(24).reshape(2,3,4)
b = np.repeat(a,2,axis=1)
c = np.repeat(a,2)
print(a.shape)
print(b.shape)
print(c.shape)
print(a)
print(b)

>>>(2, 3, 4)
>>>(2, 6, 4)
>>>(48,)
>>>[[[ 0  1  2  3]
     [ 4  5  6  7]
     [ 8  9 10 11]]

   [[12 13 14 15]
    [16 17 18 19]
    [20 21 22 23]]]
>>>[[[ 0  1  2  3]
     [ 0  1  2  3]
     [ 4  5  6  7]
     [ 4  5  6  7]
     [ 8  9 10 11]
     [ 8  9 10 11]]

   [[12 13 14 15]
     [12 13 14 15]
     [16 17 18 19]
     [16 17 18 19]
     [20 21 22 23]
     [20 21 22 23]]]
3、维度转换
Pytorch
(1) reshape() / view()
- 不多说,非常常用。
(2) permute()
- 用于对张量进行维度重排,从而改变张量的形状。
- 语法:
Tensor.permute(*dims)接受一个可变数量的参数dims,用于指定新的维度顺序。每个参数对应于张量的一个维度,参数的值表示在新张量中的位置。 - 示例:
a = torch.arange(12).reshape(1,3,4)
b = a.permute(1,0,2)
print(a)
print(b)
print(a.shape)
print(b.shape)

>>>tensor([[[ 0,  1,  2,  3],
         [ 4,  5,  6,  7],
         [ 8,  9, 10, 11]]])
>>>tensor([[[ 0,  1,  2,  3]],

        [[ 4,  5,  6,  7]],

        [[ 8,  9, 10, 11]]])
>>>torch.Size([1, 3, 4])
>>>torch.Size([3, 1, 4])
- 注意:
reshape和permute的变换张量维度的区别,reshape是按照原始矩阵元素的顺序进行变换的,而permute会改变张量中元素的顺序。如:
a = torch.tensor([[1,2,3],[4,5,6]])
b = a.reshape(3,2)
c = a.permute(1,0)
print(a)
print(b)
print(c)

>>>tensor([[1, 2, 3],
           [4, 5, 6]])
>>>tensor([[1, 2],
           [3, 4],
           [5, 6]])
>>>tensor([[1, 4],
           [2, 5],
           [3, 6]])
(3) torch.transpose()
- 用于对张量进行转置操作。它可以交换张量的两个维度,从而改变张量的形状。
- 语法:
torch.transpose(input, dim0, dim1)
input:要进行转置操作的输入张量。
dim0、dim1:要交换的两个维度。 - 示例:
a = torch.rand(2,3,4)
b = torch.transpose(a,1,2)
print(a.shape)
print(b.shape)

>>>torch.Size([2, 3, 4])
>>>torch.Size([2, 4, 3])
Numpy
(1) reshape() / view()
(2) np.transpose()
- 与pytorch中
permute()方法类似 - 语法:
numpy.transpose(a, axes)用来调整数组的不同轴 - 示例:
a = np.arange(12).reshape(1,2,6)
b = np.transpose(a,(0,2,1))
print(b.shape)

>>>(1, 6, 2)
4、展平操作
Pytorch
(1) flatten()方法
- 用于将张量展平为一维。
- 语法:
tensor.flatten(start_dim=0),star_dim 表示开始展平的维度。 - 示例:
a = torch.arange(12).reshape(2,3,2)
b = a.flatten()
c = a.flatten(1)
d = a.reshape(-1)   # 也可以使hape实现展平化
print(a,a.shape)
print(b,b.shape)
print(c,c.shape)
print(d,d.shape)

>>>tensor([[[ 0,  1],
         [ 2,  3],
         [ 4,  5]],

        [[ 6,  7],
         [ 8,  9],
         [10, 11]]]) torch.Size([2, 3, 2])
>>>tensor([ 0,  1,  2,  3,  4,  5,  6,  7,  8,  9, 10, 11]) torch.Size([12])
>>>tensor([[ 0,  1,  2,  3,  4,  5],
        [ 6,  7,  8,  9, 10, 11]]) torch.Size([2, 6])
>>>tensor([ 0,  1,  2,  3,  4,  5,  6,  7,  8,  9, 10, 11]) torch.Size([12])
(1) nn.Flatten()方法
- PyTorch中的一个模块,它通常用于将卷积层的输出展平为全连接层的输入,或者用于将多维张量输入到适用于一维输入的层中。
- 默认从第二维开始平坦化。
- 示例:
import torch
import torch.nn as nn

flatten = nn.Flatten()
input_tensor = torch.randn(1, 3, 4)
print(input_tensor.shape)
output_tensor = flatten(input_tensor)
print(output_tensor.shape)

>>>torch.Size([1, 3, 4])
>>>torch.Size([1, 12])
Numpy
(1) flatten()方法
- 同Pytorch中的方法
(2) ravel()方法
- 功能与
flatten一致,但是在内存上有很大不同。flatten()分配了新的内存,而ravel返回的变量会影响原始矩阵。 - 示例:
a = np.arange(12).reshape(3,4)
b = a.ravel()
c = a.flatten()
print('b=',b,'c=',c)
c[0] = 100
print(a)
b[0] = 100
print(a)

>>>b= [ 0  1  2  3  4  5  6  7  8  9 10 11] c= [ 0  1  2  3  4  5  6  7  8  9 10 11]
>>>[[ 0  1  2  3]
 [ 4  5  6  7]
 [ 8  9 10 11]]
>>>[[100   1   2   3]
 [  4   5   6   7]
 [  8   9  10  11]]
5、维度拼接
Pytorch
(1) torch.cat()
- 用于将多个张量沿指定维度进行拼接(连接)。它可以在给定的维度上将输入的张量拼接成一个更大的张量,形状必须相同。
- 语法:
torch.cat(tensors, dim=0, out=None)
tensors是一个要拼接的张量序列,可以是一个张量列表或元组。
dim是指定拼接的维度,默认为0。
out是一个可选的输出张量,用于指定结果张量的存储位置。 torch.concat()是torch.cat()的别称,用法一致。- 示例:
a = torch.tensor([[1,2],[3,4],[5,6]])
b = torch.tensor([[11,22],[33,44],[55,66]])
c = torch.cat((a,b),dim=0)
d = torch.cat((a,b),dim=1)
print(c)
print(d)

>>>tensor([[ 1,  2],
        [ 3,  4],
        [ 5,  6],
        [11, 22],
        [33, 44],
        [55, 66]])
>>>tensor([[ 1,  2, 11, 22],
        [ 3,  4, 33, 44],
        [ 5,  6, 55, 66]])
(2) torch.stack()
- 用于沿着新的维度对给定序列的张量进行堆叠的函数。和
cat()是有区别的,它是在新建的维度上进行拼接。 - 语法:
torch.stack(tensors, dim=0, out=None)
tensors:要堆叠的张量序列。
dim:沿着哪个维度进行堆叠的维度,是一个整数值。
out:(可选)输出张量。如果指定了该参数,结果将存储在这个张量中。如果没有指定,将创建一个新的张量。 - 示例:
a = torch.tensor([[1,2],[3,4],[5,6]])
b = torch.tensor([[11,22],[33,44],[55,66]])
c = torch.stack((a,b),0)
d = torch.stack((a,b),1)
print(a,a.shape)
print(b,b.shape)
print(c,c.shape)
print(d,d.shape)

>>>tensor([[1, 2],
           [3, 4],
           [5, 6]]) torch.Size([3, 2])
>>>tensor([[11, 22],
           [33, 44],
           [55, 66]]) torch.Size([3, 2])
>>>tensor([[[ 1,  2],
            [ 3,  4],
            [ 5,  6]],

            [[11, 22],
             [33, 44],
             [55, 66]]]) torch.Size([2, 3, 2])
>>>tensor([[[ 1,  2],
            [11, 22]],

           [[ 3,  4],
            [33, 44]],

           [[ 5,  6],
            [55, 66]]]) torch.Size([3, 2, 2])
Numpy
(1) np.append
- 用于在给定的轴上将值附加到数组的末尾。它可以用于在现有数组的末尾添加元素或连接两个数组,不支持三个及以上数组的拼接。
- 语法:
np.append(arr, values, axis=None)
arr:目标数组;values:要附加到arr的值,axis是指定附加的轴,默认为None。如果未提供axis参数,会将输入数组展平为一维数组,然后在末尾添加值。 - 示例:
a = np.array([1, 2, 3])
A = np.arange(6).reshape(2,3)
b = np.append(a, 100)
c = np.append(A,[[11,22,33]],axis=0)
print(a)
print(A)
print(b)
print(c)

>>>[1 2 3]
>>>[[0 1 2]
    [3 4 5]]
>>>[  1   2   3 100]
>>>[[ 0  1  2]
    [ 3  4  5]
    [11 22 33]]
(2) np.concatenate
- 与Pytorch中的
cat()方法类似,支持多个矩阵拼接。
二、高级转换操作
- 首先我们需要了解
einops这个库,它是用于灵活处理张量维度变换的库,它提供了简洁而强大的API,使得对张量进行维度操作变得更加直观和易于理解,并且支持对numpy,pytorch的张量操作。 - 几个简单示例感受一下它的魅力🧐,更多用法大家可以自行去学习。
张量维度交换
import torch
import einops
x = torch.randn(10, 20, 30)

# 将维度顺序从(10, 20, 30)变为(30, 10, 20)
result = einops.rearrange(x, 'a b c -> c a b')
print(result.shape)  # 输出:torch.Size([30, 10, 20])
张量展平
import torch
import einops
x = torch.randn(10, 20, 30)

# 将形状为(10, 20, 30)的张量展平为形状为(10, 600)的张量
result = einops.flatten(x, 'a b c -> a (b c)')
print(result.shape)  # 输出:torch.Size([10, 600])
张量维度拆分
import torch
import einops
x = torch.randn(10, 20, 30)

# 将形状为(10, 20, 30)的张量在第二个维度上拆分为两个形状为(10, 10, 30)的张量
result1, result2 = einops.split(x, 'a (b1 b2) c -> b1 a c', b1=10, b2=10)

print(result1.shape)  # 输出:torch.Size([10, 10, 30])
print(result2.shape)  # 输出:torch.Size([10, 10, 30])
总结
对Pytorch和Numpy张量各种维度变换的方法作了一个简单的总结。


 1万+
1万+

 被折叠的 条评论
为什么被折叠?
被折叠的 条评论
为什么被折叠?
 到【灌水乐园】发言


