


前言
在编写 BloomFilter 之前,我们先来了解下什么是 BloomFilter,BloomFilter 又有什么用呢?我们知道,为了减小 mysql 的负担,于是引入了 redis 作为缓存挡在 mysql 前,对于绝大多数请求从 redis 中获取就好,这样可以避免对 mysql 的频繁访问。但是这样做就万无一失了吗?答案显然不是的!引入 redis 的初衷是为了降低对 mysql 的频繁访问,但是如果查询一个 redis 中根本不存在的 key 时,这份请求就打到了 mysql 上,此时你会说这不是挺正常吗。但是不妨设想,倘若你的系统被恶意攻击,攻击者发送了巨量请求,请求的 key 在 redis 中均不存在,那这巨量的请求是不是就全打在了 mysql 上,而 mysql 中也没有存储相关信息,因此,回写机制也不会触发,这时,redis 可以说形同虚设!mysql 随时面临着被打爆的风险,这种情况我们也称为缓存穿透。
于是又有人提出,那我们返回一个 null 回写进 redis 中,也就是常说的空对象缓存,这样 redis 就可以挡住这些恶意请求。这样确实可以解决点问题,但是还有问题没有解决,那就是,你这样只能抵挡住相同的请求,对于巨量的不同请求,你的 mysql 一方面面临被打爆的风险,其次你的 redis 因为缓存了太多空对象,也面临着 redis 内存耗尽的风险!所以,你的问题根本没有得到解决!那么,怎么办??就这样妥协了?当然不!正是基于这种情况 BloomFilter 诞生了。
BloomFilter 挡在 redis 前,对于发送来的请求进行判断,该请求所需要的内容我的缓存或者是数据库中,存在吗?如果判断出,不存在,那么就一定不存在,直接进行返回,此时这份请求甚至连 redis 都接收不到,更别说打在 mysql 上了。这样便解决了这些恶意攻击!问题得到极大的改善。
什么是 BloomFilter
BloomFilter 本质上就是一个大型位数组与几个无偏的哈希函数的结合。通过哈希函数,我们可以计算一个关键字的哈希值,而且使用相同的哈希函数进行计算,得到的结果也必然是相同的。那么什么是无偏?无偏就是指分布均匀。
那么 BloomFilter 得到的结果一定准确吗?当然不是!BloomFilter 也存在着一定的误判概率!这个误判概率怎么来的呢?接下来我引用一下网上的截图,让大家看的更为直观
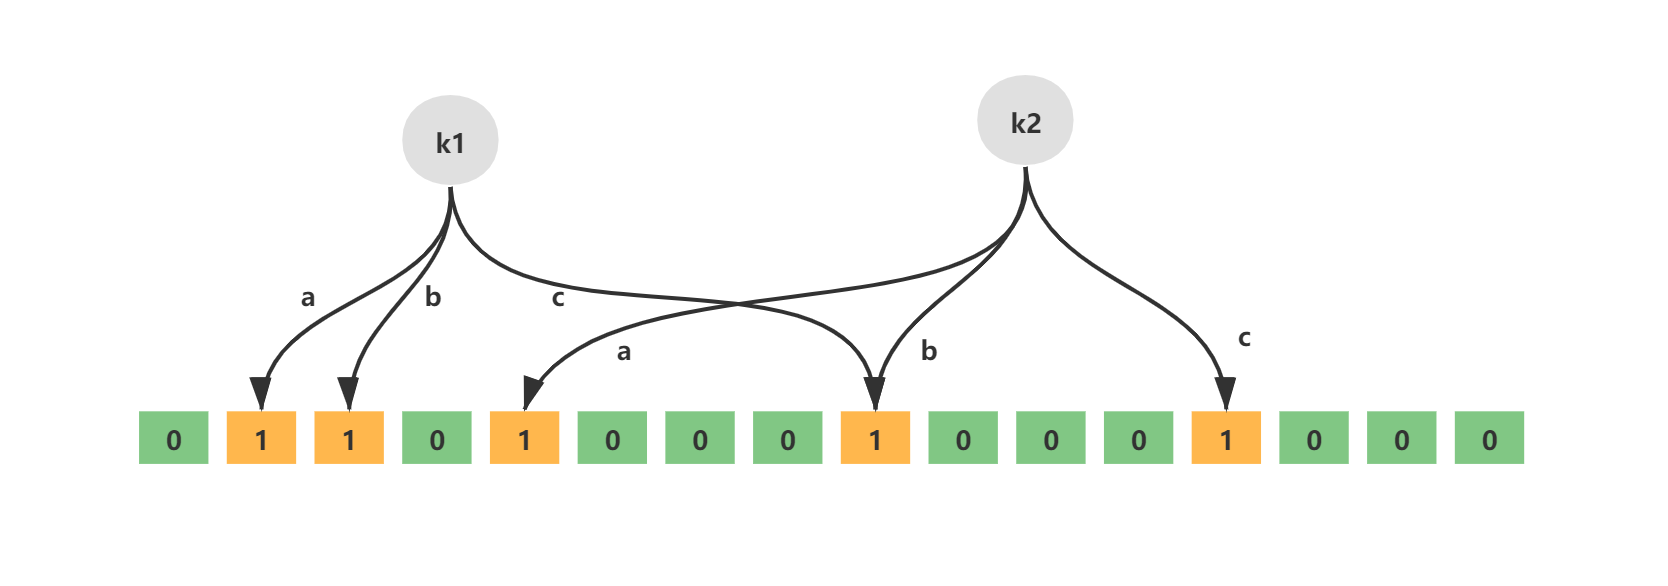
前面我们说 BloomFilter 本质就是一个大型的位数组与几个无偏哈希函数的结合,那么在使用多个哈希函数对不同的 key 进行计算必然存在着可能,计算的结果相同!于是在存入大量数据后误判就有可能产生,一个关键字使用多个无偏哈希函数计算出来的结果极有可能已经因为其他关键字被置为 1 了。因此一个结论就此产生,对于 BloomFilter 而言无是一定无,有是可能有。所以即使误判性存在,但是在过滤恶意请求上也是完全没问题的,因为无是一定无。
BloomFilter 的优点
基于 BloomFilter 的快速检测的特性,可以在把数据写入数据库时,使用 BloomFilter 做个标记。当缓存缺失后,应用查询数据库时,可通过 BloomFilter 快速判定数据是否存在。若不存在,就不用去数据库中查询。这样一来即使发生缓存穿透了,大量请求也只会查询 BloomFilter ,而不会积压到数据库。
BloomFilter 的缺点
因为 BloomFilter 的误判性的原因,导致我们不能对 BloomFilter 的位数组进行删除操作。位数组的某一位上被置为 1 。极有可能被多个关键字所共享,如果贸然删除,会影响其他的关键字。
再次理解 BloomFilter
前面我们已经了解了 BloomFilter 的本质是什么,以及它的优缺点,那么我们该如何实现呢?既然 BloomFilter 的本质是一个大型的位数组和多个无偏哈希函数的结合,那么一看到位数组,是不是下意识地就想到 redis 的一个数据类型,bitmap。该数据类型就是由 0 和 1 状态表现的二进制位的 bit 数组,所以我们不就可以使用哈希函数计算出关键字的哈希值,并使用 bitmap 的相关命令来将计算出的哈希值所对应着的位置设置为 1 ,不就完成了 BloomFilter 的实现啦。所以接下来,我们来写写 BloomFilter 的实现代码吧。
场景:
现在,我们要插入一个用户的相关信息存入 mysql 数据库中,并使用 redis 作为缓存,后面再进行查询时从缓存中获取,而针对不存在的数据直接被 BloomFilter 所拦截,不会被数据库所收到。于是我们写一个用户类
package com.example.bloomFilter.pojo;

import lombok.*;

@NoArgsConstructor
@AllArgsConstructor
@ToString
@Data
@EqualsAndHashCode
public class User {

    private Integer uid;

    private String username;

    private String password;

    private String email;

    private String nickname;
}
并编写业务层的核心代码,增加用户部分
public Boolean insertUser(User user) {
        Integer id = userMapper.insertUser(user);
        String userKey = USER_KEY + user.getUid();

        long pos = (long) (Math.abs(userKey.hashCode()) % (Math.pow(2, 32)));
        stringRedisTemplate.opsForValue().setBit(BLOOM_FILTER_KEY, pos, true);
        log.info("offset:{}",pos);

        if (id > 0) {
            return true;
        }
        return false;
    }
查询用户部分
public User findUserById(Integer id) {
String userKey = USER_KEY + id;
long pos = (long) (Math.abs(userKey.hashCode()) % (Math.pow(2, 32)));
if (!stringRedisTemplate.opsForValue().getBit(BLOOM_FILTER_KEY, pos)) {
return null;
}
String userStr = stringRedisTemplate.opsForValue().get(userKey);
if (userStr == null) {
synchronized (UserServiceImpl.class) {
String userStr2 = stringRedisTemplate.opsForValue().get(userKey);
if (userStr2 == null) {
User userById = userMapper.findUserById(id);
if (userById == null) {
return null;
}
String userJson = JSON.toJSONString(userById);
stringRedisTemplate.opsForValue().set(userKey, userJson, 1000, TimeUnit.SECONDS);
return userById;
}
return JSON.parseObject(userStr2, User.class);
}
}
User user = JSON.parseObject(userStr, User.class);
return user;
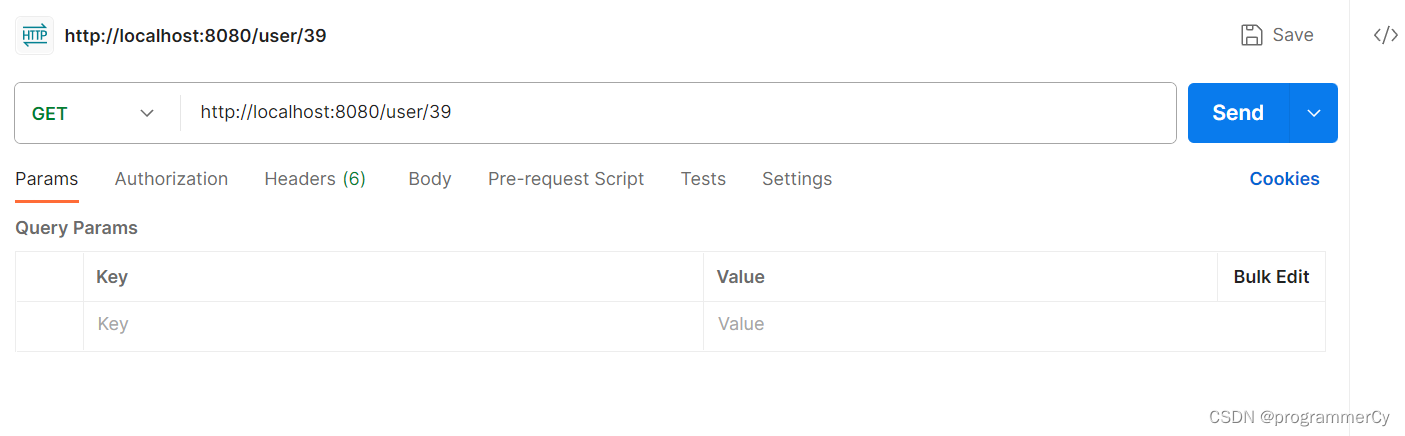
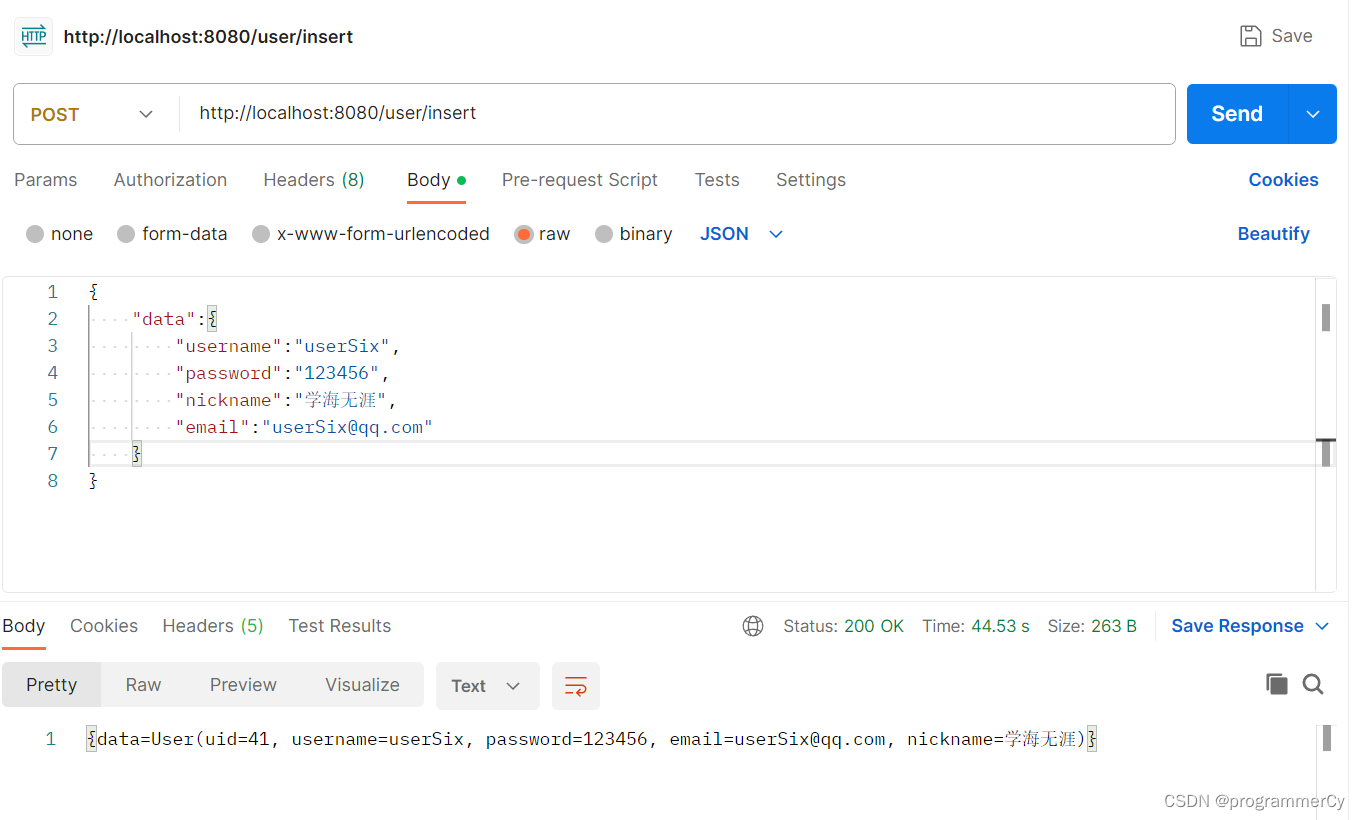
}至此,核心代码已经编写完成,接下来我们进行测试,看是否 BloomFilter 会起作用,本次测试的请求使用 postman 进行发送

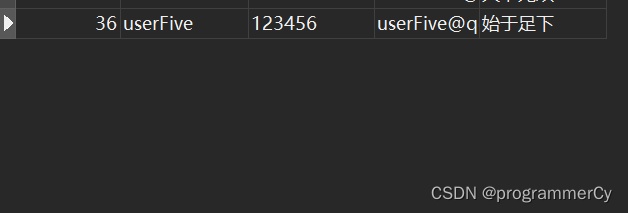
看看此时的数据库中的数据
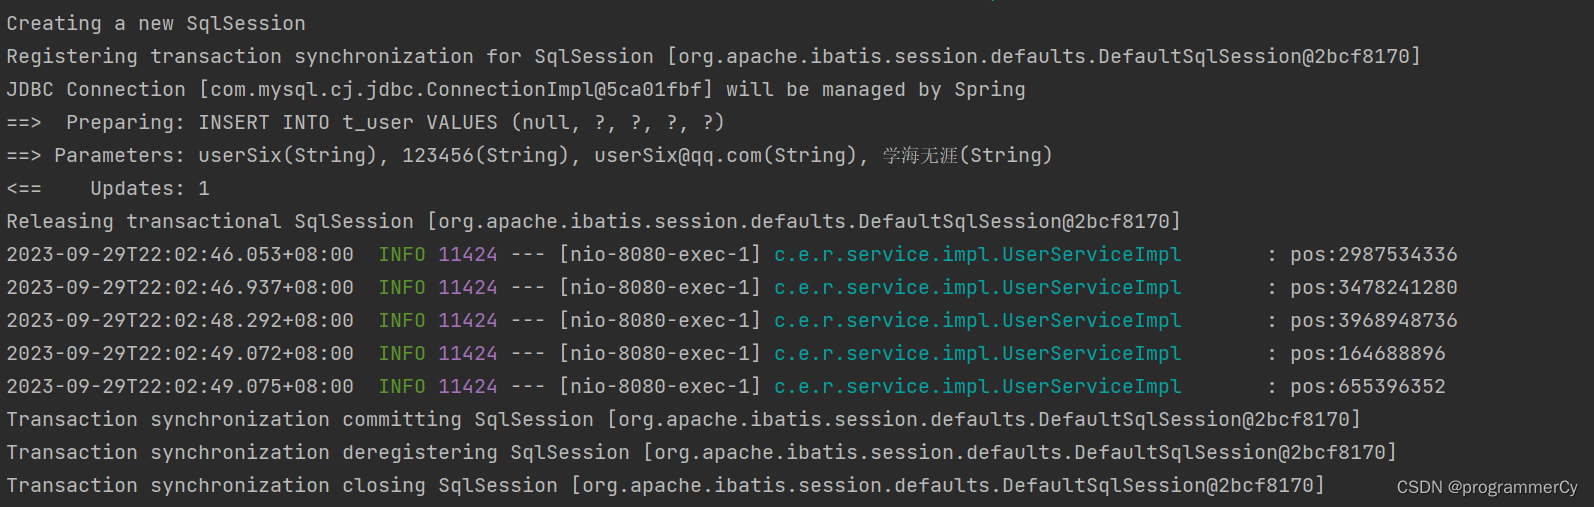
此时我们发送请求后,看看控制台

可以看见,偏移量为 147170187。我们不妨去 redis 中查看,看看我们写的 BloomFilter 在此处是否标记为 1。

可以看见,此处已经被置为 1。再来看看此时的数据库中,是什么情况

可以看到,数据已经被存入。那么接下来,我们尝试发送请求,查询 uid 为 39 的用户信息。如果 BloomFilter 判定是有的,那么才去查询 redis ,如果 redis 没有,才去查询数据库。而如果 BloomFilter 判定是没有的,那么从代码我们可以知道,直接被返回为 null,根本不会去访问数据库了。
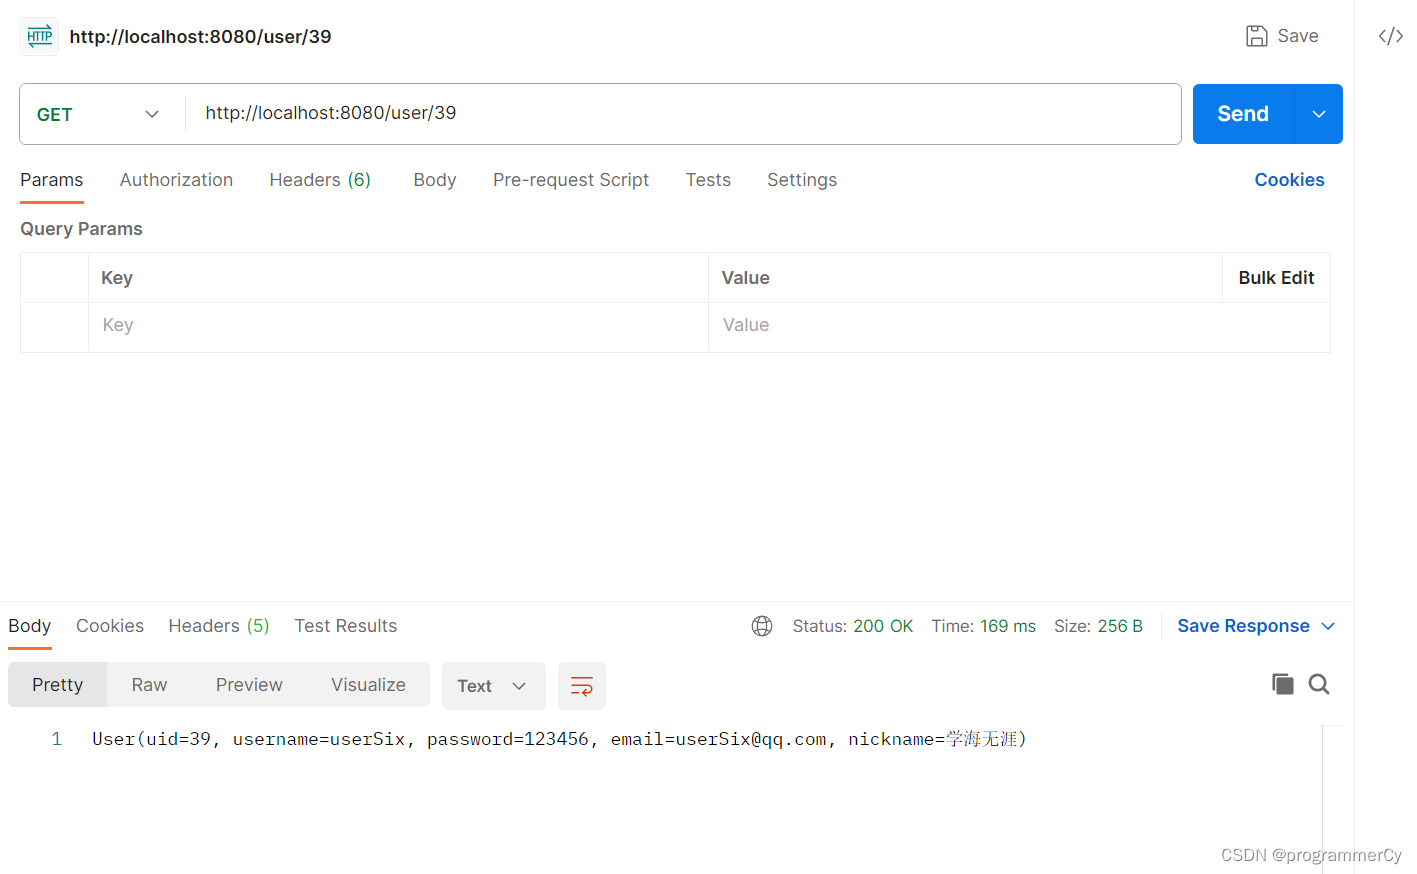
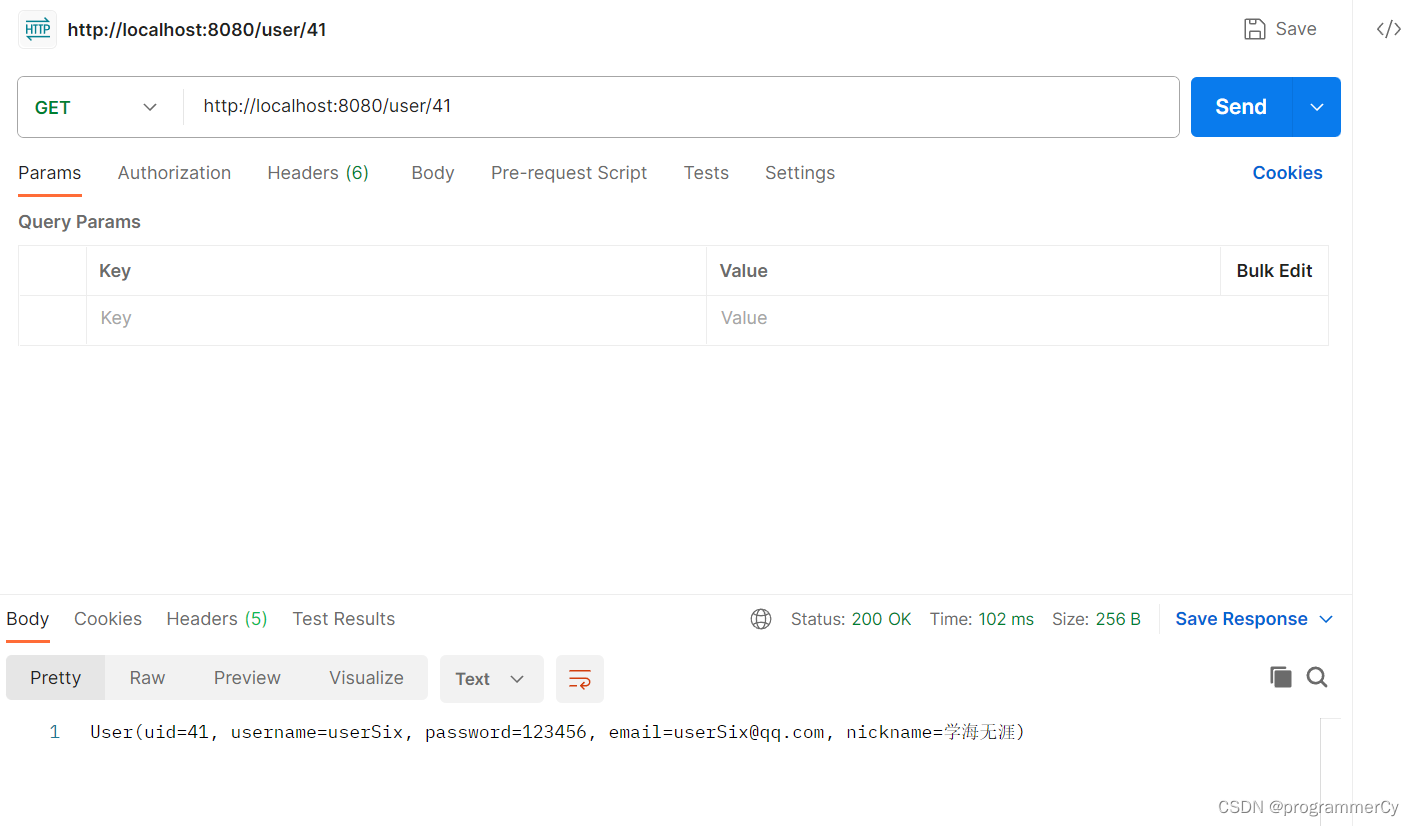
我们发送请求后,返回的结果如下图
而如果,我们尝试查询一个 uid 为 40 的用户,该用户根本不存在,看看会发生什么呢
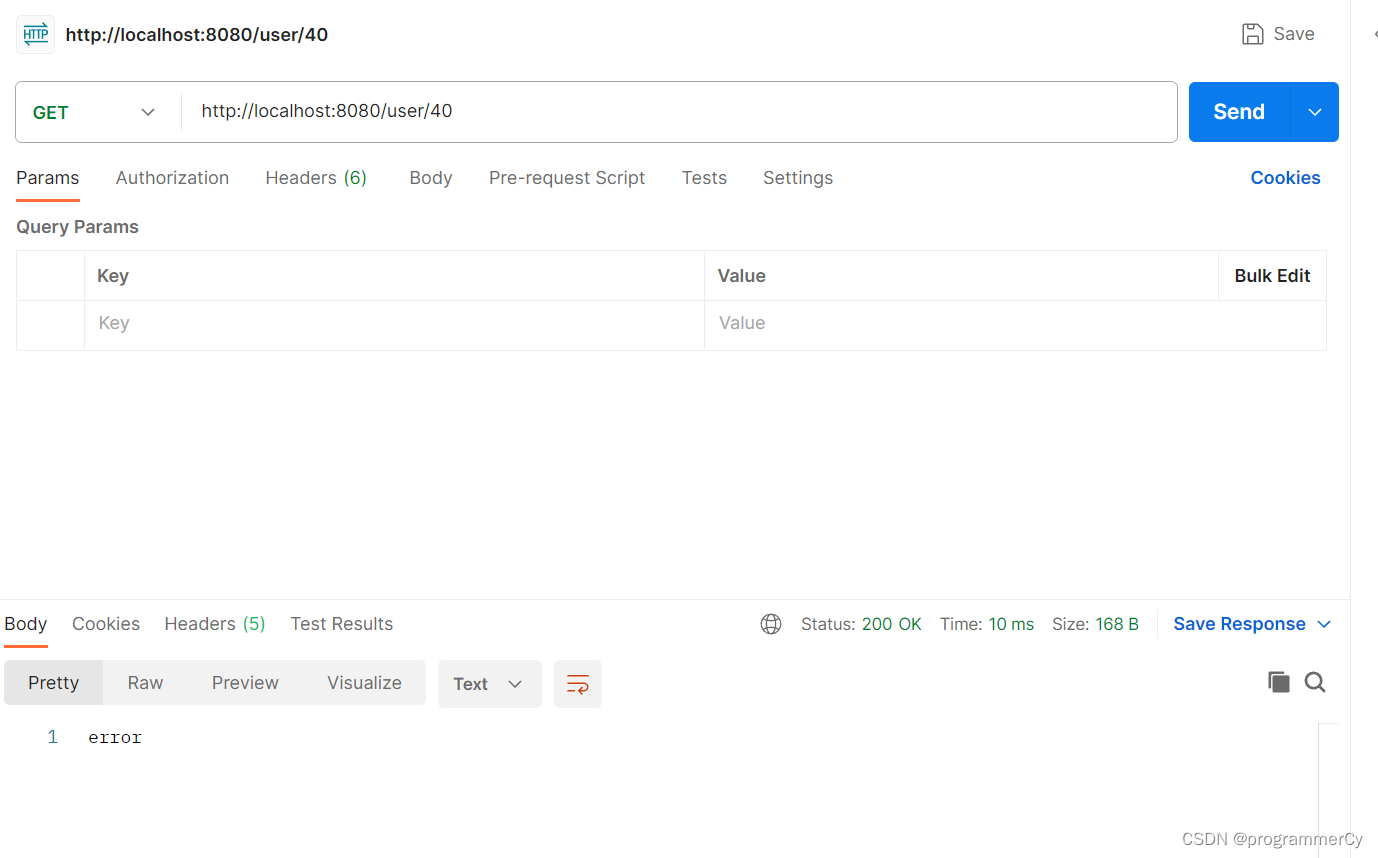
没错,返回为 error ,因为 BloomFilter 根本就没有记录这个 uid。
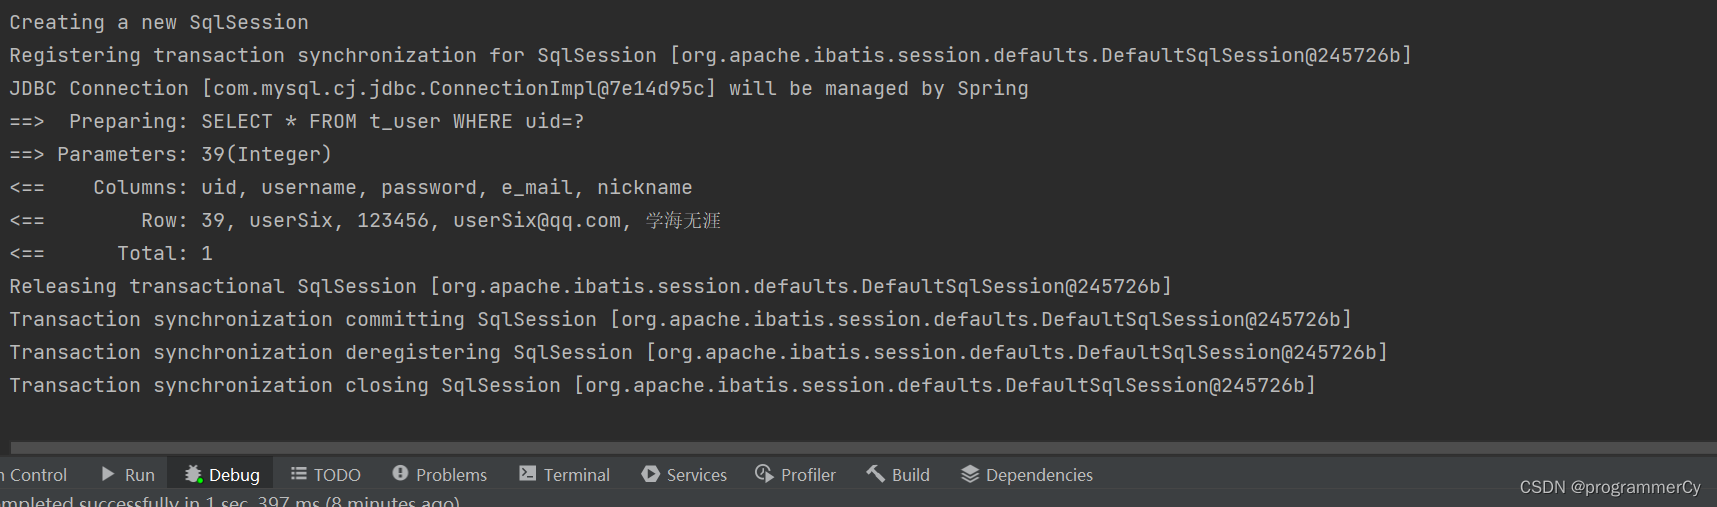
从控制台中我们可以看到,这个查询 uid=40 的请求根本就没有走到数据库去。成功被 BloomFilter 所拦截。至此,手写 BloomFilter 完成。
Guava 的 BloomFilter
我们自己手写的 BloomFilter 还是过于简单,使用的哈希函数也只是用了一个,而想实现一个完整的 BloomFilter 还是有些繁琐的,但是核心思想还是我上述提到的这样,不过 Google 大佬在 guava 已经为我们封装了布隆过滤器实现。本文的重点在于手写 BloomFilter ,因此对于 guava 的 BloomFilter 就不做重点描述,讲述下相关使用即可。
首先,引入依赖
<dependency>
   <groupId>com.google.guava</groupId>
   <artifactId>guava</artifactId>
   <version>32.1.2-jre</version>
</dependency>
然后对上述代码,做略微改写,整体如下
package com.example.bloomFilter.service.impl;

import com.alibaba.fastjson.JSON;
import com.example.redis_study.mapper.UserMapper;
import com.example.redis_study.pojo.User;
import com.example.redis_study.service.UserService;
import com.google.common.base.Charsets;
import com.google.common.hash.BloomFilter;
import com.google.common.hash.Funnels;
import lombok.extern.slf4j.Slf4j;
import org.springframework.beans.factory.annotation.Autowired;
import org.springframework.data.redis.core.StringRedisTemplate;
import org.springframework.stereotype.Service;
import org.springframework.transaction.annotation.Transactional;

import java.util.concurrent.TimeUnit;


@Service
@Transactional
@Slf4j
public class UserServiceImpl implements UserService {

    @Autowired
    UserMapper userMapper;

    @Autowired
    StringRedisTemplate stringRedisTemplate;

    static final String USER_KEY="user:";

    long size = (long) Math.pow(2, 32);

    BloomFilter<CharSequence> bloomFilter = BloomFilter.create(Funnels.stringFunnel(Charsets.UTF_8), size, 0.03);

    @Override
    public User findUserById(Integer id) {

        String userKey = USER_KEY + id;

        if (!bloomFilter.mightContain(userKey)) {
            return null;
        }

        String userStr = stringRedisTemplate.opsForValue().get(userKey);

        if (userStr == null) {
            synchronized (UserServiceImpl.class) {
                String userStr2 = stringRedisTemplate.opsForValue().get(userKey);
                if (userStr2 == null) {
                    User userById = userMapper.findUserById(id);
                    if (userById == null) {
                        return null;
                    }
                    String userJson = JSON.toJSONString(userById);
                    stringRedisTemplate.opsForValue().set(userKey, userJson, 1000, TimeUnit.SECONDS);
                    return userById;
                }
                return JSON.parseObject(userStr2, User.class);
            }
        }

        User user = JSON.parseObject(userStr, User.class);

        return user;
    }

    @Override
    public Boolean insertUser(User user) {
        Integer id = userMapper.insertUser(user);
        String userKey = USER_KEY + user.getUid();

        bloomFilter.put(userKey);

        if (id > 0) {
            return true;
        }
        return false;
    }
}
补充:分布式 BloomFilter 引入
在我的学习过程中,其实一直都有个疑惑困扰着我,那就是分布式的问题,如果使用我们手写的基于 redis 的 BloomFilter 结合 redission 可以解决分布式的问题。可是我们手写的这个 BloomFilter 却存在着巨大的隐患,首先哈希函数选择随意,也没有选择多个哈希函数,因此不可能进行生产级别的使用,那么我们用 guava!可是如果使用 guava,却无法解决分布式的问题。这时,我知道想实现分布式 redis 无疑是最好的选择,因此,我选择结合 guava 和我们手写的 BloomFilter。通过翻阅 guava 的源码,我截取了它最核心的部分,引入到自己的 BloomFilter 中,在最终测试后发现,已经存入 redis 中!
先贴出改进后的源码
package com.example.bloomFilter.service.impl;

import com.alibaba.fastjson.JSON;
import com.example.redis_study.mapper.UserMapper;
import com.example.redis_study.pojo.User;
import com.example.redis_study.service.UserService;
import com.google.common.base.Charsets;
import com.google.common.hash.BloomFilter;
import com.google.common.hash.Funnels;
import com.google.common.hash.Hashing;
import com.google.common.primitives.Longs;
import lombok.extern.slf4j.Slf4j;
import org.springframework.beans.factory.annotation.Autowired;
import org.springframework.data.redis.core.StringRedisTemplate;
import org.springframework.stereotype.Service;
import org.springframework.transaction.annotation.Transactional;

import java.util.concurrent.TimeUnit;

@Service
@Transactional
@Slf4j
public class UserServiceImpl implements UserService {

    @Autowired
    UserMapper userMapper;

    @Autowired
    StringRedisTemplate stringRedisTemplate;

    static final String USER_KEY="user:";

    static final String BLOOM_FILTER_KEY="bloomFilter";

    long size = (long) Math.pow(2, 32);

    BloomFilter<CharSequence> bloomFilter = BloomFilter.create(Funnels.stringFunnel(Charsets.UTF_8), size, 0.03);

    @Override
    public User findUserById(Integer id) {

        String userKey = USER_KEY + id;

        byte[] bytes = Hashing.murmur3_128().hashObject(userKey, Funnels.stringFunnel(Charsets.UTF_8)).asBytes();
        long hash1 = this.lowerEight(bytes);
        long hash2 = this.upperEight(bytes);
        long combinedHash = hash1;
        Integer numHashFunctions = 5;

        for(int i = 0; i < numHashFunctions; ++i) {
            if (!stringRedisTemplate.opsForValue().getBit(BLOOM_FILTER_KEY, (long) ((combinedHash & Long.MAX_VALUE) % (Math.pow(2, 32))))) {
                return null;
            }

            combinedHash += hash2;
        }

        String userStr = stringRedisTemplate.opsForValue().get(userKey);

        if (userStr == null) {
            synchronized (UserServiceImpl.class) {
                String userStr2 = stringRedisTemplate.opsForValue().get(userKey);
                if (userStr2 == null) {
                    User userById = userMapper.findUserById(id);
                    if (userById == null) {
                        return null;
                    }
                    String userJson = JSON.toJSONString(userById);
                    stringRedisTemplate.opsForValue().set(userKey, userJson, 1000, TimeUnit.SECONDS);
                    return userById;
                }
                return JSON.parseObject(userStr2, User.class);
            }
        }

        User user = JSON.parseObject(userStr, User.class);

        return user;
    }

    @Override
    public Boolean insertUser(User user) {
        Integer id = userMapper.insertUser(user);
        String userKey = USER_KEY + user.getUid();
        byte[] bytes = Hashing.murmur3_128().hashObject(userKey, Funnels.stringFunnel(Charsets.UTF_8)).asBytes();

        long hash1 = lowerEight(bytes);
        long hash2 = upperEight(bytes);

        boolean bitsChanged = false;
        long combinedHash = hash1;

        Integer numHashFunctions = 5;

        for(int i = 0; i < numHashFunctions; ++i) {
            bitsChanged |= stringRedisTemplate.opsForValue().setBit(BLOOM_FILTER_KEY, (long) ((combinedHash & Long.MAX_VALUE) % (Math.pow(2, 32))), true);
            combinedHash += hash2;
            log.info("pos:{}", (long) ((combinedHash & Long.MAX_VALUE) % (Math.pow(2, 32))));
        }

        if (id > 0) {
            return true;
        }
        return false;
    }

    private long lowerEight(byte[] bytes) {
        return Longs.fromBytes(bytes[7], bytes[6], bytes[5], bytes[4], bytes[3], bytes[2], bytes[1], bytes[0]);
    }

    private long upperEight(byte[] bytes) {
        return Longs.fromBytes(bytes[15], bytes[14], bytes[13], bytes[12], bytes[11], bytes[10], bytes[9], bytes[8]);
    }
}
我们尝试发送请求
可以看到返回了结果,再看看控制台
可以看到,返回了 5 个偏移量。接下来,尝试查询

可以看到,结果完全符合!至此,我们便将 BloomFilter 存储带了 redis 中,那么此时便可以解决分布式的问题!


 715
715


 被折叠的 条评论
为什么被折叠?
被折叠的 条评论
为什么被折叠?
 到【灌水乐园】发言


