


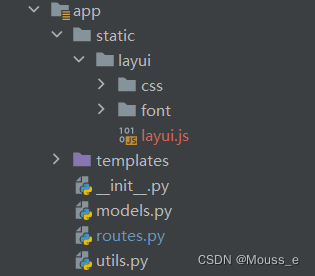
一、目录结构
project/
├── app/
│   ├── __init__.py
│   ├── models.py
│   ├── routes.py
│   ├── static/
│   ├── templates/
│   └── utils.py
├── config.py
├── requirements.txt
└── run.py
其中:
- app/ 目录存放应用代码。
app/__init__.py文件是 Python 模块的初始化文件,是应用包的根目录。- app/models.py 文件存放数据模型,用于与数据库交互。
- app/routes.py 文件存放路由定义,负责将用户的请求映射到对应的处理函数。
- app/static/ 目录存放静态文件,如 CSS 样式表、JavaScript 脚本和图片等。
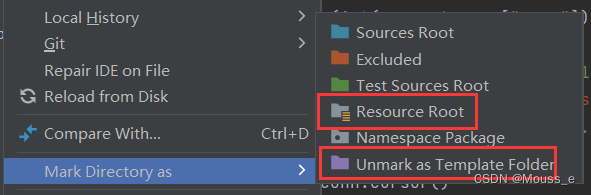
标记出 Resource Root 和 Template Folder,使templates中的*.html可以被识别
二、*.html
1.<head>
    <link href="../static/layui/css/layui.css" rel="stylesheet">
    <script src="../static/layui/layui.js"></script>
    <script src="https://cdn.staticfile.org/jquery/1.10.2/jquery.min.js"></script>
    <script src="https://cdn.jsdelivr.net/npm/echarts@5.4.2/dist/echarts.min.js"></script>
引入css和js文件:jquary、layui、eChars等
注:css文件使用<link href="">引入,js文件使用<script src="">引入
2.ajax
(1)get
            $.ajax({
                type: "Get",
                dataType: "json",
                url: "/url",
                data: {

                },
                success: function (data) {
                  // TODO 成功的回调

                },
                error: function () {
                }
            })
(2)post
            var json = {
                "xxx": $("#xxx").val(),
                ...,
                ...,
                ...
            }

            $.ajax({
                type: "Post",
                dataType: "json",
                contentType: "application/json",
                url: "/url",
                data: JSON.stringify(json),
                success: function (data) {
                  // TODO 成功的回调

                },
                error: function () {
                }
            })
注:post请求直接传递参数,而不是用json传递,会出现400 Bad Request(我自己遇到的是这种情况)
三、routes.py
1.引入工具
import json
import requests
from flask import Flask, render_template, jsonify, request
import pymysql
from gevent import pywsgi
from pymysql import cursors
使用conda安装相应工具
2.构建FLask
app = Flask(__name__)
// TODO 开始你的路由代码

if __name__ == "__main__":
    app.run() # 开发环境 默认127.0.0.1:5000

    server = pywsgi.WSGIServer(('127.0.0.1', 5000), app)  # Use a production WSGI server instead.
    server.serve_forever() # 正式环境

许多关于Python web框架的讨论都从Flask开始,这是有原因的。Flask构建良好,易于理解的框架,很容易使用并且很稳定。在轻量级web项目或基本REST API中使用Flask几乎是不可能出错的,但是如果您试图构建任何更大的东西,你将会面临很大的负担。
3.访问页面
@app.route("/hello")
def hello():
    return render_template('hello.html')
4.查询
@app.route("/select", methods=['GET', 'POST'])
def select():
    limit = int(request.args["limit"]) # 获取前端get请求传递的参数,默认是string类型,其他类型需要进行转换
    page = (int(request.args["page"]) - 1) * limit

	steel_no = request.args["steel_no"]
    steel_type = request.args["steel_type"]

    conn = pymysql.connect(host='10.11.12.19', user='root', password='mysql_alloy', db='alloy',
                           cursorclass=cursors.DictCursor)  # 建立数据库连接(cursorclass=cursors.DictCursor使查询返回的结果为json格式)
    conn2 = pymysql.connect(host='10.11.12.19', user='root', password='mysql_alloy', db='alloy')  # 建立数据库连接

    cur = conn.cursor()
    cur2 = conn2.cursor()

    sqls = "SELECT * FROM table WHERE (steel_no = '%s' or '%s' = '') and (steel_type = '%s' or '%s' = '') " \
           "ORDER BY id DESC LIMIT %d,%d " % (steel_no, steel_no, steel_type, steel_type, page, limit)
    sqlCount = " SELECT count(1) FROM hebut_pred " # 查询总条数

    cur.execute(sqls)  # 执行sql
    results = cur.fetchall()  # 获取查询结果,可以防止sql注入

    cur2.execute(sqlCount)
    count = cur2.fetchall()

    cur.close()  # 关闭指针对象
    conn.close()  # 关闭连接对象
    return jsonify({"code": 0, "msg": "请求成功", "count": count, "data": results}) # layui-table的默认json格式
5.插入(删除、更新)
@app.route("/insert", methods=['GET', 'POST'])
def insert():
    # raw
    get_data = request.get_data()
    # 将bytes类型转换为json数据
    get_data = json.loads(get_data)
    # init参数
    steel_no = get_data.get('steel_no')
    steel_type = get_data.get('steel_type')
    scrap_weight = float(get_data.get('scrap_weight'))
    iron_weight = int(get_data.get('iron_weight'))
    iron_temperature = int(get_data.get('iron_temperature'))
    iron_c = float(get_data.get('iron_c'))
    iron_mn = float(get_data.get('iron_mn'))
    iron_si = float(get_data.get('iron_si'))
    work_no = get_data.get('work_no')

    conn = pymysql.connect(host='10.11.12.19', user='root', password='root', db='database',
                           autocommit=True)  # 建立数据库连接

    cur = conn.cursor()

    sqls = "INSERT INTO table (steel_no,steel_type,scrap_weight,iron_weight,iron_temperature,iron_c,iron_mn," \
           "iron_si,work_no,hebut) VALUES ('%s','%s',%f,%d,%d,%f,%f,%f,'%s',%f)" % (
               steel_no, steel_type, scrap_weight, iron_weight,
               iron_temperature, iron_c, iron_mn, iron_si,
               work_no, res)

    result = cur.execute(sqls)  # 执行sql

    if result == 1:
        return jsonify({"code": 200, "msg": "操作成功"})
    else:
        return jsonify({"code": 500, "msg": "操作失败"})
注:变量赋值时不要在末尾加逗号,否则会赋值为元组
6.请求http接口
    url = "http://127.0.0.1:5000/interface"
    headers = {'content-type': 'application/json'}

    requestData = {
        'steel_no': steel_no,
        'steel_type': steel_type,
        'scrap_weight': scrap_weight,
        'iron_weight': iron_weight,
        'iron_temperature': iron_temperature,
        'iron_c': iron_c,
        'iron_mn': iron_mn,
        'iron_si': iron_si,
        'work_no': work_no
    }

    ret = requests.post(url, json=requestData, headers=headers)  # 请求接口

    if ret.status_code == 200:
        text = json.loads(ret.text)
        res = text['result']
    else:
        res = -1.0

    print(res)


 1万+
1万+


 被折叠的 条评论
为什么被折叠?
被折叠的 条评论
为什么被折叠?
 到【灌水乐园】发言


