


我们现在有必要学习一下线程池的技术了,这样就很方便我们来对线程进行管理,有了线程池,就不需要重复地进行创建了,并且还能有效地避免阻塞。
目录
1 何为线程池
前面我也介绍过了,所谓的线程池,就就是用线程池来执行线程的操作。ThreadPoolExecutorThreadPoolExecutor!ThreadPoolExecutor!
这个关键词一定要记清楚。
2 三种线程池
Executors.newFixedThreadPool(int)【在线程池里面固定的线程数】
Executors.newSingleThreadExecutor()【一池一线程】
Executors.newSingleThreadExecutor()【一池多线程】
3 如何使用上述三种线程池
对于上述的三种线程池,我们首先来学习的就是第一种newFixedThreadPool(int n)
ExecutorService executorService= Executors.newFixedThreadPool(5);
        try {

            for(int i=0;i<10;i++) {
                int finalI = i;
                executorService.execute(()->{
                    System.out.println("本次是第"+ finalI +"个用户");
                });
            }
        } catch (Exception e) {
            e.printStackTrace();
        }
        executorService.shutdown();

    }
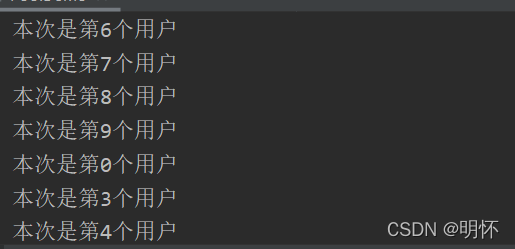
你会发现一个主要的特点就是,对应的线程在运行的过程中,就是五个线程来处理这十个请求。
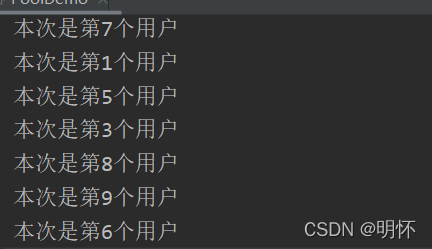
接下来我们继续看下面的代码:
ExecutorService executorService1=Executors.newCachedThreadPool();
        try {

            for(int i=0;i<10;i++) {
                int finalI = i;
                executorService1.execute(()->{
                    System.out.println("本次是第"+ finalI +"个用户");
                });

            }
        } catch (Exception e) {
            e.printStackTrace();
        }
        executorService1.shutdown();

    }
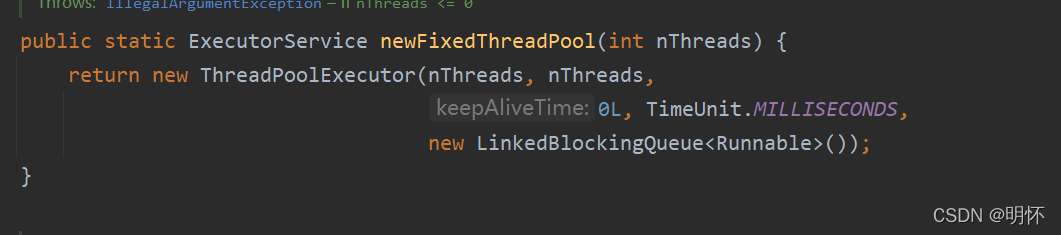
好了,现在就可以了,我们可以想到的就是利用ExecutorService就可以通过Executors类来实现对应的方法,对应的newSingle…我就不继续敲给大家看了,因为都是很简单的知识,好了,接下来大家一定会想到我刚刚讲到ThreadPoolExecutor这个东东,我们可要仔细思考一下它是什么了,我们来看看源码


 1316
1316


 被折叠的 条评论
为什么被折叠?
被折叠的 条评论
为什么被折叠?
 到【灌水乐园】发言


