


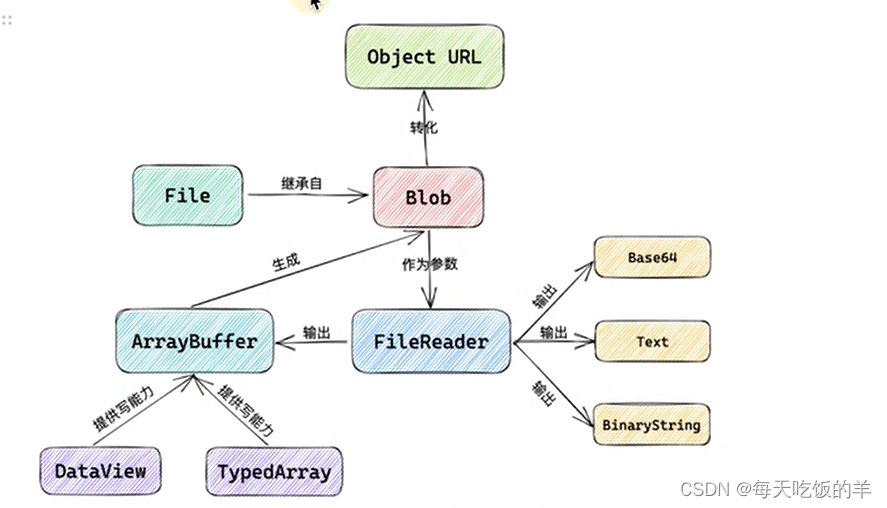
https://blog.csdn.net/weixin_45811256/article/details/112575704
文件流转arrayBuffer转base64
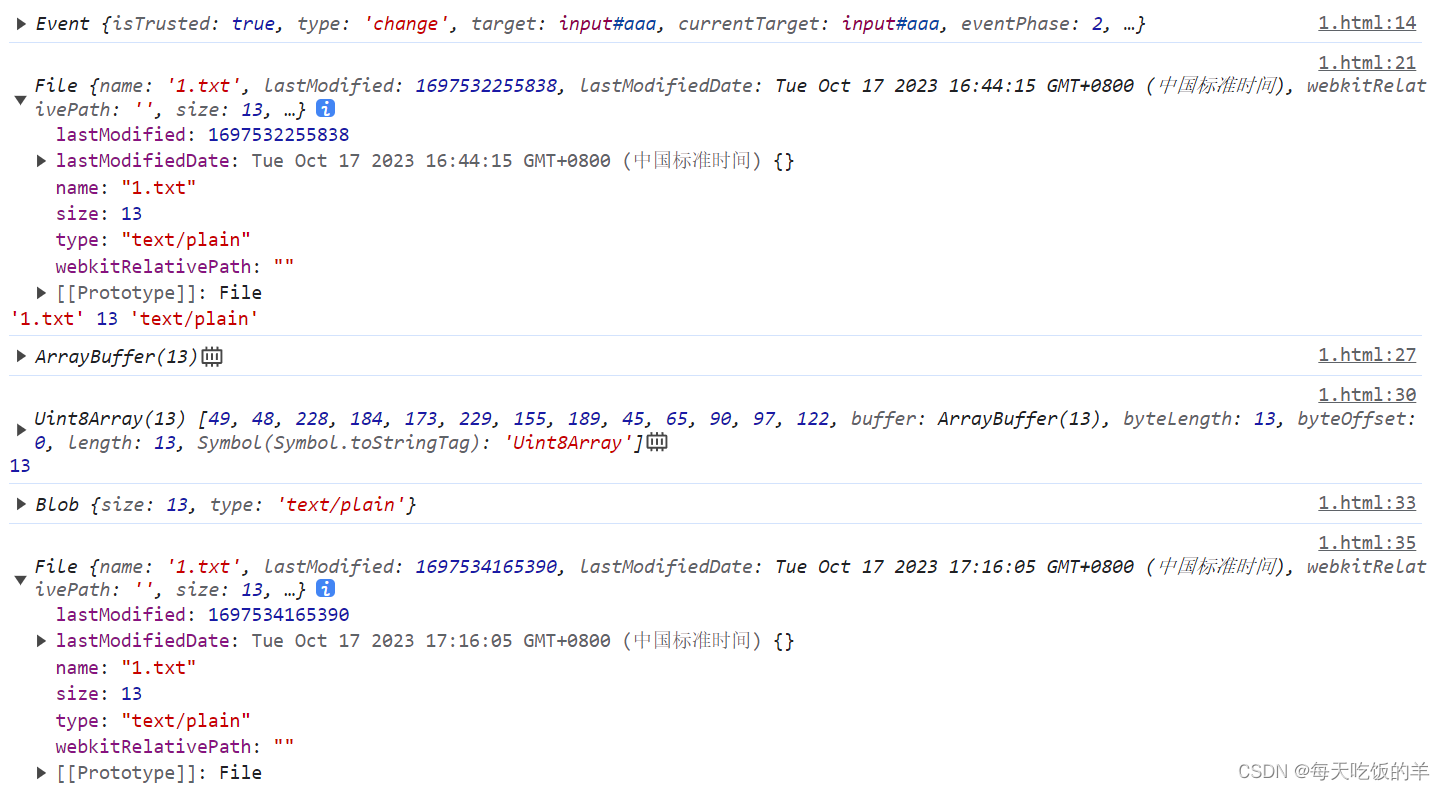
一、C:\fakepath\新建文本文档.txt [object String]
实现方式:
    <input onchange="test(this.value)" type="file"></input>
    <script>
        function test(e){
            console.log(e,Object.prototype.toString.call(e))
        }
</script>二、fileMDN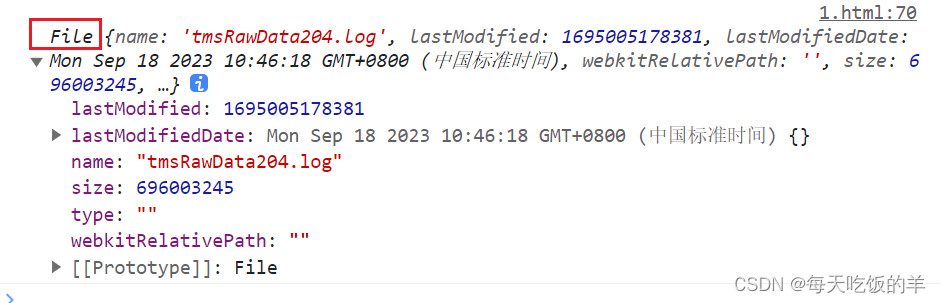
实现方式:
1.html中
    <input  id="aaa" type="file"></input>
    <script>
        const inp = document.getElementById("aaa");
        inp.onchange= (e) =>{
            const file = inp.files[0];
            if(!file){
                return;
            }
            console.log(file)
        }
    </script>
2.vue中
    <div class="upload" @click="uploadFile">上传.log文件进行解析</div>
    async uploadFile() {
      const arrFileHandle = await window.showOpenFilePicker({});
      let fileName = await arrFileHandle[0].getFile();
      console.log(fileName);
    }


    <input type='file' @change="handleFileChange" />
        handleFileChange(event) {
      console.log(event)
      console.log(event.target.files[0]);
return}三、blobMDN
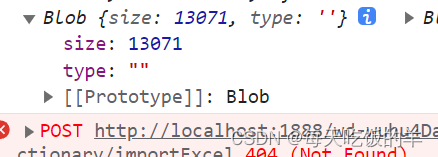
实现方式:
将上放第二点获取到的file对象比如为fileName,new Blob([fileName])就可以实现
四、里面有base64格式
实现方式:
将上放第二点获取到的file对象比如为fileName,
    oFReader = new FileReader()
    oFReader.onload = function (oFREvent) {
        console.log(oFREvent,1,oFREvent.target.result);
    };
    oFReader.readAsDataURL(fileName);
四、blob URL 可以放到a/img标签里直接使用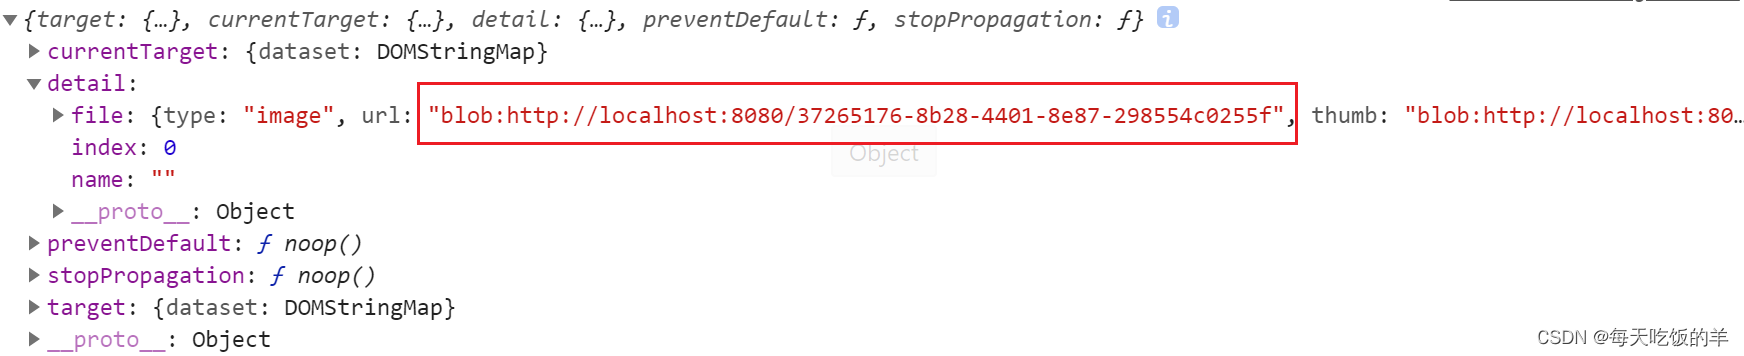
实现方式:
1、这种格式是用vant的uploader组件获取的,看上去url是个字符串,但可以直接传给后端完成文件上穿,非常神奇。
2、也可以使用第三点中的blob通过:URL.createObjectURL(blob) 直接转换(web端,移动端不太可用)
五、ArrayBuffer
实现方式:
将上放第二点获取到的file对象比如为fileName
const reader = new FileReader();
reader.onloadend = function () {
const arrayBuffer = reader.result;
// 进行相应的操作
console.log(arrayBuffer);
};
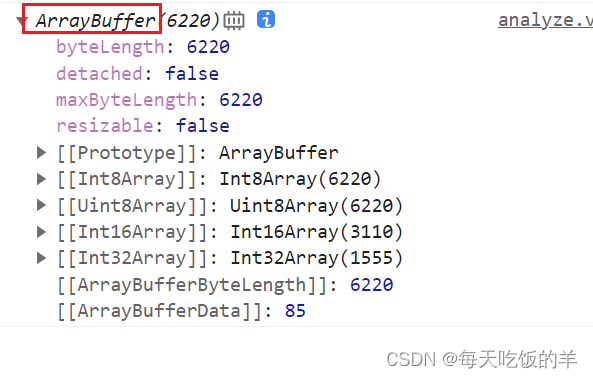
reader.readAsArrayBuffer(fileName);六、[80, 75, 3, 4, 20, 0, 6, 0, 8, 0, 0, 0, 33, 0, 190, 26, 137, 252, 233, 1, 0, 0, 153, 9, 0, 0, 19, 0, 8, 2, 91, 67, 111, 110, 116, 101, 110, 116, 95, 84, 121, 112, 101, 115, 93, 46]
将上放第五点获取到的ArrayBuffer对象比如为arrayBuffer
            var int8Array = new Int8Array(arrayBuffer);
            var uint8Array = new Uint8Array(arrayBuffer);
            var int16Array = new Int16Array(arrayBuffer);
            var int32Array = new Int32Array(arrayBuffer);

            console.log(int8Array, int8Array.length)
            console.log(uint8Array, uint8Array.length)
            console.log(int16Array, int16Array.length)
            console.log(int32Array, int32Array.length)
但不一定每个文件都有int16Array或者int32Array,得到如下
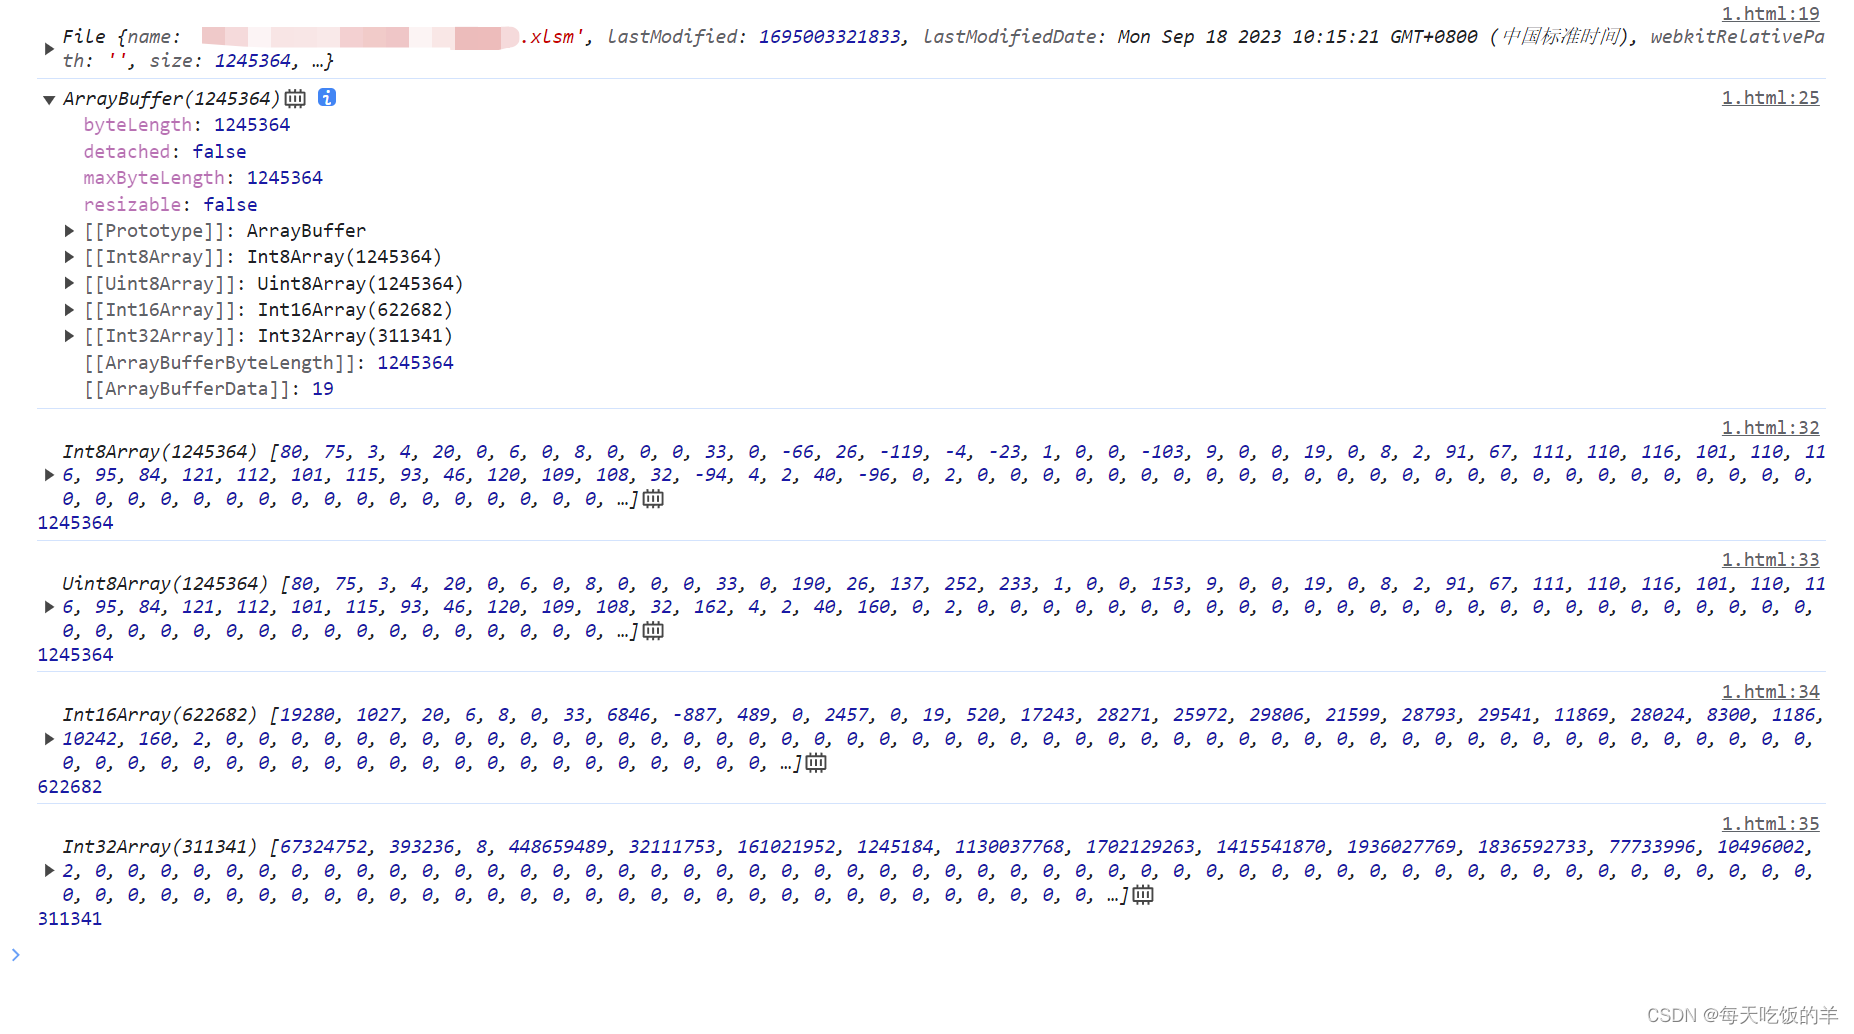
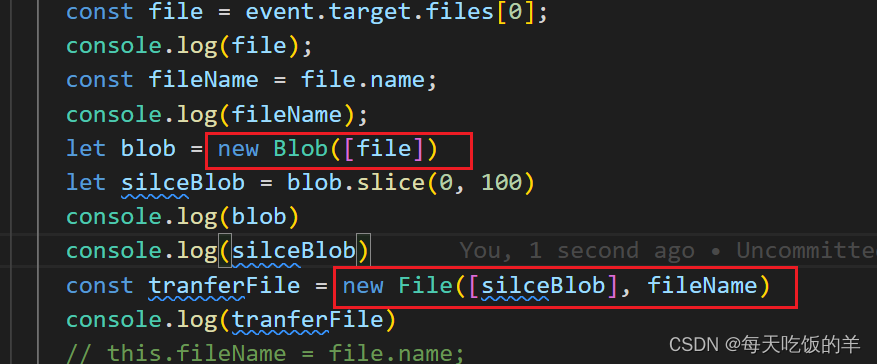
文件转换
一,file文件类型和blob文件类型之间转换
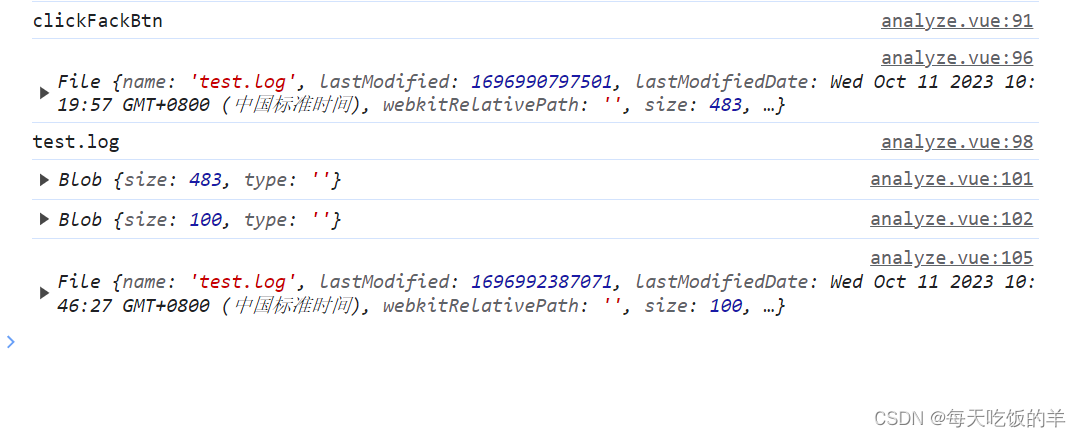
如图所示input标签获取到是file对象,转换成blob后进行切割,然后转换成原file对象
二,blob,file,二进制流
file-ArrayBuffer-Unit8Array-blob-file
对于图片类型可以从Unit8Array转成base64格式
<!DOCTYPE html>
<html lang="en">
<head>
  <meta charset="UTF-8">
  <meta http-equiv="X-UA-Compatible" content="IE=edge">
  <meta name="viewport" content="width=device-width, initial-scale=1.0">
  <title>Document</title>
</head>
<body>
  <input  id="aaa" onchange="fileChange()" type="file"></input>
  <script>
      const inp = document.getElementById("aaa");
      inp.onchange= (e) =>{
        console.log(e)
          const file = inp.files[0];
          if(!file){
              return;
          }
          const fileType = file.type;
          const fileName = file.name;
          console.log(file, file.name, file.size, file.type)

          const reader = new FileReader();
          reader.onloadend = function () {
            const arrayBuffer = reader.result;
            console.log(arrayBuffer);

            var uint8Array = new Uint8Array(arrayBuffer);
            console.log(uint8Array, uint8Array.length)

            var blob = new Blob([uint8Array], { type: fileType});
            console.log(blob)

            var sbFile = new File([blob], fileName, { type: fileType });
            console.log(sbFile)
          };
          reader.readAsArrayBuffer(file);
      }
  </script>
</body>
</html>
对于图片类型可以从Unit8Array转成base64格式
在上面的基础上添加如下代码
        const arrayBuffer = reader.result;
        console.log(arrayBuffer);
        const src =
          "data:image/png;base64," +
          btoa(
            new Uint8Array(arrayBuffer).reduce(
              (data, byte) => data + String.fromCharCode(byte),
              ""
            )
          );
        console.log(src);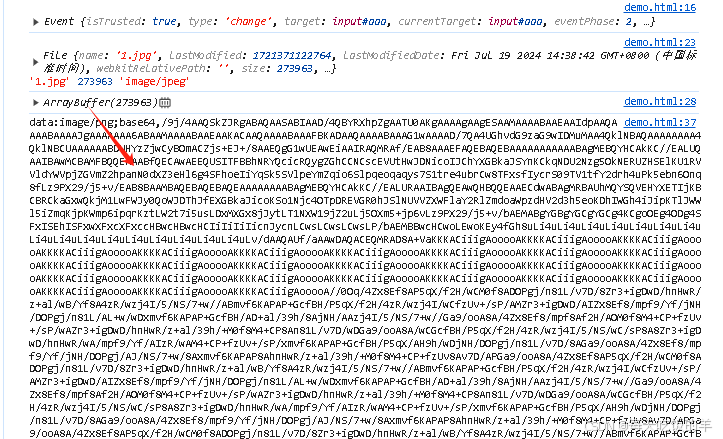
三、读取文件并在控制台输出
<!DOCTYPE html>
<html lang="en">
<head>
  <meta charset="UTF-8">
  <meta http-equiv="X-UA-Compatible" content="IE=edge">
  <meta name="viewport" content="width=device-width, initial-scale=1.0">
  <title>Document</title>
</head>
<body>
  <input  id="aaa" onchange="fileChange()" type="file"></input>
  <script>
      const inp = document.getElementById("aaa");
      inp.onchange= (e) =>{
        console.log(e)
        const files = e.target.files;
        for (let i = 0; i < files.length; i++) {
          const file = files[i];
          const reader = new FileReader();
          // 监听readAsText方法的加载完成事件
          reader.onload = function() {
            // 将文件内容按行拆分
            console.log(reader.result);
            const lines = reader.result.split('\n');
            // 遍历每一行内容
            for (let j = 0; j < lines.length; j++) {
              const line = lines[j];
              // 在控制台中输出每一行的内容
              console.log(line);
            }
          };
          // 使用readAsText方法读取文件内容
          reader.readAsText(file);
        }
      }
  </script>
</body>
</html>
四、读取文件并转换成blob
<!DOCTYPE html>
<html lang="en">
<head>
  <meta charset="UTF-8">
  <meta http-equiv="X-UA-Compatible" content="IE=edge">
  <meta name="viewport" content="width=device-width, initial-scale=1.0">
  <title>Document</title>
</head>
<body>
  <input  id="aaa" onchange="fileChange()" type="file"></input>
  <script>
      const inp = document.getElementById("aaa");
      inp.onchange= (e) =>{
        console.log(e)
          const file = inp.files[0];
          if(!file){
              return;
          }
          var reader = new FileReader();
          reader.onload = function(e) {
            var fileContent = e.target.result;
            // 将文本内容转换为Blob对象
            var blob = new Blob([fileContent], { type: file.type });

            // 使用slice方法将Blob对象转换为File对象
            var convertedFile = blob.slice(0, blob.size, file.name);

            // 在这里可以继续处理转换后的File对象
            console.log(convertedFile);
          };
          reader.readAsText(file);

      }
  </script>
</body>
</html>
五、mp3转arrayBuffer
mp3toArrayBuffer() {
	axios({
		method: 'get',
		url: this.imageListAll[this.templateId - 1].template_audio,
		responseType: 'arraybuffer'
	}).then((res) => {
		console.log('mp3的arraybuffer', res.data) //这个是arraybuffer
		this.audio = res.data
		this.imgArrayBufferData.push({
			name: 'bg',
			data: this.audio
		})
	})
},
五、blobUrl转blob或者file
转blob
const blobUrl = 'your - blob - url - here';
fetch(blobUrl)
 .then(response => response.blob())
 .then(blob => {
    console.log('成功获取到blob对象', blob);
    // 可以在这里对blob对象进行进一步的操作,比如读取文件内容、上传等
  })
 .catch(error => {
    console.error('转换过程出现错误', error);
  });
转file
const blobUrl = 'your - blob - url - here';
fetch(blobUrl)
 .then(response => response.blob())
 .then(blob => {
    const fileName = 'example - file - name.txt';// 文件名,可根据实际情况修改
    const fileType = 'text/plain';// 文件类型,可根据实际情况修改
    const file = new File([blob], fileName, {type: fileType});
    console.log('成功获取到file对象', file);
    // 可以在这里对file对象进行进一步的操作,比如上传、添加到表单等
  })
 .catch(error => {
    console.error('转换过程出现错误', error);
  });
实际上传
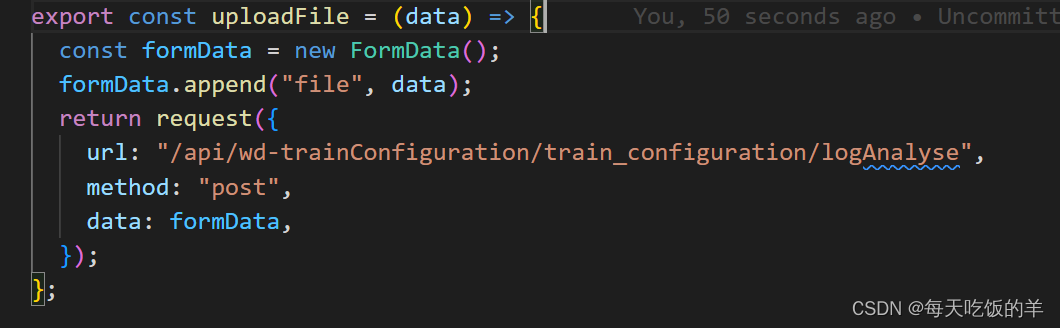
一、 file对象:现在获取到了第二点中的file对象要求要使用post请求传输给后端:
一般的请求是:
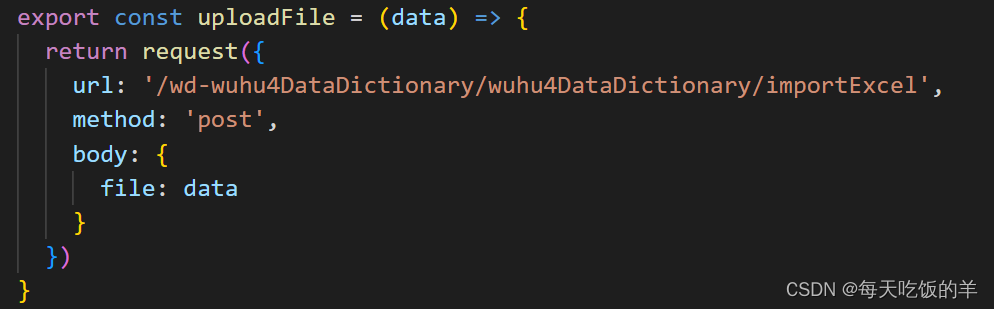
接口报500,把接口改造成如下form-data的格式就好
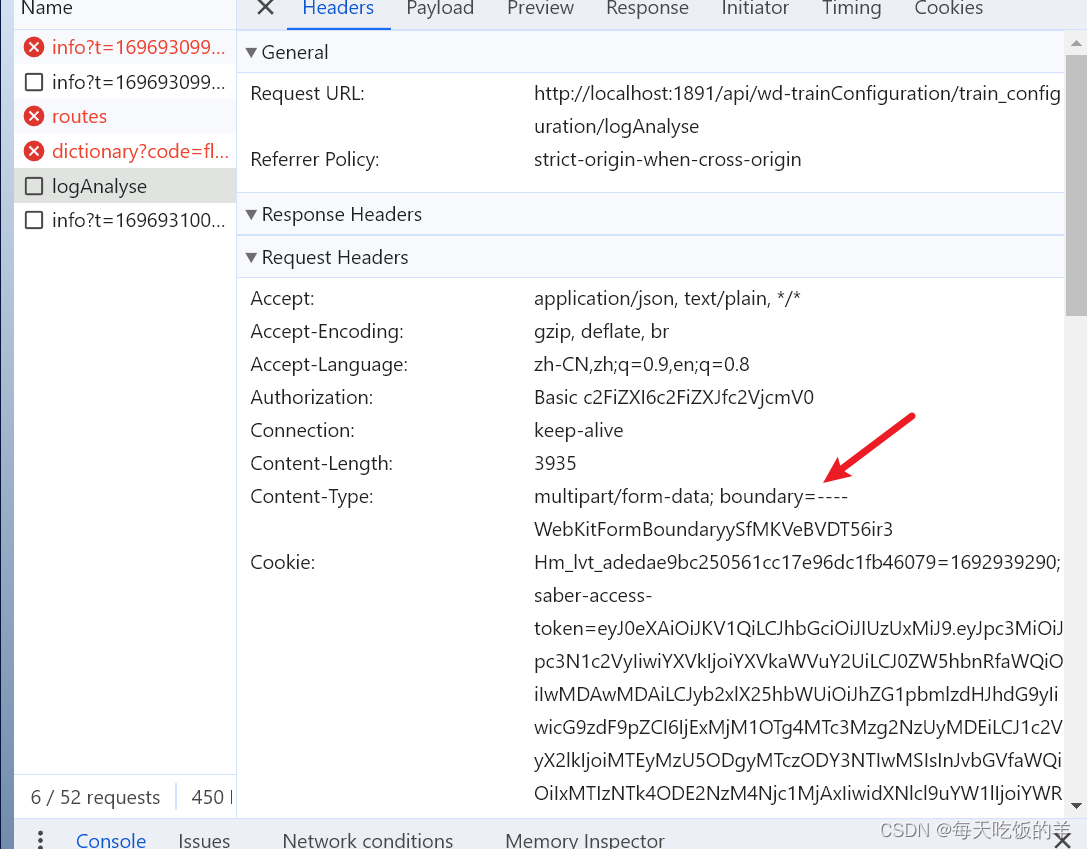
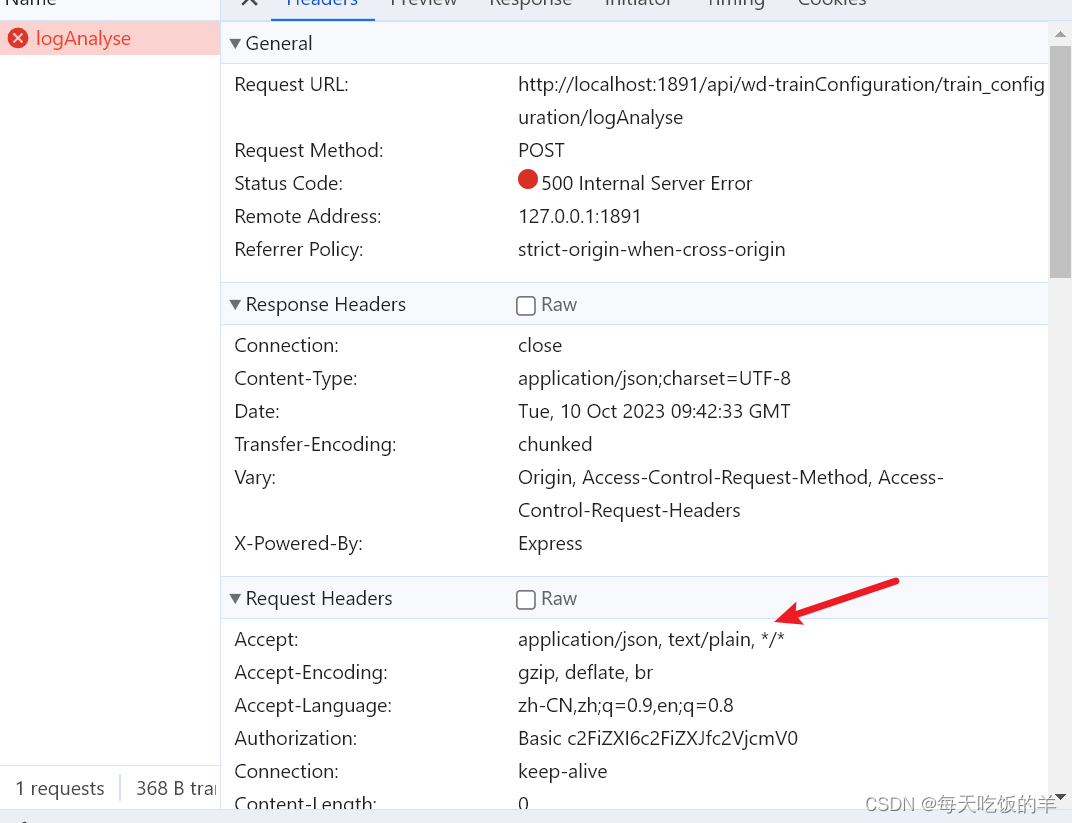
二、二进制格式
类似以上的格式,需要设置 请求头的文件格式Content-Type:application/octet-stream
除此之外还需要设置 请求头字段x-ext:.jpg,对于获取到的file对象file.name.split('.').pop()
以xhr为例:
xhr.setRequestHeader('Content-Type', 'application/octet-stream')
xhr.setRequestHeader('x-ext', '.' + file.name.split('.').pop())
三、base64格式
base64格式上传就会比较简单,他的请求头Content-Type和普通的请求是一样的application/json
基本上不用改造请求头
将获取到的base64值假设为A
获取文件类型 A.splice('.').pop()文件大小限制 1M file.size > 1*1024*1024
一般是设置响应头responseType:blob(会将文件流转化为blob对象)
后端返回blob对象后使用window.URL.createObjectURL(blob)转换为blob URL,就可以在a/img标签上直接使用了,下载完成后要及时删除dom元素和blobURL以免造成内存泄漏(window.URL.revokeObjectURL(link.href))
export const exportFile = (url) => {
return request({
url: url,
method: "get",
responseType: "blob",
});
};
// 这里是在定义exportFile的时候添加了返回的数据格式 responseType:blob
exportFile(params).then((response) => {
let blob = response.data;
console.log(blob)
let fileName = decodeURI(Object.values(response.headers)[1])
.split("''")
.pop();
var link = document.createElement("a");
link.href = window.URL.createObjectURL(blob);
console.log(link.href)
link.download = fileName;
link.click();
window.URL.revokeObjectURL(link.href);
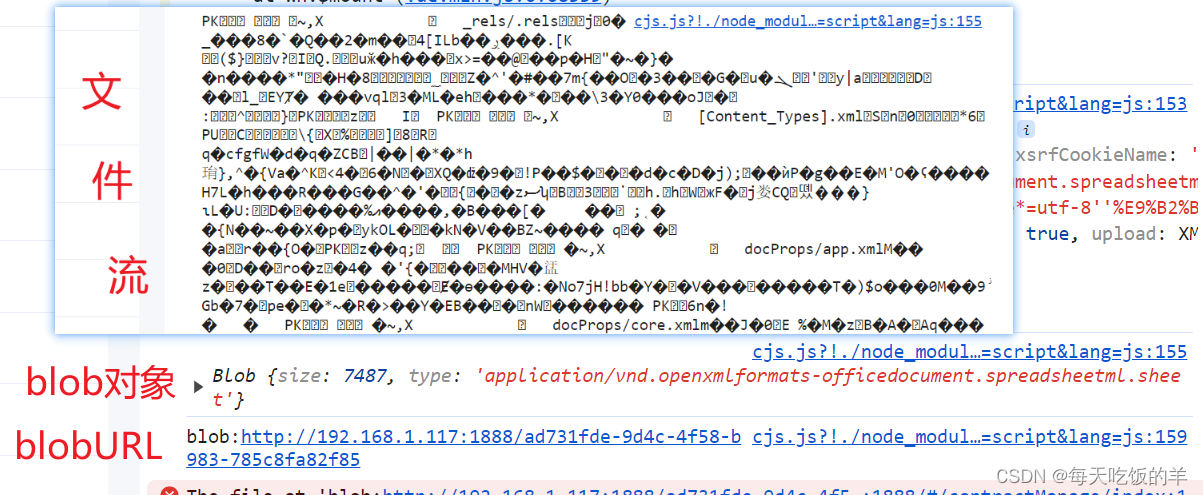
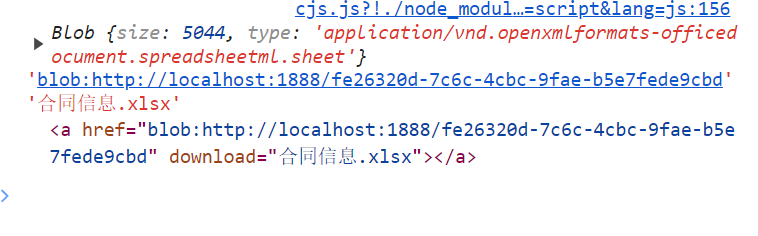
});返回的是文件流的格式转化为
fetch(url,{
    method: 'get',
    responseType: 'blob'
}).then(res => {
    return res.blob();
}).then(blob => {
    let bl = new Blob([blob], {type: "application/vnd.openxmlformats-officedocument.spreadsheetml.sheet"});
    let fileName = '文件名'+".xlsx";
    var link = document.createElement('a');
    link.href = window.URL.createObjectURL(blob);
    link.download = fileName;
    link.click();
console.log(blob, link.href, link.download, link);
    window.URL.revokeObjectURL(link.href);
})


//也有设置为arrayBuffer的
fetch(url,{
    method: 'get',
    responseType: 'arraybuffer'
}).then(res => {
    return res. arraybuffer();
}).then(arraybuffer => {
    let bl = new Blob([arraybuffer], {type: "application/vnd.openxmlformats-officedocument.spreadsheetml.sheet"});
    let fileName = '文件名'+".xlsx";
    var link = document.createElement('a');
    link.href = window.URL.createObjectURL(blob);
    link.download = fileName;
    link.click();
    window.URL.revokeObjectURL(link.href);
})
我们看下这里的各个参数代表啥意思
它这个原理是啥呢,就是创建了一个<a />,然后使用点击事件去完成

然后到页面上点击这个标签就可以下载了。是一样的效果,但是实际呢,不可行的。
现在是有url地址,(不管它是图片还是doc,txt,excel,png)通用的下载
downloadFiles('http://60.204.133.97:9000/wdtek/upload/20240105/Snipaste_2023-08-09_11-05-18.png',"Snipaste_2023-08-09_11-05-18.png")
    downloadFiles(url,name) {
      fetch(url)
        .then((response) => response.blob())
        .then((blob) => {
          const blobUrl = window.URL.createObjectURL(blob);
          const link = document.createElement("a");
          link.href = blobUrl;
          link.download = name; // 提供您希望的文件名和扩展名
          document.body.appendChild(link); // 附加到文档
          link.click(); // 触发下载
          document.body.removeChild(link); // 下载后移除元素
          window.URL.revokeObjectURL(blobUrl); // 释放URL对象
        })
        .catch((e) => console.error(e));
    },
    downloadFile() {
      this.downloadFiles(this.fileList[0].link,this.fileList[0].originalName)
}同事说window.open也可以,测试了只有图片可以,文件不太行,也不知道是不是我使用的方式对不对
buffer和string互转换
在写node的时候buffer是非常常用的一中文件类型
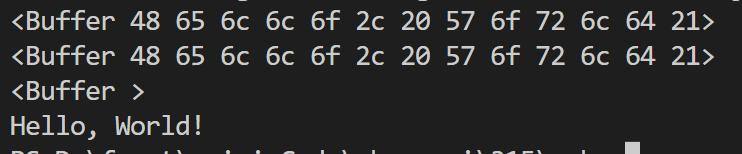
let string = 'Hello, World!';
let buffer = Buffer.from(string); //默认string转buffer是2进制的
let stringUtf8 = buffer.toString();  //buffer转string
let bufferUtf8 = Buffer.from(string, 'utf8');  // 声明转2进制的
let bufferHex = Buffer.from(string, 'hex'); // 声明转16进制的
console.log(buffer);
console.log(bufferUtf8);
console.log(bufferHex);
console.log(stringUtf8);
buffer,stream,ArrayBuffer
1.buffer
const fs = require('fs');
const path = require('path');
console.log(fs.readFileSync(path.join(__dirname, 'readme.txt')))
2.stream
const fs = require('fs');
const path = require('path');
// 创建一个可读流来读取文件
const readStream = fs.createReadStream('readme.txt');
console.log({
  readStream
})
{
readStream: ReadStream {
fd: null,
path: 'readme.txt',
flags: 'r',
mode: 438,
start: undefined,
end: Infinity,
pos: undefined,
bytesRead: 0,
_events: {
close: undefined,
error: undefined,
data: undefined,
end: undefined,
readable: undefined,
[Symbol(kConstruct)]: [Function]
},
_readableState: ReadableState {
highWaterMark: 65536,
buffer: [],
bufferIndex: 0,
length: 0,
pipes: [],
awaitDrainWriters: null,
[Symbol(kState)]: 1052684
},
_maxListeners: undefined,
_eventsCount: 1,
[Symbol(kFs)]: {
appendFile: [Function: appendFile],
appendFileSync: [Function: appendFileSync],
access: [Function: access],
accessSync: [Function: accessSync],
chown: [Function: chown],
chownSync: [Function: chownSync],
chmod: [Function: chmod],
chmodSync: [Function: chmodSync],
close: [Function: close],
closeSync: [Function: closeSync],
copyFile: [Function: copyFile],
copyFileSync: [Function: copyFileSync],
cp: [Function: cp],
cpSync: [Function: cpSync],
createReadStream: [Function: createReadStream],
createWriteStream: [Function: createWriteStream],
exists: [Function: exists],
existsSync: [Function: existsSync],
fchown: [Function: fchown],
fchownSync: [Function: fchownSync],
fchmod: [Function: fchmod],
fchmodSync: [Function: fchmodSync],
fdatasync: [Function: fdatasync],
fdatasyncSync: [Function: fdatasyncSync],
fstat: [Function: fstat],
fstatSync: [Function: fstatSync],
fsync: [Function: fsync],
fsyncSync: [Function: fsyncSync],
ftruncate: [Function: ftruncate],
ftruncateSync: [Function: ftruncateSync],
futimes: [Function: futimes],
futimesSync: [Function: futimesSync],
lchown: [Function: lchown],
lchownSync: [Function: lchownSync],
lchmod: undefined,
lchmodSync: undefined,
link: [Function: link],
linkSync: [Function: linkSync],
lstat: [Function: lstat],
lstatSync: [Function: lstatSync],
lutimes: [Function: lutimes],
lutimesSync: [Function: lutimesSync],
mkdir: [Function: mkdir],
mkdirSync: [Function: mkdirSync],
mkdtemp: [Function: mkdtemp],
mkdtempSync: [Function: mkdtempSync],
open: [Function: open],
openSync: [Function: openSync],
openAsBlob: [Function: openAsBlob],
readdir: [Function: readdir],
readdirSync: [Function: readdirSync],
read: [Function: read],
readSync: [Function: readSync],
readv: [Function: readv],
readvSync: [Function: readvSync],
readFile: [Function: readFile],
readFileSync: [Function: readFileSync],
readlink: [Function: readlink],
readlinkSync: [Function: readlinkSync],
realpath: [Function],
realpathSync: [Function],
rename: [Function: rename],
renameSync: [Function: renameSync],
rm: [Function: rm],
rmSync: [Function: rmSync],
rmdir: [Function: rmdir],
rmdirSync: [Function: rmdirSync],
stat: [Function: stat],
statfs: [Function: statfs],
statSync: [Function: statSync],
statfsSync: [Function: statfsSync],
symlink: [Function: symlink],
symlinkSync: [Function: symlinkSync],
truncate: [Function: truncate],
truncateSync: [Function: truncateSync],
unwatchFile: [Function: unwatchFile],
unlink: [Function: unlink],
unlinkSync: [Function: unlinkSync],
utimes: [Function: utimes],
utimesSync: [Function: utimesSync],
watch: [Function: watch],
watchFile: [Function: watchFile],
writeFile: [Function: writeFile],
writeFileSync: [Function: writeFileSync],
write: [Function: write],
writeSync: [Function: writeSync],
writev: [Function: writev],
writevSync: [Function: writevSync],
Dirent: [class Dirent],
Stats: [Function: Stats],
ReadStream: [Getter/Setter],
WriteStream: [Getter/Setter],
FileReadStream: [Getter/Setter],
FileWriteStream: [Getter/Setter],
_toUnixTimestamp: [Function: toUnixTimestamp],
Dir: [class Dir],
opendir: [Function: opendir],
opendirSync: [Function: opendirSync],
F_OK: 0,
R_OK: 4,
W_OK: 2,
X_OK: 1,
constants: [Object: null prototype],
promises: [Getter]
},
[Symbol(kIsPerformingIO)]: false,
[Symbol(shapeMode)]: true,
[Symbol(kCapture)]: false
}
}3.arrayBuffer
const fs = require('fs');
const path = require('path');
// 创建一个可读流来读取文件
const readStream = fs.createReadStream('readme.txt');
console.log({
  readStream
})
readStream.on('data', (chunk) => {
  // chunk 是 Buffer 类型
  const arrayBuffer = chunk.buffer; // 获取 ArrayBuffer
  // 这里可以对 arrayBuffer 进行进一步处理
  console.log(arrayBuffer)
});

readStream.on('end', () => {
  console.log('文件读取完成');
});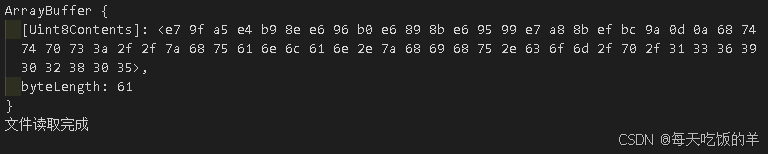
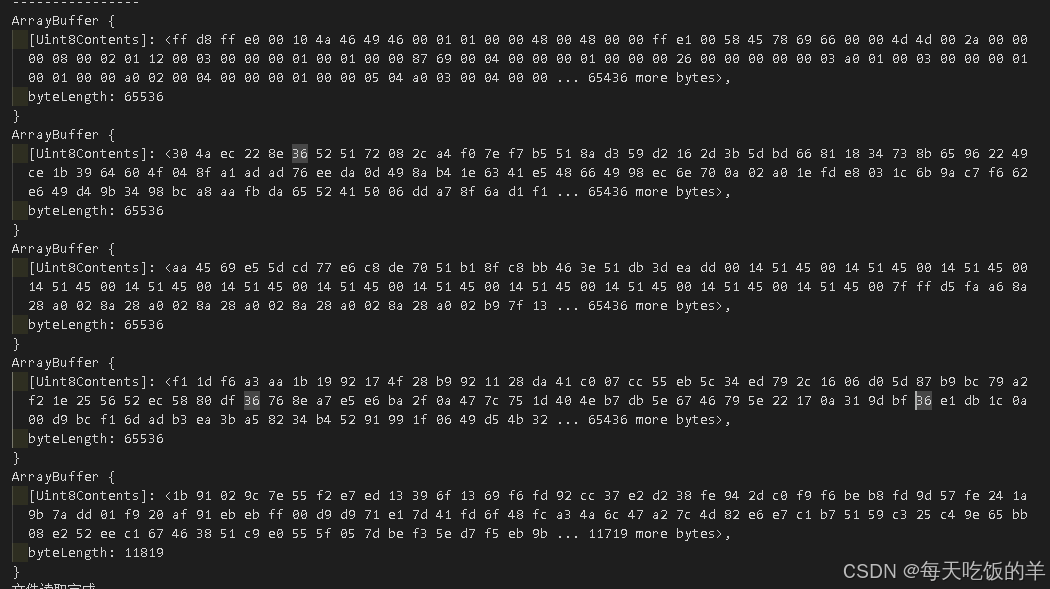
这里相同的代码,文件变成了一个图片,前面的buffer和stream并没有变换,但是这里的arrraybuffer变成了多个arraybuffer,最大值为65536
从上面的文件转换的第二点知道可以使用Uint8Array准换成blobURL或者base64给前端使用


 2034
2034

 被折叠的 条评论
为什么被折叠?
被折叠的 条评论
为什么被折叠?
 到【灌水乐园】发言


