


目录
一、引入
1. ssh是什么?
secure shell,建立在应用层基础上的安全协议
2. 作用
远程控制服务器,使用在Linux/unix系统
3. 如何搭建ssh服务?
OpenSSH是使用SSH协议进行远程登录的首要连接工具。它对所有通信进行加密,以消除窃听、连接劫持和其他攻击。此外,OpenSSH提供了大量的安全隧道功能、几种身份验证方法和复杂的配置选项。
4. rpm(redhat package managment 红帽公司出品)
Linux中的一个软件管理命令,在redhat/centos中使用
-q 查询query
a 所有
rpm -qa 查询在本机已经安装的所有软件
[root@nginx-kafka01 etc]# rpm -qa |grep openssh
openssh-clients-7.4p1-21.el7.x86_64
openssh-7.4p1-21.el7.x86_64
openssh-server-7.4p1-21.el7.x86_64
更新
[root@nginx-kafka01 ~]# yum update openssh openssh-clients openssh-server5. 配置文件
sshd_config 服务器端的进程的配置文件
ssh 客户端命令的配置文件
[root@nginx-kafka01 etc]# cd /etc/ssh
[root@nginx-kafka01 ssh]# ls
moduli      sshd_config         ssh_host_ecdsa_key.pub  ssh_host_ed25519_key.pub  ssh_host_rsa_key.pub
ssh_config  ssh_host_ecdsa_key  ssh_host_ed25519_key    ssh_host_rsa_key
6. 如何知道ssh服务是否启动
1. 进程
[root@nginx-kafka01 ssh]# ps aux|grep sshd
root        986  0.0  0.2 112900  4324 ?        Ss   11:57   0:00 /usr/sbin/sshd -D
root       1515  0.0  0.3 161512  6084 ?        Ss   11:58   0:00 sshd: root@pts/0
root       1845  0.0  0.0 112828   988 pts/0    S+   17:18   0:00 grep --color=auto sshd
2. 端口
COMMAND  PID USER   FD   TYPE DEVICE SIZE/OFF NODE NAME
sshd     986 root    3u  IPv4  18119      0t0  TCP *:ssh (LISTEN)
sshd     986 root    4u  IPv6  18121      0t0  TCP *:ssh (LISTEN)
sshd    1515 root    3u  IPv4  20677      0t0  TCP nginx-kafka01:ssh->192.168.182.1:58405 (ESTABLISHED)
[root@nginx-kafka01 ssh]# netstat -anplut |grep sshd
tcp        0      0 0.0.0.0:22              0.0.0.0:*               LISTEN      986/sshd
tcp        0     36 192.168.182.132:22      192.168.182.1:58405     ESTABLISHED 1515/sshd: root@pts
tcp6       0      0 :::22                   :::*                    LISTEN      986/sshd
3. 直接访问
4. 日志
7. 启动ssh服务
systemctl enable sshd 设置开机自启动
systemctl start sshd 启动
systemctl restart sshd 重启
8. sshd名字由来 ==> ssh daemon
守护进程:daemon:一直运行在内存中,除非人为停止
二、配置
2.1 配置文件
查看配置文件
[root@nginx-kafka01 ~]# cd /etc/ssh
[root@nginx-kafka01 ssh]# vim sshd_config
===文件内容===
>默认端口 前面的数字是在文件中的行号
17 #Port 22
18 #AddressFamily any
>默认监听地址,IPV4,0.0.0.0表示本机任意IP地址
19 #ListenAddress 0.0.0.0
>IPV6
20 #ListenAddress ::
>是否允许root用户ssh登录
38 #PermitRootLogin yes
>是否限制密码登录
65 PasswordAuthentication yes
2.1.1 修改ssh服务的端口
[root@nginx-kafka01 ssh]# vim /etc/ssh/sshd_config  # Port 2299 将端口号改为2299

[root@nginx-kafka01 ssh]# systemctl restart sshd  # 重启ssh服务
[root@nginx-kafka01 ssh]# netstat -antplu |grep 2299
tcp        0      0 0.0.0.0:2299            0.0.0.0:*               LISTEN      16257/sshd
tcp6       0      0 :::2299                 :::*                    LISTEN      16257/sshd
> 修改端口后ssh服务无法启动,可能是因为开启了selinux
getenforce  #查看selinux状态
->enforcing:强制模式,permissive:宽容模式,disabled:关闭
setenforce 0 #临时修改为宽容模式
vim /etc/selinux/config ==>  SELINUX=disabled  #修改配置文件--永久修改
> 在xshell开启新的会话连接连接不上,原因有2:(1)连接端口没有改为修改后的;(2)防火墙限制,需要关闭防火墙
service firewalld stop # 关闭防火墙
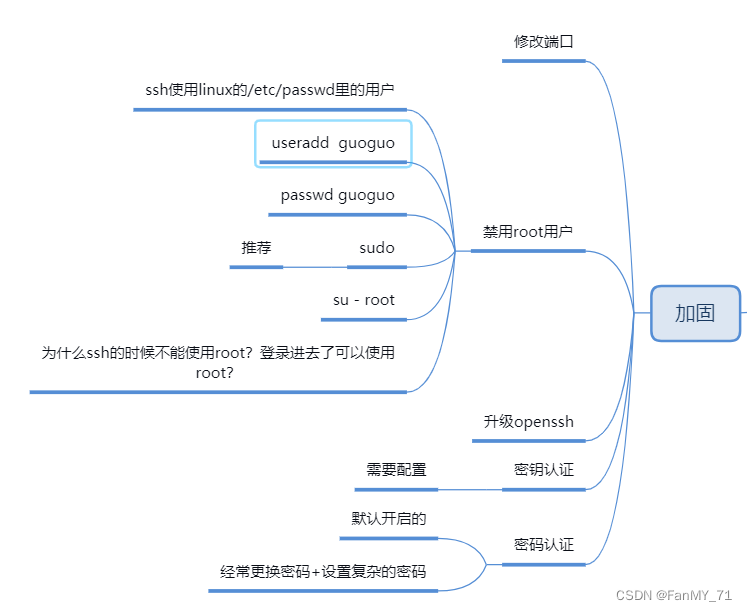
systemctl disabled firewalld # 关闭开机自启2.2 限制root用户登录ssh
vim /etc/ssh/sshd_config
PermitRootLogin yes修改为PermitRootLogin no
不能远程连接,但可以先用普通用户连接,再su - root 切换到root用户
原因:su不经过ssh,可以通过pstree -p查看进程树,可以看到pid
如何断开这个连接:杀死对应的bash进程
2.2.3 日志
/var/log/secure> 显示Faild passwd :表示登录失败
三、命令
3.1 ssh认证方式
1. 密码认证
/etc/passwd + /etc/shadow
ssh服务依赖Linux系统的用户名和密码
2. 密钥认证
公钥(public key)和私钥(private key)是一对文件,文件里面是一段字符串,用来给加密算法提供参数。

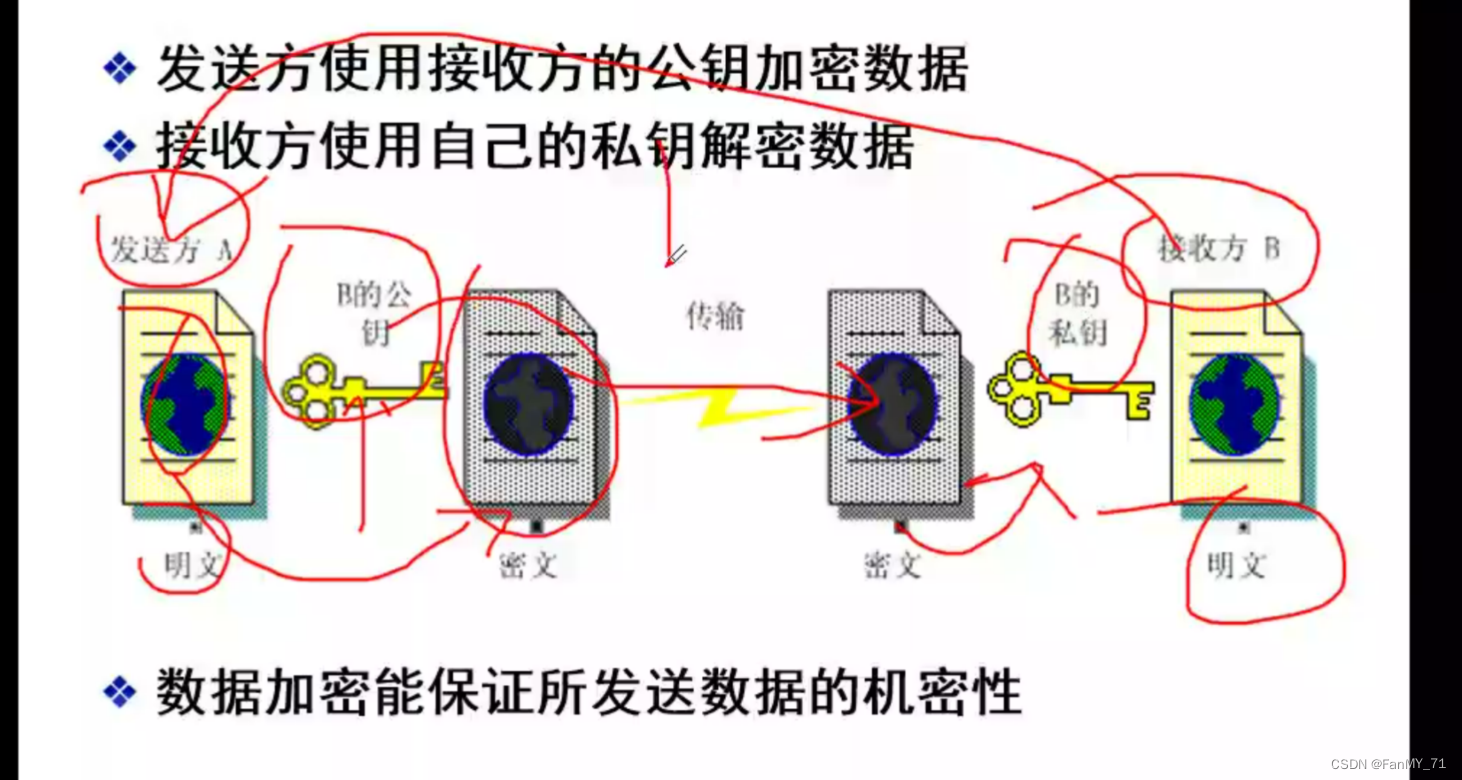

公钥存储路径:/root/.ssh/know_hosts
将服务器上的sshd守护进程的公钥复制到本地,每行存放一台服务器的公钥,用来验证服务器的身份。
四、建立免密通道
A:192.168.29.155
B:192.168.29.128
root - root
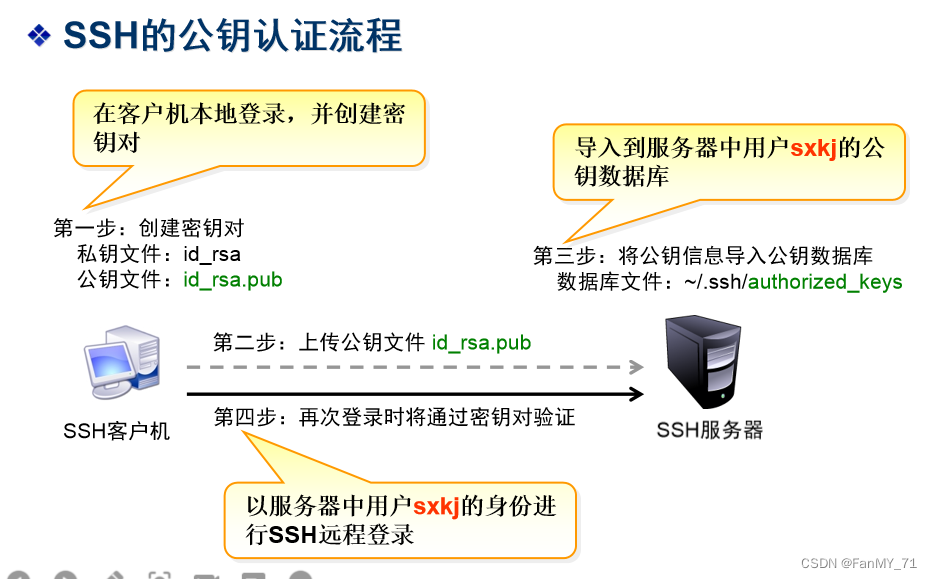
第一步:生成密钥对,在A机器上使用root用户生成密钥对
[root@nginx-kafka02 .ssh]#  ssh-keygen -t rsa  # 选择不同的加密算法
 # 这里直接敲击回车就行了
Generating public/private rsa key pair.
Enter file in which to save the key (/root/.ssh/id_rsa):
Enter passphrase (empty for no passphrase):
Enter same passphrase again:

[root@nginx-kafka02 .ssh]# cd /root/.ssh
[root@nginx-kafka02 .ssh]# ls
id_rsa  id_rsa.pub  known_hosts
[root@nginx-kafka02 .ssh]# ll
总用量 12
-rw-------. 1 root root 1679 7月  27 16:46 id_rsa  # 这个私钥只有自己才能使用,千万不要动它的权限
-rw-r--r--. 1 root root  400 7月  27 16:46 id_rsa.pub
-rw-r--r--. 1 root root  731 7月  27 12:00 known_hosts
第二步:上传公钥
有scp和ssh-copy-id两种方式上传
[root@nginx-kafka02 .ssh]# ssh-copy-id -i id_rsa.pub root@192.168.29.128  # -i,指定公钥文件
# 这条命令相比于scp的要指定公钥路径,可以自动在B机器上生成对应的公钥路径
检查
[root@nginx-kafaka03 ~]# cd ~/.ssh
[root@nginx-kafaka03 .ssh]# ls
authorized_keys  known_hosts
authorized_keys是用来linux系统登录使用的
known_hosts是第一次连接服务器发送过来的东西
第三步:测试
[root@nginx-kafka02 .ssh]# ssh 192.168.29.128
Last login: Wed Jul 27 14:52:44 2022 from 192.168.29.1
# 我们现在能够使用A机器连接B机器不需要密码,但是B机器连接A机器需要密码,所以这是单向信任关系。
4.1、ssh
远程连接命令
不指定登录用户时,默认使用当前用户
# 不指定
ssh 192.168.1.173
# 指定
ssh cali@192.168.1.173
-p 指定端口号
写脚本推荐使用ssh,建立免密通道后,无需使用密码
# 登录的同时在远端机器上新建目录
ssh cali@192.168.1.173 mkdir /home/cali/test -p
退出:exit
建立了免密通道之后,我们可以使用":ssh ip bash 命令",来操作别的机器运行代码
4.2、scp
远程文件传输命令
# 将192.168.1.173的/etc/passwd文件复制到本机的/etc/ssh
# 复制文件夹的时候需要接-r,递归复制目录
[root@nginx-kafka01 ~]# scp cali@192.168.1.173:/etc/passwd /etc/ssh
cali@192.168.1.173's password:
passwd                                                    100% 1217    81.0KB/s   00:00
# 将本机/etc/ssh/passwd文件复制给192.168.1.173cali的家目录下
[root@nginx-kafka01 ssh]# scp /etc/ssh/passwd cali@192.168.1.173:~
cali@192.168.1.173's password:
passwd 100% 1217 64.7KB/s 00:00 4.3、sftp
基于ssh协议的ftp功能,底层使用ssh协议
提供文件的上传(put)和下载(get)
[root@nginx-kafka01 ssh]# sftp cali@192.168.1.173
cali@192.168.1.173's password:
Connected to 192.168.1.173.
# 查看在远程机器的哪个目录
sftp> pwd
Remote working directory: /home/cali
# 查看远程机器当前目录下的文件
sftp> ls
fengdeyong   passwd       shiyq
# 将本机的/var/log/secure文件传至远程机器
sftp> put /var/log/secure
Uploading /var/log/secure to /home/cali/secure
/var/log/secure                                           100% 5118   200.3KB/s   00:00
sftp> ls
fengdeyong   hosts        passwd       secure       shiyq
# 查看现在在当前机器的哪个目录
sftp> lpwd
Local working directory: /etc/ssh
# 查看有哪些命令
sftp>
?
# 查看本机所在目录下有哪些文件
sftp> !ls
moduli	ssh_config   ssh_host_ecdsa_key      ssh_host_ed25519_key      ssh_host_rsa_key
passwd	sshd_config  ssh_host_ecdsa_key.pub  ssh_host_ed25519_key.pub  ssh_host_rsa_key.pub
# 进入本机的/lianxi目录
sftp> lcd /lianxi
sftp> !ls
0408  0617  0701  0704	75  76	code  linux  python-test  scrip  script  shell-test
# 下载hosts文件
sftp> get hosts
# 递归上传linux目录
sftp> put -r linux
五、加固服务
六、signal
man 7 signal
       Signal     Value     Action   Comment
       ──────────────────────────────────────────────────────────────────────
       SIGHUP        1       Term    Hangup detected on controlling terminal
                                     or death of controlling process
       SIGINT        2       Term    Interrupt from keyboard
       SIGQUIT       3       Core    Quit from keyboard
       SIGILL        4       Core    Illegal Instruction
       SIGABRT       6       Core    Abort signal from abort(3)
       SIGFPE        8       Core    Floating point exception
       SIGKILL       9       Term    Kill signal

       SIGSEGV      11       Core    Invalid memory reference
       SIGPIPE      13       Term    Broken pipe: write to pipe with no
                                     readers
       SIGALRM      14       Term    Timer signal from alarm(2)
       SIGTERM      15       Term    Termination signal
       SIGUSR1   30,10,16    Term    User-defined signal 1
       SIGUSR2   31,12,17    Term    User-defined signal 2
       SIGCHLD   20,17,18    Ign     Child stopped or terminated
       SIGCONT   19,18,25    Cont    Continue if stopped
       SIGSTOP   17,19,23    Stop    Stop process
       SIGTSTP   18,20,24    Stop    Stop typed at terminal
       SIGTTIN   21,21,26    Stop    Terminal input for background process
       SIGTTOU   22,22,27    Stop    Terminal output for background process


 2374
2374


 被折叠的 条评论
为什么被折叠?
被折叠的 条评论
为什么被折叠?
 到【灌水乐园】发言


