


文章目录
一、SSH简介
概念:SSH([Secure Shell]) 为建立在应用层基础上的安全协议。SSH 是较可靠,专为远程登录会话和其他网络服务提供安全性的协议。利用 SSH 协议可以有效防止远程管理过程中的信息泄露问题。
如何搭建ssh服务?
软件来实现某个功能–》远程登录
openssh
OpenSSH是使用SSH协议进行远程登录的首要连接工具。它对所有通信进行加密,以消除窃听、连接劫持和其他攻击。此外,OpenSSH提供了大量的安全隧道功能、几种身份验证方法和复杂的配置选项。
centos7/8/6安装好系统,默认安装openssh
[root@VM-12-8-centos ~]# rpm -qa |grep openssh
openssh-clients-7.4p1-22.el7_9.x86_64
openssh-server-7.4p1-22.el7_9.x86_64
openssh-7.4p1-22.el7_9.x86_64
[root@VM-12-8-centos ~]#
openssh-clients 客户端程序
openssh-server 服务器端
c/s架构的软件
[root@VM-12-8-centos ~]# cd /etc/ssh
[root@VM-12-8-centos ssh]# ls
moduli       ssh_host_dsa_key      ssh_host_ecdsa_key.pub    ssh_host_rsa_key
ssh_config   ssh_host_dsa_key.pub  ssh_host_ed25519_key      ssh_host_rsa_key.pub
sshd_config  ssh_host_ecdsa_key    ssh_host_ed25519_key.pub
[root@VM-12-8-centos ssh]#
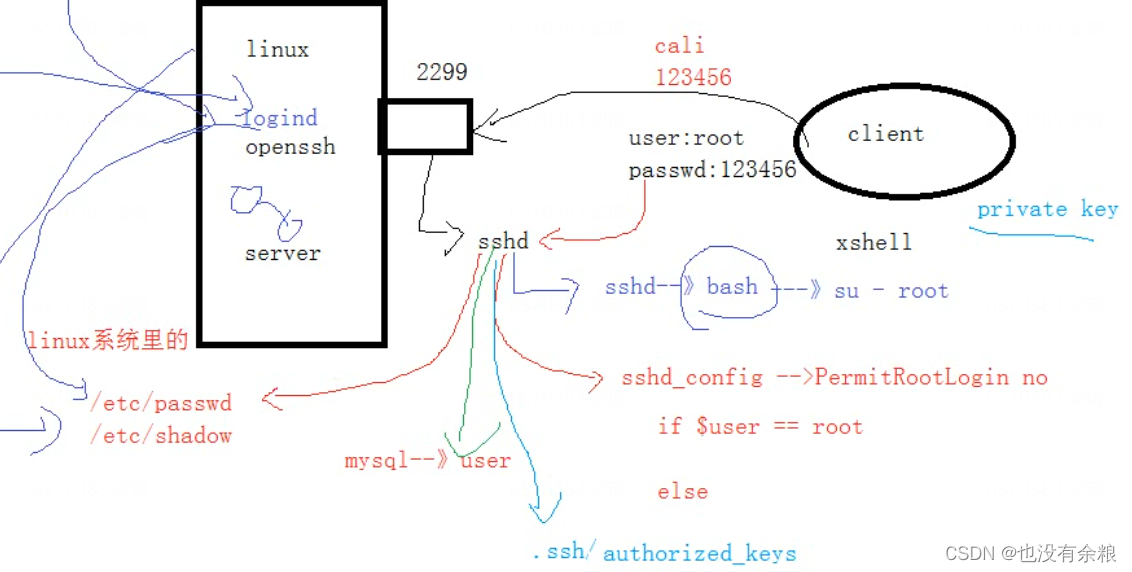
sshd_config --》sshd 服务器端的进程
ssh_config --》ssh 客户端命令的配置文件
- sshd进程的例子:
在一个窗口执行如下代码并执行之后,关闭窗口不会继续运行
#!/bin/bash
i=1
while true
do
	echo "sanchuang $i"
	((i++))
	sleep 1
done
上图为另一个窗口的测试过程
使用nohup命令+ & 将进程放在后台执行,关闭窗口程序继续运行
[root@VM-12-8-centos ~]# nohup bash while.sh &
二、SSH —加固方法
配置文件就是一个传递参数的作用,修改配置文件之后要重启才能生效
vim etc/ssh/sshd_config
(截取config文件中的部分行)
#Port 22    默认22号端口

PermitRootLogin yes    允许root用户登录(改为no表示进程)

#MaxAuthTries 6     认证的时候,最多允许输入密码6次

#PubkeyAuthentication yes    公钥认证

AuthorizedKeysFile .ssh/authorized_keys       密钥文件存放路径

PasswordAuthentication yes    密码登录是打开的
1、修改端口号
Port 2299
在配置文件中将port改为2299端口号,重启服务失败后关闭selinux,后ok
[root@VM-12-8-centos ssh]# pwd
/etc/ssh
[root@VM-12-8-centos ssh]# vim sshd_config
[root@localhost ssh]# vim /etc/selinux/config
SELINUX=disabled
[root@localhost ssh]# getenforce  查看selinux的状态
Enforcing
[root@localhost ssh]# setenforce 0  临时调整selinux的策略为宽容模式
[root@localhost ssh]# getenforce
Permissive
[root@localhost ssh]#
[root@localhost ssh]# service sshd restart
Redirecting to /bin/systemctl restart sshd.service
[root@localhost ssh]# netstat -anplut|grep 2299
tcp        0      0 0.0.0.0:2299            0.0.0.0:*               LISTEN      2383/sshd
[root@localhost ssh]#
要想重新连接到ssh服务,还需要关闭防火墙
[root@localhost ssh]# service firewalld stop  关闭防火墙
Redirecting to /bin/systemctl stop firewalld.service
[root@localhost ssh]#
将端口号改为2299,别人并不知我们开了22端口,并且不知2299端口做什么的,不容易被入侵
扩:端口号的范围 2^16 0–65535 (在传输层封装的时候只允许到65535)
2、禁用root用户
PermitRootLogin no
#将yes改为no
Ⅰ、(给其他某个用户授权登录,用这个用户进行登录)
可以用sudo命令给该用户授权,就可以更流畅的进行操作;或者使用su - root,切入到root用户操作
问:为什么登录系统不行,进入系统后可以重新登录root了呢?
—因为切换用户没经过ssh服务 远程登录过来的时候会在sshd里开一个进程sshd---->bash ---->su - root(进来之后知识切换了用户而已)

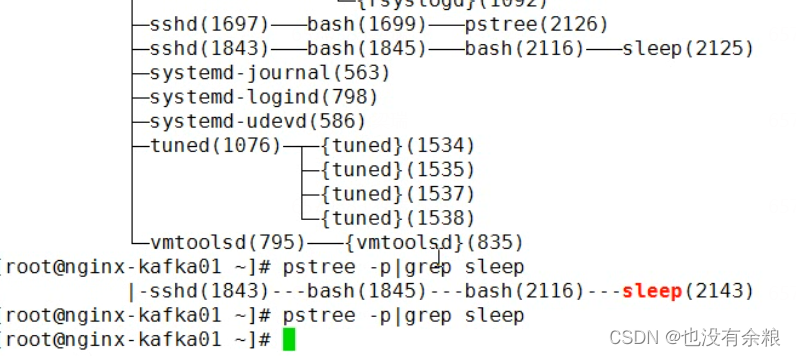
Ⅱ、w查看有哪些用户登录到了你的服务器
杀死某个其他人登录进来的进程,使用pstree -p,kill它的进程号即可
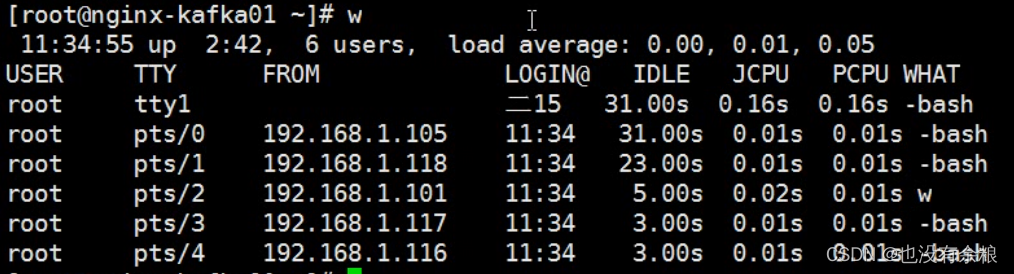
我的是101的终端号是pts/2 , 过滤出其他登录我的机器的进程,kill -9 +pid号 即可,后续改密码或者设置防火墙规则

Ⅲ、如果多人连接到你的服务器
使用wall + 其他 可以发送消息给其他终端

3、禁用密码认证
PasswordAuthentication no
4、配置密钥认证
密钥认证
Ⅰ、ssh使用的算法是非对称加密的
对称加密算法需要两个密钥:公开密钥( publickey)和私有密钥( privatekey)。公开密钥与私有密钥是一对,如果用公开密钥对数据进行加密,只有用对应的私有密钥才能解密;如果用私有密钥对数据进行加密,那么只有用对应的公开密钥才能解密。因为加密和解密使用的是两个不同的密钥,所以这种算法叫作非对称加密算法。
Ⅱ、 数字签名
----身份识别的一种加密算法
[root@VM-12-8-centos ssh]# ls
moduli       ssh_host_dsa_key      ssh_host_ecdsa_key.pub    ssh_host_rsa_key
ssh_config   ssh_host_dsa_key.pub  ssh_host_ed25519_key      ssh_host_rsa_key.pub
sshd_config  ssh_host_ecdsa_key    ssh_host_ed25519_key.pub
[root@VM-12-8-centos ssh]#
Ⅲ、key结尾的是私钥,.pub结尾的是公钥,ed25519等是加密算法
[root@VM-12-8-centos ssh]# cat ssh_host_dsa_key
-----BEGIN DSA PRIVATE KEY-----
MIIBuwIBAAKBgQDoMhvRYUDmFEJ+HsLVfpi2cO0LQeCymX+qIwLAINCkseix1+or
Cadldgq/s5gHJAQQkTnEN4w1xc6fhcpMUl80txOAmaB6mVNtlfqSTwI/DiWSSw25
EP0VAcrnD50aHn9cu0tLMmW7eYyy/yw9fqiEm7w4v+jHJy7dTom4EokzvwIVAKj1
LZYZEuo2+H+dWVHOloG8tJHFAoGBAL5IxpNjA8IhMAhN6ku8Pk3R9bRH7Ztb9iUL
wV1gtQ2RFPR2VrggfRi7yAVwzDgWpDrcx8obofHDVslgbRZiX4tb99uae82pSM1h
HwAteYpHvsV3zJa12uQq1t0WCAo6/+DqqncClnHGandmooQIqiBqX4YvptHWP+9F
GoBRVaCwAoGAYWR+YXllXN0NDh/9B+pM0cc5Wgc4+oGmXQNb1Tpy1FOeyOgWka4w
DxwSlaeX+XYTTrhpPZ+087KW5KBH+LadQlULBmgM8gUp7PpwDaW2MFopHk1MgSJ4
byAHFCzZohm/tr0ohqCHITU3lXNWvDqutaRV1M2dEQScPHb9UpWa+W4CFC7mXlO3
lIsUAq5xLUyZBjZSTgiw
-----END DSA PRIVATE KEY-----
公钥和私钥是一对文件,文件里面是一段字符串,告诉加密算法加密的时候,使用的参数。
[root@localhost .ssh]# pwd
/root/.ssh
[root@localhost .ssh]# ls
known_hosts  用来存放对方的服务器的公钥的,ssh连接登录的时候会提示
[root@localhost .ssh]#
用来保存你曾经连过的哪台服务器的公钥
[root@nginx-kafka03 .ssh]# cat known_hosts
127.0.0.1 ecdsa-sha2-nistp256 AAAAE2VjZHNhLXNoYTItbmlzdHAyNTYAAAAIbmlzdHAyNTYAAABBBAU4RcXypueSDmTnshKhtROhMT0ZL6V3j6jzNsgmOXEtmVsuoXrzzciaSRKCNTrlDXzV4HZEODVAOE+KIHHv84Q=
192.168.10.143 ecdsa-sha2-nistp256 AAAAE2VjZHNhLXNoYTItbmlzdHAyNTYAAAAIbmlzdHAyNTYAAABBBAU4RcXypueSDmTnshKhtROhMT0ZL6V3j6jzNsgmOXEtmVsuoXrzzciaSRKCNTrlDXzV4HZEODVAOE+KIHHv84Q=
192.168.10.161 ecdsa-sha2-nistp256 AAAAE2VjZHNhLXNoYTItbmlzdHAyNTYAAAAIbmlzdHAyNTYAAABBB
如果遇到你连接的服务器提示你,你保存的公钥和你正在连接的机器的公钥不一样。很可能是你保存的和你正在连的机器的IP地址冲突,会影响你连不上,只需要把know_hosts文件删除即可
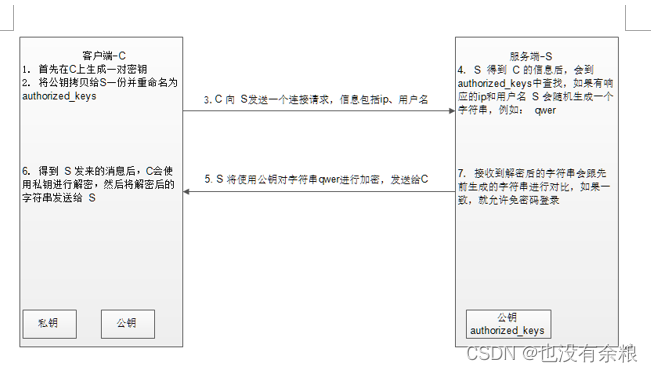
Ⅳ、ssh的公钥认证流程

1.生成密钥对,在192.168.1.105上使用root用户生成密钥对,密钥对会在用户的家目录下
[root@localhost ssh]# ssh-keygen -t rsa   生成密钥对,指定类型为rsa
Generating public/private rsa key pair.
Enter file in which to save the key (/root/.ssh/id_rsa):
Enter passphrase (empty for no passphrase):
Enter same passphrase again:
Your identification has been saved in /root/.ssh/id_rsa.
Your public key has been saved in /root/.ssh/id_rsa.pub.
The key fingerprint is:
SHA256:Ecds9x/kXGpjN1lXDtudEerhZyCFAJ4ugGRThdehBsM root@localhost.localdomain
The key's randomart image is:
+---[RSA 2048]----+
| +o+o..o++o ...o+|
|o oEo.o..o+.o .*B|
| . ..o o.. o ==oO|
|    o .  .  + O*.|
|     . .S    = *o|
|      .       o .|
|                 |
|                 |
|                 |
+----[SHA256]-----+
[root@localhost ssh]# cd /root/.ssh/ 进入用户的家目录
[root@localhost .ssh]# ls
id_rsa 私钥
id_rsa.pub  公钥
known_hosts
[root@localhost .ssh]# ll  不建议修改密钥文件的权限,不然会导致密钥失效
总用量 12
-rw-------. 1 root root 1679 7月  27 16:46 id_rsa
-rw-r--r--. 1 root root  408 7月  27 16:46 id_rsa.pub
-rw-r--r--. 1 root root  182 7月  27 16:34 known_hosts
[root@localhost .ssh]#
2、上传公钥到对方的服务器,要求对方的服务器运行root用户登录
[root@localhost .ssh]# ssh-copy-id -p 2288 -i id_rsa.pub root@192.168.1.173
/bin/ssh-copy-id: INFO: Source of key(s) to be installed: "id_rsa.pub"
/bin/ssh-copy-id: INFO: attempting to log in with the new key(s), to filter out any that are already installed
/bin/ssh-copy-id: INFO: 1 key(s) remain to be installed -- if you are prompted now it is to install the new keys
root@192.168.1.173's password:

Number of key(s) added: 1

Now try logging into the machine, with:   "ssh -p '2288' 'root@192.168.1.173'"
and check to make sure that only the key(s) you wanted were added.
3.验证登录是否需要密码
[root@localhost .ssh]# ssh -p '2288' 'root@192.168.1.173'
Last failed login: Wed Jul 27 16:53:28 CST 2022 from 192.168.1.105 on ssh:notty
There were 30 failed login attempts since the last successful login.
Last login: Wed Jul 27 11:55:11 2022
[root@nginx-kafka01 ~]#
[root@localhost .ssh]# scp  -P 2288 'root@192.168.1.173':/etc/passwd  .
passwd                                                                                     100% 1217   561.0KB/s   00:00
[root@localhost .ssh]#
[root@localhost .ssh]# ssh -p '2288' 'root@192.168.1.173' mkdir /wangshuai
5、升级openssh
三、使用ssh远程登录
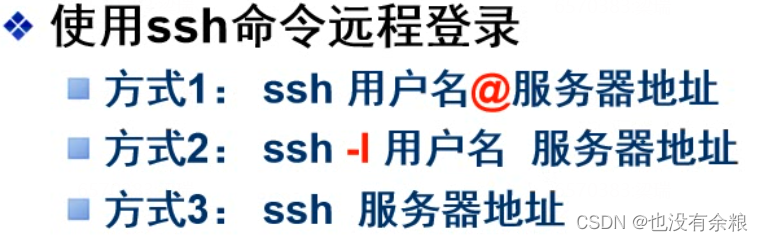
1、通过xshell连到其他远程服务器
[root@localhost ssh]# ssh root@192.168.1.173
The authenticity of host '192.168.1.173 (192.168.1.173)' can't be established.
ECDSA key fingerprint is SHA256:R5hCgn7KQWr9ayqU/Qs50+ipykX+RnlV73ZVBal6/lI.
ECDSA key fingerprint is MD5:6d:97:ac:00:06:a7:f1:5c:fd:17:f6:b4:d5:66:d5:a5.
Are you sure you want to continue connecting (yes/no)? yes
Warning: Permanently added '192.168.1.173' (ECDSA) to the list of known hosts.
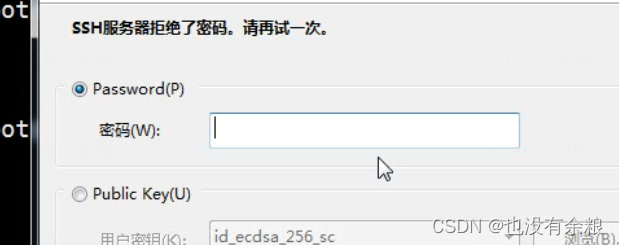
root@192.168.1.173's password:
Permission denied, please try again.
root@192.168.1.173's password:
Permission denied, please try again.
root@192.168.1.173's password:
Permission denied (publickey,gssapi-keyex,gssapi-with-mic,password).
[root@localhost ssh]# ssh cali@192.168.1.173
cali@192.168.1.173's password:
Last failed login: Wed Jul 27 12:00:45 CST 2022 from 192.168.1.122 on ssh:notty
There were 3 failed login attempts since the last successful login.
Last login: Wed Jul 27 11:53:17 2022
[cali@nginx-kafka01 ~]$
可以通过ssh 使用普通用户在它的家目录下创建文件夹,其他目录无权限
[root@localhost ssh]# ssh cali@192.168.1.173 mkdir /home/cali/fengdeyong/zhangtongtong -p
2、scp 远程拷贝
底层通过ssh协议远程连接到其他的机器上,复制文件
[root@localhost ssh]# scp  cali@192.168.1.173:/etc/passwd   /etc/ssh
cali@192.168.1.173's password:
passwd                                                         100% 1217   677.1KB/s   00:00
[root@localhost ssh]# scp -r  cali@192.168.1.173:/boot   /etc/ssh
                                 源                      目的地
[root@localhost ssh]# scp -r /etc/passwd  cali@192.168.1.173:~
cali@192.168.1.173's password:   将我本机的复制到远程那台机器
passwd                                                                                     100% 1692   745.6KB/s   00:00
3、也可以使用sftp 进行上传下载
[root@localhost ssh]# sftp cali@192.168.1.173
ls 看家目录下有哪些文件
!ls 看本地当前目录有哪些
pwd
lpwd
cd
lcd
get 下载
put 上传
put -r 上传文件夹
sftp> put -r grub2
exit
四、练习:
1、生成公钥和私钥
[root@nginx-kafka03 .ssh]# ssh-keygen -t rsa
Generating public/private rsa key pair.
Enter file in which to save the key (/root/.ssh/id_rsa):
Enter passphrase (empty for no passphrase):
Enter same passphrase again:
Your identification has been saved in /root/.ssh/id_rsa.
Your public key has been saved in /root/.ssh/id_rsa.pub.
The key fingerprint is:
SHA256:z9/yYqcZGjUNRW6TzguY7QV2SV/4qiXVyld/RGU5MuM root@nginx-kafka03.localdomain
The key's randomart image is:
+---[RSA 2048]----+
|             .+.*|
|             B.Bo|
|            = @+o|
|           = E..=|
|        S o =o=+o|
|         o o.+=.+|
|          + o+...|
|           +=+.  |
|          ..+*o  |
+----[SHA256]-----+
[root@nginx-kafka03 .ssh]#
[root@nginx-kafka03 .ssh]# cd /root/.ssh
[root@nginx-kafka03 .ssh]# ls
id_rsa  id_rsa.pub  known_hosts ---用来存放第一次连接过去
[root@nginx-kafka03 .ssh]#
2、传到需要连接的服务器
						-i 指定那个文件
[root@nginx-kafka03 .ssh]# ssh-copy-id -i id_rsa.pub root@1.14.183.210
/usr/bin/ssh-copy-id: INFO: Source of key(s) to be installed: "id_rsa.pub"
/usr/bin/ssh-copy-id: INFO: attempting to log in with the new key(s), to filter out any that are already installed
/usr/bin/ssh-copy-id: INFO: 1 key(s) remain to be installed -- if you are prompted now it is to install the new keys
root@1.14.183.210's password:

Number of key(s) added: 1

Now try logging into the machine, with:   "ssh 'root@1.14.183.210'"
and check to make sure that only the key(s) you wanted were added.

[root@nginx-kafka03 .ssh]#
[root@nginx-kafka03 .ssh]# ssh root@1.14.183.210   再次连接无需输入密码,并切换到另一台机器
Last login: Tue Aug  2 16:54:17 2022 from 222.244.212.228
[root@VM-12-8-centos ~]# cd /root/.ssh
[root@VM-12-8-centos .ssh]# ls   并生成一个新的文件,存放对方的公钥
authorized_keys			用来验证用户身份的合法性
[root@VM-12-8-centos .ssh]#


 218
218


 被折叠的 条评论
为什么被折叠?
被折叠的 条评论
为什么被折叠?
 到【灌水乐园】发言


