


文章目录
spring学习
操作bean管理(基于配置方式)省略

1.String中操作bean管理(基于注解方式)
1.1 基于注解创建对象
不能用在接口,用在接口的实现类
- @Component:普通的注解(全能),可以代替其他三个注解
- @Service:业务层
- @Controller:控制层
- @Repository:数据层
1.1.1 用注解要扫包(三种方式)
<!--1.设置组件扫描(常用)-->
<context:component-scan base-package="com.gok"></context:component-scan>


<!--2.use-default-filters="false":不使用默认的filter,使用自己配置的filter
        context:include-filter :设置扫描哪些注解
    -->
<context:component-scan base-package="com.gok" use-default-filters="false">
    <context:include-filter type="annotation"
                            expression="org.springframework.stereotype.Service"/>
</context:component-scan>


<!--3.context:exclude-filter:设置注解不包括哪些注解-->
<context:component-scan base-package="com.gok">
    <context:exclude-filter type="annotation"
                            expression="org.springframework.stereotype.Controller"/>
</context:component-scan>
1.2 基于注解实现属性的注入
实际开发都是一个dao/service对应一个实现类
- @Autowired:根据属性类型进行自动装配(常用)
- @Qualifier:根据属性名称进行注入(要跟@Autowired一起使用)
- @Resource:可以根据类型注入,可以根据名称注入
- @Value:注入普通属性
注意点:
- 一般实际开发都是一个dao/service对应一个实现类
- 一般用@Autowired和@Resource
- 如果一个接口有两个实现类,就要用@Qualifier,而且要跟@Autowired一起使用
栗子1:
按名称注入@Qualifier 和 @Resource
Dao层:
@Repository(value = "bookDao2") //注
public class BookDaoImpl implements BookDao {

    @Override
    public void add() {
        System.out.println("dao add。。。");
    }
}
Service层:
//第一种:用@Qualifier跟@Autowired一起使用
@Service
public class BookService {

    @Autowired
    //@Resource
    @Qualifier(value = "bookDao2") //注
    public BookDao bookDao;
    public void add(){
        System.out.println("书籍增加!");
        bookDao.add();
    }
}
//第二种:用@Resource
@Service
public class BookService {

    @Resource(name = "bookDao2")//注
    public BookDao bookDao;

    public void add(){
        System.out.println("书籍增加!");
        bookDao.add();
    }
}
栗子2:
@Value:给属性注入值
@Service
public class BookService {

    @Value("xiaolu")
    private String name

    public void add(){
        System.out.println(name+"的书籍增加!");
        //结果:xiaolu的书籍增加!
    }
}
编写配置类(基于xml配置文件)
@Test  //基于配置文件
public void testBookService(){
    ApplicationContext app = new ClassPathXmlApplicationContext("bean2.xml");
    System.out.println("IOC初始化完成!");
    BookService bookService = app.getBean(BookService.class);
    bookService.add();
}
1.3 完全注解开发
(1)创建配置类,替代xml配置文件
@Configuration
@ComponentScan(basePackages = "com.gok")
public class SpringConfig {//配置类替代xml配置文件
}
(2)编写测试类(全注解)
@Test  //基于配置类(全注解)
public void testBookService2(){
    ApplicationContext app = new AnnotationConfigApplicationContext(SpringConfig.class);
    System.out.println("IOC初始化完成!");
    BookService bookService = app.getBean(BookService.class);
    bookService.add();
}
2.AOP面向切面编程
2.1 aop概念
是Spring框架中的一个重要内容,利用AOP可以对业务逻辑的各个部分进行隔离,从而使得业务逻辑各部分之间的耦合度降低,提高程序的可重用性,同时提高了开发的效率。
通俗描述: 不通过修改源代码的方式,在主干功能里添加新的功能,这就是AOP
2.2 AOP动态代理
有接口情况,使用jdk动态代理
没有接口情况,使用CGLIB动态代理
2.2.1 AOP(jdk动态代理)
使用proxy类里面的方法创建代理对象
(1)调用Proxy.newProxyInstance方法:创建代理对象,写增强的方法
方法中有三个参数:
-
类加载器ClassLoader
-
类实现的接口(支持多个接口)
-
实现委托执行的处理类对象
处理类:JDKProxy
public class JDKProxy implements InvocationHandler {
    //被代理对象
    Object target;

    //有参构造传参
    public JDKProxy(Object target) {
        this.target = target;
    }

    //增强的逻辑
    @Override
    public Object invoke(Object proxy, Method method, Object[] args) throws Throwable {
      //方法之前
        System.out.println("方法名:"+method.getName()+"  "+"方法参数:"+ Arrays.toString(args));
        Long start = System.currentTimeMillis();

        //增强逻辑的方法
        Object o = method.invoke(target, args);

        //方法之后
        Long end = System.currentTimeMillis();
        System.out.println("方法执行时间:"+(end-start));

        return o;
    }
动态创建对象方法
//1.用一个方法封装
private static Object createProxy(Object proxy){
    //获取被代理对象的类加载器
    ClassLoader classLoader = proxy.getClass().getClassLoader();
    //获取被代理对象的所有接口
    Class<?>[] interfaces = proxy.getClass().getInterfaces();
    //实现一个委托执行的处理类对象
    JDKProxy jdkProxy = new JDKProxy(proxy);
    //最后一步:动态创建对象
    Object o = Proxy.newProxyInstance(classLoader, interfaces, jdkProxy); //重 重 重

    return o;
}
//2.直接在测试中实现
测试:
public static void main(String[] args) {
        BookDaoImpl bookDaoImpl = new BookDaoImpl();  //实现类new出来
        BookDao bookDao = (BookDao)createProxy(bookDaoImpl);   //创建动态代理对象,要用接口类强转
   	    //BookDao bookDao =(BookDao)Proxy.newProxyInstance(bookDaoImpl.getClass().getClassLoader(),bookDaoImpl.getClass().getInterfaces(),new JDKProxy(bookDaoImpl));  //此种创建一步到位,不用封装
        bookDao.add();
        System.out.println(bookDao.add2(1, 2));
        System.out.println(bookDao.update("xiaolu"));
    }
2.3 AOP(术语)——要理解
-
连接点
类里面哪些方法可以被增强,这些方法称为连接点
-
切入点
实际被真正增强的方法,称为切入点
-
通知(增强)
某方法中实际增强的逻辑部分,称为通知(增强)
通知有多种类型:
- 前置通知:表示业务方法在执行前的执行动作——@Before
- 后置异常通知:业务抛出异常,就会执行这个通知——@AfterThrowing
- 环绕通知:——@Around
- 后置返回通知:表示业务执行完毕,如果没有抛异常,将会返回业务结果——@AfterReturning
- 后置通知:方法执行之后要执行此通知方法——@After
注意:通知执行顺序
通知执行顺序 1.业务执行未抛出异常时,@Before -->@AfterReturning -->@After 2.业务执行有异常失败,@Before -->@AfterThrowing -->@After 什么通知都要执行? @Before @After @Around -
切面(定义切点方法的类)
把通知(增强)应用到切入点的过程
2.4 AOP操作(准备工作)
String框架一般都是基于AspectJ实现AOP操作
2.4.1 AspectJ概念
AspectJ不是Spring组成部分,独立AOP框架,一般把AspectJ 和 Spring框架一起使用,进行AOP操作
2.4.2 基于AspectJ实现AOP操作
1、基于xml配置文件实现
2、基于注解方式实现(常0用)
2.4.3 引入Aop相关依赖
2.4.4 切点表达式 ——重中之重
切点表达式作用:知道对哪个类里面的哪个方法进行增强
1、语法结构:execution([权限修饰符—可以省略] [返回类型—可以用] [类全路径] [方法名称] ([参数列表—可以用…]))*
栗子1:—参数列表:用…
-
对 com.gok.dao.BookDao 类中的add2方法进行增强
execution(* com.gok.dao.BookDao.add2(…))
栗子2: —所有: 用*
-
对 com.gok.dao.BookDao 类中的所有方法进行增强
execution(* com.gok.dao.BookDao.*(…))
栗子3:—只是dao包中:用.
-
对 com.gok.dao包里面所有类,类里面所有方法进行增强
execution(* com.gok.dao.* .*(…))
栗子4:—以“ad”开始的方法:用ad*
-
对 com.gok.dao包里面所有类,类里面任何一个以“ad”开始的方法进行增强
execution(* com.gok.dao.* .ad*(…))
栗子5:—dao包和其所有子包: 用. .
-
对 com.gok.dao包里和所有子包里 所有类,类里面所有方法进行增强
execution(* com.gok.dao. . * .*(…))
2.5 AOP操作(AspectJ注解)
-
xml配置文件中开启组件扫描
<!--扫描组件扫描--> <context:component-scan base-package="com.gok"></context:component-scan> -
使用注解创建类,以及增强类(加上@Component:创建对象)
Book类:
@Component
public class Book {

    public void add() {
        System.out.println("books add。。。");
    }
}
AspectJBook增强类:
//增强类(增加的逻辑部分) @Component @Aspect public class AspectBook { } -
在增强类上加上注解@Aspect
目的: 生成代理对象
-
xml配置文件中开启Aspect生成代理对象
<!--开启Aop生成代理对象--> <aop:aspectj-autoproxy></aop:aspectj-autoproxy> -
配置不同类型的通知
添加通知类型的注解,并且要有切点表达式
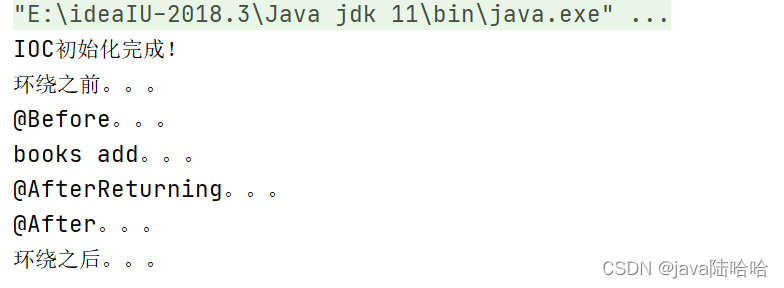
//增强类(增加的逻辑部分) @Component @Aspect public class AspectBook { //切点表达式 @Pointcut("execution(* com.gok.aopanno.Book.add(..))") public void pointCut(){ } @Before(value = "pointCut()") //前置通知 public void before(){ System.out.println("@Before。。。"); } @AfterReturning(value = "pointCut()") //后置返回通知(有异常不通知) public void afterReturning(){ System.out.println("@AfterReturning。。。"); } @AfterThrowing(value = "pointCut()") //后置异常通知 public void afterThrowing(){ System.out.println("@AfterThrowing。。。"); } @After(value = "pointCut()") //后置通知 public void after(){ System.out.println("@After。。。"); } @Around(value = "pointCut()") //环绕通知 public void around(ProceedingJoinPoint proceedingJoinPoint) throws Throwable { System.out.println("环绕之前。。。"); proceedingJoinPoint.proceed(); System.out.println("环绕之后。。。"); } } -
测试1:有配置文件
@Test public void testBook(){ ApplicationContext app = new ClassPathXmlApplicationContext("aopbean.xml"); System.out.println("IOC初始化完成!"); Book book = app.getBean(Book.class); book.add(); } -
额外测试2:不需要配置文件,基于全注解
配置类AopConfig:
@Configuration //配置类一定要加
@ComponentScan(basePackages = {"com.gok"})//开启组件扫描
@EnableAspectJAutoProxy(proxyTargetClass = true) //开启aop生成代理对象
public class AopConfig {
}
测试方法:
@Test
public void testBook2(){
    ApplicationContext app = new AnnotationConfigApplicationContext(AopConfig.class);
    System.out.println("IOC初始化完成!");
    Book book = app.getBean(Book.class);
    book.add();
}
注意点:
-
执行顺序: 看 2.3 Aop术语
-
优先级问题(@Order(数字)注解——数字越小,优先级越高)
问题:有两个增强类 同时 对 一个类方法进行增强
AspectJBook增强类:
@Component
@Aspect
@Order(3)
public class AspectBook {
    。。。。
}
AspectJBook2增强类:
@Component
@Aspect
@Order(1)
public class AspectBook2 {
    //切点表达式
    @Pointcut("execution(* com.gok.aopanno.Book.add(..))")
    public void pointCut(){
    }

    @Before(value = "pointCut()")
    public void before(){
        System.out.println("@Before2。。。");
    }


    @After(value = "pointCut()")
    public void after(){
        System.out.println("@After2。。。");
    }

    @Around(value = "pointCut()")
    public void around(ProceedingJoinPoint proceedingJoinPoint) throws Throwable {
        System.out.println("2环绕之前。。。");

        proceedingJoinPoint.proceed();

        System.out.println("2环绕之后。。。");
    }
}
结果: 优先级高的,前置就越前,后置就越后——重

2.6 AOP操作(Aspect配置文件)—— 基本不用
步骤:创建对象、扫描包、配置切点表达式,及通知(增强)都在配置文件xml中
<!--扫描组件扫描-->
<context:component-scan base-package="com.gok"></context:component-scan>


<!--开启Aop生成代理对象-->
<aop:aspectj-autoproxy></aop:aspectj-autoproxy>

<!--创建对象-->
<bean id="book" class="com.gok.aopanno.Book"></bean>
<bean id="aspectBook" class="com.gok.aopanno.AspectBook"></bean>

<!--配置Aop增强-->
<aop:config>
    <!--定义切点表达式-->
    <aop:pointcut id="cutAllService" expression="execution(* com.gok.service..*.*(..))"/>
    <!--配置切面-->
    <aop:aspect ref="aspectBook">
        <!--增强在具体的方法-->
        <aop:before method="before" pointcut-ref="cutAllService"></aop:before>
        <aop:before method="afterReturning" pointcut-ref="cutAllService"></aop:before>
        <aop:before method="after" pointcut-ref="cutAllService"></aop:before>
    </aop:aspect>
</aop:config>
3.JdbcTemplate(了解)
-
相关依赖
mysql-connector、druid、spring-jdbc、spring-orm、spring-tx
-
开启组件扫描并配置连接池
<!--开启组件扫描--> <context:component-scan base-package="com.gok"></context:component-scan> <!--读取properties配置文件--> <context:property-placeholder location="classpath:db.properties"></context:property-placeholder> <!--配置数据库连接池--> <bean class="com.alibaba.druid.pool.DruidDataSource" id="dataSource" > <property name="driverClassName" value="${mysql.driverClassName}"></property> <property name="url" value="${mysql.url}"></property> <property name="username" value="${mysql.username}"></property> <property name="password" value="${mysql.password}"></property> </bean> -
配置JdbcTemplate对象
<!--配置JdbcTemplate对象,注入DataSource--> <bean class="org.springframework.jdbc.core.JdbcTemplate" id="jdbcTemplate"> <!--注入dataSource--> <property name="dataSource" ref="dataSource"></property> </bean> -
创建service类、创建dao类,在dao中注入jdbcTemplate对象
@Repository(value = "bookDao2") public class BookDaoImpl implements BookDao { //注入JdbcTemplate对象 @Autowired private JdbcTemplate jdbcTemplate; //增删改查操作 jdbcTemplate.update(....); } -
调用JdbcTemplate对象 jdbcTemplate,进行增删改查
4.事务
4.1 概念
事务是数据库操作最基本的单元,逻辑上是一组操作,要么都成功,如果有一个失败,所有操作都失败。
4.2 四个特性
-
原子性
要么都成功,要么都失败
-
一致性
事务执行之前和执行之后都必须处于一致性状态
例如: 小陆和小欧两者的钱一共5000,不管两者如何转账,事务结束之后,两人的钱应该还是5000
-
隔离性
两个事务操作,互不影响
- 不考虑事务的隔离性,会发生的几种问题?
脏读、不可重复读、幻读
- 四种隔离级别
- Serializable (串行化):可避免脏读、不可重复读、幻读的发生。
- Repeatable read (可重复读):可避免脏读、不可重复读的发生。
- Read committed (读已提交):可避免脏读的发生
- Read uncommitted (读未提交):最低级别,任何情况都无法保证
-
持久性
事务一旦被提交,对数据改变就是永久性的
4.3 事务操作
事务添加在JavaEE三层结构里面的Service层(业务逻辑层)
4.3.1 Spring进行事务管理操作
编程式事务管理——基本不用
声明式事务管理——常用
4.3.2 声明式事务管理
进行声明式事务管理,底层使用的是AOP
- 基于注解方式 ——常用
- 基于xml配置文件方式
4.3.3 基于注解声明式事务管理
-
在spring 配置文件中配置事务管理器
<!--开启组件扫描--> <context:component-scan base-package="com.gok"></context:component-scan> <!--读取properties配置文件--> <context:property-placeholder location="classpath:db.properties"></context:property-placeholder> <!--配置数据库连接池--> <bean class="com.alibaba.druid.pool.DruidDataSource" id="dataSource" > <property name="driverClassName" value="${mysql.driverClassName}"></property> <property name="url" value="${mysql.url}"></property> <property name="username" value="${mysql.username}"></property> <property name="password" value="${mysql.password}"></property> </bean> <!--配置JdbcTemplate对象,注入DataSource--> <bean class="org.springframework.jdbc.core.JdbcTemplate" id="jdbcTemplate"> <!--注入dataSource--> <property name="dataSource" ref="dataSource"></property> </bean> <!--配置事务管理器--> <bean class="org.springframework.jdbc.datasource.DataSourceTransactionManager" id="transactionManager"> <property name="dataSource" ref="dataSource"></property> </bean> -
在spring配置文件中,开启事务注解
(1)、在配置文件头 引入名称空间tx
xmlns:tx="http://www.springframework.org/schema/tx
xsi:schemaLocation="http://www.springframework.org/schema/beans http://www.springframework.org/schema/beans/spring-beans.xsd"
(2)、开启事务注解
<!--开启事务注解--> <tx:annotation-driven transaction-manager="transactionManager"></tx:annotation-driven> -
在service类上面(或者service类里面方法上面)添加事务注解
- @Transactional,这个注解可以添加到类上面,也可以添加到方法上面
- 如果这个注解添加在类上面,这个类上的所有方法都添加事务
- 如果这个注解添加在方法上面,则是为这个方法添加事务
@Service @Transactional(propagation = Propagation.REQUIRED) public class UserAccountService { } -
@Transactional,这个注解里面可以配置事务相关参数

propagation:事务传播行为
常用有两种:(假如业务方法add() 和 update())
required: 如果add方法本身有事务,调用update方法之后,update使用当前add方法里面事务
required_new: 如果add方法调用update方法之后,无论add方法是否有事务,都创建新的事务

isolation:事务隔离级别
事务有隔离性,两个事务操作,互不影响
timeout:超时时间
事务在一定时间内进行提交,如果不提交进行回滚
设置的时间是以秒单位进行计算
readOnly:是否只读
读:查询操作 写:添加修改删除操作
= true:只读 ; = false:可以添加修改删除操作
rollbackFor:回滚
设置哪些异常需要回滚
noRollbackFor:不回滚
设置哪些异常不需要回滚
4.3.4 基于xml配置文件声明式事务管理
-
配置事务管理器
-
配置事务参数
-
配置切入点和切面,并开启aop注解
 <!--配置事务管理器-->
<bean class="org.springframework.jdbc.datasource.DataSourceTransactionManager" id="transactionManager">
    <property name="dataSource" ref="dataSource"></property>
</bean>

<!--
    基于xml配置的事务:依赖tx名称空间和aop名称空间
     1、spring中提供事务管理器(切面),配置这个事务管理器
     2、配置出事务方法
     3、告诉spring哪些方法是事务方法(事务切面按照我们的切入点表达式去切入事务方法)
    -->

<!--定义事务通知-->
<tx:advice id="myAdvice" transaction-manager="transactionManager">
    <!--事务的属性-->
    <tx:attributes>
        <!--写入方法:增 删 改-->
        <tx:method name="trans*" propagation="REQUIRED"/>
        <!--查询数据-->
        <tx:method name="select*" propagation="NEVER"/>
        <!--记录交易信息-->
        <tx:method name="save*" propagation="REQUIRED"></tx:method>
    </tx:attributes>
</tx:advice>

<aop:aspectj-autoproxy></aop:aspectj-autoproxy>

<aop:config>
    <!--切点表达式-->
    <aop:pointcut id="pointCut" expression="execution( * com.gok.service..*.*(..))"/>
    <!--事务建议: advice-ref:指向事务管理器的配置-->
    <aop:advisor advice-ref="myAdvice" pointcut-ref="pointCut"></aop:advisor>
</aop:config>
4.3.5 完全注解方式声明式事务管理
-
创建配置类,使用配置类替代xml配置文件
事务配置类:TxConfig
@Configuration //配置类 @ComponentScan(basePackages = "com.gok") //开启组件扫描 @EnableTransactionManagement //开启事务 @PropertySource("classpath:db.properties") public class TxConfig { @Value("${mysql.driverClassName}") private String driverClassName; @Value("${mysql.url}") private String url; @Value("${mysql.username}") private String userName; @Value("${mysql.password}") private String password; //创建连接池 @Bean public DruidDataSource druidDataSource(){ DruidDataSource druidDataSource = new DruidDataSource(); druidDataSource.setDriverClassName(driverClassName); druidDataSource.setUrl(url); druidDataSource.setUsername(userName); druidDataSource.setPassword(password); return druidDataSource; } //创建JdbcTemplate对象 @Bean public JdbcTemplate jdbcTemplate(DruidDataSource druidDataSource){ JdbcTemplate jdbcTemplate = new JdbcTemplate(); jdbcTemplate.setDataSource(druidDataSource); return jdbcTemplate; } //创建事务管理器对象 @Bean public DataSourceTransactionManager dataSourceTransactionManager(DruidDataSource druidDataSource){ DataSourceTransactionManager dataSourceTransactionManager = new DataSourceTransactionManager(); dataSourceTransactionManager.setDataSource(druidDataSource); return dataSourceTransactionManager; } } -
全注解测试
//全注解
@Test
public void testTransfer1(){
    ApplicationContext app = new AnnotationConfigApplicationContext(TxConfig.class);
    UserAccountService userAccount = app.getBean(UserAccountService.class);
    userAccount.transfer("ls","zs",100.0);
}


 1068
1068


 被折叠的 条评论
为什么被折叠?
被折叠的 条评论
为什么被折叠?
 到【灌水乐园】发言


