


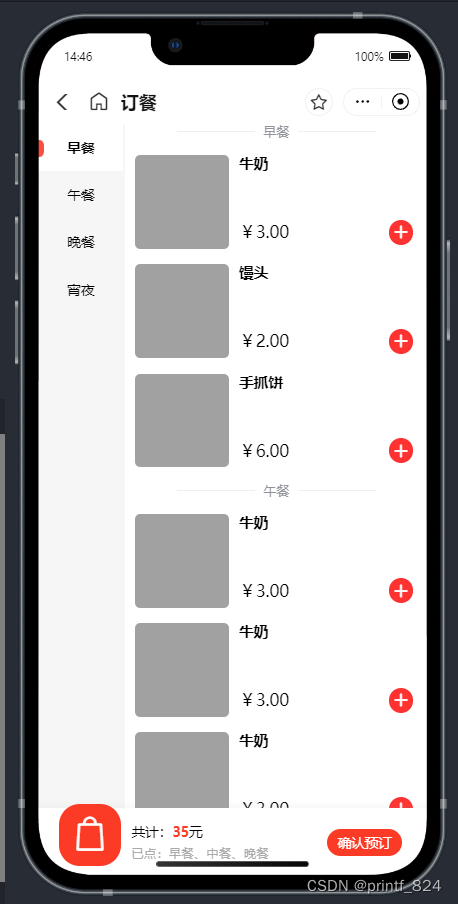
1、实现效果:
下拉有自定义组件(商品卡片、进步器、侧边栏等)源码
2、左右联动功能
使用scroll-view来做右边的菜单页,title的id动态绑定充当锚点
<scroll-view :scroll-into-view="toView" scroll-with-animation="true" class="main" @scroll="scroll" scroll-y>
				<view class="scroll_main">
					<view class="" v-for="(item,index) in list" :id="'type' + index">
						<view :id="'title' + index">
							<u-divider>{{item.meal_name}}</u-divider>
						</view>
						<card v-for="(item2,indax) in item.goods" :data="item2" @change="cardChange"></card>
					</view>
				</view>
			</scroll-view>
侧边栏组件点击事件,返回分类信息,根据分类的id,定位到scroll-view对应的title
<view class="nav">
				<left-nav :data="list" :current="current" @change="navChange"></left-nav>
			</view>
function navChange(e) {
current.value = e
getRightScrollDistance()
}scroll-view属性@scroll用于监听scroll的滚动距离,注意用防抖(我用的是uView里自带的防抖方法),防止nav跳动
获取每个titile距离盒子顶部的距离,用于判断滚动距离是否超出某个分类
onReady(() => {
list.value.forEach((item, index) => {
uni.createSelectorQuery().select('#title' + index).boundingClientRect(data => {
console.log(data);
titleH.value.push(data)
}).exec()
})
})获取“this”:
const {
appContext: {
app: {
config: {
globalProperties
}
}
}
} = getCurrentInstance()/* 菜单滚动监听 */
function scroll(e) {
//防抖
globalProperties.$u.debounce(() => {
console.log(e.detail.scrollTop);
titleH.value.forEach((item, index) => {
if ((e.detail.scrollTop + item.height) > item.top) {
current.value = index
}
})
scrollH.value = e.detail.scrollTop
}, 100)
}3、加入购物车动画
购物车是固定的,我们得给它固定的id以便找到它
<view class="bottom">
<view id="left_icon" class="left_icon" ref="cartBtn" @click="showPop = !showPop">
<u-icon name="bag" size="80" color="#fff"></u-icon>
</view>
<view class="bottom_info">
<view>共计:<text style="font-weight: bold;color: #FB3B26;">{{35}}</text>元</view>
<view>已点:早餐、中餐、晚餐</view>
</view>
<view class="submit">
确认预订
</view>
</view>
</view>定义移动小球的样式,写活它的初始位置
<!-- 小球 -->
<view class="ball" v-if="showAnimation" :animation="animation"
:style="{ top: ballTop + 'px', left: ballLeft + 'px' }">
</view>.ball {
position: absolute;
z-index: 1;
width: 40rpx;
height: 40rpx;
background-color: red;
border-radius: 50%;
}写活“+”号的id,以便我们获取实例
<view v-if="id" class="plus" :id="id" @click="addClick">
<u-icon :name="plusIcon" size="32" color="#ffffff" :customStyle="iconStyle"></u-icon>
</view>用uni.createAnimation()来制作动画,按钮的位置减去购物车的位置等于偏移的位置
/* 动画效果控制 */
function addToCart(item) {
const btn = '#id_' + item.id;
const car = '.left_icon';
console.log('#id_' + item.id);
uni.createSelectorQuery().select(btn).boundingClientRect().exec((rect) => {
const btnRect = rect[0];
const left = btnRect.left;
const top = btnRect.top;
ballTop.value = top;
ballLeft.value = left;
uni.createSelectorQuery().select(car).boundingClientRect().exec((rect) => {
console.log(rect);
const carRect = rect[0];
const x = carRect.left;
const y = carRect.top;
carTop.value = carRect.top;
carLeft.value = carRect.left;
animationData.value = uni.createAnimation()
animationData.value.translate(x - left + 20, y - top).step({
duration: 300,
})
animationTimeout.value
clearTimeout(animationTimeout.value)
animation.value = animationData.value.export()
showAnimation.value = true;
animationTimeout.value = setTimeout(() => {
showAnimation.value = false;
}, 300);
});
});
}4、代码
页面booking.vue
<template>
<view class="booking">
<view class="content">
<view class="nav">
<left-nav :data="list" :current="current" @change="navChange"></left-nav>
</view>
<scroll-view :scroll-into-view="toView" scroll-with-animation="true" class="main" @scroll="scroll" scroll-y>
<view class="scroll_main">
<view class="" v-for="(item,index) in list" :id="'type' + index">
<view :id="'title' + index">
<u-divider>{{item.meal_name}}</u-divider>
</view>
<card v-for="(item2,indax) in item.goods" :data="item2" @change="cardChange"></card>
</view>
</view>
</scroll-view>
</view>
<view class="bottom">
<view id="left_icon" class="left_icon" ref="cartBtn" @click="showPop = !showPop">
<u-icon name="bag" size="80" color="#fff"></u-icon>
</view>
<view class="bottom_info">
<view>共计:<text style="font-weight: bold;color: #FB3B26;">{{35}}</text>元</view>
<view>已点:早餐、中餐、晚餐</view>
</view>
<view class="submit">
确认预订
</view>
</view>
</view>
<!-- 弹出层 -->
<u-popup v-model="showPop" mode="bottom" border-radius="20" closeable z-index="1">
<scroll-view class="pop_main" scroll-y>
<view class="pop_title">
已选菜品
</view>
<view class="scroll_main">
<view class="" v-for="(item,index) in list" :id="'type' + index">
<view :id="'title' + index">
<u-divider>{{item.meal_name}}</u-divider>
</view>
<card v-for="(item2,indax) in item.goods" :data="item2" @change="cardChange" :isAdd="false"></card>
</view>
</view>
</scroll-view>
</u-popup>
<!-- 小球 -->
<view class="ball" v-if="showAnimation" :animation="animation"
:style="{ top: ballTop + 'px', left: ballLeft + 'px' }">
</view>
</template>
<script setup>
import leftNav from "@/components/booking/nav.vue"
import card from "@/components/booking/card.vue"
import {
mockData
} from "../binding/mock.js"
import {
getCurrentInstance,
ref
} from "vue";
import {
onLoad,
onReady
} from '@dcloudio/uni-app';
onLoad(e => {
mock.value = mockData
list.value = mock.value.data.datas
console.log(list.value);
})
onReady(() => {
list.value.forEach((item, index) => {
uni.createSelectorQuery().select('#title' + index).boundingClientRect(data => {
console.log(data);
titleH.value.push(data)
}).exec()
})
})
const showPop = ref(false)
const animationData = ref()
const animation = ref()
const animationTimeout = ref()
const titleH = ref([])
const scrollH = ref(0)
const toView = ref("")
const current = ref(0)
const mock = ref()
const list = ref([{}])
let ballTop = ref(0);
let ballLeft = ref(0);
let carTop = ref(0);
let carLeft = ref(0);
const showAnimation = ref(false);
const {
appContext: {
app: {
config: {
globalProperties
}
}
}
} = getCurrentInstance()
/* 菜单滚动监听 */
function scroll(e) {
//防抖
globalProperties.$u.debounce(() => {
console.log(e.detail.scrollTop);
titleH.value.forEach((item, index) => {
if ((e.detail.scrollTop + item.height) > item.top) {
current.value = index
}
})
scrollH.value = e.detail.scrollTop
}, 100)
}
function cardChange(e) {
addToCart(e)
}
function navChange(e) {
		current.value = e
		getRightScrollDistance()
	}
function getRightScrollDistance() {
toView.value = "title" + current.value;
}
/* 动画效果控制 */
function addToCart(item) {
const btn = '#id_' + item.id;
const car = '.left_icon';
console.log('#id_' + item.id);
uni.createSelectorQuery().select(btn).boundingClientRect().exec((rect) => {
const btnRect = rect[0];
const left = btnRect.left;
const top = btnRect.top;
ballTop.value = top;
ballLeft.value = left;
uni.createSelectorQuery().select(car).boundingClientRect().exec((rect) => {
console.log(rect);
const carRect = rect[0];
const x = carRect.left;
const y = carRect.top;
carTop.value = carRect.top;
carLeft.value = carRect.left;
animationData.value = uni.createAnimation()
animationData.value.translate(x - left + 20, y - top).step({
duration: 300,
})
animationTimeout.value
clearTimeout(animationTimeout.value)
animation.value = animationData.value.export()
showAnimation.value = true;
animationTimeout.value = setTimeout(() => {
showAnimation.value = false;
}, 300);
});
});
}
</script>
<style lang="scss" scoped>
page {
background-color: #fff;
}
.content {
min-height: 100vh;
display: flex;
.nav {
flex: 1;
min-width: 164rpx;
background-color: #F6F6F6;
}
.main {
flex: 3.5;
height: 100vh;
background-color: #fff;
.scroll_main {
padding-bottom: 150rpx;
}
}
}
.bottom {
position: absolute;
z-index: 2;
bottom: 0;
width: 750rpx;
height: 132rpx;
background: #FFFFFF;
box-shadow: 0rpx -2rpx 16rpx 2rpx rgba(164, 164, 164, 0.11);
border-radius: 0rpx 0rpx 0rpx 0rpx;
display: flex;
justify-content: space-between;
align-items: center;
.bottom_info {
flex: 1;
margin: 0 20rpx;
font-size: 26rpx;
line-height: 40rpx;
&>view:nth-child(2) {
font-size: 24rpx;
color: #aaa;
}
}
.submit {
color: #FFFFFF;
padding: 10rpx 20rpx;
background-color: #FB3B26;
font-size: 26rpx;
border-radius: 30rpx;
margin-right: 50rpx;
}
#left_icon {
margin-top: -30rpx;
margin-left: 40rpx;
width: 120rpx;
height: 120rpx;
background: #FB3B26;
border-radius: 40rpx;
line-height: 150rpx;
text-align: center;
}
}
.ball {
		position: absolute;
		z-index: 1;
		width: 40rpx;
		height: 40rpx;
		background-color: red;
		border-radius: 50%;
	}
.pop_main {
position: relative;
max-height: 60vh;
padding-top: 100rpx;
padding-bottom: 150rpx;
&>.pop_title {
text-align: center;
width: 100vw;
height: 100rpx;
font-size: 32rpx;
font-weight: bold;
position: fixed;
top: 0;
z-index: 1;
background-color: #fff;
line-height: 100rpx;
text-align: center;
}
}
</style>
侧边栏组件nav.vue
<template>
<view class="nav_main">
<view v-for="(item,index) in data" :class="{'tool-box':true,'item':true,'item_act':current==index}"
@click="change(index)">
{{item.meal_name}}
</view>
</view>
</template>
<script setup>
const emit = defineEmits(['change'])
const props = defineProps({
data: {
type: Array,
default: () => ([])
},
current: {
type: Number,
default: () => (0)
},
});
function change(index) {
emit('change', index) // 当前值 + 进步值
}
</script>
<style scoped lang="scss">
.nav_main {
position: fixed;
}
.item {
width: 164rpx;
text-align: center;
padding: 30rpx 0;
font-size: 26rpx;
color: #000000;
font-weight: 400;
position: relative;
}
.item_act {
background-color: #fff;
font-size: 26rpx;
font-weight: 700;
&::before {
content: "";
display: inline-block;
width: 12rpx;
height: 34rpx;
background: #FC4E3E;
border-radius: 0rpx 30rpx 30rpx 0rpx;
position: absolute;
left: 0;
}
}
</style>
商品卡片组件card.vue
<template>
<view class="card_body">
<view class="image">
</view>
<view class="foods_info">
<view>{{data.name}}</view>
<view></view>
<view>
<view class="">
¥{{data.price}}
</view>
<counter v-if="isAdd" :id="'id_' + data.id" :number="data.number ?? 0" @change-click="change"></counter>
</view>
</view>
</view>
</template>
<script setup>
import counter from "@/components/booking/counter.vue"
const emit = defineEmits(['change'])
const props = defineProps({
data: {
type: Object,
default: () => ({})
},
isAdd: {
type: Boolean,
default: () => true
}
});
function change(e) {
let obj = props.data
obj.number = e
console.log(obj);
emit('change', obj)
}
</script>
<style scoped lang="scss">
.card_body {
display: flex;
margin: 30rpx 20rpx;
.image {
width: 180rpx;
height: 180rpx;
background-color: #a1a1a1;
border-radius: 10rpx;
margin-right: 20rpx;
}
.foods_info {
display: flex;
flex-direction: column;
justify-content: space-between;
flex: 1;
&>view:nth-child(1) {
font-weight: 700;
font-size: 28rpx;
color: #000000;
}
&>view:nth-child(3) {
display: flex;
align-items: center;
font-weight: 400;
font-size: 32rpx;
color: #000000;
justify-content: space-between;
}
}
}
</style>
进步器组件counter.vue
<template>
<view class="counter">
<u-icon v-if="number>0" :name="reduceIcon" size="60" color="#8E8E8E" @click="reduceClick"></u-icon>
<input v-if="number>0" type="number" :value="number" @blur="inputBlurEvent" @input="inputChangeEvent"
:disabled="disabled">
<view v-if="id" class="plus" :id="id" @click="addClick">
			<u-icon :name="plusIcon" size="32" color="#ffffff" :customStyle="iconStyle"></u-icon>
		</view>
</view>
</template>
<script setup>
import {
ref,
reactive,
computed,
nextTick
} from "vue";
const props = defineProps({
id: {
type: String,
default: ""
},
disabled: {
type: Number,
default: false
},
number: {
type: Number,
default: 0
},
maxNumber: {
type: Number,
default: 99999
},
minNumber: {
type: Number,
default: 0
},
progressValue: {
type: Number,
default: 1
},
reduceIcon: {
type: String,
default: "minus-circle"
},
plusIcon: {
type: String,
default: "plus"
}
})
const temp = computed(() => {
return props.number
})
const iconStyle = reactive({
fontWeight: 'blod'
})
const emit = defineEmits(['change-click'])
// 加
function addClick(ev) {
emit('change-click', props.number + props.progressValue) // 当前值 + 进步值
}
// 减
function reduceClick() {
if (props.number <= props.minNumber) {
console.log("不能继续减少啦 ~");
return;
}
if ((props.number - props.progressValue) < props.minNumber) {
console.log("不能继续减少");
return;
}
// 3、执行 减操作
emit('change-click', props.number - props.progressValue)
}
function inputBlurEvent(e) {
let number = parseInt(e.detail.value)
if (isNaN(number) || number === 0) {
emit('change-click', 0)
return;
}
// 条件:输入数不为进步值的倍数,则往前取成倍数值
let multipie = Math.ceil(number / props.progressValue) // 获取倍数
number = multipie * props.progressValue // 向上获取最近的倍数
if (number > props.maxNumber) {
number = props.maxNumber
emit('change-click', number)
} else if (number <= props.minNumber) {
emit('change-click', props.minNumber)
} else {
emit('change-click', number)
}
}
function inputChangeEvent(e) {
// 限制输入在最大与最小值之间
// 注意:因为都是赋值最大或最小值,所以会出现值复用无法重新渲染页面的情况(第一次能重新渲染,之后的都不渲染):已解决
let number = parseInt(e.detail.value)
if (isNaN(number) || number === 0) {
// 为空为0
return
}
if (number > props.maxNumber) {
emit('change-click', props.maxNumber)
} else if (number <= props.minNumber) {
emit('change-click', props.minNumber)
} else {
emit('change-click', number)
}
}
</script>
<style lang="scss" scoped>
.counter {
display: flex;
align-items: center;
&>input {
width: 2em;
font-size: 28rpx;
font-family: Source Han Sans CN-Bold, Source Han Sans CN;
font-weight: bold;
color: #000000;
flex: 1;
text-align: center;
}
.plus {
margin: 8rpx;
width: 48rpx;
height: 48rpx;
border-radius: 50%;
background: #FF3232;
display: flex;
justify-content: center;
align-items: center;
&>image {
width: 32rpx;
height: 30rpx;
margin-right: 5rpx;
}
}
}
</style>
模拟数据mock.js
const mockData = {
	"code": 200,
	"msg": "",
	"data": {
		"datas": [{
				"meal_id": 5,
				"meal_name": "早餐",
				"meal_type": 1,
				"goods": [{
						"id": 4,
						"name": "牛奶",
						"price": "3.00",
						"img": ""
					},
					{
						"id": 5,
						"name": "馒头",
						"price": "2.00",
						"img": "http://192.168.1.23:9508/campus_pay_resource/goods/f82315767e959b536f64b0a199f99eb5.png"
					},
					{
						"id": 6,
						"name": "手抓饼",
						"price": "6.00",
						"img": "http://192.168.1.23:9508/campus_pay_resource/goods/9370838db9f50a2e950070995975e3b7.png"
					}
				]
			},
			{
				"meal_id": 5,
				"meal_name": "午餐",
				"meal_type": 1,
				"goods": [{
						"id": 7,
						"name": "牛奶",
						"price": "3.00",
						"img": ""
					},
					{
						"id": 8,
						"name": "牛奶",
						"price": "3.00",
						"img": ""
					},
					{
						"id": 9,
						"name": "牛奶",
						"price": "3.00",
						"img": ""
					},
					{
						"id": 10,
						"name": "牛奶",
						"price": "3.00",
						"img": ""
					},
					{
						"id": 11,
						"name": "牛奶",
						"price": "3.00",
						"img": ""
					},
					{
						"id": 12,
						"name": "牛奶",
						"price": "3.00",
						"img": ""
					},
					{
						"id": 13,
						"name": "牛奶",
						"price": "3.00",
						"img": ""
					},
					{
						"id": 14,
						"name": "牛奶",
						"price": "3.00",
						"img": ""
					},
					{
						"id": 15,
						"name": "牛奶",
						"price": "3.00",
						"img": ""
					},
					{
						"id": 16,
						"name": "牛奶",
						"price": "3.00",
						"img": ""
					},
					{
						"id": 17,
						"name": "牛奶",
						"price": "3.00",
						"img": ""
					},
					{
						"id": 18,
						"name": "牛奶",
						"price": "3.00",
						"img": ""
					},
					{
						"id": 19,
						"name": "馒头",
						"price": "2.00",
						"img": "http://192.168.1.23:9508/campus_pay_resource/goods/f82315767e959b536f64b0a199f99eb5.png"
					},
					{
						"id": 20,
						"name": "手抓饼",
						"price": "6.00",
						"img": "http://192.168.1.23:9508/campus_pay_resource/goods/9370838db9f50a2e950070995975e3b7.png"
					}
				]
			},
			{
				"meal_id": 5,
				"meal_name": "晚餐",
				"meal_type": 1,
				"goods": [{
						"id": 21,
						"name": "牛奶",
						"price": "3.00",
						"img": ""
					},
					{
						"id": 22,
						"name": "馒头",
						"price": "2.00",
						"img": "http://192.168.1.23:9508/campus_pay_resource/goods/f82315767e959b536f64b0a199f99eb5.png"
					},
					{
						"id": 23,
						"name": "手抓饼",
						"price": "6.00",
						"img": "http://192.168.1.23:9508/campus_pay_resource/goods/9370838db9f50a2e950070995975e3b7.png"
					}
				]
			},
			{
				"meal_id": 5,
				"meal_name": "宵夜",
				"meal_type": 1,
				"goods": [{
						"id": 24,
						"name": "牛奶",
						"price": "3.00",
						"img": ""
					},
					{
						"id": 25,
						"name": "馒头",
						"price": "2.00",
						"img": "http://192.168.1.23:9508/campus_pay_resource/goods/f82315767e959b536f64b0a199f99eb5.png"
					},
					{
						"id": 26,
						"name": "手抓饼",
						"price": "6.00",
						"img": "http://192.168.1.23:9508/campus_pay_resource/goods/9370838db9f50a2e950070995975e3b7.png"
					}
				]
			}
		],
		"school_name": "测试学校"
	}
}

export {
	mockData
}


 5835
5835


 被折叠的 条评论
为什么被折叠?
被折叠的 条评论
为什么被折叠?
 到【灌水乐园】发言


