


1.CSS初始化
<style>
    /* 清除浏览器默认格式 */
    *{margin:0;padding:0}
    /* 斜体文字不倾斜 */
    em,i{font-style:normal}
    /* 去掉li的小圆点 */
    li{list-style:none}

    img{
        /* 照顾低版本浏览器,如果图片外面包含链接,会出现边框 */
        border:0;
        /* 取消图片底部与边框产生的缝隙 */
        vertical-align:middle}
        /* 鼠标样式,小手 */
    button{cursor:pointer}
    /* 取消下划线更改默认颜色 */
    a{color:#666;text-decoration:none}
    /* 鼠标经过变颜色 */
    a:hover{color:#c81623}
    button,input{font-family:Microsoft YaHei,Heiti SC,tahoma,arial,Hiragino Sans GB,"\5B8B\4F53",sans-serif}
    body{
        /* 文字放大会产生锯齿,这个是抗锯齿的 */
        -webkit-font-smoothing:antialiased;
        background-color:#fff;font:12px/1.5 Microsoft YaHei,Heiti SC,tahoma,arial,Hiragino Sans GB,"\5B8B\4F53",sans-serif;
        color:#666}
    .hide,.none{display:none}
    /* 清除浮动 */
    .clearfix:after{visibility:hidden;clear:both;display:block;content:".";height:0;}
    .clearfix{*zoom:1}
</style>
上面的只是京东的初始化,全部的有位博主总结的很好:
CSS初始化
2.文字环绕浮动
类似这种的,一般来写估计就是左右两个div,加上左浮动,右边还得多写一个span,单独更改一下最下面文字格式。
但是文字环绕浮动,就是用图片直接把文字“挤”到别的空白区域,可以少些几行代码:
<style>
div{
width: 200px;
height: 100px;
border:1px solid pink;
margin:auto;
}
div img{
float: left;
width: 100px;
margin-right:15px;
}
div span{
display: block;
margin:15px;
}
</style>
<body>
<!-- 注意,文字的做左间距只能通过图片的右间距去调节 -->
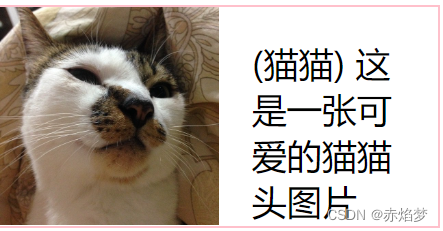
<div><img src="img/1 (5).jpg"><span>(猫猫) 这是一张可爱的猫猫头图片</span></div>
</body>
3.三角强化应用 — 案例:京东价格标签

视频比较早了,京东网站这个标签一时间我还找不到了
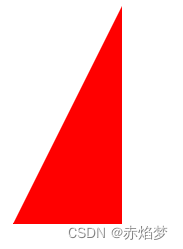
就是这个小三角比较难搞:
<style>
    .box1{
        width: 0;
        height: 0;
        /* border-top:100px solid transparent;
        border-right:50px solid skyblue ;
        border-bottom: 0 solid blue;
        border-left:0 solid green; */

        /* 简写: */
        border-color: transparent red transparent transparent;
        border-style:solid;
        border-width:100px 50px 0 0;
    }
    .price{
        width: 160px;
        height: 24px;
        border:1px solid red;
        margin:0 auto;
    }
    .ms{
        position: relative;
        width: 90px;height: 100%;
        float: left;
    text-align: center;
        background-color: red;
        color:#fff;
        font-weight: 700;
       margin-right: 10px;
    }
.ms i{
    position: absolute;
    right:0; top:0;
    width: 0; height: 0;
    border-color: transparent #fff transparent transparent;
    border-style: solid;
border-width: 24px 10px 0 0;
}
.os{
    font-size: 12px;
    color:gray;
    text-decoration: line-through;
}
</style>
<body>
    <div class="box1"></div>
        <div class="price">
            <span class="ms">1650
                <i></i>
            </span>
            <span class="os">¥6666</span>

    </div>

</body>
4.H5新增的属性选择器
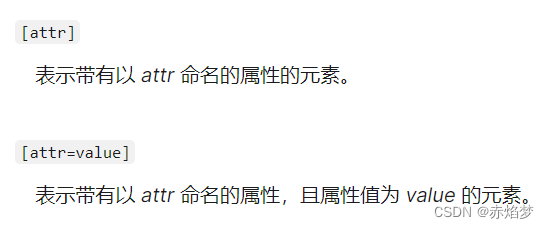

上面这五种比较常用
举个例子哦:
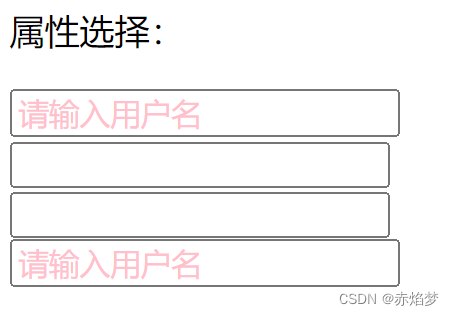
    <p>属性选择:</p>
    <input type="text" value="请输入用户名"> <br/>
    <input type="text"><br/>
    <input type="text"><br/>
    <input type="text" value="请输入用户名"> <br/>
/* 如果属性唯一,可快速选出 */
input[value]{
    color:red;
    font-size: 14px;
}
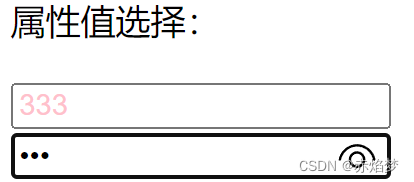
  <p>属性值选择:</p>
    <input type="text"><br/>
    <input type="password">
/* 注意,这种选择器必须前后紧挨着input[ */
input[type=text]{
    color:pink;
}
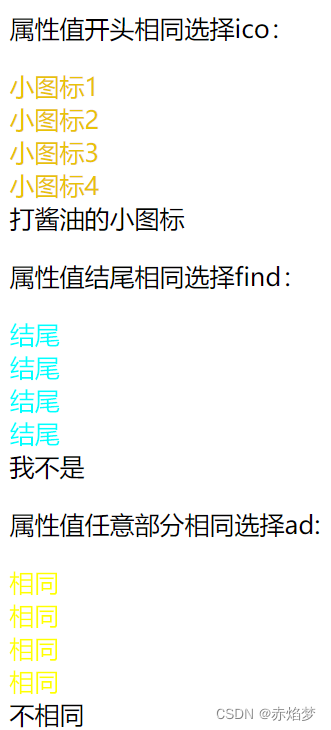
 <P>属性值开头相同选择ico:</P>
    <div class="icon1">小图标1</div>
    <div class="icon2">小图标2</div>
    <div class="icon3">小图标3</div>
    <div class="icon4">小图标4</div>
    <div class="ifcon4">打酱油的小图标</div>

    <p>属性值结尾相同选择find:</p>
    <div class="_find">结尾</div>
    <div class="_find">结尾</div>
    <div class="_find">结尾</div>
    <div class="_find">结尾</div>
    <div class="_finding">我不是</div>

    <p>属性值任意部分相同选择ad:</p>
    <div class="fad_">相同</div>
    <div class="ad_g">相同</div>
    <div class="had_">相同</div>
    <div class="ad_j">相同</div>
    <div class="akd_">不相同</div>
div[class^=icon]{
    color:rgb(233, 195, 6);
}
div[class$=find]{
    color:aqua;
}
div[class*=ad]{
    color:yellow;
}
5.nth-child和nth-of-type的区别
全网最详细的nth-child和:nth-of-type的区别(特别是nth-of-type)
下面的看不懂,可以去上面的链接去看,那个博主写的更清晰
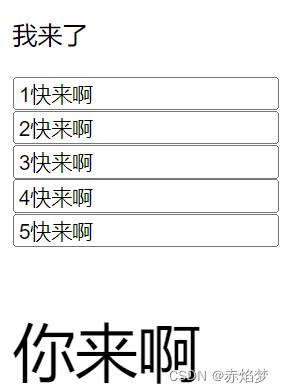
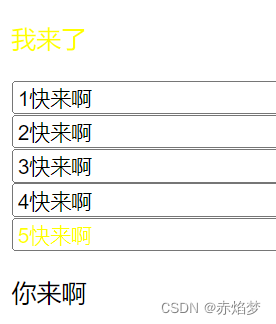
<p>我来了</p>
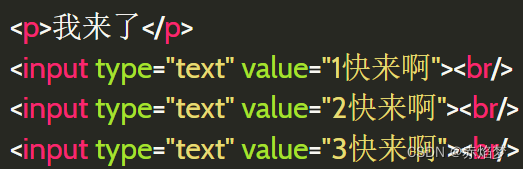
<input type="text" value="1快来啊"><br/>
<input type="text" value="2快来啊"><br/>
<input type="text" value="3快来啊"><br/>
<input type="text" value="4快来啊"><br/>
<input type="text" value="5快来啊"><br/>
<p>你来啊</p>
  p:nth-child(1){
        color:yellow;
    }
    input:nth-of-type(5){
        color:aqua
    }
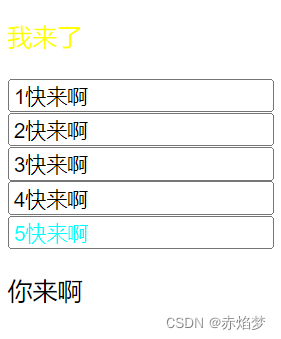
现在这种是正常的。
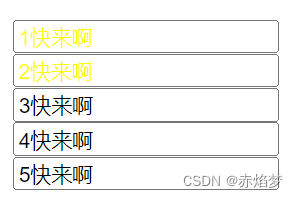
  p:nth-child(2){
        color:yellow;
    }
    p:nth-of-type(2){
        font-size: 40px;
    }
尝试同时选中第二个p标签,但是,很明显,child失败了:
然后,我尝试选中第二个input,但是实际上选中的是第一个:
  input:nth-child(2){
        color:yellow;
    }

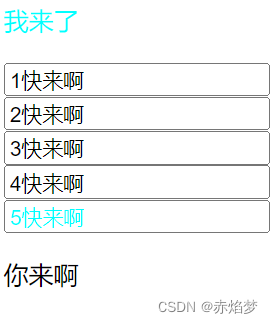
再次尝试:
 input:nth-child(2){
        color:yellow;
    }
    input:nth-child(3){
        color:yellow;
    }
    input:nth-child(4){
        color:yellow;
    }
这次选中了234,但是只有12被改变:
通过f12,我搞明白了,child(4)对应的是第2个,chid(2)对应的是第一个。
因为p标签对应的是chid(1) br标签对应的是child(3)
chid会把不同标签一起排序,按照序列去找:

然后再看前面限制的范围:input,因此,只有12变颜色
相对来说,nth-of-type要更加精确,更加好用一点:
 input:nth-of-type(5){
        color:aqua
    }
    p:nth-of-type(1){
        color:aqua;
    }
对比:实现相同效果,用nth-chid会更麻烦:
 p:nth-child(1){
        color:yellow;
    }
 input:nth-child(10){
        color:yellow;
    }
nth-child(n) : 匹配父元素中的第 n 个子元素,元素类型没有限制。
nth-of-type(n) : 匹配同类型中的第n个同级兄弟元素。
n可以是一个数字,一个关键字,或者一个公式,比如:nth-child(odd) 奇数 ,nth-child(even) 偶数。
nth-child和nth-of-type的不同之处就是查找元素的方式不同。前者是查找兄弟元素中某个绝对位置的元素,后者是查找同类型元素中某个绝对位置的元素。相同之处是,两者都是找到元素之后再与前面的选择符进行匹配,这里的匹配方式是一样的。
:nth-child和:nth-of-type都是找对应元素父元素内子元素(仅包含当前父元素子元素不包含子元素的子元素),然后区别在于:nth-child是找出包含对应元素父元素内所有的子元素然后再去找到对应位置的元素后再去匹配选择器,nth-of-type是找出包含对应元素父元素内的子元素,然后根据样式选择器找到的元素的tag,把父元素内子元素所有对应tag种类分别取出排列后,分别比对对应的位置然后匹配选择器


 3225
3225


 被折叠的 条评论
为什么被折叠?
被折叠的 条评论
为什么被折叠?
 到【灌水乐园】发言


