


常用控件的使用方法
TextView
理论
| 属性 | 含义 | 用法 |
|---|---|---|
android:id | 唯一标识符 | \ |
android:layout_width | 控件宽度 | match_parent:让当前控件的大小和父布局的一样; wrap_content:让当前控件的大小正好适配里面的内容; |
android:layout_height | 空间高度 | 固定值:单位用dp能保证不同分辨率效果下屏幕显示效果尽量一致(与上栏用法相同) |
android:gravity | 文字对齐方式 | center、top、bottom、start、end(字面意思) |
android:textColor | 文字颜色 | #000000,六位16进制数字表示 |
android:textSize | 文字大小 | 单位用sp能在用户调整文字大小的时候跟随调整 |
android:text | 文字内容 | \ |
实践
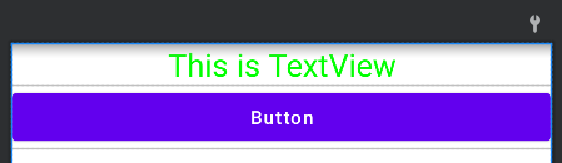
<TextView
    android:id="@+id/textView"
    android:layout_width="match_parent"
    android:layout_height="wrap_content"
    android:gravity="center"
    android:textColor="#00ff00"
    android:textSize="24sp"
    android:text="This is TextView"
    />

Button
理论
大部分与TextView相同。
Button中默认显示出来的字母都是大写,如果不需要,则加上:android:textAllCaps="false"
实践
<Button
    android:layout_width="match_parent"
    android:layout_height="wrap_content"
    android:text="Button"
    android:textAllCaps="false"
    />
点击事件监听器
函数式API方式
class MainActivity : AppCompatActivity() {

    private lateinit var binding: ActivityMainBinding

    override fun onCreate(savedInstanceState: Bundle?) {
        super.onCreate(savedInstanceState)

        binding = ActivityMainBinding.inflate(layoutInflater)
        setContentView(binding.root)

        binding.button.setOnClickListener {

        }

    }
}

补充:这里使用了ViewBinding
实现接口方式
class MainActivity : AppCompatActivity(),View.OnClickListener {

    private  lateinit var binding: ActivityMainBinding

    override fun onCreate(savedInstanceState: Bundle?) {
        super.onCreate(savedInstanceState)

        binding = ActivityMainBinding.inflate(layoutInflater)
        setContentView(binding.root)

        binding.button.setOnClickListener(this)

    }

    override fun onClick(v: View?) {
        when(v?.id){
            R.id.button -> {

            }
        }
    }

}

EditText
理论
| 属性 | 含义 | 用法 |
|---|---|---|
android:hint | 输入提示字 | 提示性文本,当用户需要输入的时候,文字自动消失 |
android:maxLines | 最大行数 | 当输入内容超过规定的最大行数时就向上滚动,不会继续拉伸 |
实践
<EditText
    android:id="@+id/editText"
    android:layout_width="match_parent"
    android:layout_height="wrap_content"
    android:hint="Type something here"
    android:maxLines="2"
    />

获取输入功能
class MainActivity : AppCompatActivity(),View.OnClickListener {

    private  lateinit var binding: ActivityMainBinding

    override fun onCreate(savedInstanceState: Bundle?) {
        super.onCreate(savedInstanceState)

        binding = ActivityMainBinding.inflate(layoutInflater)
        setContentView(binding.root)

        binding.button.setOnClickListener(this)

    }

    override fun onClick(v: View?) {
        when(v?.id){
            R.id.button -> {
                val inputText = binding.editText.text.toString()
                Toast.makeText(this, inputText, Toast.LENGTH_SHORT).show()
            }
        }
    }

}

ImageView
由于现在主流手机屏幕的分辨率都是xxhdpi,所以再res目录下再新建一个drawable-xxhdpi的目录用于存放图片。
放入图片
<ImageView
    android:id="@+id/imageView"
    android:layout_width="wrap_content"
    android:layout_height="wrap_content"
    android:src="@drawable/apple_pic"
    />

改变图片
override fun onClick(v: View?) {
    when(v?.id){
        R.id.button -> {
            binding.imageView.setImageResource(R.drawable.banana_pic)
        }
    }
}
这样在点击button后,苹果就会变为香蕉

ProgressBar
圆形进度条
放入进度条
<ProgressBar
    android:id="@+id/progressBar"
    android:layout_width="match_parent"
    android:layout_height="wrap_content"
    />

消失和出现
实现点击button后进度条消失,再点击后进度条出现。
override fun onClick(v: View?) {
    when(v?.id){
        R.id.button -> {
            if(binding.progressBar.visibility == View.VISIBLE){
                binding.progressBar.visibility = View.GONE
            }else{
                binding.progressBar.visibility = View.VISIBLE
            }
        }
    }
}
水平进度条
activity_main.xml
<ProgressBar
    android:id="@+id/progressBar"
    android:layout_width="match_parent"
    android:layout_height="wrap_content"
    style="?android:attr/progressBarStyleHorizontal"
    android:max="100"
    />
MainActivity
override fun onClick(v: View?) {
    when(v?.id){
        R.id.button -> {
            binding.progressBar.progress = binding.progressBar.progress + 10
        }
    }
}

每点击一次,进度就会增加
1
/
10
1/10
1/10。
AlertDialog
override fun onClick(v: View?) {
    when(v?.id){
        R.id.button -> {
            AlertDialog.Builder(this).apply {
                setTitle("This is Dialog")
                setMessage("Something important")
                setCancelable(false)
                setPositiveButton("OK"){dialog,which -> }
                setNegativeButton("Cancel"){dialog,which -> }
                show()
            }
        }
    }
}

基本布局
LinearLayout
LinearLayout又称作线性布局,这个布局会将它所包含的控件在线性方向上依次排列。
布局的方向
horizontal:水平方向vertical:竖直方向


控件的排列
- 因为当前布局的排列方向为
horizontal,所以layout_gravity只能指定垂直方向上的排列方向

控件大小比例


RelativeLayout
RelativeLayout又称作相对布局,它可以通过相对定位的方式让控件出现在布局的任何位置。
相对于父布局进行定位
<?xml version="1.0" encoding="utf-8"?>
<RelativeLayout xmlns:android="http://schemas.android.com/apk/res/android"
    android:layout_width="match_parent"
    android:layout_height="match_parent"
    >
    <Button
        android:layout_width="wrap_content"
        android:layout_height="wrap_content"
        android:layout_alignParentLeft="true"
        android:layout_alignParentTop="true"
        android:text="button 1"
        />

    <Button
        android:layout_width="wrap_content"
        android:layout_height="wrap_content"
        android:layout_alignParentRight="true"
        android:layout_alignParentTop="true"
        android:text="button 2"
        />

    <Button
        android:layout_width="wrap_content"
        android:layout_height="wrap_content"
        android:layout_centerInParent="true"
        android:text="button 3"
        />

    <Button
        android:layout_width="wrap_content"
        android:layout_height="wrap_content"
        android:layout_alignParentLeft="true"
        android:layout_alignParentBottom="true"
        android:text="button 4"
        />

    <Button
        android:layout_width="wrap_content"
        android:layout_height="wrap_content"
        android:layout_alignParentRight="true"
        android:layout_alignParentBottom="true"
        android:text="button 5"
        />

</RelativeLayout>

相对于控件进行定位
注意:当控件a要去引用控件b时,控件b要定义在控件a前面
<?xml version="1.0" encoding="utf-8"?>
<RelativeLayout xmlns:android="http://schemas.android.com/apk/res/android"
    android:layout_width="match_parent"
    android:layout_height="match_parent"
    >

    <Button
        android:id="@+id/button3"
        android:layout_width="wrap_content"
        android:layout_height="wrap_content"
        android:layout_centerInParent="true"
        android:text="button 3"
        />

    <Button
        android:id="@+id/button1"
        android:layout_width="wrap_content"
        android:layout_height="wrap_content"
        android:layout_above="@id/button3"
        android:layout_toLeftOf="@id/button3"
        android:text="button 1"
        />

    <Button
        android:id="@+id/button2"
        android:layout_width="wrap_content"
        android:layout_height="wrap_content"
        android:layout_above="@id/button3"
        android:layout_toRightOf="@id/button3"
        android:text="button 2"
        />

    <Button
        android:id="@+id/button4"
        android:layout_width="wrap_content"
        android:layout_height="wrap_content"
        android:layout_below="@id/button3"
        android:layout_toLeftOf="@id/button3"
        android:text="button 4"
        />

    <Button
        android:id="@+id/button5"
        android:layout_width="wrap_content"
        android:layout_height="wrap_content"
        android:layout_below="@id/button3"
        android:layout_toRightOf="@id/button3"
        android:text="button 5"
        />

</RelativeLayout>

FrameLayout
FrameLayout又称作帧布局,这种布局没有丰富的定位方式,所有的控件都会默认摆放在布局的左上角。

因为Button是在TextView之后添加的,所以按钮在文字的上面。

自定义控件
引入布局
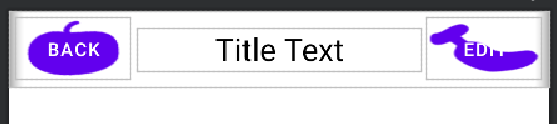
尝试定义一个标题栏布局 title.xml
<?xml version="1.0" encoding="utf-8"?>
<LinearLayout xmlns:android="http://schemas.android.com/apk/res/android"
    xmlns:app="http://schemas.android.com/apk/res-auto"
    xmlns:tools="http://schemas.android.com/tools"
    android:layout_width="match_parent"
    tools:viewBindingIgnore="true"
    android:layout_height="wrap_content">

    <Button
        android:id="@+id/titleBack"
        android:layout_width="wrap_content"
        android:layout_height="wrap_content"
        android:layout_gravity="center"
        android:layout_margin="5dp"
        android:background="@drawable/apple_pic"
        android:text="Back"
        android:textColor="#fff"
        />

    <TextView
        android:id="@+id/titleText"
        android:layout_width="0dp"
        android:layout_height="wrap_content"
        android:layout_gravity="center"
        android:layout_weight="1"
        android:gravity="center"
        android:text="Title Text"
        android:textColor="#000"
        android:textSize="24sp"
        />

    <Button
        android:id="@+id/titleEdit"
        android:layout_width="wrap_content"
        android:layout_height="wrap_content"
        android:layout_gravity="center"
        android:layout_margin="5dp"
        android:background="@drawable/banana_pic"
        android:text="Edit"
        android:textColor="#fff"
        />

</LinearLayout>
在activity_main.xml中使用

注意在MainActivity中将系统自带的标题栏隐藏
supportActionBar?.hide()
这样重复使用这个标题的时候就可以大大减少代码量
创建自定义控件
新建TitleLayout继承自LinearLayout,让它成为自定义的标题栏控件
class TitleLayout(context: Context, attrs: AttributeSet) :
    LinearLayout(context,attrs) {

    init {
        LayoutInflater.from(context).inflate(R.layout.title,this)
        val titleBack = findViewById<Button>(R.id.titleBack)
        val titleEdit = findViewById<Button>(R.id.titleEdit)
        titleBack.setOnClickListener {
            val activity = context as Activity
            activity.finish()
        }
        titleEdit.setOnClickListener {
            Toast.makeText(context, "You clicked Edit button", Toast.LENGTH_SHORT).show()
        }
    }

}
注意这里没有使用 viewBinding
然后在布局文件中添加这个自定义控件
<com.example.uiwidgettest.TitleLayout
    android:id="@+id/titlelayout"
    android:layout_width="match_parent"
    android:layout_height="67dp"
    />

ListView
简单用法
class MainActivity : AppCompatActivity() {
    private  lateinit var binding: ActivityMainBinding

    private val data = listOf("Apple","Banana","Orange","Watermelon","Pear",
        "Grape","Pineapple","Strawberry","Cherry","Mango","Apple","Banana",
        "Orange","Watermelon","Pear","Grape","Pineapple","Strawberry","Cherry","Mango")

    override fun onCreate(savedInstanceState: Bundle?) {
        super.onCreate(savedInstanceState)

        binding = ActivityMainBinding.inflate(layoutInflater)
        setContentView(binding.root)

        val adapter = ArrayAdapter<String>(this,android.R.layout.simple_list_item_1,data)
        binding.listView.adapter = adapter
    }
}
可以滚动的list

定制ListView界面
定义实体类fruit
class Fruit(val name: String,val imageId: Int) {
}
在layout目录下新建一个fruit_item.xml用于自定义布局
<?xml version="1.0" encoding="utf-8"?>
<LinearLayout xmlns:android="http://schemas.android.com/apk/res/android"
    android:orientation="vertical"
    android:layout_width="match_parent"
    android:layout_height="60dp">

    <ImageView
        android:id="@+id/fruitImage"
        android:layout_width="40dp"
        android:layout_height="40dp"
        android:layout_gravity="center_vertical"
        android:layout_marginLeft="10dp"
        />

    <TextView
        android:id="@+id/fruitName"
        android:layout_width="wrap_content"
        android:layout_height="wrap_content"
        android:layout_gravity="center_vertical"
        android:layout_marginLeft="10dp"
        />

</LinearLayout>
创建继承于ArrayAdapter的自定义适配器FruitAdapter,并将泛型指定为Fruit类
class FruitAdapter(activity: Activity, val resourceId: Int, data: List<Fruit>):
    ArrayAdapter<Fruit>(activity,resourceId,data){

    override fun getView(position: Int, convertView: View?, parent: ViewGroup): View {
        val view = LayoutInflater.from(context).inflate(resourceId,parent,false)
        val fruitImage: ImageView = view.findViewById(R.id.fruitImage)
        val fruitName: TextView = view.findViewById(R.id.fruitName)
        val fruit = getItem(position)

        if (fruit != null){
            fruitImage.setImageResource(fruit.imageId)
            fruitName.text = fruit.name
        }else{
            Log.d("++++++++++","null")
        }

        return view
    }
}
最后编写MainActivity中的代码
class MainActivity : AppCompatActivity() {

    private  lateinit var binding: ActivityMainBinding

    private val fruitList = ArrayList<Fruit>()

    override fun onCreate(savedInstanceState: Bundle?) {
        super.onCreate(savedInstanceState)
        binding = ActivityMainBinding.inflate(layoutInflater)
        setContentView(binding.root)

        initFruits()

        val adapter = FruitAdapter(this, R.layout.fruit_item,fruitList)
        binding.listView.adapter = adapter

    }

    private fun initFruits(){
        repeat(2){
            fruitList.add(Fruit("Apple",R.drawable.apple_pic))
            fruitList.add(Fruit("Banana",R.drawable.banana_pic))
            fruitList.add(Fruit("Orange",R.drawable.orange_pic))
            fruitList.add(Fruit("Watermelon",R.drawable.watermelon_pic))
            fruitList.add(Fruit("Pear",R.drawable.pear_pic))
            fruitList.add(Fruit("Grape",R.drawable.grape_pic))
            fruitList.add(Fruit("Pineapple",R.drawable.pineapple_pic))
            fruitList.add(Fruit("Strawberry",R.drawable.strawberry_pic))
            fruitList.add(Fruit("Cherry",R.drawable.cherry_pic))
            fruitList.add(Fruit("Mango",R.drawable.mango_pic))
        }
    }
}

提升ListView的运行效率
当前ListView的运行效率是很低的,因为在FruitAdapter的getView()方法中,每次都将布局重新加载了一遍,当ListView快速滚动的时候,这就会成为性能的瓶颈。
使用convertView参数
getView()方法中还有⼀个convertView参数,这个参数用于将之前加载好的布局进行缓存,以便之后进行重用,我们可以借助这个参数来进行性能优化。
val view: View
if (convertView == null){
    view =  LayoutInflater.from(context).inflate(resourceId,parent,false)
}else{
    view = convertView
}
- 如果
convertView为null,则使用LayoutInflater去加载布局 - 如果不为
null,则直接对convertView进行重用。
使用内部类ViewHolder
class FruitAdapter(activity: Activity, val resourceId: Int, data: List<Fruit>):
    ArrayAdapter<Fruit>(activity,resourceId,data){

    inner class ViewHolder(val fruitImage: ImageView, val fruitName: TextView)

    override fun getView(position: Int, convertView: View?, parent: ViewGroup): View {

        val view: View
        val viewHolder: ViewHolder

        if (convertView == null){
            view =  LayoutInflater.from(context).inflate(resourceId,parent,false)
            val fruitImage: ImageView = view.findViewById(R.id.fruitImage)
            val fruitName: TextView = view.findViewById(R.id.fruitName)
            viewHolder = ViewHolder(fruitImage,fruitName)
            view.tag = viewHolder
        }else{
            view = convertView
            viewHolder = view.tag as ViewHolder
        }

        val fruit = getItem(position)
        if (fruit != null){
            viewHolder.fruitImage.setImageResource(fruit.imageId)
            viewHolder.fruitName.text = fruit.name
        }

        return view
    }
}
内部类ViewHolder,用于对ImageView和TextView的控件实例进行缓存
Kotlin中使用 inner class关键字来定义内部类。
- 当
convertView为null的时候,创建⼀个ViewHolder对象,并将控件的实例存放在ViewHolder里,然后调用View的setTag()方法,将ViewHolder对象存储在View中。 - 当
convertView不为null的时候,则调用View的getTag()方法,把ViewHolder重新取出。这样所有控件的实例都缓存在了ViewHolder里,就没有必要每次都通过findViewById()方法来获取控件实例了。
ListView的点击事件
使用setOnItemClickListener()方法为ListView注册了一个监听器,当用户点击了ListView中的任何⼀个子项时,就会回调到Lambda表达式中。这里我们可以通过position参数判断用户点击的是哪一个子项,然后获取到相应的水果。
class MainActivity : AppCompatActivity() {

    private  lateinit var binding: ActivityMainBinding

    private val fruitList = ArrayList<Fruit>()

    override fun onCreate(savedInstanceState: Bundle?) {
        super.onCreate(savedInstanceState)
        binding = ActivityMainBinding.inflate(layoutInflater)
        setContentView(binding.root)

        initFruits()

        val adapter = FruitAdapter(this, R.layout.fruit_item, fruitList)
        binding.listView.adapter = adapter

        binding.listView.setOnItemClickListener{ parent, view, position, id ->
            val fruit = fruitList[position]
            Toast.makeText(this, fruit.name, Toast.LENGTH_SHORT).show()
        }

    }

    private fun initFruits(){
        repeat(2){
            fruitList.add(Fruit("Apple",R.drawable.apple_pic))
            fruitList.add(Fruit("Banana",R.drawable.banana_pic))
            fruitList.add(Fruit("Orange",R.drawable.orange_pic))
            fruitList.add(Fruit("Watermelon", R.drawable.watermelon_pic))
            fruitList.add(Fruit("Pear",R.drawable.pear_pic))
            fruitList.add(Fruit("Grape",R.drawable.grape_pic))
            fruitList.add(Fruit("Pineapple",R.drawable.pineapple_pic))
            fruitList.add(Fruit("Strawberry",R.drawable.strawberry_pic))
            fruitList.add(Fruit("Cherry",R.drawable.cherry_pic))
            fruitList.add(Fruit("Mango",R.drawable.mango_pic))
        }
    }
}

Kotlin允许将没有用到的参数使用下划线来替代,这种写法也是合法且更加推荐
binding.listView.setOnItemClickListener{ _, _, position, _ ->
    val fruit = fruitList[position]
    Toast.makeText(this, fruit.name, Toast.LENGTH_SHORT).show()
}
RecyclerView
先在app/build.gradle将RecyclerView库导入到项目中
implementation 'androidx.recyclerview:recyclerview:1.0.0'
基本用法
还是之前的fruit、fruit_item.xml代码
在activity_main.xml中加入
<androidx.recyclerview.widget.RecyclerView
    android:id="@+id/recyclerView"
    android:layout_width="match_parent"
    android:layout_height="match_parent"
    />
新建FruitAdapter类为RecyclerView的适配器,让这个适配器继承自RecyclerView.Adapter,并将泛型指定为FruitAdapter.ViewHolder。其中,ViewHolder是我们在FruitAdapter中定义的⼀个内部类
class FruitAdapter(val fruitList: List<Fruit>) :
        RecyclerView.Adapter<FruitAdapter.ViewHolder>(){

    inner class ViewHolder(view: View) : RecyclerView.ViewHolder(view){
        val fruitImage: ImageView = view.findViewById(R.id.fruitImage)
        val fruitName: TextView = view.findViewById(R.id.fruitName)
    }

    override fun onCreateViewHolder(parent: ViewGroup, viewType: Int): ViewHolder {
        val view = LayoutInflater.from(parent.context).inflate(R.layout.fruit_item,parent,false)
        return ViewHolder(view)
    }

    override fun onBindViewHolder(holder: ViewHolder, position: Int) {
        val fruit = fruitList[position]
        holder.fruitImage.setImageResource(fruit.imageId)
        holder.fruitName.text = fruit.name
    }

    override fun getItemCount() = fruitList.size
}
这是RecyclerView适配器标准的写法
首先定义了⼀个内部类ViewHolder,它要继承自RecyclerView.ViewHolder。然后ViewHolder的主构造函数中要传入⼀个View参数,这个参数通常就是RecyclerView子项的最外层布局,那么就可以通过findViewById()方法来获取布局中ImageView和TextView的实例了。
FruitAdapter中也有⼀个主构造函数,它⽤于把要展示的数据源传进 来,后续的操作都将在这个数据源的基础上进行。
onCreateViewHolder()方法是用于创建ViewHolder实例的,我们在这个方法中将fruit_item布局加载进来,然后创建⼀个ViewHolder实例,并把加载出来的布局传入构造函数当中,最后将ViewHolder的实例返回onBindViewHolder()方法用于对RecyclerView子项的数据进行赋值,会在每个子项被滚动到屏幕内的时候执行,这里我们通过position参数得到当前项的Fruit实例,然后再将数据设置到ViewHolder的ImageView和TextView当中即可。getItemCount()方法用于告诉RecyclerView⼀共有多少子项,直接返回数据源的长度就可以了。
上面的准备工作就绪后,就可以在MainActivity中使用RecyclerView了
class MainActivity : AppCompatActivity() {

    private lateinit var binding: ActivityMainBinding
    private val fruitList = ArrayList<Fruit>()

    override fun onCreate(savedInstanceState: Bundle?) {
        super.onCreate(savedInstanceState)
        binding = ActivityMainBinding.inflate(layoutInflater)
        setContentView(binding.root)

        initFruits()

        val layoutManager = LinearLayoutManager(this)
        binding.recyclerView.layoutManager = layoutManager

        val adapter = FruitAdapter(fruitList)
        binding.recyclerView.adapter = adapter

    }

    private fun initFruits(){
        repeat(2){
            fruitList.add(Fruit("Apple",R.drawable.apple_pic))
            fruitList.add(Fruit("Banana",R.drawable.banana_pic))
            fruitList.add(Fruit("Orange",R.drawable.orange_pic))
            fruitList.add(Fruit("Watermelon", R.drawable.watermelon_pic))
            fruitList.add(Fruit("Pear",R.drawable.pear_pic))
            fruitList.add(Fruit("Grape",R.drawable.grape_pic))
            fruitList.add(Fruit("Pineapple",R.drawable.pineapple_pic))
            fruitList.add(Fruit("Strawberry",R.drawable.strawberry_pic))
            fruitList.add(Fruit("Cherry",R.drawable.cherry_pic))
            fruitList.add(Fruit("Mango",R.drawable.mango_pic))
        }
    }
}
LayoutManager用于指定RecyclerView的布局方式,这里使用的LinearLayoutManager是线性布局的意思,可以实现和ListView类似的效果。

横向滚动
ListView中无法实现横向滚动,而RecyclerView中就可以轻易做到
首先要调整一下fruit_item.xml
<?xml version="1.0" encoding="utf-8"?>
<LinearLayout xmlns:android="http://schemas.android.com/apk/res/android"
    android:orientation="vertical"
    android:layout_width="80dp"
    android:layout_height="wrap_content">

    <ImageView
        android:id="@+id/fruitImage"
        android:layout_width="40dp"
        android:layout_height="40dp"
        android:layout_gravity="center_horizontal"
        android:layout_marginTop="10dp"
        />

    <TextView
        android:id="@+id/fruitName"
        android:layout_width="wrap_content"
        android:layout_height="wrap_content"
        android:layout_gravity="center_horizontal"
        android:layout_marginTop="10dp"
        />

</LinearLayout>
在MainActivity的layoutManager后添加一行代码
layoutManager.orientation = LinearLayoutManager.HORIZONTAL
调用LinearLayoutManager的setOrientation()方法设置布局的排列方向。默认是纵向排列的,传入LinearLayoutManager.HORIZONTAL表示让布局横行排列,这样RecyclerView就可以横向滚动了。

瀑布流布局
首先要调整一下fruit_item.xml
<?xml version="1.0" encoding="utf-8"?>
<LinearLayout xmlns:android="http://schemas.android.com/apk/res/android"
    android:orientation="vertical"
    android:layout_width="match_parent"
    android:layout_height="wrap_content"
    android:layout_margin="5dp">

    <ImageView
        android:id="@+id/fruitImage"
        android:layout_width="40dp"
        android:layout_height="40dp"
        android:layout_gravity="center_horizontal"
        android:layout_marginTop="10dp"
        />

    <TextView
        android:id="@+id/fruitName"
        android:layout_width="wrap_content"
        android:layout_height="wrap_content"
        android:layout_gravity="left"
        android:layout_marginTop="10dp"
        />

</LinearLayout>
然后修改MainActivity
class MainActivity : AppCompatActivity() {

    private lateinit var binding: ActivityMainBinding
    private val fruitList = ArrayList<Fruit>()

    override fun onCreate(savedInstanceState: Bundle?) {
        super.onCreate(savedInstanceState)
        binding = ActivityMainBinding.inflate(layoutInflater)
        setContentView(binding.root)

        initFruits()
        val layoutManager = StaggeredGridLayoutManager(3, StaggeredGridLayoutManager.VERTICAL)
        binding.recyclerView.layoutManager = layoutManager

        val adapter = FruitAdapter(fruitList)
        binding.recyclerView.adapter = adapter

    }

    private fun initFruits(){
        repeat(2){
            fruitList.add(Fruit(getRandomLengthString("Apple"),R.drawable.apple_pic))
            fruitList.add(Fruit(getRandomLengthString("Banana"),R.drawable.banana_pic))
            fruitList.add(Fruit(getRandomLengthString("Orange"),R.drawable.orange_pic))
            fruitList.add(Fruit(getRandomLengthString("Watermelon"),R.drawable.watermelon_pic))
            fruitList.add(Fruit(getRandomLengthString("Pear"),R.drawable.pear_pic))
            fruitList.add(Fruit(getRandomLengthString("Grape"),R.drawable.grape_pic))
            fruitList.add(Fruit(getRandomLengthString("Pineapple"),R.drawable.pineapple_pic))
            fruitList.add(Fruit(getRandomLengthString("Strawberry"),R.drawable.strawberry_pic))
            fruitList.add(Fruit(getRandomLengthString("Cherry"),R.drawable.cherry_pic))
            fruitList.add(Fruit(getRandomLengthString("Mango"),R.drawable.mango_pic))
        }
    }

    private fun getRandomLengthString(str: String): String{
        val n = (1..20).random()
        val builder = StringBuilder()
        repeat(n){
            builder.append(str)
        }
        return builder.toString()
    }
}
在onCreate()方法中创建⼀个StaggeredGridLayoutManager的实例。
StaggeredGridLayoutManager的构造函数接收两个参数:
第一个参数用于指定布局的列数,传入3表示会把布局分为3列;
第二个参数用于指定布局的排列方向,传入StaggeredGridLayoutManager.VERTICAL表示会让布局纵向排列。
最后把创建好的实例设置到RecyclerView当中就可以了

设置点击事件
只需修改FruitAdapter中inCreateViewHolder方法的代码
override fun onCreateViewHolder(parent: ViewGroup, viewType: Int): ViewHolder {
    val view = LayoutInflater.from(parent.context).inflate(R.layout.fruit_item,parent,false)
    val viewHolder = ViewHolder(view)
    viewHolder.itemView.setOnClickListener {
        val position = viewHolder.adapterPosition
        val fruit = fruitList[position]
        Toast.makeText(parent.context,"you clicked view ${fruit.name}",Toast.LENGTH_SHORT).show()
    }
    viewHolder.fruitImage.setOnClickListener{
        val position = viewHolder.adapterPosition
        val fruit = fruitList[position]
        Toast.makeText(parent.context,"you clicked image ${fruit.name}",Toast.LENGTH_SHORT).show()
    }
    return viewHolder
}

编写界面
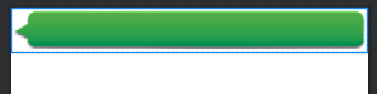
制作9-Patch图片
普通图片作为背景时,就会被均匀拉伸,如下图所示,效果很不好。
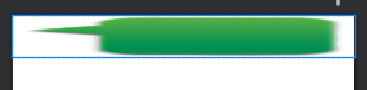
9-Patch图片是一种被特殊处理过的png图片,能够指定哪些区域可以被拉伸、哪些区域不可以。
插入聊天框图片,右击选择下图中蓝色框的Creat 9-Patch file

进入界面后可以在图片的4个边框绘制⼀个个的小黑点
- 在上边框和左边框绘制的部分表示当图片需要拉伸时就拉伸黑点标记的区域
- 在下边框和右边框绘制的部分表示内容允许被放置的区域。
使用鼠标在图片的边缘拖动就可以进行绘制了,按住Shift键拖动可以进行擦除。

将新图片设为背景时:
编写聊天界面
activity_main.xml
<?xml version="1.0" encoding="utf-8"?>
<LinearLayout xmlns:android="http://schemas.android.com/apk/res/android"
    xmlns:app="http://schemas.android.com/apk/res-auto"
    android:orientation="vertical"
    xmlns:tools="http://schemas.android.com/tools"
    android:layout_width="match_parent"
    android:layout_height="match_parent"
    android:background="#d8e0e8"
    tools:context=".MainActivity">

    <androidx.recyclerview.widget.RecyclerView
        android:id="@+id/recyclerView"
        android:layout_width="match_parent"
        android:layout_height="0dp"
        android:layout_weight="1"
        />

    <LinearLayout
        android:layout_width="match_parent"
        android:layout_height="wrap_content"
        >

        <EditText
            android:id="@+id/inputText"
            android:layout_width="0dp"
            android:layout_height="wrap_content"
            android:layout_weight="1"
            android:hint="Type someThing here"
            android:maxLines="2"
            />

        <Button
            android:id="@+id/send"
            android:layout_width="wrap_content"
            android:layout_height="wrap_content"
            android:text="Send"/>

    </LinearLayout>


</LinearLayout>
实体类Msg
class Msg(val content: String, val type: Int) {
    companion object{
        const val TYPE_RECEIVED = 0
        const val TYPE_SENT = 1
    }
}
msg_left_item.xml
<?xml version="1.0" encoding="utf-8"?>
<FrameLayout xmlns:android="http://schemas.android.com/apk/res/android"
    android:layout_width="match_parent"
    android:layout_height="wrap_content"
    android:padding="10dp"
    >

    <LinearLayout
        android:layout_width="wrap_content"
        android:layout_height="wrap_content"
        android:layout_gravity="left"
        android:background="@drawable/message_left">

        <TextView
            android:id="@+id/leftMsg"
            android:layout_width="wrap_content"
            android:layout_height="wrap_content"
            android:layout_gravity="center"
            android:layout_margin="10dp"
            android:textColor="#fff"
            />

    </LinearLayout>

</FrameLayout>
msg_right_item.xml
与msg_left_item.xml左右对称,不再赘述
适配器类MsgAdapter
class MsgAdapter(val msgList: List<Msg>) : RecyclerView.Adapter<RecyclerView.ViewHolder>(){

    inner class LeftViewHolder(view: View) : RecyclerView.ViewHolder(view){
        val leftMsg: TextView = view.findViewById(R.id.leftMsg)
    }

    inner class RightViewHolder(view: View) : RecyclerView.ViewHolder(view){
        val rightMsg: TextView = view.findViewById(R.id.rightMsg)
    }

    override fun getItemViewType(position: Int): Int {
        val msg = msgList[position]
        return msg.type
    }

    override fun onCreateViewHolder(parent: ViewGroup, viewType: Int) = if (viewType == Msg.TYPE_RECEIVED){
        val view = LayoutInflater.from(parent.context).inflate(R.layout.msg_left_item,parent,false)
        LeftViewHolder(view)
    }else{
        val view = LayoutInflater.from(parent.context).inflate(R.layout.msg_right_item,parent,false)
        RightViewHolder(view)
    }


    override fun onBindViewHolder(holder: RecyclerView.ViewHolder, position: Int) {
        val msg = msgList[position]
        when (holder){
            is LeftViewHolder -> holder.leftMsg.text = msg.content
            is RightViewHolder -> holder.rightMsg.text = msg.content
            else -> throw IllegalArgumentException()
        }
    }

    override fun getItemCount() = msgList.size

}
根据不同的viewType创建不同的界面。
首先先定义了LeftViewHolder和RightViewHolder这两个ViewHolder,分别用于缓存msg_left_item.xml和msg_right_item.xml布局中的控件。
然后要重写getItemViewType()方法,并在这个方法中返回当前position对应的消息类型。
MainActivity
class MainActivity : AppCompatActivity() {

    private lateinit var binding: ActivityMainBinding
    private val msgList = ArrayList<Msg>()
    private var adapter: MsgAdapter ?= null

    override fun onCreate(savedInstanceState: Bundle?) {
        super.onCreate(savedInstanceState)
        binding = ActivityMainBinding.inflate(layoutInflater)
        setContentView(binding.root)

        initMsg()

        val layoutManager = LinearLayoutManager(this)
        binding.recyclerView.layoutManager = layoutManager
        adapter = MsgAdapter(msgList)
        binding.recyclerView.adapter = adapter
        binding.send.setOnClickListener {
            val content = binding.inputText.text.toString()
            if (content.isNotEmpty()){
                val msg = Msg(content, Msg.TYPE_SENT)
                msgList.add(msg)
                adapter?.notifyItemInserted(msgList.size - 1)
                binding.recyclerView.scrollToPosition(msgList.size - 1)
                binding.inputText.setText("")
            }
        }

    }

    private fun initMsg(){
        val msg1 = Msg("Hello guy.",Msg.TYPE_RECEIVED)
        msgList.add(msg1)
        val msg2 = Msg("Hello. Who is that?",Msg.TYPE_SENT)
        msgList.add(msg2)
        val msg3 = Msg("This is Tom.",Msg.TYPE_RECEIVED)
        msgList.add(msg3)
    }

}
在发送按钮的点击事件里获取EditText中的内容,如果内容不为空字符串,则创建⼀个新的Msg对象并添加到msgList列表中去。之后又调用了适配器的notifyItemInserted()方法,用于通知列表有新的数据插入,这样新增的⼀条消息才能够在RecyclerView中显示出来。接着调用RecyclerView的scrollToPosition()方法将显示的数据定位到最后一行,以保证一定可以看得到最后发出的⼀条消息。最后调用EditText的setText()方法将输入的内容清空。

这个实践真的太妙了
Kotlin小课堂
延迟初始化
参考传送门
当你对一个全局变量使用了lateinit关键字时,请⼀定要确保它在被任何地方调用之前已经完成了初始化工作,否则Kotlin将无法保证程序的安全性。

对结果进行取反,如果还没有初始化,那么就立即对adapter变量进行初始化,否则什么都不用做。
密封类

在这里不得不再编写⼀个else条件,否则Kotlin编译器会认为这里缺少条件分支,代码无法编译通过。另外,如果现在新增了⼀个Unknown类并实现Result接口,用于表示未知的执行结果,但是忘记在getResultMsg()方法中添加相应的条件分支,编译器在这种情况下是不会提醒的,而是在运行的时候进入else条件里面,从而抛出异常并导致程序崩溃。
通过密封类就可以解决这个问题
关键字sealed cladd

在when语句中传入一个密封类变量作为条件时,Kotlin编译器会自动检查该密封类有哪些子类,并强制要求你将每一个子类所对应的条件全部处理。这样就可以保证,即使没有编写else条件,也不可能会出现漏写条件分支的情况。而如果我们现在新增一个Unknown类,并也让它继承自Result,此时
getResultMsg()方法就一定会报错,必须增加一个Unknown的条件分支才能让代码编译通过。
密封类及其所有子类只能定义在同一个文件的顶层位置,不能嵌套在其他类中,这是被密封类底层的实现机制所限制的。


 被折叠的 条评论
为什么被折叠?
被折叠的 条评论
为什么被折叠?
 到【灌水乐园】发言


