


文章目录
pb转uff具体代码
这里用的是uff自带的一个转换器,直接通过调用这个包就可以完成转换,只需要自己定义输入和输出的路径,如果没有定义输出的路径那么它就会自己以输入路径当作输出路径。
python3 /usr/lib/python3.6/dist-packages/uff/bin/convert_to_uff.py --input_file models/yolov4-tiny.pb
#则会在models文件夹中生成yolov4-tiny.uff文件
运行结果

pb转onnx转trt具体代码
install onnx
pip install numpy
pip install protobuf
sudo apt-get install protobuf-compiler libprotoc-dev
pip install onnx
首先完成pb转onnx,转换情况如下:
这里用的是tf2onnx官方自带的包,github下载链接为:
https://codechina.csdn.net/mirrors/onnx/tensorflow-onnx?utm_source=csdn_github_accelerator
直接通过调用这个包就可以完成转换,只需要自己定义一些参数,情况如下
python3 -m tf2onnx.convert\
    --input /home/z/Documents/face_detect_yolov4_yolov4tiny_ssd-master/yolov4-tiny.pb\
    --inputs inputs:0\
    --outputs Reshape:0,Reshape_4:0\
    --output /home/z/Documents/face_detect_yolov4_yolov4tiny_ssd-master/yolov4-tiny.onnx\
    --verbose
也就是pb输入路径,输入节点和输出节点(必须以A:B形式),然后输出路径,最后一个是verbose参数。
如果报错
-
ValueError: StridedSlice: only strides=1 is supported
解决方法:加上–opset 10 -
OSError: SavedModel file does not exist at:checkpoints//{saved_model.pbtxt|saved_model.pb}
原因:–saved-model参数路径不对,应该定位到yolov4-tiny目录
解决:–saved-model参数后必须是存放.pb模型的目录,而不是直接是.pb文件
onnx前向推理
import numpy as np
import onnx
import onnxruntime as rt

def Yolov4_onnx(onnx_path):
    # create runtime session
    sess = rt.InferenceSession(onnx_path)
    # get output name
    input_name = sess.get_inputs()[0].name
    output_name = sess.get_outputs()[0].name
    output_name1 = sess.get_outputs()[1].name
    output_shape = sess.get_outputs()[0].shape
    # forward model
    outs1, outs2 = sess.run([output_name,output_name1], {input_name: input_data})
    return outs1,outs2

# create input data
input_data = np.random.random((1,416,416,3)).astype('float32')
onnx_path='/home/lqs/Documents/feature_match/tools/yolov_4-tiny.onnx'
pb转onnx运行结果


onnx转化trt
方法1:trtexec
使用TensorRT的OSS工具
我的其中trtexec工具在/usr/src/tensorrt/bin/trtexec
–verbose,verbose打印日志看着能安心点
# fp32---noTF32 fp16---fp16 int8---int8
# set enviornment export PATH="$PATH:/usr/src/tensorrt/bin" sudo /usr/src/tensorrt/bin/trtexec
trtexec --explicitBatch=1 --onnx=/home/z/Documents/face_detect_yolov4_yolov4tiny_ssd-master/tools/yolov4-tiny.onnx --saveEngine=/home/z/Documents/face_detect_yolov4_yolov4tiny_ssd-master/yolov4-tiny-fp16.trt --fp16 --workspace=1 --verbose

trtexec --explicitBatch=1 --onnx=/home/z/Documents/face_detect_yolov4_yolov4tiny_ssd-master/tools/yolov4-tiny.onnx --saveEngine=/home/z/Documents/face_detect_yolov4_yolov4tiny_ssd-master/yolov4-tiny-fp32.trt --noTF32 --workspace=1 --verbose

trtexec --explicitBatch=1 --onnx=/home/z/Documents/face_detect_yolov4_yolov4tiny_ssd-master/tools/yolov4-tiny.onnx --saveEngine=/home/z/Documents/face_detect_yolov4_yolov4tiny_ssd-master/yolov4-tiny-int8.trt --int8 --workspace=1 --verbose
方法2:onnx-tensorrt工具
$ git clone --recursive https://github.com/onnx/onnx-tensorrt.git
$ mkdir build
$ cd build
$ cmake .. -DTENSORRT_ROOT=/home/wt/download/TensorRT-5.1.5.0
or
# 根据GPU的实际计算能力,修改 DGPU_ARCHS 值
$ cmake .. -DTENSORRT_ROOT=/home/wt/download/TensorRT-5.1.5.0 -DGPU_ARCHS="61"
$ make -j8
$ sudo make install
通过 ONNX-TensorRT 工具,可以将 onnx 模型转换为 tensorrt 模型,如
onnx2trt my_model.onnx -o my_engine.trt
还可以将 onnx 模型转换为人们可读的txt文档
onnx2trt my_model.onnx -t my_model.onnx.txt
更多用法,输入
onnx2trt -h
方法3:使用以下代码(结合着改)
3.1
#!/usr/bin/env python3

import tensorrt as trt

import sys, os
sys.path.insert(1, os.path.join(sys.path[0], ".."))


TRT_LOGGER = trt.Logger()
EXPLICIT_BATCH = 1 << (int)(trt.NetworkDefinitionCreationFlag.EXPLICIT_BATCH)#batchsize=1
def get_engine(onnx_file_path, engine_file_path):
    """Attempts to load a serialized engine if available, otherwise builds a new TensorRT engine and saves it."""
    def build_engine():
        """Takes an ONNX file and creates a TensorRT engine to run inference with"""
        with trt.Builder(TRT_LOGGER) as builder, builder.create_network(EXPLICIT_BATCH) as network, builder.create_builder_config() as config, trt.OnnxParser(network, TRT_LOGGER) as parser:
            builder.max_batch_size = 1
            config.max_workspace_size = 1 << 30 # 30:1GB;28:256MiB config
            builder.fp16_mode=True
            # Parse model file
            if not os.path.exists(onnx_file_path):
                print('ONNX file {} not found, please run yolov3_to_onnx.py first to generate it.'.format(onnx_file_path))
                exit(0)
            print('Loading ONNX file from path {}...'.format(onnx_file_path))
            with open(onnx_file_path, 'rb') as model:
                print('Beginning ONNX file parsing')
                parser.parse(model.read())
                if not parser.parse(model.read()):
                    print ('ERROR: Failed to parse the ONNX file.')
                    for error in range(parser.num_errors):
                        print (parser.get_error(error))
                    return None
            # The actual yolov3.onnx is generated with batch size 64. Reshape input to batch size 1
            print('Completed parsing of ONNX file')
            print('Building an engine from file {}; this may take a while...'.format(onnx_file_path))
            engine = builder.build_engine(network,config)
            print("Completed creating Engine")
            with open(engine_file_path, "wb") as f:
                f.write(bytearray(engine.serialize()))
            return engine

    if os.path.exists(engine_file_path):
        # If a serialized engine exists, use it instead of building an engine.
        print("Reading engine from file {}".format(engine_file_path))
        with open(engine_file_path, "rb") as f, trt.Runtime(TRT_LOGGER) as runtime:
            return runtime.deserialize_cuda_engine(f.read())
    else:
        return build_engine()

def get_engine1(engine_path):
    # If a serialized engine exists, use it instead of building an engine.
    print("Reading engine from file {}".format(engine_path))
    with open(engine_path, "rb") as f, trt.Runtime(TRT_LOGGER) as runtime:
        return runtime.deserialize_cuda_engine(f.read())


if __name__ == '__main__':
    #main()
    onnx_file_path = '/home/z/Documents/face_detect_yolov4_yolov4tiny_ssd-master/tools/yolov4-tiny.onnx'
    engine_file_path = "/home/z/Documents/face_detect_yolov4_yolov4tiny_ssd-master/tools/yolov4-tiny.trt"
    get_engine(onnx_file_path, engine_file_path)
    # 可用netron查看onnx的输出数量和尺寸
    engines=get_engine1(engine_file_path)
    for binding in engines:
        size = trt.volume(engines.get_binding_shape(binding)) * 1
        dims = engines.get_binding_shape(binding)
        print('size=',size)
        print('dims=',dims)
        print('binding=',binding)
        print("input =", engines.binding_is_input(binding))
        dtype = trt.nptype(engines.get_binding_dtype(binding))
3.2
#!/usr/bin/env python3

import tensorrt as trt

import sys, os
sys.path.insert(1, os.path.join(sys.path[0], ".."))


TRT_LOGGER = trt.Logger()
EXPLICIT_BATCH = 1 << (int)(trt.NetworkDefinitionCreationFlag.EXPLICIT_BATCH)#batchsize=1
def get_engine(onnx_file_path, engine_file_path):
    """Attempts to load a serialized engine if available, otherwise builds a new TensorRT engine and saves it."""
    def build_engine(mode='int8',calib=None):
        """Takes an ONNX file and creates a TensorRT engine to run inference with"""
        with trt.Builder(TRT_LOGGER) as builder, builder.create_network(EXPLICIT_BATCH) as network, builder.create_builder_config() as config, trt.OnnxParser(network, TRT_LOGGER) as parser:
            builder.max_batch_size = 1
            config.max_workspace_size = 1 << 30 # 30:1GB;28:256MiB config
            if mode=='int8':
                print('the type is int8')
                builder.int8_mode=True
                builder.int8_calibrator=calib
            elif mode=='fp16':
                print('the type is fp16')
                builder.fp16_mode=True
            # Parse model file
            if not os.path.exists(onnx_file_path):
                print('ONNX file {} not found, please run yolov3_to_onnx.py first to generate it.'.format(onnx_file_path))
                exit(0)
            print('Loading ONNX file from path {}...'.format(onnx_file_path))
            with open(onnx_file_path, 'rb') as model:
                print('Beginning ONNX file parsing')
                parser.parse(model.read())
                if not parser.parse(model.read()):
                    print ('ERROR: Failed to parse the ONNX file.')
                    for error in range(parser.num_errors):
                        print (parser.get_error(error))
                    return None
            # The actual yolov3.onnx is generated with batch size 64. Reshape input to batch size 1
            print('Completed parsing of ONNX file')
            print('Building an engine from file {}; this may take a while...'.format(onnx_file_path))
            engine = builder.build_engine(network,config)
            print("Completed creating Engine")
            with open(engine_file_path, "wb") as f:
                f.write(bytearray(engine.serialize()))
            return engine

    if os.path.exists(engine_file_path):
        # If a serialized engine exists, use it instead of building an engine.
        print("Reading engine from file {}".format(engine_file_path))
        with open(engine_file_path, "rb") as f, trt.Runtime(TRT_LOGGER) as runtime:
            return runtime.deserialize_cuda_engine(f.read())
    else:
        return build_engine()

def get_engine1(engine_path):
    # If a serialized engine exists, use it instead of building an engine.
    print("Reading engine from file {}".format(engine_path))
    with open(engine_path, "rb") as f, trt.Runtime(TRT_LOGGER) as runtime:
        return runtime.deserialize_cuda_engine(f.read())


if __name__ == '__main__':
    #main()
    onnx_file_path = '/home/z/Documents/face_detect_yolov4_yolov4tiny_ssd-master/tools/yolov4-tiny.onnx'
    engine_file_path = "/home/z/Documents/face_detect_yolov4_yolov4tiny_ssd-master/tools/yolov4-tiny-int8.trt"
    get_engine(onnx_file_path, engine_file_path)
    # 可用netron查看onnx的输出数量和尺寸
    engines=get_engine1(engine_file_path)
    for binding in engines:
        size = trt.volume(engines.get_binding_shape(binding)) * 1
        dims = engines.get_binding_shape(binding)
        print('size=',size)
        print('dims=',dims)
        print('binding=',binding)
        print("input =", engines.binding_is_input(binding))
        dtype = trt.nptype(engines.get_binding_dtype(binding))
        print("dtype =", dtype)
3.3
[TensorRT] ERROR: Network must have at least one output
[TensorRT] ERROR: Network validation failed.
在with open(onnx_file_path, ‘rb’) as model:之后加两行:
last_layer = network.get_layer(network.num_layers - 1)
network.mark_output(last_layer.get_output(0))
import os
import tensorrt as trt
max_batch_size = 1
explicit_batch = 1
TRT_LOGGER = trt.Logger()
def get_engine(max_batch_size=1, onnx_file_path="", engine_file_path="", save_engine=False):
    with trt.Builder(TRT_LOGGER) as builder, \
            builder.create_network(explicit_batch) as network, \
            trt.OnnxParser(network, TRT_LOGGER) as parser:  # 使用onnx的解析器绑定计算图,后续将通过解析填充计算图
        builder.max_workspace_size = 1 << 30  # 预先分配的工作空间大小,即ICudaEngine执行时GPU最大需要的空间
        builder.max_batch_size = max_batch_size  # 执行时最大可以使用的batchsize
        builder.fp16_mode = True
        #  使用logger创建一个builder
        #  builder创建一个计算图 INetworkDefinition
        # 解析onnx文件,填充计算图
        if not os.path.exists(onnx_file_path):
            quit("ONNX file {} not found!".format(onnx_file_path))
        print('loading onnx file from path {} ...'.format(onnx_file_path))
        with open(onnx_file_path, 'rb') as model:  # 二值化的网络结果和参数
            print("Begining onnx file parsing")
            parser.parse(model.read())  # 解析onnx文件
        # parser.parse_from_file(onnx_file_path) # parser还有一个从文件解析onnx的方法
        print("Completed parsing of onnx file")
        # 填充计算图完成后,则使用builder从计算图中创建CudaEngine
        print("Building an engine from file{}' this may take a while...".format(onnx_file_path))

        #################
        print(network.get_layer(network.num_layers - 1).get_output(0).shape)
        # network.mark_output(network.get_layer(network.num_layers -1).get_output(0))
        last_layer = network.get_layer(network.num_layers - 1)
        network.mark_output(last_layer.get_output(0))
        engine = builder.build_cuda_engine(network)  # 注意,这里的network是INetworkDefinition类型,即填充后的计算图
        print("Completed creating Engine")
        if save_engine:  # 保存engine供以后直接反序列化使用
            with open(engine_file_path, 'wb') as f:
                f.write(engine.serialize())  # 序列化
        return engine
- 如果运行出错
[TensorRT] ERROR: Network must have at least one output 解决:在parser.parse下with循环外添加两行代码
last_layer = network.get_layer(network.num_layers - 1)
network.mark_output(last_layer.get_output(0))
推理trt模型
我通过trtexec工具完成的转换并通过下面这篇博客检查trt模型是否转换成功,查看输出https://blog.csdn.net/m0_51004308/article/details/115407130?spm=1001.2014.3001.5501
结果如下

运行成功之后可以按照下面的代码进行推理:
import pycuda.driver as cuda
import pycuda.autoinit
import cv2,time
import numpy as np
import os
import tensorrt as trt

TRT_LOGGER = trt.Logger()
engine_file_path = "/home/z/Documents/face_detect_yolov4_yolov4tiny_ssd-master/yolov4-tiny.trt"

class HostDeviceMem(object):
    def __init__(self, host_mem, device_mem):
        self.host = host_mem
        self.device = device_mem

    def __str__(self):
        return "Host:\n" + str(self.host) + "\nDevice:\n" + str(self.device)

    def __repr__(self):
        return self.__str__()
# Allocates all buffers required for an engine, i.e. host/device inputs/outputs. 分配引擎所需的所有缓冲区
def allocate_buffers(engine):
    inputs = []
    outputs = []
    bindings = []
    stream = cuda.Stream()
    for binding in engine:
        size = trt.volume(engine.get_binding_shape(binding)) * engine.max_batch_size
        dtype = trt.nptype(engine.get_binding_dtype(binding))
        # Allocate host and device buffers
        host_mem = cuda.pagelocked_empty(size, dtype)
        device_mem = cuda.mem_alloc(host_mem.nbytes)
        # Append the device buffer to device bindings.
        bindings.append(int(device_mem))
        # Append to the appropriate list.
        if engine.binding_is_input(binding):
            inputs.append(HostDeviceMem(host_mem, device_mem))
        else:
            outputs.append(HostDeviceMem(host_mem, device_mem))
    return inputs, outputs, bindings, stream

def do_inference_v2(context, bindings, inputs, outputs, stream):
    # Transfer input data to the GPU.
    [cuda.memcpy_htod_async(inp.device, inp.host, stream) for inp in inputs]
    # Run inference.
    context.execute_async_v2(bindings=bindings, stream_handle=stream.handle)
    # Transfer predictions back from the GPU.
    [cuda.memcpy_dtoh_async(out.host, out.device, stream) for out in outputs]
    # Synchronize the stream
    stream.synchronize()
    # Return only the host outputs.
    return [out.host for out in outputs]

with open(engine_file_path, "rb") as f, trt.Runtime(TRT_LOGGER) as runtime,\
runtime.deserialize_cuda_engine(f.read()) as engine, engine.create_execution_context() as context:
    inputs, outputs, bindings, stream = allocate_buffers(engine)
    #print('Len of inputs:',len(inputs))
    #print('Len of outputs:',len(outputs))

    image = cv2.imread('4.jpg',cv2.IMREAD_GRAYSCALE)
    image=cv2.resize(image,(28,28))
    print(image.shape)
    image=image[np.newaxis,np.newaxis,:,:].astype(np.float32)
    inputs[0].host = image
    print('开始推理')
    start = time.time()
    trt_outputs =do_inference_v2(context, bindings=bindings, \
    	inputs=inputs, outputs=outputs, stream=stream)
    finish = time.time()
    #print('inference time {} sec'.format(finish - start))
    print(trt_outputs)
结果如下:

如果要直接调用两个trt模型推理也是一样的道理,直接看代码。
import pycuda.driver as cuda
import pycuda.autoinit
import cv2, time
import numpy as np
import os
import pickle
import tensorrt as trt

class HostDeviceMem(object):
    def __init__(self, host_mem, device_mem):
        self.host = host_mem
        self.device = device_mem

    def __str__(self):
        return "Host:\n" + str(self.host) + "\nDevice:\n" + str(self.device)

    def __repr__(self):
        return self.__str__()

# Allocates all buffers required for an engine, i.e. host/device inputs/outputs. 分配引擎所需的所有缓冲区
def allocate_buffers(engine):
    inputs = []
    outputs = []
    bindings = []
    stream = cuda.Stream()
    for binding in engine:
        size = trt.volume(engine.get_binding_shape(binding)) * engine.max_batch_size
        dtype = trt.nptype(engine.get_binding_dtype(binding))
        # Allocate host and device buffers
        host_mem = cuda.pagelocked_empty(size, dtype)
        device_mem = cuda.mem_alloc(host_mem.nbytes)
        # Append the device buffer to device bindings.
        bindings.append(int(device_mem))
        # Append to the appropriate list.
        if engine.binding_is_input(binding):
            inputs.append(HostDeviceMem(host_mem, device_mem))
        else:
            outputs.append(HostDeviceMem(host_mem, device_mem))
    return inputs, outputs, bindings, stream

def do_inference_v2(context, bindings, inputs, outputs, stream):
    # Transfer input data to the GPU.
    [cuda.memcpy_htod_async(inp.device, inp.host, stream) for inp in inputs]
    # Run inference.
    context.execute_async_v2(bindings=bindings, stream_handle=stream.handle)
    # Transfer predictions back from the GPU.
    [cuda.memcpy_dtoh_async(out.host, out.device, stream) for out in outputs]
    # Synchronize the stream
    stream.synchronize()
    # Return only the host outputs.
    return [out.host for out in outputs]

if __name__ == "__main__":
    TRT_LOGGER = trt.Logger()
    arc_engine_file_path = "/home/z/Documents/face_detect_yolov4_yolov4tiny_ssd-master/arcface/resnet18_110.trt"
    yolo_engine_file_path = "/home/z/Documents/face_detect_yolov4_yolov4tiny_ssd-master/tools/yolov4-tiny.trt"
    with open(yolo_engine_file_path, "rb") as f, open(arc_engine_file_path, "rb") as y, trt.Runtime(
            TRT_LOGGER) as runtime, \
            runtime.deserialize_cuda_engine(
                f.read()) as engine, engine.create_execution_context() as context, runtime.deserialize_cuda_engine(
        y.read()) as engine1, engine1.create_execution_context() as context1:
        inputs, outputs, bindings, stream = allocate_buffers(engine)
        inputs1, outputs1, bindings1, stream1 = allocate_buffers(engine1)
pth转onnx
pth是pytorch结合网络架构生成的模型文件。主要是需要找到model加载部分的代码,然后在结合下面的代码进行修改即可。还需要找到输入尺寸的值,也就是input的值。
import torch
import torch.onnx
import numpy as np
import os
from nets.yolo4_tiny import YoloBody


def pth_to_onnx(checkpoint, onnx_path, input_names=['input'], output_names=['output'], device='cpu'):
    if not onnx_path.endswith('.onnx'):
        print('Warning! The onnx model name is not correct,\
              please give a name that ends with \'.onnx\'!')
        return 0
    #加载模型
    model = YoloBody(3, 16).eval()

    model.load_state_dict(torch.load(checkpoint))
    #将模型切换到推理状态
    model.eval()
    # model.to(device)
    #创建输入张量
    input = torch.randn(1, 3, 416, 416)
    #转化onnx模型
    torch.onnx.export(model, input, onnx_path, verbose=True, input_names=input_names, output_names=output_names)
    print("Exporting .pth model to onnx model has been successful!")


if __name__ == '__main__':

    os.environ['CUDA_VISIBLE_DEVICES'] = '0'
    checkpoint = 'D:/pycharm/tinyyolov4/model_data/yolo4_tiny_weights_100epoch.pth'
    onnx_path = 'D:/pycharm/tinyyolov4/model_data/yolo4_tiny_weights_100epoch.onnx'
    # device = torch.device("cuda:2" if torch.cuda.is_available() else 'cpu')
    pth_to_onnx(checkpoint, onnx_path)
onnx转pb
方法1:onnx-tensorflow工具
- 注意安装时onnx-tensorflow与tensorflow的版本对应关系
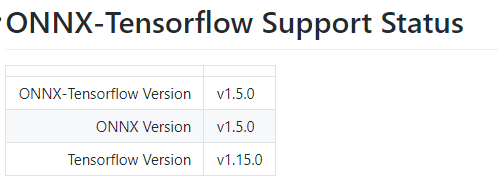
- 如果你是tensorflow1.15的版本就直接安装(下载github):https://github.com/onnx/onnx-tensorflow/tree/rel-1.5.0
- 下载代码,解压后进入onnx-tensorflow目录,然后执行python3 setup.py -e ./ 就可以了
转换方式如下
onnx-tf convert -i input_onnx_path -o output_pb_path
- 遇到问题 TypeErro: pad() got multiple values for argument 'name’参考下面博客https://github.com/onnx/onnx-tensorflow/issues/673修改onnx_tf/handlers/backend_hander.py文件

方法2:代码执行
import onnx
from onnx_tf.backend import prepare

def onnx2pb(onnx_input_path, pb_output_path):
    onnx_model = onnx.load(onnx_input_path)
    tf_exp = prepare(onnx_model)
    tf_exp.export_graph(pb_output_path)

if __name__ == "__main__":
    onnx_input_path = './culane_resnet50.onnx'
    pb_output_path = './culane_resnet50.pb'

    onnx2pb(onnx_input_path, pb_output_path)


 2747
2747


 被折叠的 条评论
为什么被折叠?
被折叠的 条评论
为什么被折叠?
 到【灌水乐园】发言


