


Mosaic数据增强介绍
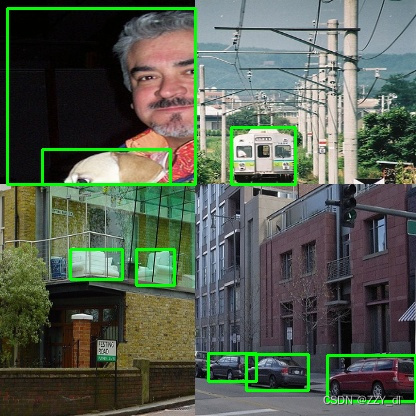
mosaic数据增强则利用了四张图片,对四张图片进行拼接,每一张图片都有其对应的框框,将四张图片拼接之后就获得一张新的图片,同时也获得这张图片对应的框框,然后我们将这样一张新的图片传入到神经网络当中去学习,相当于一下子传入四张图片进行学习了。论文中说这极大丰富了检测物体的背景!且在标准化BN计算的时候一下子会计算四张图片的数据!从而提升学习效率。
Mosaic数据增强代码
首先创建两个文件夹,一个放标注anno,一个放原图
from xml.etree import ElementTree as ET # xml文件解析方法
import numpy as np
import cv2
# (3)处理超出边缘的检测框
def merge_bboxes(bboxes, cutx, cuty):
# 保存修改后的检测框
merge_box = []
# 遍历每张图像,共4个
for i, box in enumerate(bboxes):
# 每张图片中需要删掉的检测框
index_list = []
# 遍历每张图的所有检测框,index代表第几个框
for index, box in enumerate(box[0]):
# axis=1纵向删除index索引指定的列,axis=0横向删除index指定的行
# box[0] = np.delete(box[0], index, axis=0)
# 获取每个检测框的宽高
x1, y1, x2, y2 = box
# 如果是左上图,修正右侧和下侧框线
if i == 0:
# 如果检测框左上坐标点不在第一部分中,就忽略它
if x1 > cutx or y1 > cuty:
index_list.append(index)
# 如果检测框右下坐标点不在第一部分中,右下坐标变成边缘点
if y2 >= cuty and y1 <= cuty:
y2 = cuty
if y2 - y1 < 5:
index_list.append(index)
if x2 >= cutx and x1 <= cutx:
x2 = cutx
# 如果修正后的左上坐标和右下坐标之间的距离过小,就忽略这个框
if x2 - x1 < 5:
index_list.append(index)
# 如果是右上图,修正左侧和下册框线
if i == 1:
if x2 < cutx or y1 > cuty:
index_list.append(index)
if y2 >= cuty and y1 <= cuty:
y2 = cuty
if y2 - y1 < 5:
index_list.append(index)
if x1 <= cutx and x2 >= cutx:
x1 = cutx
if x2 - x1 < 5:
index_list.append(index)
# 如果是左下图
if i == 2:
if x1 > cutx or y2 < cuty:
index_list.append(index)
if y1 <= cuty and y2 >= cuty:
y1 = cuty
if y2 - y1 < 5:
index_list.append(index)
if x1 <= cutx and x2 >= cutx:
x2 = cutx
if x2 - x1 < 5:
index_list.append(index)
# 如果是右下图
if i == 3:
if x2 < cutx or y2 < cuty:
index_list.append(index)
if x1 <= cutx and x2 >= cutx:
x1 = cutx
if x2 - x1 < 5:
index_list.append(index)
if y1 <= cuty and y2 >= cuty:
y1 = cuty
if y2 - y1 < 5:
index_list.append(index)
# 更新坐标信息
bboxes[i][0][index] = [x1, y1, x2, y2] # 更新第i张图的第index个检测框的坐标
# 删除不满足要求的框,并保存
merge_box.append(np.delete(bboxes[i][0], index_list, axis=0))
# 返回坐标信息
return merge_box
# (1)对传入的四张图片数据增强
def get_random_data(image_list, input_shape):
h, w = input_shape # 获取图像的宽高
'''设置拼接的分隔线位置'''
min_offset_x = 0.4
min_offset_y = 0.4
scale_low = 1 - min(min_offset_x, min_offset_y) # 0.6
scale_high = scale_low + 0.2 # 0.8
image_datas = [] # 存放图像信息
box_datas = [] # 存放检测框信息
index = 0 # 当前是第几张图
# (1)图像分割
for frame_list in image_list:
frame = frame_list[0] # 取出的某一张图像
box = np.array(frame_list[1:]) # 该图像对应的检测框坐标
ih, iw = frame.shape[0:2] # 图片的宽高
cx = (box[0, :, 0] + box[0, :, 2]) // 2 # 检测框中心点的x坐标
cy = (box[0, :, 1] + box[0, :, 3]) // 2 # 检测框中心点的y坐标
# 对输入图像缩放
new_ar = w / h # 图像的宽高比
scale = np.random.uniform(scale_low, scale_high) # 缩放0.6--0.8倍
# 调整后的宽高
nh = int(scale * h) # 缩放比例乘以要求的宽高
nw = int(nh * new_ar) # 保持原始宽高比例
# 缩放图像
frame = cv2.resize(frame, (nw, nh))
# 调整中心点坐标
cx = cx * nw / iw
cy = cy * nh / ih
# 调整检测框的宽高
bw = (box[0, :, 2] - box[0, :, 0]) * nw / iw # 修改后的检测框的宽高
bh = (box[0, :, 3] - box[0, :, 1]) * nh / ih
# 创建一块[416,416]的底版
new_frame = np.zeros((h, w, 3), np.uint8)
# 确定每张图的位置
if index == 0:
new_frame[0:nh, 0:nw] = frame # 第一张位于左上方
elif index == 1:
new_frame[0:nh, w - nw:w] = frame # 第二张位于右上方
elif index == 2:
new_frame[h - nh:h, 0:nw] = frame # 第三张位于左下方
elif index == 3:
new_frame[h - nh:h, w - nw:w] = frame # 第四张位于右下方
# 修正每个检测框的位置
if index == 0: # 左上图像
box[0, :, 0] = cx - bw // 2 # x1
box[0, :, 1] = cy - bh // 2 # y1
box[0, :, 2] = cx + bw // 2 # x2
box[0, :, 3] = cy + bh // 2 # y2
if index == 1: # 右上图像
box[0, :, 0] = cx - bw // 2 + w - nw # x1
box[0, :, 1] = cy - bh // 2 # y1
box[0, :, 2] = cx + bw // 2 + w - nw # x2
box[0, :, 3] = cy + bh // 2 # y2
if index == 2: # 左下图像
box[0, :, 0] = cx - bw // 2 # x1
box[0, :, 1] = cy - bh // 2 + h - nh # y1
box[0, :, 2] = cx + bw // 2 # x2
box[0, :, 3] = cy + bh // 2 + h - nh # y2
if index == 3: # 右下图像
box[0, :, 2] = cx - bw // 2 + w - nw # x1
box[0, :, 3] = cy - bh // 2 + h - nh # y1
box[0, :, 0] = cx + bw // 2 + w - nw # x2
box[0, :, 1] = cy + bh // 2 + h - nh # y2
index = index + 1 # 处理下一张
# 保存处理后的图像及对应的检测框坐标
image_datas.append(new_frame)
box_datas.append(box)
# 取出某张图片以及它对应的检测框信息, i代表图片索引
for image, boxes in zip(image_datas, box_datas):
# 复制一份原图
image_copy = image.copy()
# 遍历该张图像中的所有检测框
for box in boxes[0]:
# 获取某一个框的坐标
x1, y1, x2, y2 = box
cv2.rectangle(image_copy, (x1, y1), (x2, y2), (0, 255, 0), 2)
cv2.imshow('img', image_copy)
cv2.waitKey(0)
cv2.destroyAllWindows()
# (2)将四张图像拼接在一起
# 在指定范围中选择横纵向分割线
cutx = np.random.randint(int(w * min_offset_x), int(w * (1 - min_offset_x)))
cuty = np.random.randint(int(h * min_offset_y), int(h * (1 - min_offset_y)))
# 创建一块[416,416]的底版用来组合四张图
new_image = np.zeros((h, w, 3), np.uint8)
new_image[:cuty, :cutx, :] = image_datas[0][:cuty, :cutx, :]
new_image[:cuty, cutx:, :] = image_datas[1][:cuty, cutx:, :]
new_image[cuty:, :cutx, :] = image_datas[2][cuty:, :cutx, :]
new_image[cuty:, cutx:, :] = image_datas[3][cuty:, cutx:, :]
# 显示合并后的图像
cv2.imshow('new_img', new_image)
cv2.waitKey(0)
cv2.destroyAllWindows()
# 复制一份合并后的原图
final_image_copy = new_image.copy()
# 显示有检测框并合并后的图像
for boxes in box_datas:
# 遍历该张图像中的所有检测框
for box in boxes[0]:
# 获取某一个框的坐标
x1, y1, x2, y2 = box
cv2.rectangle(final_image_copy, (x1, y1), (x2, y2), (0, 255, 0), 2)
cv2.imshow('new_img_bbox', final_image_copy)
cv2.waitKey(0)
cv2.destroyAllWindows()
# 处理超出图像边缘的检测框
new_boxes = merge_bboxes(box_datas, cutx, cuty)
# 复制一份合并后的图像
modify_image_copy = new_image.copy()
# 绘制修正后的检测框
for boxes in new_boxes:
# 遍历每张图像中的所有检测框
for box in boxes:
# 获取某一个框的坐标
x1, y1, x2, y2 = box
cv2.rectangle(modify_image_copy, (x1, y1), (x2, y2), (0, 255, 0), 2)
cv2.imshow('new_img_bbox', modify_image_copy)
cv2.waitKey(0)
cv2.destroyAllWindows()
# 主函数,获取图片路径和检测框路径
if __name__ == '__main__':
# 给出图片文件夹和检测框文件夹所在的位置
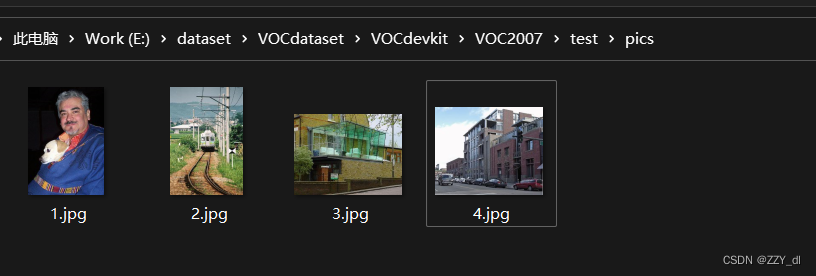
image_dir = r'E:\dataset\VOCdataset\VOCdevkit\VOC2007\test\pics/'
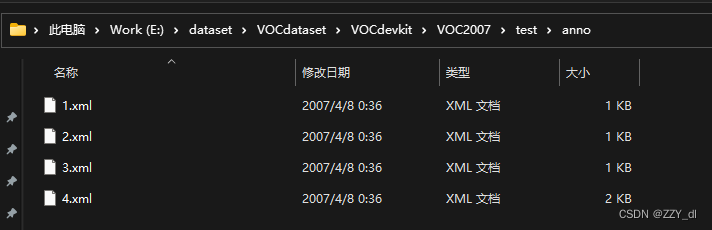
annotation_dir = r'E:\dataset\VOCdataset\VOCdevkit\VOC2007\test\anno/'
image_list = [] # 存放每张图像和该图像对应的检测框坐标信息
# 读取4张图像及其检测框信息
for i in range(4):
image_box = [] # 存放每张图片的检测框信息
# 某张图片位置及其对应的检测框信息
image_path = image_dir + str(i + 1) + '.jpg'
annotation_path = annotation_dir + str(i + 1) + '.xml'
image = cv2.imread(image_path) # 读取图像
# 读取检测框信息
with open(annotation_path, 'r') as new_f:
# getroot()获取根节点
root = ET.parse(annotation_path).getroot()
# findall查询根节点下的所有直系子节点,find查询根节点下的第一个直系子节点
for obj in root.findall('object'):
obj_name = obj.find('name').text # 目标名称
bndbox = obj.find('bndbox')
left = eval(bndbox.find('xmin').text) # 左上坐标x
top = eval(bndbox.find('ymin').text) # 左上坐标y
right = eval(bndbox.find('xmax').text) # 右下坐标x
bottom = eval(bndbox.find('ymax').text) # 右下坐标y
# 保存每张图片的检测框信息
image_box.append([left, top, right, bottom]) # [[x1,y1,x2,y2],[..],[..]]
# 保存图像及其对应的检测框信息
image_list.append([image, image_box])
# 缩放、拼接图片
get_random_data(image_list, input_shape=[416, 416])
运行结果


 1万+
1万+


 被折叠的 条评论
为什么被折叠?
被折叠的 条评论
为什么被折叠?
 到【灌水乐园】发言


