


TensorFlow安装及VGG猫狗识别
https://github.com/Rounak-Das-02/DogsVsCats_withVGG
TensorFlow安装
1.创建虚拟环境
打开Anaconda Prompt,输入以下命令,创建Python 3.7版本的虚拟环境:
conda create -n tensorflow python=3.7
tensorflow为环境名称,可以自定义
2.激活虚拟环境
在终端或Anaconda Prompt中输入以下命令,激活环境:
conda activate tensorflow
3.安装TensorFlow
在激活虚拟环境的状态下,使用pip命令安装TensorFlow:
pip install tensorflow
4.添加环境变量
输入以下命令,查看TensorFlow模块的安装路径:
python -c "import tensorflow as tf; print(tf.__file__)"
复制到tensorflow部分,比如:
D:\Anaconda3\envs\tensorflow\Lib\site-packages\tensorflow
依次打开控制面板系统和安全系统高级系统设置环境变量,在系统变量一栏选择Path,点击编辑,点击新建,粘贴上刚刚复制的路径,依次点击三个确定以保存设置。
5.为了运行后面的VGG代码,在这里安装几个库,只安装TensorFlow可以跳过这一步
依次在虚拟环境运行:
pip install matplotlib
pip install scipy
这个scipy库如果在打开jupyter之后再安装的话记得重启一下jupyter,因为没重启一直显示No moudle named ‘scipy’,浪费了很多时间
pip install keras_preprocessing
6.在虚拟环境中安装jupyter
使用以下命令安装:
conda install jupyter
7.打开jupyter
在虚拟环境中输入:
jupyter notebook
数据集
可以从最上面那个GitHub网址下载 link
也可以下载百度网盘 link
https://pan.baidu.com/s/1oeAQEFYRHH92XzjOod9c2w
提取码:0619
VGG
from keras.layers import Input, Lambda, Dense, Flatten
from keras.models import Model
from keras.applications.vgg16 import VGG16
from keras.applications.vgg16 import preprocess_input
from keras.preprocessing import image
from keras.preprocessing.image import ImageDataGenerator
from keras.models import Sequential
import numpy as np
from glob import glob
import matplotlib.pyplot as plt
from PIL import Image

# re-size all the images to this
IMAGE_SIZE = [224, 224]

train_path = 'D:/VGG/data/train'
valid_path = 'D:/VGG/data/test'

# add preprocessing layer to the front of VGG
vgg = VGG16(input_shape=IMAGE_SIZE + [3], weights='imagenet', include_top=False)

# don't train existing weights
for layer in vgg.layers:
  layer.trainable = False

# our layers - you can add more if you want
x = Flatten()(vgg.output)
# x = Dense(1000, activation='relu')(x)
prediction = Dense(2, activation='softmax')(x)
# create a model object
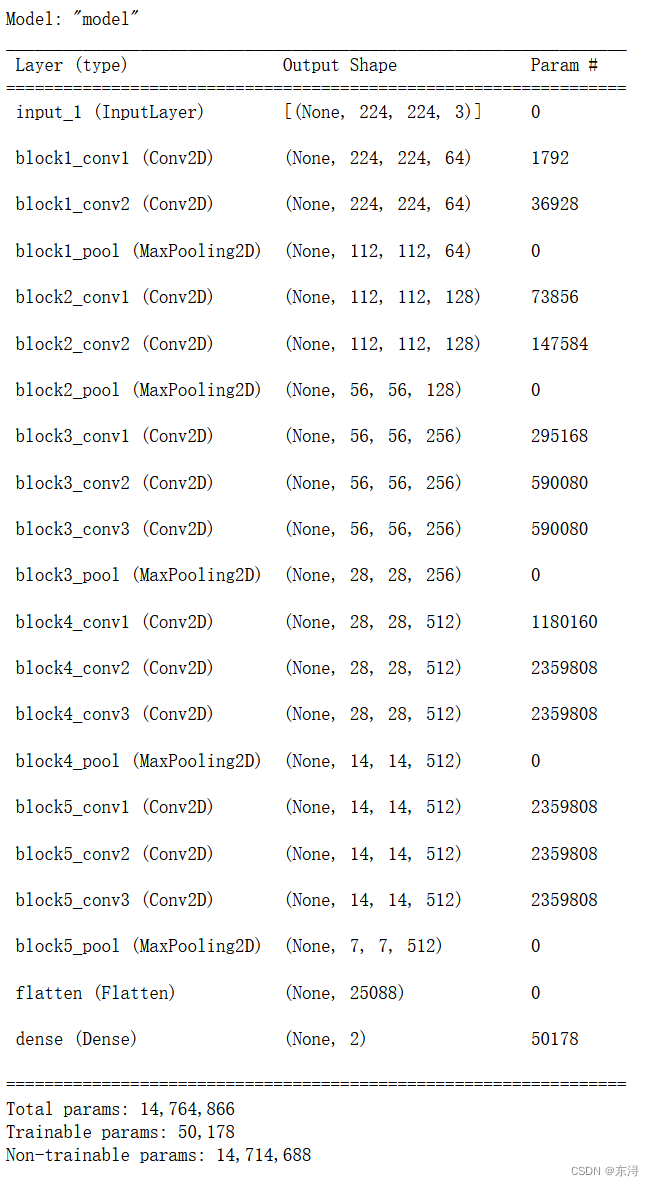
model = Model(inputs=vgg.input, outputs=prediction)
# view the structure of the model
model.summary()
# tell the model what cost and optimization method to use
model.compile(
loss='categorical_crossentropy',
optimizer='adam',
metrics=['accuracy']
)
from keras.preprocessing.image import ImageDataGenerator

train_datagen = ImageDataGenerator(rescale = 1./255,
                                   shear_range = 0.2,
                                   zoom_range = 0.2,
                                   horizontal_flip = True)

test_datagen = ImageDataGenerator(rescale = 1./255)

training_set = train_datagen.flow_from_directory('D:/VGG/data/train',
                                                 target_size = (224, 224),
                                                 batch_size = 32,
                                                 class_mode = 'categorical')

test_set = test_datagen.flow_from_directory('D:/VGG/data/test',
                                            target_size = (224, 224),
                                            batch_size = 32,
                                            class_mode = 'categorical')

# fit the model
r = model.fit_generator(
  training_set,
  validation_data=test_set,
  epochs=5,
  steps_per_epoch=len(training_set),
  validation_steps=len(test_set)
)

import tensorflow as tf
from keras.models import load_model
model.save("Cats_Dogs_model.h5")
model = load_model("Cats_Dogs_model.h5")
model.compile(
  loss='categorical_crossentropy',
  optimizer='adam',
  metrics=['accuracy']
)
import matplotlib.pyplot as plt
import numpy as np
from keras_preprocessing import image
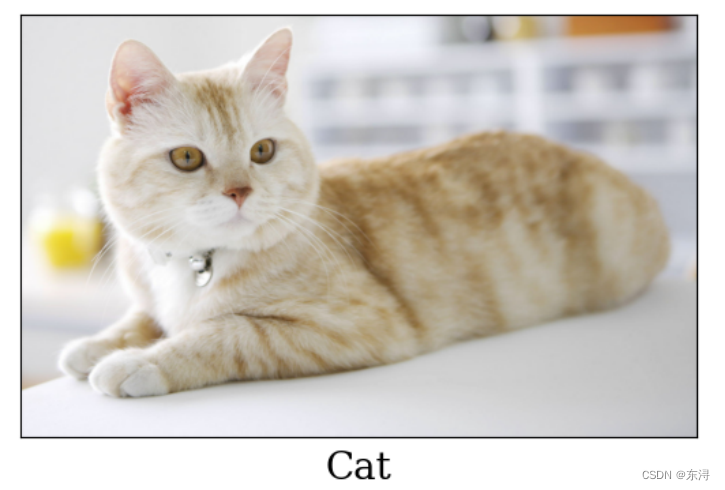
image_path = "cat.jpg"
img = image.load_img( image_path , target_size=(224,224))
img = image.img_to_array(img)
img = np.expand_dims(img, axis=0)
img.shape
predict = model.predict([img])
img1 = plt.imread("cat.jpg")
plt.imshow(img1)

plt.xticks([])
plt.yticks([])


font = {'family': 'serif',
        'color':  'BLACK',
        'weight': 'medium',
        'size': 20,
        }


if predict[0][0] == 1 :
  plt.xlabel("Cat" , fontdict = font)

if predict[0][1] == 1 :
  plt.xlabel("Dog" , fontdict = font)


plt.show()


 471
471


 被折叠的 条评论
为什么被折叠?
被折叠的 条评论
为什么被折叠?
 到【灌水乐园】发言


