


项目地址:GitHub - antgroup/echomimic_v2
基于Ant Group开源的先进人体动画生成框架,支持音频驱动生成半身人像动画
目录
部署环境
- 操作系统:Ubuntu 22.04
- GPU:NVIDIA H20
- 显存:95.09GB
- CUDA:12.4
- Python:3.10
- CUDA版本:12.4
- Pytorch版本:2.5.1+cu124
项目快速部署
默认已经安装CUDA、anaconda/miniconda。
克隆仓库
git clone https://github.com/antgroup/echomimic_v2
cd echomimic_v2
安装
自动安装和手动安装二选一即可
自动安装
(一键安装,建议手动创建conda环境以及手动下载预训练权重后,其他交给脚本)
# 执行自动安装脚本
sh linux_setup.sh
手动安装
创建 conda 环境
conda create -n echomimic python=3.10
conda activate echomimic
安装PyTorch套件及其他依赖
pip install torch==2.5.1 torchvision==0.20.1 torchaudio==2.5.1 xformers==0.0.28.post3 --index-url https://download.pytorch.org/whl/cu124
pip install -r requirements.txt
pip install facenet_pytorch==2.6.0 --no-deps
下载 ffmpeg-static
下载并解压 ffmpeg-static,然后设置FFMPEG_PATH,/path/to需要具体成ffmpeg-4.4-amd64-static文件夹所在路径
export FFMPEG_PATH=/path/to/ffmpeg-4.4-amd64-static预训练权重下载
这里建议上代理(用镜像export HF_ENDPOINT=https://hf-mirror.com或尝试git lfs pull也行)
git lfs install
git clone https://huggingface.co/BadToBest/EchoMimicV2 pretrained_weights

cd pretrained_weights
#下载sd-vae-ft-mse
git clone https://huggingface.co/stabilityai/sd-vae-ft-mse#下载audio_processor(whisper)
wget -P ./audio_processor "https://openaipublic.azureedge.net/main/whisper/models/65147644a518d12f04e32d6f3b26facc3f8dd46e5390956a9424a650c0ce22b9/tiny.pt"注意!!!:官方教程中的手动安装此处缺少下载了一个模型 sd-image-variations-diffusers
git clone https://huggingface.co/lambdalabs/sd-image-variations-diffuserspretrained_weights 的组织方式如下
./pretrained_weights/
├── denoising_unet.pth├── denoising_unet_acc.pth
├── reference_unet.pth
├── motion_module.pth├── motion_module_acc.pth
├── pose_encoder.pth
├── sd-vae-ft-mse
├── diffusion_pytorch_model.bin└── diffusion_pytorch_model.safetensors
├── audio_processor
└── tiny.pt└──sd-image-variations-diffusers
└── ...
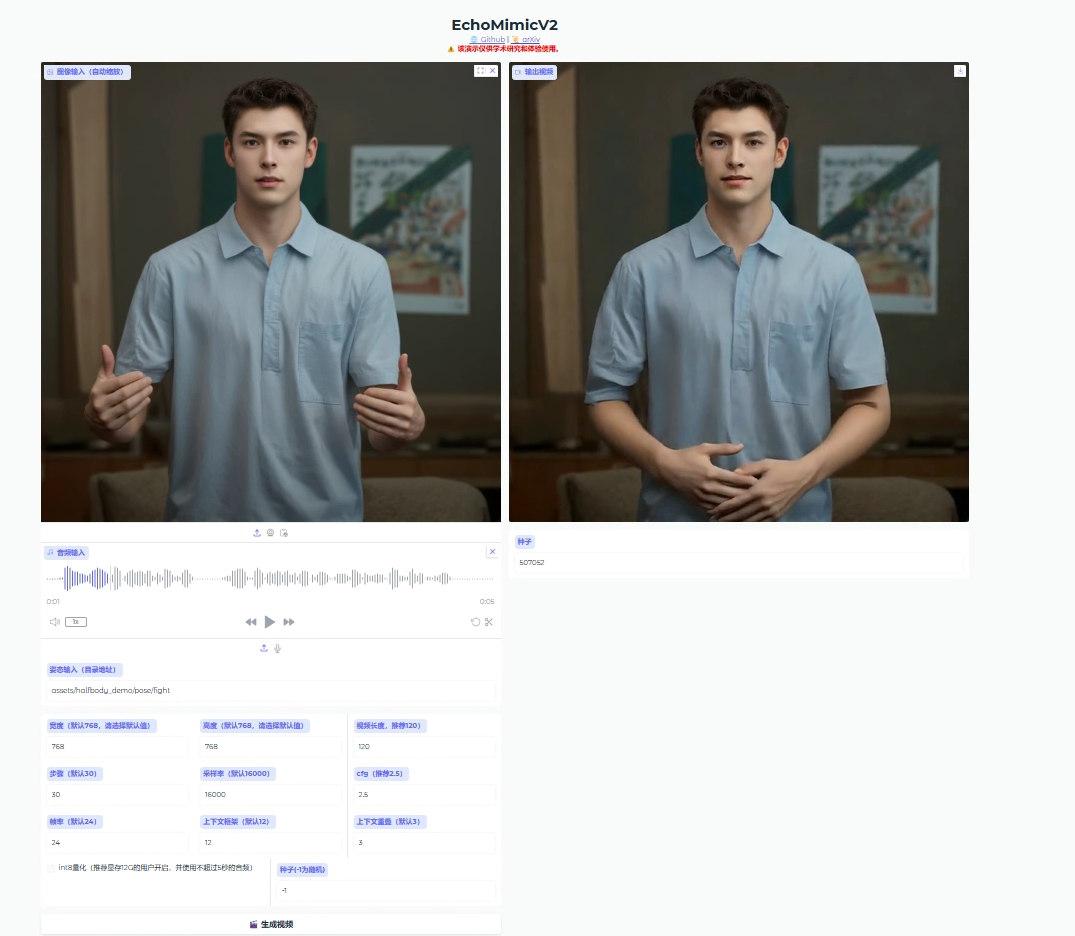
启动演示
启动Gradio网页端
cd .. #回到echomimic_v2目录
python app.py
#这样输出则启动成功
(echomimic) :~/echomimic_v2$ python app.py
CUDA版本:12.4
Pytorch版本:2.5.1+cu124
显卡型号:NVIDIA H20
显存大小:95.09GB
精度:float16
add ffmpeg to path
* Running on local URL: http://0.0.0.0:7864#如果和我一样ssh连接的服务器,URL改为服务器主机ip即可
#主机123.12.123.12则访问http://123.12.123.12:7864
访问Gradio网页端成功界面
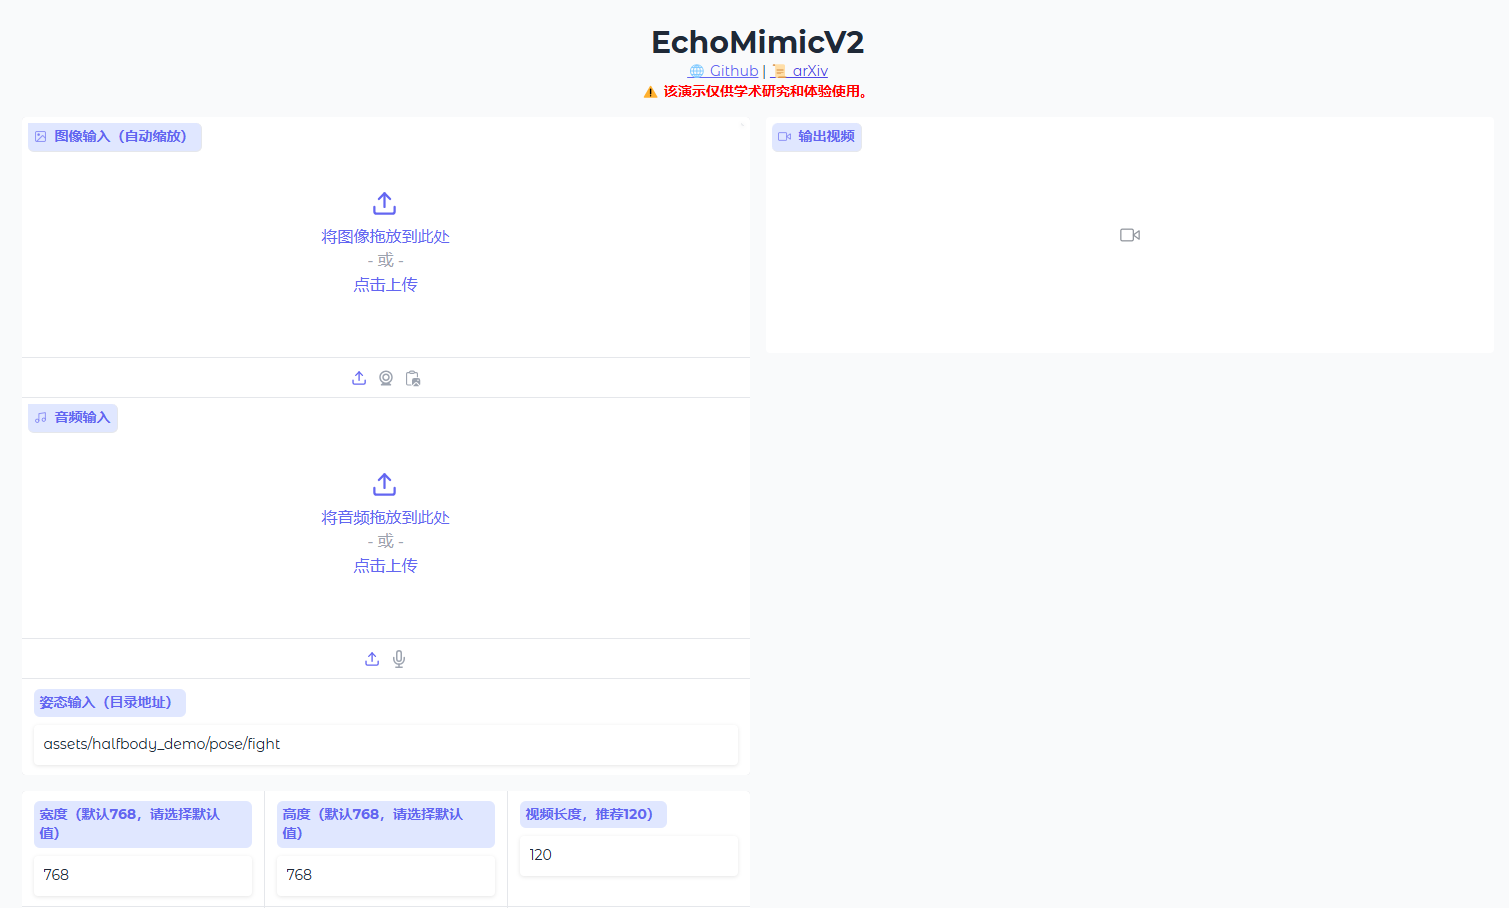
运行预设的图像和音频生成视频
运行python推理脚本或加速脚本
python infer.py --config='./configs/prompts/infer.yaml'

python infer_acc.py --config='./configs/prompts/infer_acc.yaml'
出现进度条则正常推理
using motion module
Pose: ./assets/halfbody_demo/pose/01
Reference: ./assets/halfbody_demo/refimag/natural_bk_openhand/0035.png
Audio: ./assets/halfbody_demo/audio/chinese/echomimicv2_woman.wav
video in 24 FPS, audio idx in 50FPS
latents shape:torch.Size([1, 4, 149, 96, 96]), video_length:149
100%|██████████████████████████████████████████████████████████████████████████████████████████████████████████████████████████████████████████████████████████████████████████████████████████████████████████████| 30/30 [12:55<00:00, 25.86s/it]
100%|████████████████████████████████████████████████████████████████████████████████████████████████████████████████████████████████████████████████████████████████████████████████████████████████████████████| 149/149 [00:13<00:00, 10.74it/s]
Moviepy - Building video outputs/pretrained_weights-itermotion_module-seed3407/natural_bk_openhand.0035.png/01/0035-a-chinese/echomimicv2_woman.wav-i0_sig.mp4.
MoviePy - Writing audio in echomimicv2_woman.wav-i0_sigTEMP_MPY_wvf_snd.mp4
MoviePy - Done.
Moviepy - Writing video outputs/pretrained_weights-itermotion_module-seed3407/natural_bk_openhand.0035.png/01/0035-a-chinese/echomimicv2_woman.wav-i0_sig.mp4Moviepy - Done !
Moviepy - video ready outputs/pretrained_weights-itermotion_module-seed3407/natural_bk_openhand.0035.png/01/0035-a-chinese/echomimicv2_woman.wav-i0_sig.mp4
outputs/pretrained_weights-itermotion_module-seed3407/natural_bk_openhand.0035.png/01/0035-a-chinese/echomimicv2_woman.wav-i0
EMTD 数据集
(普通用户(仅生成动画)无需EMTD数据集,依赖预训练权重即可)
下载EMTD 数据集
cd EMTD_dataset
python download.py
如果遇到 No such file or directory: 'yt-dlp',pip install yt-dlp即可。
如果遇到下面的问题,参考作者文章Sign in to confirm you’re not a bot
Fail to download https://www.youtube.com/watch?app=desktop&v=R7jm0-R9N_o, error info:
ERROR: [youtube] R7jm0-R9N_o: Sign in to confirm you’re not a bot. Use --cookies-from-browser or --cookies for the authentication. See https://github.com/yt-dlp/yt-dlp/wiki/FAQ#how-do-i-pass-cookies-to-yt-dlp for how to manually pass cookies. Also see https://github.com/yt-dlp/yt-dlp/wiki/Extractors#exporting-youtube-cookies for tips on effectively exporting YouTube cookies
后面数据切片和数据预处理这两个部分,由于作者显卡目前还不支持ffmpeg生成av1,没有继续
bash ./EMTD_dataset/slice.sh
python ./EMTD_dataset/preprocess.py
踩坑及解决方法
bug1
运行python app.py时,遇到login to server failed: dial tcp x.x.x.x:7000: i/o timeout
[W] [service.go:132] login to server failed: dial tcp 44.237.78.176:7000: i/o timeout
Could not create share link. Please check your internet connection or our status page:
xdg-open: no method available for opening 'http://localhost:7860/'
参考作者设置代理文章login to server failed
设置代理的方法还适用于在自动安装时遇到
Could not install packages due to an OSError: HTTPSConnectionPool(host='github.com', port=443)
Connection to github.com timed out.
以及预训练权重下载过慢
bug2
运行python app.py时,遇到TypeError: argument of type 'bool' is not iterable,更新gradio和gradio_client即可
pip uninstall gradio gradio_client -y
pip install gradio gradio_client
bug3
运行python infer.py --config='./configs/prompts/infer.yaml' 遇到
ValueError: Cannot load <class 'src.models.unet_2d_condition.UNet2DConditionModel'> from ./pretrained_weights/sd-image-variations-diffusers because the following keys are missing
这也是手动安装才会遇到的bug,下载 sd-image-variations-diffusers即可,具体参考预训练权重下载
提示1
运行python infer.py --config='./configs/prompts/infer.yaml' 或python infer_acc.py --config='./configs/prompts/infer_acc.yaml'出现
An error occurred while trying to fetch ./pretrained_weights/sd-image-variations-diffusers: Error no file named diffusion_pytorch_model.safetensors found in directory ./pretrained_weights/sd-image-variations-diffusers.
Defaulting to unsafe serialization. Pass `allow_pickle=False` to raise an error instead.
这个目录下面确实是没有这个文件的,也特地去hugging-face对应的页面看过了,的确不应该有这个文件,但是这个报错不影响推理,也可以在infer.py或infer_acc.py文件 UNet2DConditionModel.from_pretrained 那里加一个 use_safetensors=False,解决
#修改后
reference_unet = UNet2DConditionModel.from_pretrained(
config.pretrained_base_model_path,
subfolder="unet",
use_safetensors=False,
).to(dtype=weight_dtype, device=device)
reference_unet.load_state_dict(
torch.load(config.reference_unet_path, map_location="cpu"),
)


 20万+
20万+

 被折叠的 条评论
为什么被折叠?
被折叠的 条评论
为什么被折叠?
 到【灌水乐园】发言


