


Asynocio异步编程实战篇(1)
异步上下文管理器
- 回顾:什么是上下文管理器:实现了
__enter__和__exit__的对象
import time


class ContextManager:
    def __init__(self):
        self.conn = None

    def action(self):
        return self.conn

    def __enter__(self):
        # 链接数据库
        time.sleep(1)
        self.conn = "OK"
        return self

    def __exit__(self, exc_type, exc, tb):
        # 关闭数据库链接
        self.conn = "CLOSE"


def main():
    with ContextManager() as cm:
        result = cm.action()
        print(result)


main()
- 异步上下文管理器:实现
__aenter__和__aexit__,可以使用async with
import asyncio


class ContextManager:
    def __init__(self):
        self.conn = None

    async def action(self):
        return self.conn

    async def __aenter__(self):
        # 链接数据库
        await asyncio.sleep(1)
        self.conn = "OK"
        return self

    async def __aexit__(self, exc_type, exc, tb):
        # 关闭数据库链接
        self.conn = "CLOSE"


async def main():
    async with ContextManager() as cm:
        result = await cm.action()
        print(result)


asyncio.run(main())
异步迭代器
回顾:什么是迭代器:实现了__iter__和__next__的对象
# 自己实现一个range()

class MyRange:
    def __init__(self, total=0):
        self.total = total
        self.count = 0

    def __iter__(self):
        return self

    def __next__(self):
        if self.count < self.total:
            x = self.count
            self.count += 1
            return x
        else:
            raise StopIteration


for i in MyRange(10):
    print(i)
- 异步迭代器:需要实现
__aiter__和__anext__,可以使用async for
import asyncio


class MyRange:
    def __init__(self, total=0):
        self.total = total
        self.count = 0

    def __aiter__(self):
        return self

    async def __anext__(self):
        if self.count < self.total:
            await asyncio.sleep(1)
            x = self.count
            self.count += 1
            return x
        else:
            raise StopAsyncIteration


async def main():
    async for i in MyRange(10):
        print(i)


asyncio.run(main())
异步操作 mysql
在python中操作mysql我们通常使用pymysql,但是在异步的世界中我们使用aiomysql。这其中:连接、执行SQL、关闭都涉及网络IO请求,使用asycio异步的方式可以在IO等待时去做一些其他任务,从而提升性能。
- 安装
aiomysql
pip install aiomysql
- 示例1:简单使用
import asyncio
import aiomysql


async def main():
    # 连接MySQL
    conn = await aiomysql.connect(
        host="127.0.0.1", port=3306, user="root", password="12345", db="mysql"
    )
    # 创建CURSOR
    cur = await conn.cursor()
    # 执行SQL
    await cur.execute("SELECT Host,User FROM user")
    # 获取SQL结果
    result = await cur.fetchall()
    print(result)
    # 关闭CURSOR
    await cur.close()
    # 关闭连接
    conn.close()


asyncio.run(main())
- 示例2:连接池
import asyncio
import aiomysql


async def go():
    pool = await aiomysql.create_pool(host='127.0.0.1', port=3306,
                                      user='root', password='12345',
                                      db='mysql', autocommit=False)

    async with pool.acquire() as conn:
        cur = await conn.cursor()
        await cur.execute("SELECT 10")
        ret = await cur.fetchone()
        print(ret)

    pool.close()
    await pool.wait_closed()


loop = asyncio.get_event_loop()
loop.run_until_complete(go())
异步操作redis
异步世界操作redis,一般常使用aioredis:https://aioredis.readthedocs.io/en/latest/
- 支持连接池、事务、管道等等。
pip install aioredis
- 示例
import asyncio
import aioredis


async def main():
    # Redis client bound to single connection (no auto reconnection).
    redis = aioredis.from_url(
        "redis://localhost", encoding="utf-8", decode_responses=True
    )
    async with redis.client() as conn:
        await conn.set("my-key", "value")
        val = await conn.get("my-key")
    print(val)


async def redis_pool():
    # Redis client bound to pool of connections (auto-reconnecting).
    redis = aioredis.from_url(
        "redis://localhost", encoding="utf-8", decode_responses=True
    )
    await redis.set("my-key", "value")
    val = await redis.get("my-key")
    print(val)


if __name__ == "__main__":
    asyncio.run(main())
    asyncio.run(redis_pool())
注意:
-
目前最先版已经启用了
create_redis(),create_redis_pool(),create_pool() -
from_url是一个函数,内部调用Redis.from_url(本身是一个类方法),返回一个连接池
-
redis.client()返回一个具体的redis客户端,且可以使用异步上下文管理器
-
我们也可以自己通过Redis类实例化客户端(不推荐)
-
看看源码
    async def execute_command(self, *args, **options):
        """Execute a command and return a parsed response"""
        await self.initialize()
        pool = self.connection_pool
        command_name = args[0]
        conn = self.connection or await pool.get_connection(command_name, **options)
        try:
            await conn.send_command(*args)
            return await self.parse_response(conn, command_name, **options)
        except (ConnectionError, TimeoutError) as e:
            await conn.disconnect()
            if not (conn.retry_on_timeout and isinstance(e, TimeoutError)):
                raise
            await conn.send_command(*args)
            return await self.parse_response(conn, command_name, **options)
        finally:
            if not self.connection:
                await pool.release(conn)
异步发请求
传统python代码中发请求(如爬虫)我们一般使用requests模板,但asyncio和Python的异步HTTP客户端,常用的两个包是 aiohttp和httpx
-
aiohttp:异步支持客户端和服务端,功能强大。https://docs.aiohttp.org/en/stable/
-
httpx:httpx 既能发送同步请求,又能发送异步请求。https://www.python-httpx.org/async/
-
性能上aiohttp优于httpx
-
基本使用
import asyncio

import aiohttp
import httpx


async def aiohttp_demo():
    print("start: aiohttp")
    async with aiohttp.ClientSession() as session:
        async with session.get('http://www.baidu.com') as response:

            print("Status:", response.status)
            print("Content-type:", response.headers['content-type'])

            html = await response.text()
            print("Body:", html[:15], "...")


async def httpx_demo():
    print("start: httpx")
    async with httpx.AsyncClient() as client:
        resp = await client.get('http://www.baidu.com')
        print("status-code:", resp.status_code)
        print(resp.text)


tasks = [aiohttp_demo(), httpx_demo()]
asyncio.run(asyncio.wait(tasks))
异步文件操作
传统代码中使用open操作文件,异步世界中使用aiofile,它和python原生open 一致,而且可以支持异步迭代。
- 基本文件操作:async_open函数,返回类文件对象,有异步write、read、seek、readline等。
import asyncio

from aiofile import async_open


async def main():
    async with async_open("test.txt", 'w+') as afp:
        await afp.write("Hello ")
        await afp.write("world")
        afp.seek(0)

        print(await afp.read())

        await afp.write("Hello from\nasync world")
        afp.seek(0)
        print(await afp.readline())
        print(await afp.readline())


asyncio.run(main())
异步发邮件
异步世界的发邮件模块
aiosmtplib is an asynchronous SMTP client for use with asyncio.
官网:https://aiosmtplib.readthedocs.io/en/stable/overview.html
- 快速使用
import asyncio
from email.message import EmailMessage

import aiosmtplib


async def main():
    message = EmailMessage()
    message["From"] = "root@localhost"
    message["To"] = "somebody@example.com"
    message["Subject"] = "Hello World!"
    message.set_content("Sent via aiosmtplib")
    await aiosmtplib.send(message, hostname="127.0.0.1", port=25)


loop = asyncio.get_event_loop()
loop.run_until_complete(main())
- 登录认证:提供用户名和密码(如使用qq邮箱)
QQ邮箱:
hostname=“smtp.qq.com”
port=587
username=“你的QQ邮箱号”
password=“授权码”
await send(
    message,
    hostname="127.0.0.1",
    port=1025,
    username="test",
    password="test"
)

asgi
在说asgi之前,不得不回顾下什么是wsgi
wsgi是为 Python 定义的 Web 服务器和 Web 应用程序或框架之间的一种简单而通用的接口。
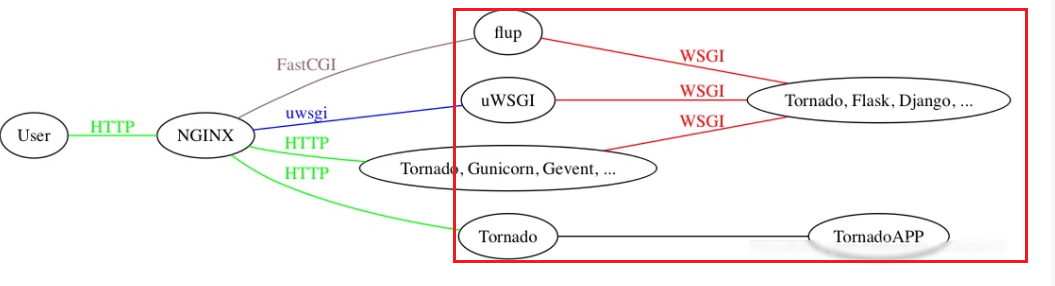
简单来说,wsgi规定了web服务器和web应用之间的通信协议。
def app(environ, start_response):
    start_response('200 OK', [('Content-Type', 'text/html')])
    return '<h1>Hello, web!</h1>'

# environ:一个包含所有HTTP请求信息的dict对象;
# start_response:一个发送HTTP响应的函数。
整个app()函数本身没有涉及到任何解析HTTP的部分,也就是说,底层代码不需要我们自己编写,我们只负责在更高层次上考虑如何响应请求就可以了。比如Diango和Flask等等web框架属于web应用这层。
app()函数必须由WSGI服务器来调用。有很多符合WSGI规范的服务器,比如uwsgi、gunicorn、gevent等,Python内置了一个WSGI服务器,这个模块叫wsgiref,它是用纯Python编写的WSGI服务器的参考实现。
补充:一般web框架不会使用函数式的app接口,会采用面向对象的方式封装成类的形式,比如Django内部定义了一个WSGIHandler类,通过 __call__(self, environ, start_redponse)实现了wsgi接口协议。
wsgi缺点:wsgi是一个单调用、同步接口,即输入一个请求,返回一个响应。这个模式无法支持长连接或者WebSocket这样的连接。即使我们想办法将应用改成异步,还有另一个限制:一个URL对应一个请求,而HTTP/2、Websocket等在一个URL里会出现多个请求。
WSGI applications are a single, synchronous callable that takes a request and returns a response; this doesn’t allow for long-lived connections, like you get with long-poll HTTP or WebSocket connections.
Even if we made this callable asynchronous, it still only has a single path to provide a request, so protocols that have multiple incoming events (like receiving WebSocket frames) can’t trigger this.
asgi:异步服务器网关接口(Asynchronous Server Gateway Interface)
ASGI is a spiritual successor to WSGI, the long-standing Python standard for compatibility between web servers, frameworks, and applications.
uvicorn------asgi---------fastapi
实现asgi的app
# example.py
async def app(scope, receive, send):
    assert scope['type'] == 'http'

    await send({
        'type': 'http.response.start',
        'status': 200,
        'headers': [
            [b'content-type', b'text/plain'],
        ],
    })
    await send({
        'type': 'http.response.body',
        'body': b'Hello, world!',
    })
scope- A dictionary containing information about the incoming connection.receive- A channel on which to receive incoming messages from the server.send- A channel on which to send outgoing messages to the server.
运行asgi服务器:uvicorn(先下载 pip install uvicorn)
uvicorn example:app
也可以在应用中直接启动uvicorn
import uvicorn

async def app(scope, receive, send):
    ...

if __name__ == "__main__":
    uvicorn.run("example:app", host="127.0.0.1", port=5000, log_level="info")
- 基于类的app
class App:
    async def __call__(self, scope, receive, send):
        assert scope['type'] == 'http'
        ...

app = App()
常见的实现了asgi的应用:fastapi、starleete、django channels等等
uvloop
uvloop是内置 asyncio 事件循环的快速、直接的替代方案。
uvloop和 asyncio 与 Python 3.5 中的 async/await 的强大功能相结合,使得在 Python 中编写高性能网络代码比以往任何时候都更加容易。
uvloop使异步速度更快。事实上,它至少比 nodejs、gevent 以及任何其他 Python 异步框架快 2 倍。基于 uvloop 的 asyncio 的性能接近 Go 程序。
-
为什么快:uvloop基于libuv,libuv是一个使用C语言实现的高性能异步I/O库,uvloop用来代替asyncio默认事件循环,可以进一步加快异步I/O操作的速度。
-
安装uvloop
pip install uvloop # 可惜!!!windows不支持
- 基本使用
# 方式1
import asyncio
import uvloop
asyncio.set_event_loop_policy(uvloop.EventLoopPolicy())

# 方式2 uvloop.install()


# 方式3
import asyncio
import uvloop
loop = uvloop.new_event_loop()
asyncio.set_event_loop(loop)


 8973
8973


 被折叠的 条评论
为什么被折叠?
被折叠的 条评论
为什么被折叠?
 到【灌水乐园】发言


