


一、Vue中的ajax请求
1.1 解决开发环境 Ajax 跨域问题
总结:
1.1.1 模拟跨域问题
准备好测试的服务器
server1.js
const express = require('express')
const app = express()

app.use((request,response,next)=>{
   console.log('有人请求服务器1了');
   // console.log('请求来自于',request.get('Host'));
   // console.log('请求的地址',request.url);
   next()
})

app.get('/students',(request,response)=>{
   const students = [
   	{id:'001',name:'tom',age:18},
   	{id:'002',name:'jerry',age:19},
   	{id:'003',name:'tony',age:120},
   ]
   response.send(students)
})

app.listen(5000,(err)=>{
   if(!err) console.log('服务器1启动成功了,请求学生信息地址为:http://localhost:5000/students');
})
server2.js
const express = require('express')
const app = express()

app.use((request,response,next)=>{
   console.log('有人请求服务器2了');
   next()
})

app.get('/cars',(request,response)=>{
   const cars = [
   	{id:'001',name:'奔驰',price:199},
   	{id:'002',name:'马自达',price:109},
   	{id:'003',name:'捷达',price:120},
   ]
   response.send(cars)
})

app.listen(5001,(err)=>{
   if(!err) console.log('服务器2启动成功了,请求汽车信息地址为:http://localhost:5001/cars');
})
准备访问5000服务器 存在跨域问题
安装插件/第三方库 axios 以发送请求
- npm i axios
- 引入 import axios from ‘axios’
app.vue
<template>
	<div>
		<button @click="getStudents">获取学生信息</button>
	</div>
</template>

<script>
	import axios from 'axios'
	export default {
		name:'App',
		methods: {
			getStudents(){
				axios.get('http://localhost:5000/students').then(
					// 成功
					response => {
						console.log('请求成功了',response.data)
					},
					// 失败
					error => {
						console.log('请求失败了',error.message)
					}
				)
			}
		},
	}
</script>

1.1.2 解决跨域
- cors 不用前端人员做任何的事情
- 写服务器(后端人员)的人,在服务器里面,给你返回响应的时候,加几个特殊的响应头
- 不是随便的配置的,造成的后果,任何人都可以找你这台服务器要数据
- jsonp 开发时使用微乎其微
- 借助了 srcipt 便签里面 src 属性 不受同源策略限制
- 前端人员需要写特殊的写法,后端人员也需要配合你,并且只能解决 get请求
- 代理服务器
- 和所处的位置(前端)是一样的,协议名、主机名、端口号都保持一致
- 服务器和服务器之间传递不用ajax,使用的是传统的http请求
- nginx 代理服务器
- vue-cli 开启一个代理服务器
代理服务器原理:
开一台跟本地服务器端口相同的服务器,由它去获取端口5000的数据
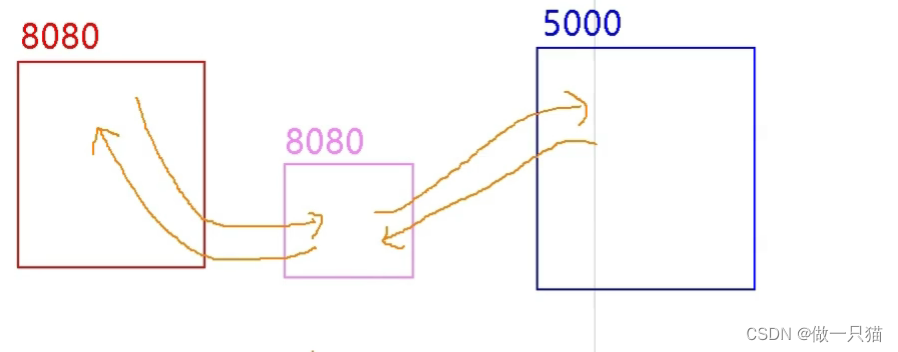
配置代理方式一:
- 代理服务器不是所有的请求,都转发给5000(不能灵活的配置走不走代理)
- 代理服务器本事就有的数据,就不转发给5000
- 不能配置多个代理
vue.config.js
 // 开启代理服务器
 devServer: {
   proxy: 'http://localhost:5000'
 },
app.vue 端口改成本地服务器
<template>
	<div>
		<button @click="getStudents">获取学生信息</button>
	</div>
</template>

<script>
	import axios from 'axios'
	export default {
		name:'App',
		methods: {
			getStudents(){
				axios.get('http://localhost:8080/students').then(
					// 成功
					response => {
						console.log('请求成功了',response.data)
					},
					// 失败
					error => {
						console.log('请求失败了',error.message)
					}
				)
			}
		},
	}
</script>
配置代理方式二:
vue.config.js
	devServer: {
   	proxy: {
     '/atguigu': { // 请求前缀
       target: 'http://localhost:5000', // 请求地址
				pathRewrite:{'^/atguigu':''}, // 重写路径 key-value  key正则的匹配条件 把以atguigu 开头的变成 空字符串
       // ws: true, //用于支持websocket  默认true
       // changeOrigin: true //用于控制请求头中的host值 默认true
     },
     '/demo': {
       target: 'http://localhost:5001',
				pathRewrite:{'^/demo':''},
       // ws: true, //用于支持websocket
       // changeOrigin: true //用于控制请求头中的host值
     }
   }
 }
app.vue
<template>
	<div>
		<button @click="getStudents">获取学生信息</button><br>
		<button @click="getCars">获取汽车信息</button>
	</div>
</template>

<script>
	import axios from 'axios'
	export default {
		name:'App',
		methods: {
			getStudents(){
				axios.get('http://localhost:8080/atguigu/students').then(
					response => {
						console.log('请求成功了',response.data)
					},
					error => {
						console.log('请求失败了',error.message)
					}
				)
			},
			getCars(){
				axios.get('http://localhost:8080/demo/cars').then(
					response => {
						console.log('请求成功了',response.data)
					},
					error => {
						console.log('请求失败了',error.message)
					}
				)
			}
		},
	}
</script>
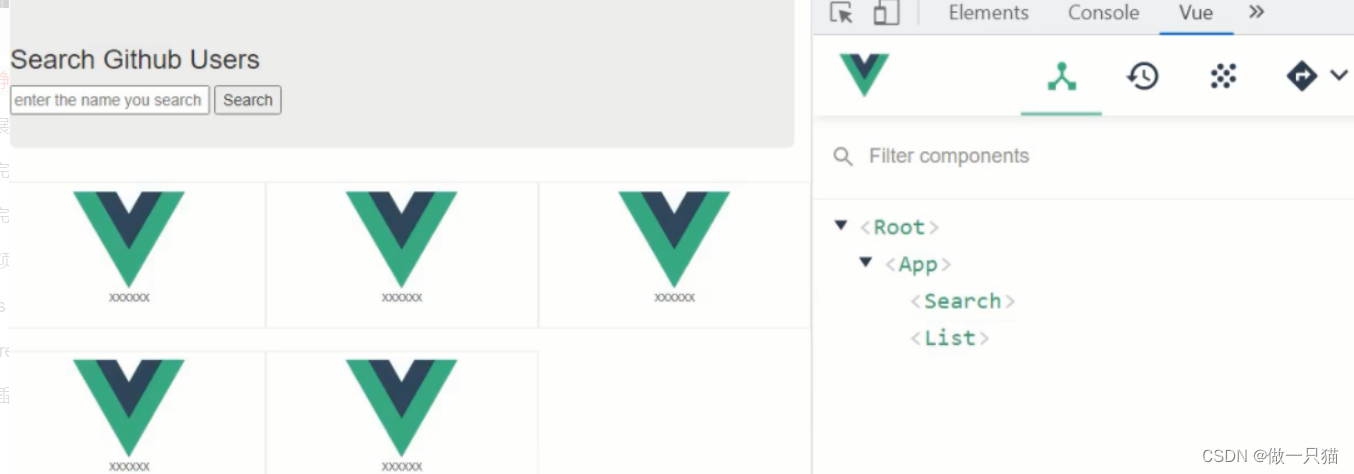
二、github用户搜索案例
项目接口: https://api.github.com/search/users?q=xxx
2.1 静态编写
① 基本代码
app.vue
<template>
<div id="app">
<div class="container">
<!--头部的搜索-->
<section class="jumbotron">
<h3 class="jumbotron-heading">Search Github Users</h3>
<div>
<input type="text" placeholder="enter the name you search"/> <button>Search</button>
</div>
</section>
<!--List-->
<div class="row">
<div class="card">
<a href="https://github.com/xxxxxx" target="_blank">
<img src="https://cn.vuejs.org/images/logo.svg" style='width: 100px'/>
</a>
<p class="card-text">xxxxxx</p>
</div>
<div class="card">
<a href="https://github.com/xxxxxx" target="_blank">
<img src="https://cn.vuejs.org/images/logo.svg" style='width: 100px'/>
</a>
<p class="card-text">xxxxxx</p>
</div>
<div class="card">
<a href="https://github.com/xxxxxx" target="_blank">
<img src="https://cn.vuejs.org/images/logo.svg" style='width: 100px'/>
</a>
<p class="card-text">xxxxxx</p>
</div>
<div class="card">
<a href="https://github.com/xxxxxx" target="_blank">
<img src="https://cn.vuejs.org/images/logo.svg" style='width: 100px'/>
</a>
<p class="card-text">xxxxxx</p>
</div>
<div class="card">
<a href="https://github.com/xxxxxx" target="_blank">
<img src="https://cn.vuejs.org/images/logo.svg" style='width: 100px'/>
</a>
<p class="card-text">xxxxxx</p>
</div>
</div>
</div>
</div>
</template>
<script>
export default {
name:'App',
}
</script>
<style>
.album {
min-height: 50rem; /* Can be removed; just added for demo purposes */
padding-top: 3rem;
padding-bottom: 3rem;
background-color: #f7f7f7;
}
.card {
float: left;
width: 33.333%;
padding: .75rem;
margin-bottom: 2rem;
border: 1px solid #efefef;
text-align: center;
}
.card > img {
margin-bottom: .75rem;
border-radius: 100px;
}
.card-text {
font-size: 85%;
}
</style>
把bootstop的样式引入
- 方式一:src下创建文件夹assets(静态资源)/css 把 bootstrap.css 存在里面
引入:
① main.js 中引入 不推荐
里面用到了第三方的样式,这些资源还不去使用,目前不用,不推荐assets方式
② 根组件app.vue引入 import ‘./assets/css/bootstrao.css’
此方式,脚手架会做一个非常严格的检查,有引入不存在的资源就会报错,没有使用也不可以 - 方式二:在public下建立一个css文件夹 把 bootstrap 放入里面,在index.html页面中引入
相对路径
index.html
<!DOCTYPE html>
<html lang="">
  <head>
    <meta charset="utf-8">
    <meta http-equiv="X-UA-Compatible" content="IE=edge">
    <meta name="viewport" content="width=device-width,initial-scale=1.0">
    <link rel="icon" href="<%= BASE_URL %>favicon.ico">
    //引入第三方库
    <link rel="stylesheet" href="<%= BASE_URL %>css/bootstrap.css">
    <title><%= htmlWebpackPlugin.options.title %></title>

  </head>
  <body>
    <noscript>
      <strong>We're sorry but <%= htmlWebpackPlugin.options.title %> doesn't work properly without JavaScript enabled. Please enable it to continue.</strong>
    </noscript>
    <div id="app"></div>
    <!-- built files will be auto injected -->
  </body>
</html>
② 拆组件
app.vue
样式都是控制列表区的
<template>
	<div class="container">
		<Search/>
		<List/>
	</div>
</template>

<script>
	import Search from './components/Search'
	import List from './components/List'
	export default {
		name:'App',
		components:{Search,List}
	}
</script>
List.vue
<template>
      <!--List-->
		<div class="row">
		<div class="card">
			<a href="https://github.com/xxxxxx" target="_blank">
			<img src="https://cn.vuejs.org/images/logo.svg" style='width: 100px'/>
			</a>
			<p class="card-text">xxxxxx</p>
		</div>
		<div class="card">
			<a href="https://github.com/xxxxxx" target="_blank">
			<img src="https://cn.vuejs.org/images/logo.svg" style='width: 100px'/>
			</a>
			<p class="card-text">xxxxxx</p>
		</div>
		<div class="card">
			<a href="https://github.com/xxxxxx" target="_blank">
			<img src="https://cn.vuejs.org/images/logo.svg" style='width: 100px'/>
			</a>
			<p class="card-text">xxxxxx</p>
		</div>
		<div class="card">
			<a href="https://github.com/xxxxxx" target="_blank">
			<img src="https://cn.vuejs.org/images/logo.svg" style='width: 100px'/>
			</a>
			<p class="card-text">xxxxxx</p>
		</div>
		<div class="card">
			<a href="https://github.com/xxxxxx" target="_blank">
			<img src="https://cn.vuejs.org/images/logo.svg" style='width: 100px'/>
			</a>
			<p class="card-text">xxxxxx</p>
		</div>
		</div>
</template>

<script>
	export default {
		name:'List'
	}
</script>

<style scoped>
  .album {
    min-height: 50rem; /* Can be removed; just added for demo purposes */
    padding-top: 3rem;
    padding-bottom: 3rem;
    background-color: #f7f7f7;
  }

  .card {
    float: left;
    width: 33.333%;
    padding: .75rem;
    margin-bottom: 2rem;
    border: 1px solid #efefef;
    text-align: center;
  }

  .card > img {
    margin-bottom: .75rem;
    border-radius: 100px;
  }

  .card-text {
    font-size: 85%;
  }
</style>
Search.vue
使用的是 bootstop 中的样式
<template>
<!--头部的搜索-->
<section class="jumbotron">
<h3 class="jumbotron-heading">Search Github Users</h3>
<div>
<input type="text" placeholder="enter the name you search"/> <button>Search</button>
</div>
</section>
</template>
<script>
export default {
name:'Search'
}
</script>
2.2 展示动态的数据和交互
Search.vue
- 获取用户搜索框输入
- 发送请求
- 把数据通过全局事件总线的方式传递给list
<template>
<section class="jumbotron">
<h3 class="jumbotron-heading">Search Github Users</h3>
<div>
<input type="text" placeholder="enter the name you search" v-model="keyWord"/>
<button @click="searchUsers">Search</button>
</div>
</section>
</template>
<script>
import axios from 'axios'
export default {
name:'Search',
data() {
return {
keyWord:''
}
},
methods: {
searchUsers(){
//请求前更新List的数据
this.$bus.$emit('updateListData',{isLoading:true,errMsg:'',users:[],isFirst:false})
// 魔板字符串
axios.get(`https://api.github.com/search/users?q=${this.keyWord}`).then(
response => {
console.log('请求成功了',response.data)
//请求成功后更新List的数据
this.$bus.$emit('updateListData',response.data.items)
},
error => {
console.log('请求失败了',error.message)
}
)
}
},
}
</script>

main.js 安装全局事件总线
//创建vm
new Vue({
	el:'#app',
	render: h => h(App),
	beforeCreate() {
		Vue.prototype.$bus = this
	},
})
List.vue
- List接收数据 Search 传输数据
- avatar_url 用户的头像地址 展示
- html_url 每一个人的github主页 点击时实现跳转
- login 用户的登录名 展示
<!--替换div中的数据-->
<template>
	<div class="row">
		<!-- 展示用户列表 -->
		<div class="card" v-for="user in info.users" :key="user.login">
			<a :href="user.html_url" target="_blank">
				<img :src="user.avatar_url" style='width: 100px'/>
			</a>
			<p class="card-text">{{user.login}}</p>
		</div>
	</div>
</template>
<script>
	export default {
		name:'List',
		data() {
			return {
				users:[]
			}
		},
		mounted() {
			this.$bus.$on('updateListData',(dataObj)=>{
               console.log('我是List组件,收到数据:',dataObj)
				this.dataObj = dataObj // 存数据
			})
		},
	}
</script>>
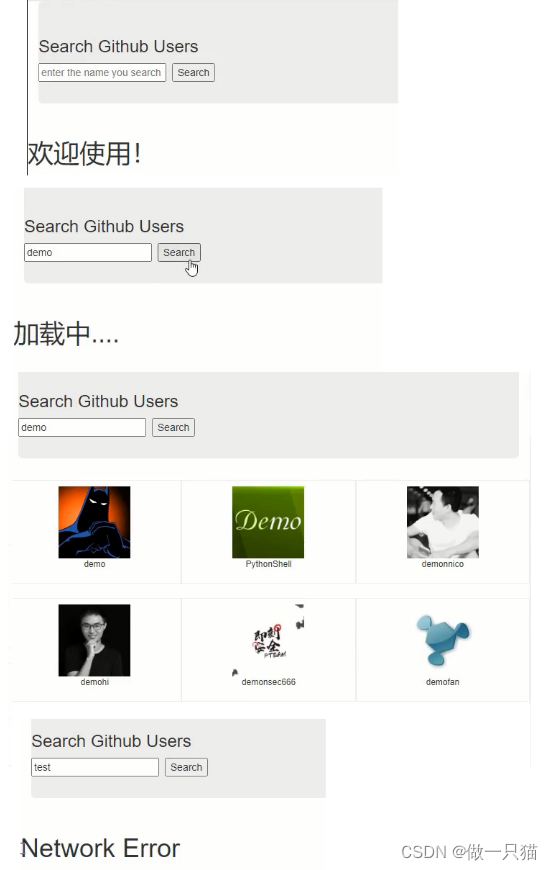
2.3 完善功能
- 一上来使用有欢迎词 list组件
- 搜索没有加载出来时,限制正在加载中 list组件
- error
List.vue
<template>
	<div class="row">
		<!-- 展示用户列表 -->
		<div v-show="info.users.length" class="card" v-for="user in info.users" :key="user.login">
			<a :href="user.html_url" target="_blank">
				<img :src="user.avatar_url" style='width: 100px'/>
			</a>
			<p class="card-text">{{user.login}}</p>
		</div>
		<!-- 展示欢迎词 -->
		<h1 v-show="info.isFirst">欢迎使用!</h1>
		<!-- 展示加载中 -->
		<h1 v-show="info.isLoading">加载中....</h1>
		<!-- 展示错误信息 -->
		<h1 v-show="info.errMsg">{{info.errMsg}}</h1>
	</div>
</template>

<script>
	export default {
		name:'List',
		data() {
			return {
				info:{
					isFirst:true,  // 是否为初次展示
					isLoading:false, // 是否处于加载中
					errMsg:'',     // 存储错误信息
					users:[]
				}
			}
		},
		mounted() {
			this.$bus.$on('updateListData',(dataObj)=>{
				this.info = {...this.info,...dataObj}// 通过字面量的形式去合并对象,重名后面为主
			})
		},
	}
</script>
Search.vue
<script>
	import axios from 'axios'
	export default {
		name:'Search',
		data() {
			return {
				keyWord:''
			}
		},
		methods: {
			searchUsers(){
				//请求前更新List的数据
				this.$bus.$emit('updateListData',{isLoading:true,errMsg:'',users:[],isFirst:false})
				axios.get(`https://api.github.com/search/users?q=${this.keyWord}`).then(
					response => {
						console.log('请求成功了')
						//请求成功后更新List的数据
						this.$bus.$emit('updateListData',{isLoading:false,errMsg:'',users:response.data.items})
					},
					error => {
						//请求后更新List的数据
						this.$bus.$emit('updateListData',{isLoading:false,errMsg:error.message,users:[]})
					}
				)
			}
		},
	}
</script>
2.4 完整代码
App.vue
<template>
	<div class="container">
		<Search/>
		<List/>
	</div>
</template>

<script>
	import Search from './components/Search'
	import List from './components/List'
	export default {
		name:'App',
		components:{Search,List}
	}
</script>
List.vue
<template>
	<div class="row">
		<!-- 展示用户列表 -->
		<div v-show="info.users.length" class="card" v-for="user in info.users" :key="user.login">
			<a :href="user.html_url" target="_blank">
				<img :src="user.avatar_url" style='width: 100px'/>
			</a>
			<p class="card-text">{{user.login}}</p>
		</div>
		<!-- 展示欢迎词 -->
		<h1 v-show="info.isFirst">欢迎使用!</h1>
		<!-- 展示加载中 -->
		<h1 v-show="info.isLoading">加载中....</h1>
		<!-- 展示错误信息 -->
		<h1 v-show="info.errMsg">{{info.errMsg}}</h1>
	</div>
</template>

<script>
	export default {
		name:'List',
		data() {
			return {
				info:{
					isFirst:true,  // 是否为初次展示
					isLoading:false, // 是否处于加载中
					errMsg:'',     // 存储错误信息
					users:[]
				}
			}
		},
		mounted() {
			this.$bus.$on('updateListData',(dataObj)=>{
				this.info = {...this.info,...dataObj}
			})
		},
	}
</script>

<style scoped>
	.album {
		min-height: 50rem; /* Can be removed; just added for demo purposes */
		padding-top: 3rem;
		padding-bottom: 3rem;
		background-color: #f7f7f7;
	}

	.card {
		float: left;
		width: 33.333%;
		padding: .75rem;
		margin-bottom: 2rem;
		border: 1px solid #efefef;
		text-align: center;
	}

	.card > img {
		margin-bottom: .75rem;
		border-radius: 100px;
	}

	.card-text {
		font-size: 85%;
	}
</style>
Search.vue
<template>
<section class="jumbotron">
<h3 class="jumbotron-heading">Search Github Users</h3>
<div>
<input type="text" placeholder="enter the name you search" v-model="keyWord"/>
<button @click="searchUsers">Search</button>
</div>
</section>
</template>
<script>
import axios from 'axios'
export default {
name:'Search',
data() {
return {
keyWord:''
}
},
methods: {
searchUsers(){
//请求前更新List的数据
this.$bus.$emit('updateListData',{isLoading:true,errMsg:'',users:[],isFirst:false})
axios.get(`https://api.github.com/search/users?q=${this.keyWord}`).then(
response => {
console.log('请求成功了')
//请求成功后更新List的数据
this.$bus.$emit('updateListData',{isLoading:false,errMsg:'',users:response.data.items})
},
error => {
//请求后更新List的数据
this.$bus.$emit('updateListData',{isLoading:false,errMsg:error.message,users:[]})
}
)
}
},
}
</script>
main.js
//引入Vue
import Vue from 'vue'
//引入App
import App from './App.vue'
//关闭Vue的生产提示
Vue.config.productionTip = false

//创建vm
new Vue({
	el:'#app',
	render: h => h(App),
	beforeCreate() {
		Vue.prototype.$bus = this
	},
})
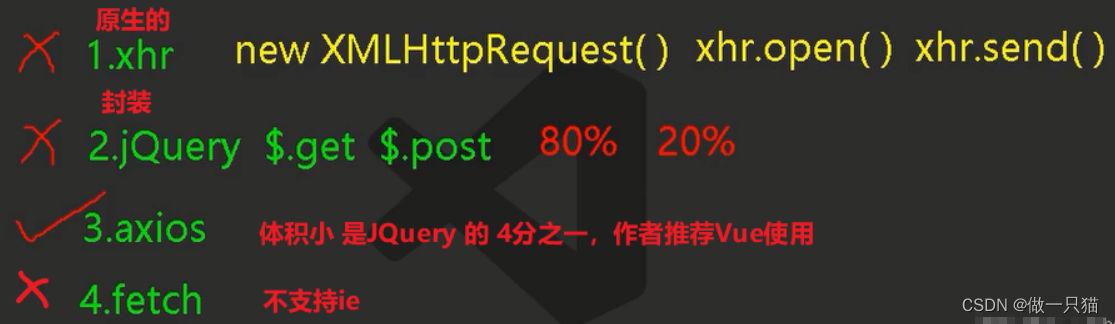
三、vue 项目中常用的 2 个 Ajax 库
axios 强力推荐
通用的 Ajax 请求库, 官方推荐,使用广泛
vue-resource(插件库)
vue 插件库, vue1.x 使用广泛, 官方已不维护。
- 安装
npm i vue-resource - 引入插件
import VueResource from ‘vue-resource’ - 使用插件
vue.use(VueResource ) - vm 和 vc 身上都多了 $http:(…)
Search.vue
//和axios使用完全一致,只是把axios.get换成this.$http.get
<script>
	export default {
		methods: {
			searchUsers(){
				this.$http.get(`https://api.github.com/search/users?q=${this.keyWord}`).then(
					response => {
						console.log('请求成功了')
						//请求成功后更新List的数据
						this.$bus.$emit('updateListData',{isLoading:false,errMsg:'',users:response.data.items})
					},
					error => {
						//请求后更新List的数据
						this.$bus.$emit('updateListData',{isLoading:false,errMsg:error.message,users:[]})
					}
				)
			}
		},
	}
</script>
四、Vue插槽solt
总结:
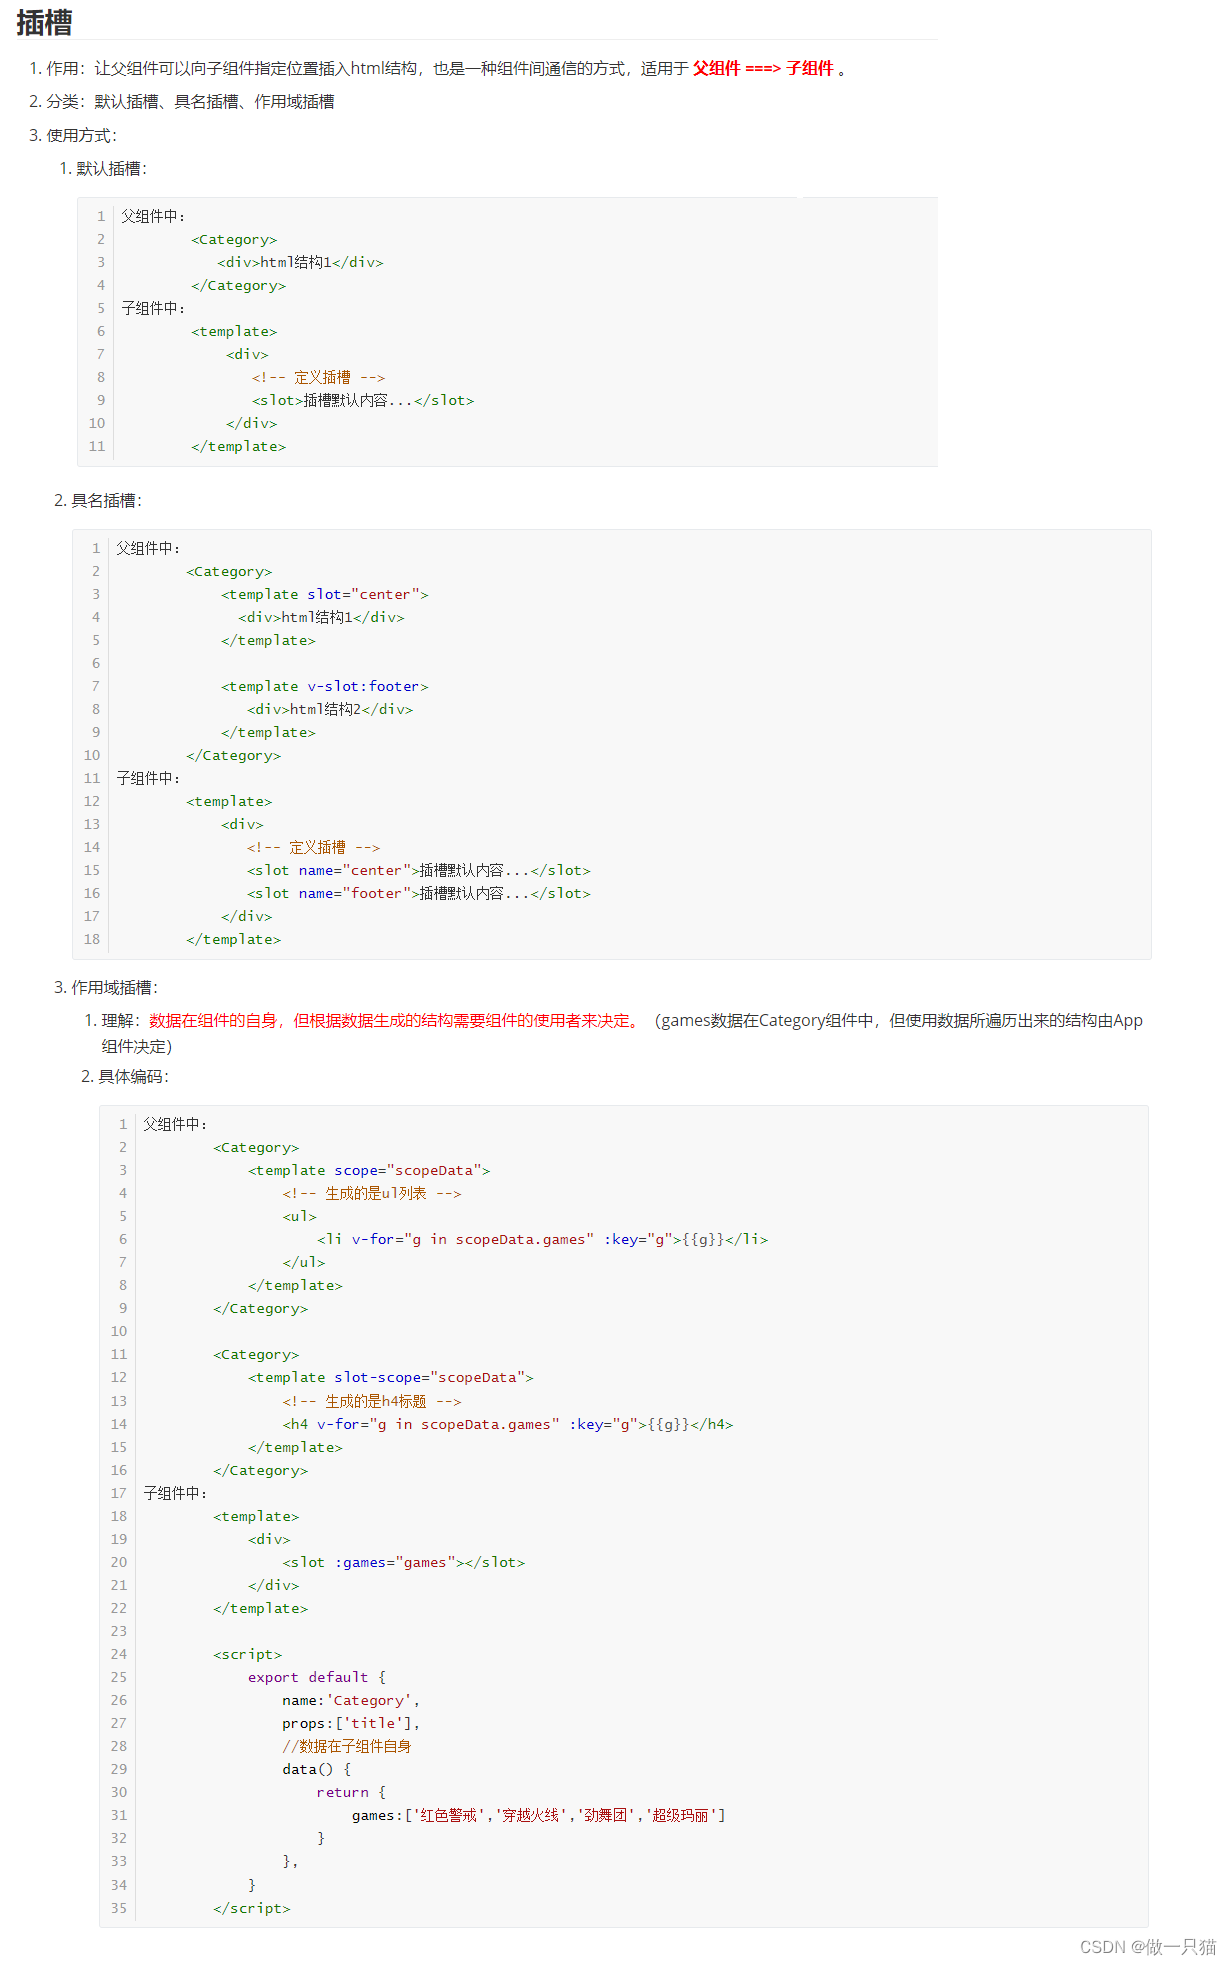
使用方式:
1. 默认插槽
父组件中:
        <Category>
        	//在这里面写的东西会自动查到slot里
           <div>html结构1</div>
        </Category>
子组件中:
        <template>
            <div>
               <!-- 定义插槽 -->
               //没东西插就会显示slot里的默认内容
               <slot>插槽默认内容...</slot>
            </div>
        </template>
2. 具名插槽
父组件中:
        <Category>
        	//方式一:slot="center"
            <template slot="center">
              <div>html结构1</div>
            </template>
			//方式二:v-slot:footer
            <template v-slot:footer>
               <div>html结构2</div>
            </template>
        </Category>
子组件中:
        <template>
            <div>
               <!-- 定义插槽 -->
               //名字对应插入
               <slot name="center">插槽默认内容...</slot>
               <slot name="footer">插槽默认内容...</slot>
            </div>
        </template>
3.作用域插槽
-
理解:数据在组件的自身(子组件),但根据数据生成的结构需要组件的使用者(父组件)来决定。(games数据在Category(子)组件中,但使用数据所遍历出来的结构由App(父)组件决定)
-
具体代码:
父组件中:
		<Category>
		//scope是旧写法,slot-scope是新api
			<template scope="scopeData">
				<!-- 生成的是ul列表 -->
				<ul>
					<li v-for="g in scopeData.games" :key="g">{{g}}</li>
				</ul>
			</template>
		</Category>

		<Category>
			<template slot-scope="scopeData">
				<!-- 生成的是h4标题 -->
				<h4 v-for="g in scopeData.games" :key="g">{{g}}</h4>
			</template>
		</Category>
子组件中:
        <template>
            <div>
            <!-- 通过数据绑定就可以把子组件的数据传到父组件 -->
                <slot :games="games"></slot>
            </div>
        </template>

        <script>
            export default {
                name:'Category',
                props:['title'],
                //数据在子组件自身
                data() {
                    return {
                        games:['红色警戒','穿越火线','劲舞团','超级玛丽']
                    }
                },
            }
        </script>
五、VUEX
原理图:
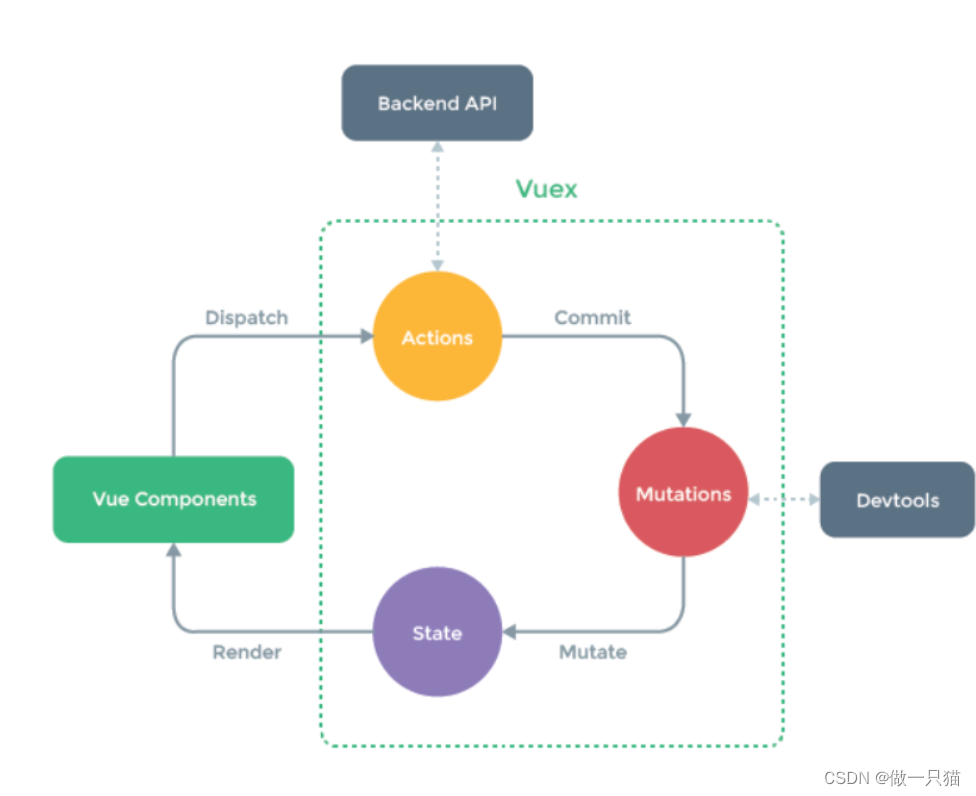
5.1 概念
在Vue中实现集中式状态(数据)管理的一个Vue插件,对vue应用中多个组件的共享状态进行集中式的管理(读/写),也是一种组件间通信的方式,且适用于任意组件间通信
何时使用
多个组件需要共享数据时
5.2 搭建vuex环境
-
npm i vuex
- vue3成为默认版本的同时,vuex也更新到了4版本
- npm i vuex 安装的是vuex4
- vuex的4版本,只能在vue3中使用
- vue2中,要用vuex的3版本 npm i vuex@3
- vue3中,要用vuex的4版本
-
Vue.use(Vuex)
-
store 管理
Actions
Mutations
State -
vc 看的见 store
创建store两种方式:
- src下创建个文件夹vuex,创建一个store.js
- 文件夹交store 里面有个index.js 官网推荐
index.js
//引入Vue核心库
import Vue from 'vue'
//引入Vuex
import Vuex from 'vuex'
//应用Vuex插件
Vue.use(Vuex)

//准备actions对象——响应组件中用户的动作
const actions = {}
//准备mutations对象——修改state中的数据
const mutations = {}
//准备state对象——保存具体的数据
const state = {}

//创建并暴露store
export default new Vuex.Store({
	actions,
	mutations,
	state
})
在main.js中创建vm时传入store配置项
......
//引入Vue
import Vue from 'vue'
//引入App
import App from './App.vue'
//引入插件
import vueResource from 'vue-resource'
//引入store
import store from './store/index'

//关闭Vue的生产提示
Vue.config.productionTip = false
//使用插件
Vue.use(vueResource)


//创建vm
new Vue({
	el:'#app',
	render: h => h(App),
	store,
	beforeCreate() {
		Vue.prototype.$bus = this
	}
})
5.3 基本使用
index.js
开发中推荐
actions 中小写
mutations 中大写
//该文件用于创建Vuex中最为核心的store
import Vue from 'vue'
//引入Vuex
import Vuex from 'vuex'
//应用Vuex插件
Vue.use(Vuex)

//准备actions——用于响应组件中的动作
const actions = {
   // context 上下文
   // 如果 Actions 中没有业务逻辑时,可以直接调用Mutations
   // 此时没有意义,拿过来就转发
	/*jia(context,value){
		console.log('actions中的jia被调用了')
		context.commit('JIA',value)
	},
	jian(context,value){
		console.log('actions中的jian被调用了')
		context.commit('JIAN',value)
	},*/
	jiaOdd(context,value){
		console.log('actions中的jiaOdd被调用了')
		if(context.state.sum % 2){
			context.commit('JIA',value)
		}
	},
	jiaWait(context,value){
		console.log('actions中的jiaWait被调用了')
		setTimeout(()=>{
			context.commit('JIA',value)
		},500)
	}
}
//准备mutations——用于操作数据(state)
const mutations = {
	// 如果 Actions 中没有业务逻辑时,可以直接调用Mutations
	JIA(state,value){
		console.log('mutations中的JIA被调用了')
		state.sum += value
	},
	JIAN(state,value){
		console.log('mutations中的JIAN被调用了')
		state.sum -= value
	}
}
//准备state——用于存储数据
const state = {
	sum:0 //当前的和
}

//创建并暴露store
export default new Vuex.Store({
	actions,
	mutations,
	state,
})
Count.vue
<template>
	<div>
		<h1>当前求和为:{{$store.state.sum}}</h1>
		<select v-model.number="n">
			<option value="1">1</option>
			<option value="2">2</option>
			<option value="3">3</option>
		</select>
		<button @click="increment">+</button>
		<button @click="decrement">-</button>
		<button @click="incrementOdd">当前求和为奇数再加</button>
		<button @click="incrementWait">等一等再加</button>
	</div>
</template>

<script>
	export default {
		name:'Count',
		data() {
			return {
				n:1, //用户选择的数字
			}
		},
		methods: {
			increment(){
				this.$store.commit('JIA',this.n)
			},
			decrement(){
				this.$store.commit('JIAN',this.n)
			},
			incrementOdd(){
				this.$store.dispatch('jiaOdd',this.n)
			},
			incrementWait(){
				this.$store.dispatch('jiaWait',this.n)
			},
		},
		mounted() {
			console.log('Count',this)
		},
	}
</script>

<style lang="css">
	button{
		margin-left: 5px;
	}
</style>
5.4 多组件共享数据
store/index.js
//该文件用于创建Vuex中最为核心的store
import Vue from 'vue'
//引入Vuex
import Vuex from 'vuex'
//应用Vuex插件
Vue.use(Vuex)

//准备actions——用于响应组件中的动作
const actions = {
	/* jia(context,value){
		console.log('actions中的jia被调用了')
		context.commit('JIA',value)
	},
	jian(context,value){
		console.log('actions中的jian被调用了')
		context.commit('JIAN',value)
	}, */
	jiaOdd(context,value){
		console.log('actions中的jiaOdd被调用了')
		if(context.state.sum % 2){
			context.commit('JIA',value)
		}
	},
	jiaWait(context,value){
		console.log('actions中的jiaWait被调用了')
		setTimeout(()=>{
			context.commit('JIA',value)
		},500)
	}
}
//准备mutations——用于操作数据(state)
const mutations = {
	JIA(state,value){
		console.log('mutations中的JIA被调用了')
		state.sum += value
	},
	JIAN(state,value){
		console.log('mutations中的JIAN被调用了')
		state.sum -= value
	},
	ADD_PERSON(state,value){
		console.log('mutations中的ADD_PERSON被调用了')
		state.personList.unshift(value)
	}
}
//准备state——用于存储数据
const state = {
	sum:0, //当前的和
	school:'尚硅谷',
	subject:'前端',
	personList:[
		{id:'001',name:'张三'}
	]
}
//准备getters——用于将state中的数据进行加工
const getters = {
	bigSum(state){
		return state.sum*10
	}
}

//创建并暴露store
export default new Vuex.Store({
	actions,
	mutations,
	state,
	getters
})
Count.vue
<template>
	<div>
		<h1>当前求和为:{{sum}}</h1>
		<h3>当前求和放大10倍为:{{bigSum}}</h3>
		<h3>我在{{school}},学习{{subject}}</h3>
		<h3 style="color:red">Person组件的总人数是:{{personList.length}}</h3>
		<select v-model.number="n">
			<option value="1">1</option>
			<option value="2">2</option>
			<option value="3">3</option>
		</select>
		<button @click="increment(n)">+</button>
		<button @click="decrement(n)">-</button>
		<button @click="incrementOdd(n)">当前求和为奇数再加</button>
		<button @click="incrementWait(n)">等一等再加</button>
	</div>
</template>

<script>
	import {mapState,mapGetters,mapMutations,mapActions} from 'vuex'
	export default {
		name:'Count',
		data() {
			return {
				n:1, //用户选择的数字
			}
		},
		computed:{
			//借助mapState生成计算属性,从state中读取数据。(数组写法)
			...mapState(['sum','school','subject','personList']),
			//借助mapGetters生成计算属性,从getters中读取数据。(数组写法)
			...mapGetters(['bigSum'])
		},
		methods: {
			//借助mapMutations生成对应的方法,方法中会调用commit去联系mutations(对象写法)
			...mapMutations({increment:'JIA',decrement:'JIAN'}),
			//借助mapActions生成对应的方法,方法中会调用dispatch去联系actions(对象写法)
			...mapActions({incrementOdd:'jiaOdd',incrementWait:'jiaWait'})
		},
		mounted() {
			// const x = mapState({he:'sum',xuexiao:'school',xueke:'subject'})
			// console.log(x)
		},
	}
</script>

<style lang="css">
	button{
		margin-left: 5px;
	}
</style>
Person.vue
<template>
	<div>
		<h1>人员列表</h1>
		<h3 style="color:red">Count组件求和为:{{sum}}</h3>
		<input type="text" placeholder="请输入名字" v-model="name">
		<button @click="add">添加</button>
		<ul>
			<li v-for="p in personList" :key="p.id">{{p.name}}</li>
		</ul>
	</div>
</template>

<script>
	import {nanoid} from 'nanoid'
	export default {
		name:'Person',
		data() {
			return {
				name:''
			}
		},
		computed:{
			personList(){
				return this.$store.state.personList
			},
			sum(){
				return this.$store.state.sum
			}
		},
		methods: {
			add(){
				const personObj = {id:nanoid(),name:this.name}
				this.$store.commit('ADD_PERSON',personObj)
				this.name = ''
			}
		},
	}
</script>
5.5 Vuex开发者工具使用
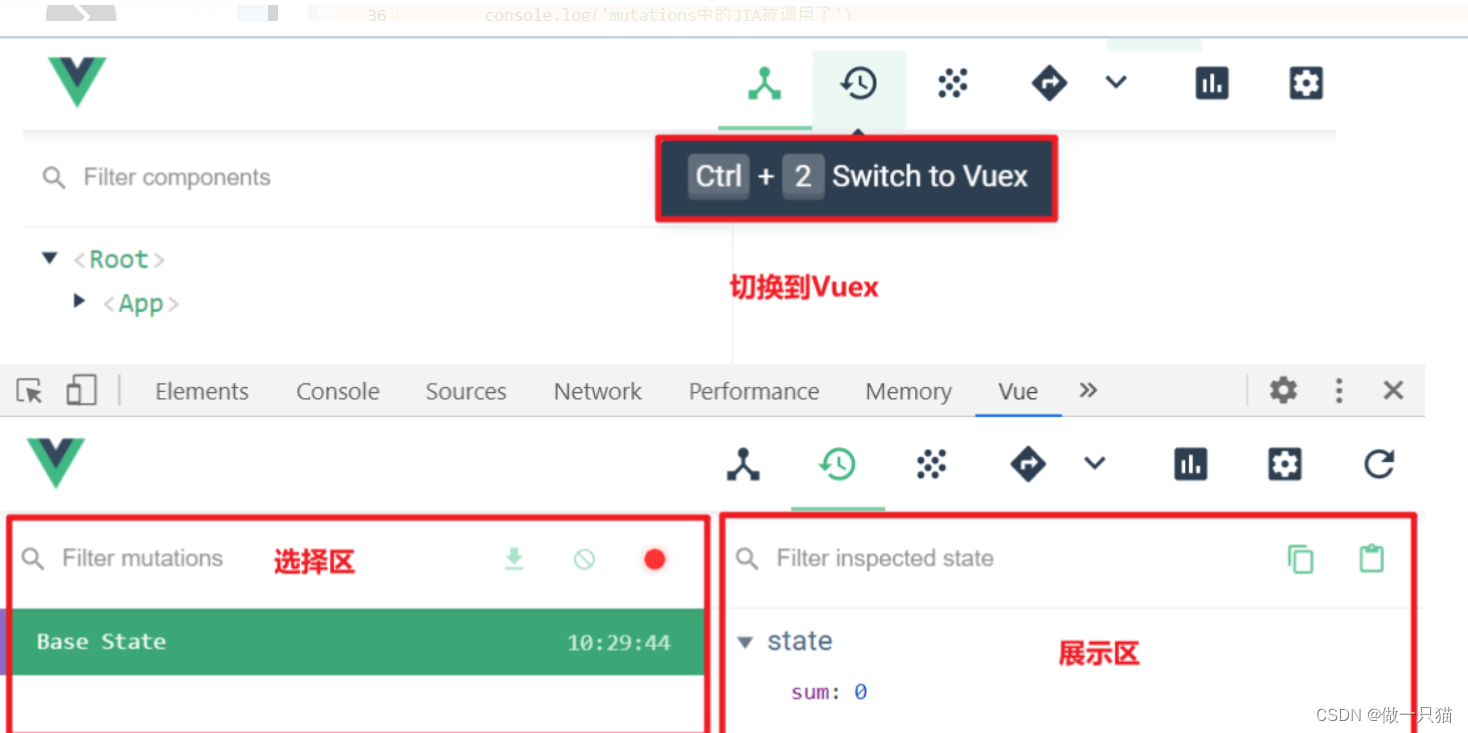
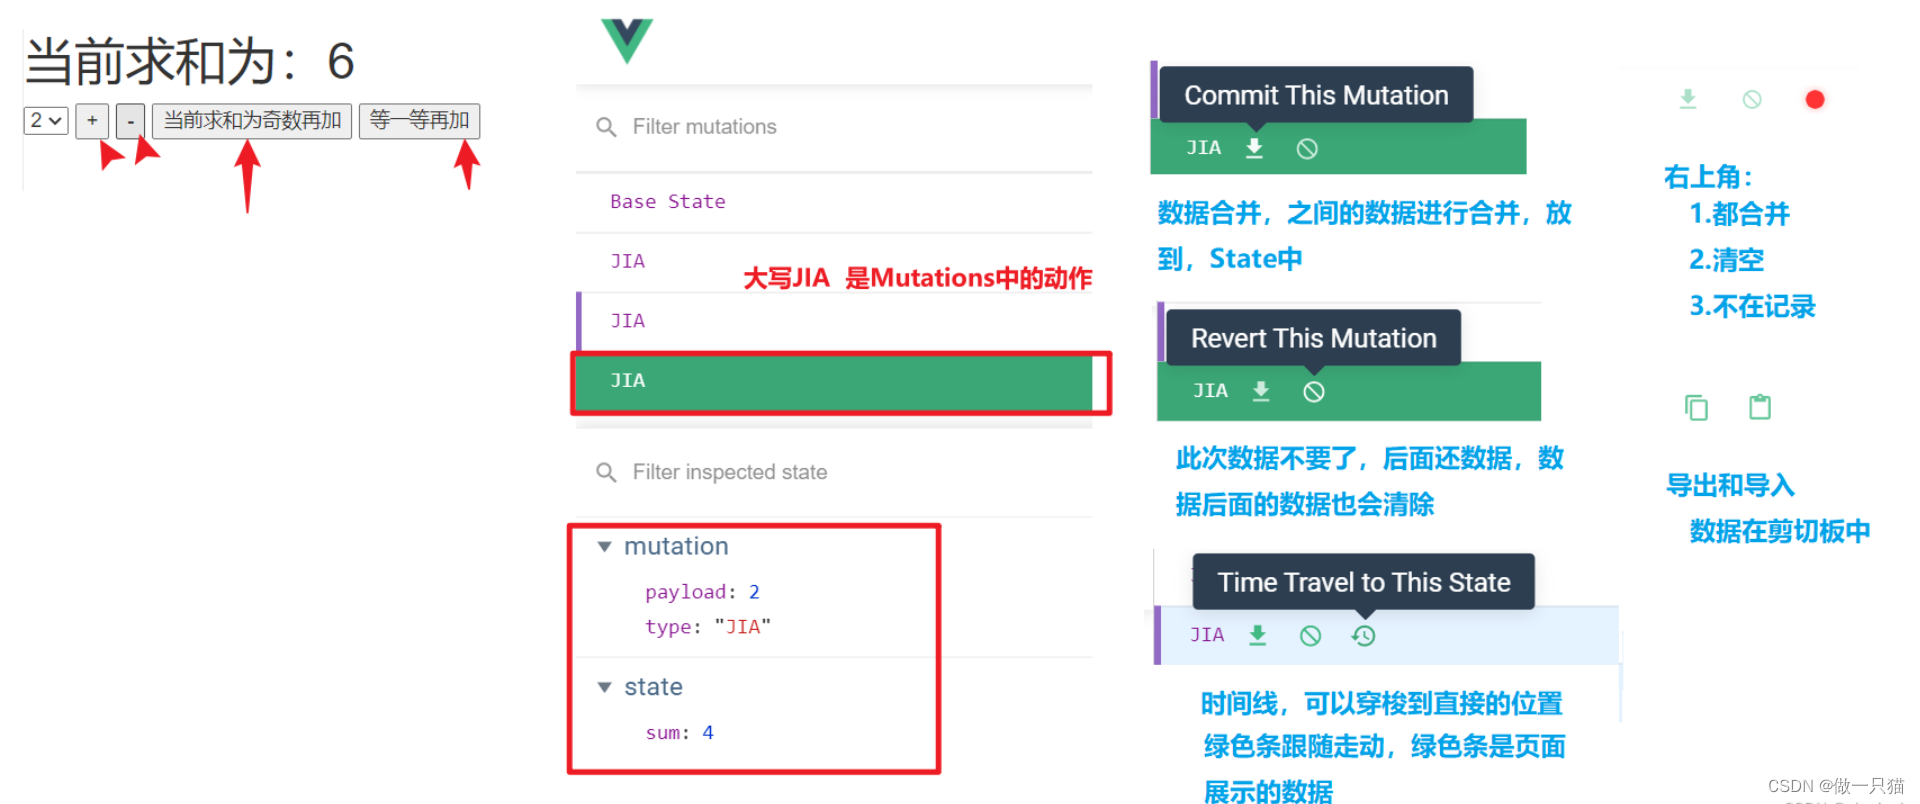
问题:
为什么在Actions 中给的是 context(上下文),明明只需要进行commit操作,为啥不直接给一个commit就可以了
- 如果给你commint 那么就没有退路可言,只能commint向下操作
- 但是Actions可以有多个,一个业务逻辑完成不了,通过上下文可以继续向下调用
// 拓展:Actions可以有多个,一个处理不过来
	jiaOdd(context,value){
		console.log('actions中的jiaOdd被调用了')
		console.log('处理了一些事情--jiaOdd')
		context.dispatch('demo1',value)
	},
	demo1(context,value){
		console.log('处理了一些事情--demo1')
		context.dispatch('demo2',value)
	},
	demo2(context,value){
		console.log('处理了一些事情--demo2')
		if(context.state.sum % 2){
			context.commit('JIA',value)
		}
	},
(本文未完结,是整理草稿箱中才发现之前学习的这篇草稿,索性发一下)


 1428
1428


 被折叠的 条评论
为什么被折叠?
被折叠的 条评论
为什么被折叠?
 到【灌水乐园】发言


