


学校计算机图形学的课程实验,第一次尝试OpenGL,实现大概花了8个小时(主要花在找各种bug上了)
作业需求:
- 三角形区域的扫描转换。设计函数ScanTriangle(int x1, int y1, int x2, int y2, int x3, int y3, int c1[], int c2[], int c3[])能在指定窗口中对由三个顶点(x1, y1), (x2, y2), (x3, y3)构成的三角形进行扫描转换,并按照如下颜色计算方法,将三角形区域的像素绘制出来。
- 数组c1, c2, c3分别存放顶点(x1, y1), (x2, y2), (x3, y3)的RGB颜色, 数组中每个颜色的取值再0-255之间;
- 三角形边上的颜色用两个短点的颜色作线性插值得到;
- 对与三角形内部点p=(px, py),计算直线y = py与三角形的两条边的交点i1, i2, p的颜色由 i1, i2的颜色线性插值得到
- 可以采用简化的活性表算法对三角形进行光栅化。
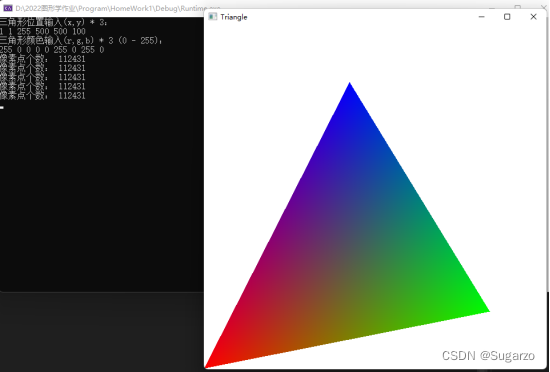
实现效果:
设计思路
因为本次实验题目要求是三角形的光栅化,所以一些循环次数和点的个数限制成3个,修改成n个变成正常的多边形扫描转换也是可以的。
首先定义一些基础的数据结构,例如点、边、颜色的struct
struct Color3
{
    float r;
    float g;
    float b;
    Color3(float r = 0, float g = 0, float b = 0)
    {
        this->r = r;
        this->g = g;
        this->b = b;
    }
};
struct Vector2
{
    int x;
    int y;
    Vector2(int _initX = 0, int _initY = 0)
    {
        x = _initX;
        y = _initY;
    }
    Color3* color = nullptr;

};
//三角形的边
Vector2 trianglePoints[3];
Color3 triangleColor[3];
然后是边表的结构,在多边形扫描转换算法中,一个边的数据结构存了4个信息ymax,x,dx,*next
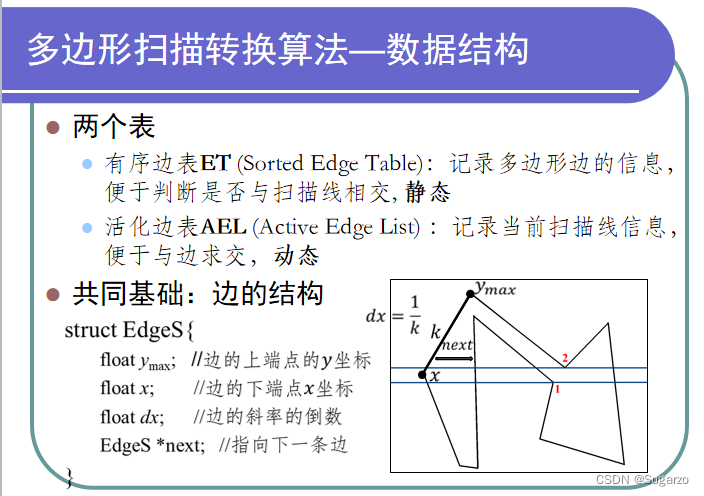
typedef struct XET
{
    float ymax;
    float x;
    float dx;

    XET* next;

    XET(float _ymax,float _x,float _dx)
    {
        x = _x;
        dx = _dx;
        ymax = _ymax;
        next = nullptr;
    }
    XET():XET(0,0,0) {};

    Vector2* pos1 = nullptr;
    Vector2* pos2 = nullptr;
};
这里下边用到了Vector2的指针,是为了方便记录两个点的位置,方便后面的计算颜色的线性插值(不影响活性边表算法的光栅化过程)除了数据结构中的四个成员变量,边表存储还利用了桶排序的思想存储了其他数据,下标为ymin
const int YMIN = 0;
const int YMAX = 600;

//ET 有序边表(ET)-桶分类,窗口像素600*600,第一个指针是空的头节点,不使用

XET ET[YMAX];
XET* AET = nullptr;
首先是静态边表的建立,静态边表只会在算法过程中执行一次,利用桶的思想,将对应的数据添加到对应数组下表即可。
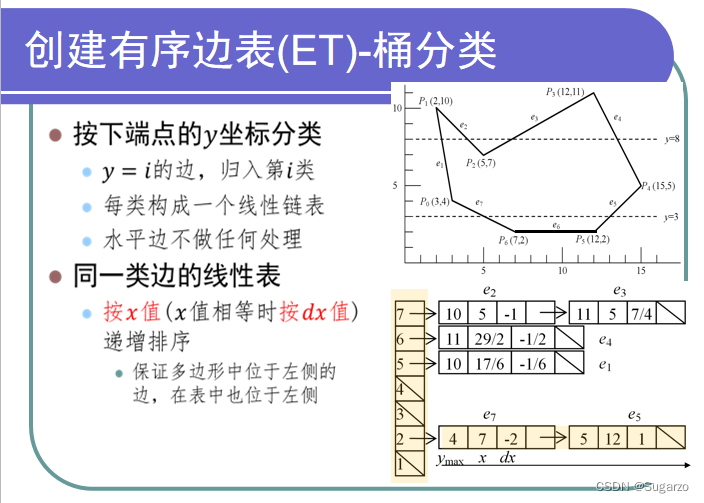
void RegisterET()
{
    //min(trianglePoints[0].y,trianglePoints[1].y)
    //构建静态边表,遍历所有点,这里直接从第二个点开始
    for (int i = 1; i < 3; i++)
    {
        //选出左下角的那个点
        Vector2* minPos = nullptr;
        Vector2* maxPos = nullptr;
        if (trianglePoints[i - 1].y <= trianglePoints[i].y)
        {
            minPos = &trianglePoints[i - 1];
            maxPos = &trianglePoints[i];
        }
        else
        {
            minPos = &trianglePoints[i];
            maxPos = &trianglePoints[i - 1];
        }

        XET* et = new XET(maxPos->y, minPos->x, float(maxPos->x - minPos->x) / (maxPos->y - minPos->y));
        et->next = nullptr;

        XET* thisPtr = &ET[minPos->y];
        //比较x和dx,递增插入
        while (thisPtr->next != nullptr)
        {
            if (thisPtr->next->x > et->x)
                break;
            else if (thisPtr->next->x == et->x && thisPtr->next->dx > et->dx)
                break;
            thisPtr = thisPtr->next;
        }
        //插入
        et->next = thisPtr->next;
        thisPtr->next = et;
        //关联节点
        et->pos1 = minPos;
        et->pos2 = maxPos;

        //首位闭环
        if (i == 2)
        {
            //选出左下角的那个点
            Vector2* minPos = nullptr;
            Vector2* maxPos = nullptr;
            if (trianglePoints[0].y <= trianglePoints[i].y)
            {
                minPos = &trianglePoints[0];
                maxPos = &trianglePoints[i];
            }
            else
            {
                minPos = &trianglePoints[i];
                maxPos = &trianglePoints[0];
            }

            XET* et = new XET(maxPos->y, minPos->x, float(maxPos->x - minPos->x) / (maxPos->y - minPos->y));
            et->next = nullptr;

            XET* thisPtr = &ET[minPos->y];
            //比较x和dx,递增插入
            while (thisPtr->next != nullptr)
            {
                if (thisPtr->next->x > et->x)
                    break;
                else if (thisPtr->next->x == et->x && thisPtr->next->dx > et->dx)
                    break;

                thisPtr = thisPtr->next;
            }
            //插入
            et->next = thisPtr->next;
            thisPtr->next = et;

            et->pos1 = minPos;
            et->pos2 = maxPos;
        }
    }

}
接着就是活性边表的建立了,y=0到最高点y轴以此遍历循环,动态更新活性边表中AET的值,虽然AET中和静态的ET用的是同一个struct,但是里面的x还是不同的。一个是xmin,一个是当前轴的currx,这里可以用相加dx计算即可(这就是图形学中的利用前后数据的连贯性优化计算的方法了)。代码流程如下:

/// <summary>
/// 三角形光栅化
/// </summary>
void RasterizationTriangle()
{
    // attributes
    glClearColor(1, 1, 1, 1);
    //设置绘制窗口颜色为白色
    glClearColor(1.0,1.0, 1.0,1.0);
    glClear(GL_COLOR_BUFFER_BIT);
    glColor3f(1, 0, 0);

    // set up viewing
    glMatrixMode(GL_PROJECTION);
    glLoadIdentity();
    gluOrtho2D(0.0, 600.0, 0.0, 600.0);
    glMatrixMode(GL_MODELVIEW);

    glBegin(GL_POINTS);
    //glColor3f(1, 0, 0);

    int count = 0;
    //AET扫描
    for (int y = YMIN; y < YMAX; y++)
    {
        //更新AET中的x值
        if (AET != nullptr)
        {
            XET* headET = new XET();
            headET->next = AET;
            XET* p1 = headET;
            while (p1->next != nullptr)
            {
                p1->next->x += p1->next->dx; //更新AET中的x值

                //如果已经超出了扫描线
                if (p1->next->ymax < y)
                {
                    auto gc = p1->next;
                    p1->next = p1->next->next;
                    //标记该节点应该被抹除
                    if (gc == AET)
                    {
                        AET = AET->next;
                    }
                    delete gc;

                }
                p1 = p1->next; //步进
                if (p1 == nullptr)
                    break;
            }
            delete headET;
        }

        //将ET[y]加入AET,并排序
        if (ET[y].next != nullptr)
        {
            XET* p2 = ET[y].next;
            //遍历这里的静态边表
            while (p2 != nullptr)
            {
                XET* et = new XET(*p2);
                //这里深复制完要把next的东西抹掉
                et->next = nullptr;
                //插入活性边表
                XET* thisPtr = AET;
                //比较x和dx,递增插入
                while (thisPtr != nullptr && thisPtr->next != nullptr)
                {
                    //找到第一个x大于它的值,保证升序
                    if (thisPtr->next->x > et->x)
                        break;
                    else if (thisPtr->next->x == et->x && thisPtr->next->dx > et->dx)
                        break;
                    thisPtr = thisPtr->next;
                }
                //插入
                if (thisPtr == nullptr)
                {
                    AET = thisPtr = et;
                }
                else
                {
                    et->next = thisPtr->next;
                    thisPtr->next = et;
                }

                p2 = p2->next;

            }
        }

        //根据AET填充区间
        if (AET != nullptr)
        {
            XET* p1 = AET;
            while (p1 != nullptr && p1->next != nullptr)
            {
                for (int x = p1->x; x <= p1->next->x; x++)
                {
                    Color3 c = GetPixelColor(x, y, p1,p1->next);
                    glColor3f(c.r, c.g, c.b);
                    //glColor3f(1,0, 0);
                    GLfloat p[3] = { x, y, 0.0 };
                    glVertex3fv(p);
                    count++;
                }
                p1 = p1->next;
                p1 = p1->next;
            }

        }
    }
    std::cout << "像素点个数: " << count << "\n";

    glEnd();
    glFlush();
}
最后是颜色插值计算,这里根据y轴在上下两个点之间计算出比例t(0-1),x轴方向也是同理,然后再lerp(a,b) = (1-t)* a + t * b的思想的思想就可以了,不过写出来挺麻烦的(好想像C#一下直接Vector3.Lerp啊,自己写确实麻烦)
Color3 GetPixelColor(int x, int y,const XET* left,const XET* right)
{

    //计算插值
    Vector2* ymax = left->pos1->y > left->pos2->y ? left->pos1 : left->pos2;
    Vector2* ymin = left->pos1->y <= left->pos2->y ? left->pos1 : left->pos2;
    float t = float(ymax->y - y) / (ymax->y - ymin->y);
    Color3 leftC = Color3(ymax->color->r * (1 - t) + ymin->color->r * t,
        ymax->color->g * (1 - t) + ymin->color->g * t,
        ymax->color->b * (1 - t) + ymin->color->b * t);

    ymax = right->pos1->y > right->pos2->y ? right->pos1 : right->pos2;
    ymin = right->pos1->y <= right->pos2->y ? right->pos1 : right->pos2;
    t = float(ymax->y - y) / (ymax->y - ymin->y);
    Color3 rightC = Color3(ymax->color->r * (1 - t) + ymin->color->r * t,
        ymax->color->g * (1 - t) + ymin->color->g * t,
        ymax->color->b * (1 - t) + ymin->color->b * t);

    if (left->x == right->x)
        return rightC;

    t = float(right->x - x) / (right->x - left->x);

    return Color3(rightC.r * (1 - t) + leftC.r * t,
        rightC.g * (1 - t) + leftC.g * t,
        rightC.b * (1 - t) + leftC.b * t);
}
一个彩色渐变三角形就实现了.
完整代码
已知缺陷:代码无法处理斜率为0或者正无穷的情况(没做除0的特殊判断),可以自行修改一下,受限于实验时间,有些地方执行效率还待优化。
#include <GL/glut.h>
#include<queue>
#include <iostream>
#include<cmath>
//1 1 255 500 500 100 255 0 0 0 0 255 0 255 0
const int YMIN = 0;
const int YMAX = 600;
struct Color3
{
    float r;
    float g;
    float b;
    Color3(float r = 0, float g = 0, float b = 0)
    {
        this->r = r;
        this->g = g;
        this->b = b;
    }
};
struct Vector2
{
    int x;
    int y;
    Vector2(int _initX = 0, int _initY = 0)
    {
        x = _initX;
        y = _initY;
    }
    Color3* color = nullptr;

};

#pragma region T3
//简易活性边表实现
typedef struct XET
{
    float ymax;
    float x;
    float dx;

    XET* next;

    XET(float _ymax,float _x,float _dx)
    {
        x = _x;
        dx = _dx;
        ymax = _ymax;
        next = nullptr;
    }
    XET():XET(0,0,0) {};

    Vector2* pos1 = nullptr;
    Vector2* pos2 = nullptr;
};
//ET 有序边表(ET)-桶分类,窗口像素600*600,第一个指针是空的头节点,不使用
XET ET[YMAX];
XET* AET = nullptr;

Vector2 trianglePoints[3];
Color3 triangleColor[3];


///ReadInputPosition
void InPutPosition()
{
    std::cout << "三角形位置输入(x,y) * 3:\n";
    std::cout << "可用测试数据: 1 1 255 500 500 100\n";
    std::cin >> trianglePoints[0].x
        >> trianglePoints[0].y
        >> trianglePoints[1].x
        >> trianglePoints[1].y
        >> trianglePoints[2].x
        >> trianglePoints[2].y;

    for (int i = 0; i < 3; i++)
    {
        trianglePoints[i].x = std::max(0, trianglePoints[i].x);
        trianglePoints[i].x = std::min(600, trianglePoints[i].x);
        trianglePoints[i].y = std::max(0, trianglePoints[i].y);
        trianglePoints[i].y = std::min(600, trianglePoints[i].y);

    }
}
///ReadInputPosition
void InPutColor()
{
    std::cout << "三角形颜色输入(r,g,b) * 3 (0 - 255):\n";
    std::cout << "可用测试数据: 255 0 0 0 0 255 0 255 0\n";
    std::cin >> triangleColor[0].r
        >> triangleColor[0].g
        >> triangleColor[0].b
        >> triangleColor[1].r
        >> triangleColor[1].g
        >> triangleColor[1].b
        >> triangleColor[2].r
        >> triangleColor[2].g
        >> triangleColor[2].b;

    for (int i = 0; i < 3; i++)
    {
        triangleColor[i].r = std::min(255.0f, triangleColor[i].r) / 255.0;
        triangleColor[i].g = std::min(255.0f, triangleColor[i].g) / 255.0;
        triangleColor[i].b = std::min(255.0f, triangleColor[i].b) / 255.0;
        triangleColor[i].r = std::max(0.0f, triangleColor[i].r);
        triangleColor[i].g = std::max(0.0f, triangleColor[i].g);
        triangleColor[i].b = std::max(0.0f, triangleColor[i].b);

        trianglePoints[i].color = &triangleColor[i];
    }
}

void RegisterET()
{
    //min(trianglePoints[0].y,trianglePoints[1].y)
    //构建静态边表,遍历所有点,这里直接从第二个点开始
    for (int i = 1; i < 3; i++)
    {
        //选出左下角的那个点
        Vector2* minPos = nullptr;
        Vector2* maxPos = nullptr;
        if (trianglePoints[i - 1].y <= trianglePoints[i].y)
        {
            minPos = &trianglePoints[i - 1];
            maxPos = &trianglePoints[i];
        }
        else
        {
            minPos = &trianglePoints[i];
            maxPos = &trianglePoints[i - 1];
        }

        XET* et = new XET(maxPos->y, minPos->x, float(maxPos->x - minPos->x) / (maxPos->y - minPos->y));
        et->next = nullptr;

        XET* thisPtr = &ET[minPos->y];
        //比较x和dx,递增插入
        while (thisPtr->next != nullptr)
        {
            if (thisPtr->next->x > et->x)
                break;
            else if (thisPtr->next->x == et->x && thisPtr->next->dx > et->dx)
                break;
            thisPtr = thisPtr->next;
        }
        //插入
        et->next = thisPtr->next;
        thisPtr->next = et;
        //关联节点
        et->pos1 = minPos;
        et->pos2 = maxPos;

        //首位闭环
        if (i == 2)
        {
            //选出左下角的那个点
            Vector2* minPos = nullptr;
            Vector2* maxPos = nullptr;
            if (trianglePoints[0].y <= trianglePoints[i].y)
            {
                minPos = &trianglePoints[0];
                maxPos = &trianglePoints[i];
            }
            else
            {
                minPos = &trianglePoints[i];
                maxPos = &trianglePoints[0];
            }

            XET* et = new XET(maxPos->y, minPos->x, float(maxPos->x - minPos->x) / (maxPos->y - minPos->y));
            et->next = nullptr;

            XET* thisPtr = &ET[minPos->y];
            //比较x和dx,递增插入
            while (thisPtr->next != nullptr)
            {
                if (thisPtr->next->x > et->x)
                    break;
                else if (thisPtr->next->x == et->x && thisPtr->next->dx > et->dx)
                    break;

                thisPtr = thisPtr->next;
            }
            //插入
            et->next = thisPtr->next;
            thisPtr->next = et;

            et->pos1 = minPos;
            et->pos2 = maxPos;
        }
    }

}
Color3 GetPixelColor(int x, int y,const XET* left,const XET* right)
{

    //计算插值
    Vector2* ymax = left->pos1->y > left->pos2->y ? left->pos1 : left->pos2;
    Vector2* ymin = left->pos1->y <= left->pos2->y ? left->pos1 : left->pos2;
    float t = float(ymax->y - y) / (ymax->y - ymin->y);
    Color3 leftC = Color3(ymax->color->r * (1 - t) + ymin->color->r * t,
        ymax->color->g * (1 - t) + ymin->color->g * t,
        ymax->color->b * (1 - t) + ymin->color->b * t);

    ymax = right->pos1->y > right->pos2->y ? right->pos1 : right->pos2;
    ymin = right->pos1->y <= right->pos2->y ? right->pos1 : right->pos2;
    t = float(ymax->y - y) / (ymax->y - ymin->y);
    Color3 rightC = Color3(ymax->color->r * (1 - t) + ymin->color->r * t,
        ymax->color->g * (1 - t) + ymin->color->g * t,
        ymax->color->b * (1 - t) + ymin->color->b * t);

    if (left->x == right->x)
        return rightC;

    t = float(right->x - x) / (right->x - left->x);

    return Color3(rightC.r * (1 - t) + leftC.r * t,
        rightC.g * (1 - t) + leftC.g * t,
        rightC.b * (1 - t) + leftC.b * t);
}

/// <summary>
/// 三角形光栅化
/// </summary>
void RasterizationTriangle()
{
    // attributes
    glClearColor(1, 1, 1, 1);
    //设置绘制窗口颜色为白色
    glClearColor(1.0,1.0, 1.0,1.0);
    glClear(GL_COLOR_BUFFER_BIT);
    glColor3f(1, 0, 0);

    // set up viewing
    glMatrixMode(GL_PROJECTION);
    glLoadIdentity();
    gluOrtho2D(0.0, 600.0, 0.0, 600.0);
    glMatrixMode(GL_MODELVIEW);

    glBegin(GL_POINTS);
    //glColor3f(1, 0, 0);

    int count = 0;
    //AET扫描
    for (int y = YMIN; y < YMAX; y++)
    {
        //更新AET中的x值
        if (AET != nullptr)
        {
            XET* headET = new XET();
            headET->next = AET;
            XET* p1 = headET;
            while (p1->next != nullptr)
            {
                p1->next->x += p1->next->dx; //更新AET中的x值

                //如果已经超出了扫描线
                if (p1->next->ymax < y)
                {
                    auto gc = p1->next;
                    p1->next = p1->next->next;
                    //标记该节点应该被抹除
                    if (gc == AET)
                    {
                        AET = AET->next;
                    }
                    delete gc;

                }
                p1 = p1->next; //步进
                if (p1 == nullptr)
                    break;
            }
            delete headET;
        }

        //将ET[y]加入AET,并排序
        if (ET[y].next != nullptr)
        {
            XET* p2 = ET[y].next;
            //遍历这里的静态边表
            while (p2 != nullptr)
            {
                XET* et = new XET(*p2);
                //这里深复制完要把next的东西抹掉
                et->next = nullptr;
                //插入活性边表
                XET* thisPtr = AET;
                //比较x和dx,递增插入
                while (thisPtr != nullptr && thisPtr->next != nullptr)
                {
                    //找到第一个x大于它的值,保证升序
                    if (thisPtr->next->x > et->x)
                        break;
                    else if (thisPtr->next->x == et->x && thisPtr->next->dx > et->dx)
                        break;
                    thisPtr = thisPtr->next;
                }
                //插入
                if (thisPtr == nullptr)
                {
                    AET = thisPtr = et;
                }
                else
                {
                    et->next = thisPtr->next;
                    thisPtr->next = et;
                }

                p2 = p2->next;

            }
        }

        //根据AET填充区间
        if (AET != nullptr)
        {
            XET* p1 = AET;
            while (p1 != nullptr && p1->next != nullptr)
            {
                for (int x = p1->x; x <= p1->next->x; x++)
                {
                    Color3 c = GetPixelColor(x, y, p1,p1->next);
                    glColor3f(c.r, c.g, c.b);
                    //glColor3f(1,0, 0);
                    GLfloat p[3] = { x, y, 0.0 };
                    glVertex3fv(p);
                    count++;
                }
                p1 = p1->next;
                p1 = p1->next;
            }

        }
    }
    std::cout << "像素点个数: " << count << "\n";

    glEnd();
    glFlush();
}

#pragma endregion

void  main(int argc, char** argv)
{
    glutInit(&argc, argv);
    glutInitDisplayMode(GLUT_SINGLE | GLUT_RGB);
    glutInitWindowSize(600, 600);
    glutInitWindowPosition(50, 50);
    glutCreateWindow("Triangle");

    InPutPosition();
    InPutColor();
    RegisterET();

    glutDisplayFunc(RasterizationTriangle);

    glutMainLoop();
}


 5056
5056


 被折叠的 条评论
为什么被折叠?
被折叠的 条评论
为什么被折叠?
 到【灌水乐园】发言


