


SSM配置与注解开发对比
Spring与Mybatis整合
配置文件开发
创建数据库表
SET FOREIGN_KEY_CHECKS=0;

-- ----------------------------
-- Table structure for `tb_user`
-- ----------------------------
DROP TABLE IF EXISTS `tb_user`;
CREATE TABLE `tb_user` (
  `id` int NOT NULL AUTO_INCREMENT,
  `username` varchar(20) DEFAULT NULL,
  `password` varchar(32) DEFAULT NULL,
  PRIMARY KEY (`id`),
  UNIQUE KEY `username` (`username`)
) ENGINE=InnoDB AUTO_INCREMENT=8 DEFAULT CHARSET=utf8mb4 COLLATE=utf8mb4_0900_ai_ci;

-- ----------------------------
-- Records of tb_user
-- ----------------------------
INSERT INTO `tb_user` VALUES ('2', '小小红', '234');
INSERT INTO `tb_user` VALUES ('3', 'www', '123');
INSERT INTO `tb_user` VALUES ('4', 'OOO', '123');
INSERT INTO `tb_user` VALUES ('5', 'XM', '123');
INSERT INTO `tb_user` VALUES ('6', '小红', '234');
实体类
package com.xxxIt.pojo;

public class User {

    private Integer id;     //建议在编程的时候使用Integer不一int,int不能为空,在处理业务时候会报错
    private String username;
    private String password;

    @Override
    public String toString() {
        return "User{" +
                "id=" + id +
                ", userName='" + username + '\'' +
                ", password='" + password + '\'' +
                '}';
    }

    public Integer getId() {
        return id;
    }

    public void setId(Integer id) {
        this.id = id;
    }

    public String getUserName() {
        return username;
    }

    public void setUserName(String username) {
        this.username = username;
    }

    public String getPassword() {
        return password;
    }

    public void setPassword(String password) {
        this.password = password;
    }
}
导包
数据库→数据源→操作工具(mybatis,spring-jdbc,spring-mybatis)→spring-context
    <dependencies>
        <dependency>
            <groupId>mysql</groupId>
            <artifactId>mysql-connector-java</artifactId>
            <version>5.1.47</version>
        </dependency>

        <dependency>
            <groupId>com.alibaba</groupId>
            <artifactId>druid</artifactId>
            <version>1.1.16</version>
        </dependency>

        <dependency>
            <groupId>org.mybatis</groupId>
            <artifactId>mybatis</artifactId>
            <version>3.5.6</version>
        </dependency>

        <dependency>
            <groupId>org.springframework</groupId>
            <artifactId>spring-jdbc</artifactId>
            <version>5.2.10.RELEASE</version>
        </dependency>

        <dependency>
            <groupId>org.mybatis</groupId>
            <artifactId>mybatis-spring</artifactId>
            <version>2.0.2</version>
        </dependency>

        <dependency>
            <groupId>org.springframework</groupId>
            <artifactId>spring-context</artifactId>
            <version>5.2.10.RELEASE</version>
        </dependency>
    </dependencies>
配置文件
jdbc.properties
jdbc.driver = com.mysql.jdbc.Driver
jdbc.url = mysql:jdbc://127.0.0.1:3306/db1?SSL=false
jdbc.username = root
jdbc.password = root
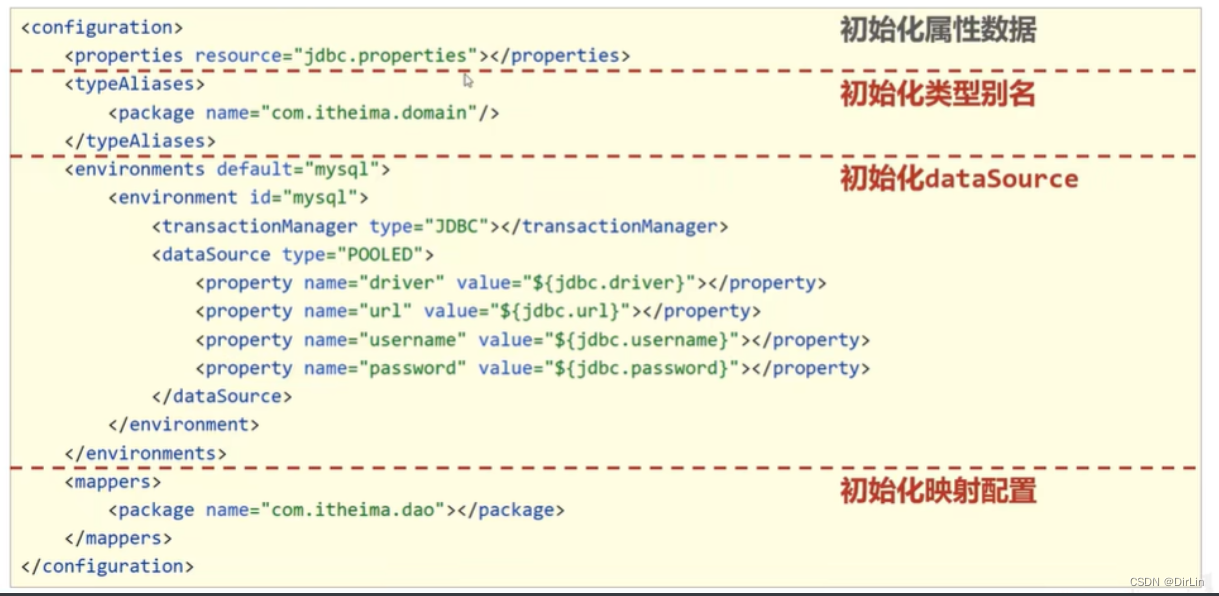
mybatis-config.xml
可以把所有配置都写到ApplicationContext里,但是为了看出这是一个mybatis项目,保留这个文件,并将类型别名,日志之类写在该文件
<?xml version="1.0" encoding="UTF-8" ?>
<!DOCTYPE configuration
        PUBLIC "-//mybatis.org//DTD Config 3.0//EN"
        "http://mybatis.org/dtd/mybatis-3-config.dtd">
<configuration>

    <typeAliases>
        <package name="com.xxxIt.pojo.User"/>   <!--别名管理-->
    </typeAliases>

<!--    <environments default="development">-->
<!--        <environment id="development">-->
<!--            <transactionManager type="JDBC"/>       事务管理器:后面交给Spring容器作为bean管理-->
<!--            <dataSource type="POOLED">              数据库连接池:后面交给Spring容器作为bean管理-->
<!--                <property name="driver" value="${driver}"/>-->
<!--                <property name="url" value="${url}"/>-->
<!--                <property name="username" value="${username}"/>-->
<!--                <property name="password" value="${password}"/>-->
<!--            </dataSource>-->
<!--        </environment>-->
<!--    </environments>-->

    <mappers>
        <mapper class="com.xxxIt.dao.UserMapper"/>
    </mappers>
</configuration>
SpringConfig

<?xml version="1.0" encoding="UTF-8"?>
<beans xmlns="http://www.springframework.org/schema/beans"
       xmlns:xsi="http://www.w3.org/2001/XMLSchema-instance"
       xmlns:context="http://www.springframework.org/schema/context"
       xsi:schemaLocation="http://www.springframework.org/schema/beans
       http://www.springframework.org/schema/beans/spring-beans.xsd
       http://www.springframework.org/schema/context
       http://www.springframework.org/schema/context/spring-context.xsd">

    <!--导入配置文件-->
    <context:property-placeholder location="classpath:jdbc.properties"/>

    <!--数据库连接池-->
    <bean id="DataSource" class="com.alibaba.druid.pool.DruidDataSource">
        <property name="driverClassName" value="${jdbc.driver}"/>
        <property name="url" value="${jdbc.url}"/>
        <property name="username" value="${jdbc.username}"/>
        <property name="password" value="${jdbc.password}"/>
    </bean>

    <!--sqlSessionFactory创建-->
    <bean id="sqlSessionFactory" class="org.mybatis.spring.SqlSessionFactoryBean">
        <property name="dataSource" ref="DataSource"/>
        <!--导入mybatis-config配置,这样可以分开配,更好的维护,根据个人喜爱-->
        <property name="configLocation" value="mybatis-config.xml"/>
<!--        <property name="mapperLocations" value="classpath:com/xxxIt/mapper/*.xml"/>-->
    </bean>

    <!--可以使用 SqlSessionFactory 作为构造方法的参数来创建 SqlSessionTemplate 对象(可看作Session)-->
    <bean id="sqlSession" class="org.mybatis.spring.SqlSessionTemplate">
        <constructor-arg name="sqlSessionFactory" ref="sqlSessionFactory"/>
    </bean>

    <!--把UserMapper注册为bean-->
    <bean id="UserMapper" class="com.xxxIt.dao.UserMapperImpl">
        <property name="sqlSessionTemplate" ref="sqlSession"/>
    </bean>

    <!--把service注册为Bean,自动装配UserMapper-->
    <bean id="UserService" class="com.xxxIt.service.Impl.UserServiceImpl" autowire="byType"/>

</beans>
以上这基本应该对应javaweb里面的
mybatis-config.xml
servlet文件

Dao数据层编写(使用mapper代理开发)
UserMapper接口
package com.xxxIt.dao;

import com.xxxIt.pojo.User;
import org.apache.ibatis.annotations.Select;

public interface UserMapper {

    @Select("select * from tb_user where id = #{id}")
    public User selectById(Integer id);      //Integer可以为空

}
UserMapper实现类
mybatis创建工厂,获取sqlSession,在配置文件里面写了,获取mapper获取dao方法在dao实现层实现
package com.xxxIt.dao;

import com.xxxIt.pojo.User;
import org.mybatis.spring.SqlSessionTemplate;

public class UserMapperImpl implements UserMapper{
    // 提供set方法让Spring注入
    // 所有在servlet的获取sqlSession都在这做
    private SqlSessionTemplate sqlSession;

    public void setSqlSessionTemplate(SqlSessionTemplate sqlSession) {
        this.sqlSession = sqlSession;
    }

    @Override
    public User selectById(Integer id) {
        UserMapper userMapper = sqlSession.getMapper(UserMapper.class);
        return userMapper.selectById(id);
    }
}
service业务层
service接口
package com.xxxIt.service;

import com.xxxIt.pojo.User;

public interface UserService {
    public User selectById(Integer id);
}
service实现类
package com.xxxIt.service.Impl;

import com.xxxIt.dao.UserMapper;
import com.xxxIt.pojo.User;
import com.xxxIt.service.UserService;

public class UserServiceImpl implements UserService {

    // 提供set方法让Spring注入
    // 所有在servlet的获取sqlSession都在这做
    private UserMapper userMapper;

    public void setUserMapper(UserMapper userMapper) {
        this.userMapper = userMapper;
    }

    @Override
    public User selectById(Integer id) {
        System.out.println(userMapper.selectById(2));
        return null;
    }
}
编写测试类
package com.xxxIt.daoTest;

import com.xxxIt.dao.UserMapper;
import com.xxxIt.service.UserService;
import org.springframework.context.ApplicationContext;
import org.springframework.context.support.ClassPathXmlApplicationContext;

public class UserTest {

    public static void main(String[] args) {
        //ApplicationContext
        ApplicationContext ctx = new ClassPathXmlApplicationContext("applicationContext.xml");

        // 业务层测试
//        UserService userService = ctx.getBean("UserService", UserService.class);
//        System.out.println(userService.selectById(2));


        //数据层测试
        UserMapper userMapper = ctx.getBean("UserMapper", UserMapper.class);
        System.out.println(userMapper.selectById(2));
    }
}
注解开发
创建数据库表,实体类,导包,jdbc.properties与上面相同
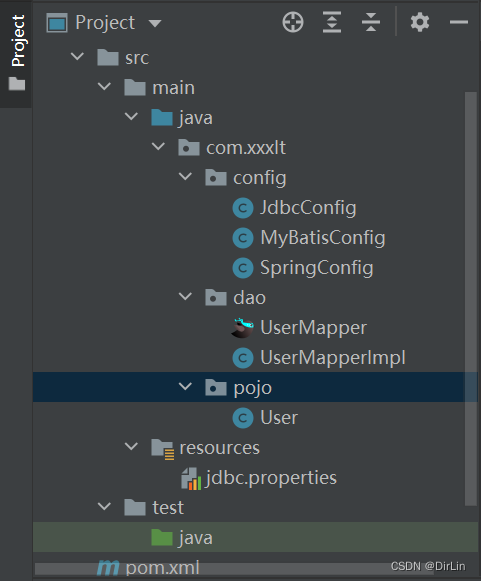
项目骨架
配置类
SpringConfig
package com.xxxIt.config;

import org.springframework.context.annotation.ComponentScan;
import org.springframework.context.annotation.Configuration;
import org.springframework.context.annotation.Import;
import org.springframework.context.annotation.PropertySource;

@Configuration  //设置为Spring配置类
@ComponentScan("com.xxxIt")     //扫描bean
@PropertySource("classpath:jdbc.properties")  //导入properties文件资源
@Import({JdbcConfig.class, MyBatisConfig.class})    //导入其他配置文件
public class SpringConfig {
}
JdbcConfig
与配置整合MyBatis不同的是,数据库连接池和sqlSessionFactory是在jdbc配置类和mybatis类配置,而配置开发是在mybatis配置文件编写
package com.xxxIt.config;

import com.alibaba.druid.pool.DruidDataSource;
import org.springframework.beans.factory.annotation.Value;
import org.springframework.context.annotation.Bean;

import javax.sql.DataSource;

public class JdbcConfig {
    @Value("${jdbc.driver}")    //普通常量注入
    private String driver;
    @Value("${jdbc.url}")
    private String url;
    @Value("${jdbc.username}")
    private String username;
    @Value("${jdbc.password}")
    private String password;

    // 第三方对象注册为bean
    @Bean
    public DataSource dataSource(){
        DruidDataSource dataSource = new DruidDataSource();
        dataSource.setDriverClassName(driver);
        dataSource.setUrl(url);
        dataSource.setUsername(username);
        dataSource.setPassword(password);
        return dataSource;
    }

}
MyBatisConfig
package com.xxxIt.config;

import org.mybatis.spring.SqlSessionFactoryBean;
import org.mybatis.spring.mapper.MapperScannerConfigurer;
import org.springframework.context.annotation.Bean;

import javax.sql.DataSource;

public class MyBatisConfig {

    @Bean
    public SqlSessionFactoryBean sqlSessionFactoryBean(DataSource dataSource){
        SqlSessionFactoryBean Ssfb = new SqlSessionFactoryBean();
        Ssfb.setTypeAliasesPackage("com.xxxIt.pojo.User");  //别名
        Ssfb.setDataSource(dataSource);
        return Ssfb;
    }
    //  mapper对象也设置为bean
    @Bean
    public MapperScannerConfigurer mapperScannerConfigurer(){
        MapperScannerConfigurer Msc = new MapperScannerConfigurer();
        Msc.setBasePackage("com.xxxIt.dao");
        return Msc;
    }
}
Dao实现类省略
Service业务层
Service接口
package com.xxxIt.service;

import com.xxxIt.pojo.User;

public interface UserService {
    /**
     * 查询单个用户
     * @param id
     * @return
     */
    public User selectById(Integer id);
}
Service实现类
package com.xxxIt.service.Impl;

import com.xxxIt.dao.UserMapper;
import com.xxxIt.pojo.User;
import com.xxxIt.service.UserService;
import org.springframework.beans.factory.annotation.Autowired;
import org.springframework.stereotype.Service;

@Service("UserService")
public class UserServiceImpl implements UserService {

    @Autowired  //自动装配
    private UserMapper userMapper;  //自动装配替代了数据层的实现类


    @Override
    public User selectById(Integer id) {
        User user = userMapper.selectById(id);
        return user;
    }
}
编写测试类
package com.xxxIt.daoTest;

import com.xxxIt.config.SpringConfig;
import com.xxxIt.dao.UserMapper;
import com.xxxIt.service.UserService;
import org.springframework.context.ApplicationContext;
import org.springframework.context.annotation.AnnotationConfigApplicationContext;

public class Test {
    public static void main(String[] args) {
        ApplicationContext applicationContext = new AnnotationConfigApplicationContext(SpringConfig.class);

//        UserService userService = applicationContext.getBean("UserService", UserService.class);
//        System.out.println(userService.selectById(3));

        UserMapper userMapper = applicationContext.getBean("UserMapper", UserMapper.class);
        System.out.println(userMapper.selectById(3));

    }
}
疑问
为什么用配置编写要写dao的实现类,而注解开发则不用,求大神告知


 1139
1139


 被折叠的 条评论
为什么被折叠?
被折叠的 条评论
为什么被折叠?
 到【灌水乐园】发言


