


Lab Week 03 实验报告
实验内容:
- 熟悉 Linux 下 x86 汇编语言编程环境
- 验证实验:Blum’s Book: Sample programs in Chapter 06, 07 (Controlling Flow and Using Numbers)
Note: This report is written mainly in English while partly in Chinese.
👽Preview
Basic knowledge
Cross-compiling instruction see Reference :
🚩How to compile 32-bit file in 64-bit operating system?
1. as - the portable GNU assembler.
--32 | --x32 | --64
Select the word size, either 32 bits or 64 bits.  --32 implies Intel i386 architecture, while --x32 and
--64 imply AMD x86-64 architecture with 32-bit or 64-bit word-size respectively.

These options are only available with the ELF object file format, and require that the necessary BFD
support has been included (on a 32-bit platform you have to add --enable-64-bit-bfd to configure enable
64-bit usage and use x86-64 as target platform).

e.g. as --32 -o calltest.o calltest.s

2. ld linker
we should connect .o file with /lib32/ld-linux.so.2 and /lib32/libc.so.6
ld -m elf_i386 -dynamic-linker /lib32/ld-linux.so.2 /lib32/libc.so.6  -o calltest calltest.o
🚩Usage of x/nyz

Experiment
Chapter 06 Controlling Execution Flow
1.Unconditional Branches
- Jump
Assembly Code: jumptest.s
# jumptest.s An example of the jmp instruction
.section .text
.globl _start
_start:
   nop
   movl $1, %eax # assigns the value 1 to the EAX register for the exit Linux system call
   jmp overhere
   movl $10, %ebx
   int $0x80
overhere:
   movl $20, %ebx
   int $0x80
movl $1, %eaxstores Linux system call number to register $eax(the number is ‘1’ in this case, which indicates “sys_exit”)
by the way register $ebx stores the exit return value (‘20’ in this case)
jmpis used to jump to ‘overhere’ section, which can be proved by the result below.
we use echo $? to check the returned value
Result:

- Calls
Call instruction can remember where it jumps from and return to that place if needed.
Here, we need to understand that there are two important registers used in the stack, they are ESP and EBP
ESP:栈指针寄存器(extended stack pointer) using for storing the top of Stack Frame
EBP:基址指针寄存器(extended base pointer) using for storing the base of Stack Frame
Assembly Code:
# calltest.s -An example of using the CALL instruction
.section .data
output:
   .asciz "This is section %d\n"  # .asciz 在字符串末尾有结束标志符
.section .text
.globl _start
_start:
   pushl $1  #这里简要复习一下C语言库里的printf需要的parameters,需要先将%d对应的参数push到stack里
   pushl $output   # 再push字符串,pop的时候就会是字符串先出栈,参数后出栈
   call printf
   add  $8, %esp # 将esp寄存器里的值加8,相当于栈顶指针加8
   call overhere
   pushl $3
   pushl $output
   call printf
   add  $8, %esp
   pushl $0
   call exit
overhere:
   pushl %ebp
   movl %esp, %ebp
   pushl $2
   pushl $output
   call printf
   add  $8, %esp
   movl %ebp, %esp
   popl %ebp
   ret
Result:

2.Conditional Branches
-
**The compare instruction **
cmp operand1, operand2
!!! When using the GNU assembler, remember that operand1 and operand2 are the reverse from what
is described in the Intel documentation for the CMP instruction. This little feature has caused many
hours of debugging nightmares for many an assembly language programmer. (operand2 – operand1)
Assembly Code:
# cmptest.s - An example of using the CMP and JGE instructions
.section .text
.globl _start
_start:
   nop
   movl $15, %eax #立即数15赋值给寄存器eax
   movl $10, %ebx #立即数10赋值给寄存器eax
   cmp %eax, %ebx # now, (eax)=15, (ebx)=10, (ebx)-(eax)=10-15=-5
   jge greater # jump greater or equal(此时ebx<eax 不执行跳转)
   movl $1, %eax
   int $0x80
greater:
   movl $20, %ebx
   movl $1, %eax
   int $0x80
Result:

Finally, the value in $ebx has not been changed by the instruciton within greater section as the value stored in ebx is smaller than eax.
We are pleasure to try these following changes in the program so as to get different results.
cmp $20, %ebx ; compare EBX with the immediate value 20
cmp data, %ebx ; compare EBX with the value in the data memory location
cmp (%edi), %ebx ; compare EBX with the value referenced by the EDI pointer
- Using the parity flag
The parity flag indicates the number of bits that should be one in a mathematical answer. This can be used as a crude error-checking system to ensure that the mathematical operation was successful.If the number of bits set to one in the resultant is even, the parity bit is set (one). If the number of bits set to one in the resultant is odd, the parity bit is not set (zero).
我们可以将结果数写成8位二进制数,如果为1的位数为偶数个,那么parity flag=1,同理,若为1的位数为奇数个,parity flag=0
Assembly Code:
# paritytest.s - An example of testing the parity flag
.section .text
.globl _start
_start:
   movl $1, %eax
   movl $4, %ebx
   subl $3,  %ebx
   jp overhere
   int $0x80
overhere:
   movl $100, %ebx
   int $0x80
Result:

In this snippet, the result from the subtraction is 1, which in binary is 00000001. the number of one bits is odd, the parity flag is not set, i.e. parity flag =0.
To test the opposite case, I changed subl $3, %ebx to subl $1, %ebx, thus I got another result:

jp overhere has been excuted and then jump to overhere section, value 100 is moved to EBX.
- Using the sign flag
The sign flag is used in signed numbers to indicate a sign change in the value contained in the register.In a signed number, the last (highest order) bit is used as the sign bit. It indicates whether the numeric representation is negative (set to 1) or positive (set to 0).
Assembly Code:
# signtest.s - An example of using the sign flag
.section .data
value:
   .int 21, 15, 34, 11, 6, 50, 32, 80, 10, 2
output:
   .asciz "The value is: %d\n"
.section .text
.globl _start
_start:
   movl $9, %edi
loop:
   pushl value(, %edi, 4) #从数组的尾部到头部遍历一次。
   pushl $output
   call printf
   add $8, $esp
   dec %edi
   jns loop #直到edi等于0,也就是数组的下标为0时,结束循环
   movl $1, %eax
   movl $0, %ebx
   int $0x80
Result:

- The loop instruction

When the LOOP instruction is executed, it first decreases the value in ECX by one, and then it checks to see whether it is zero.
Assembly Code:
# loop.s - An example of the loop instruction
.section .data
output:
   .asciz "The value is: %d\n"
.section .text
.globl _start
_start:
   movl $100, %ecx
   movl $0, %eax
loop1:
   addl %ecx, %eax #在这个过程中,eax不断地加ecx,而ecx不断减1
   loop loop1
   pushl %eax
   pushl $output
   call printf
   add $8, %esp
   movl $1, %eax
   movl $0, %ebx
   int $0x80
Result:

Because this value is not zero, the LOOP instruction continues on its way, looping back to the defined label. The loop will eventually exit when the register overflows, and the incorrect value is displayed.

从gdb的结果来看,ecx在不断地执行减1操作,eax中的值加上ecx。
Now, let’s try out the example in the textbook, setting the value of ECX to 0, and see what will happen then.
_start:
   movl $0, %ecx
   movl $0, %eax


Apprerently, the value in EAX is incorrect, that indicates the register is overflowed, and the incorrect value is displayed.
- Preventing LOOP catastrophes
The JCXZ instruction to provide some rudimentary error-checking. (Jump CX zero)
Assembly Code:
# betterloop.s - An example of the loop and jcxz instructions.section .dataoutput: .asciz "The value is: %d\n".section .text.globl _start_start: movl $0, %ecx movl $0, %eax jcxz doneloop1: addl %ecx, %eax loop loop1done: pushl %eax pushl $output call printf movl $1, %eax movl $0, %ebx int $0x80
Result:

Instruction jcxz checks whether ECX is containing value 0 or not, in this snippet, ECX is set value 0, thus it outputs the result immediately.
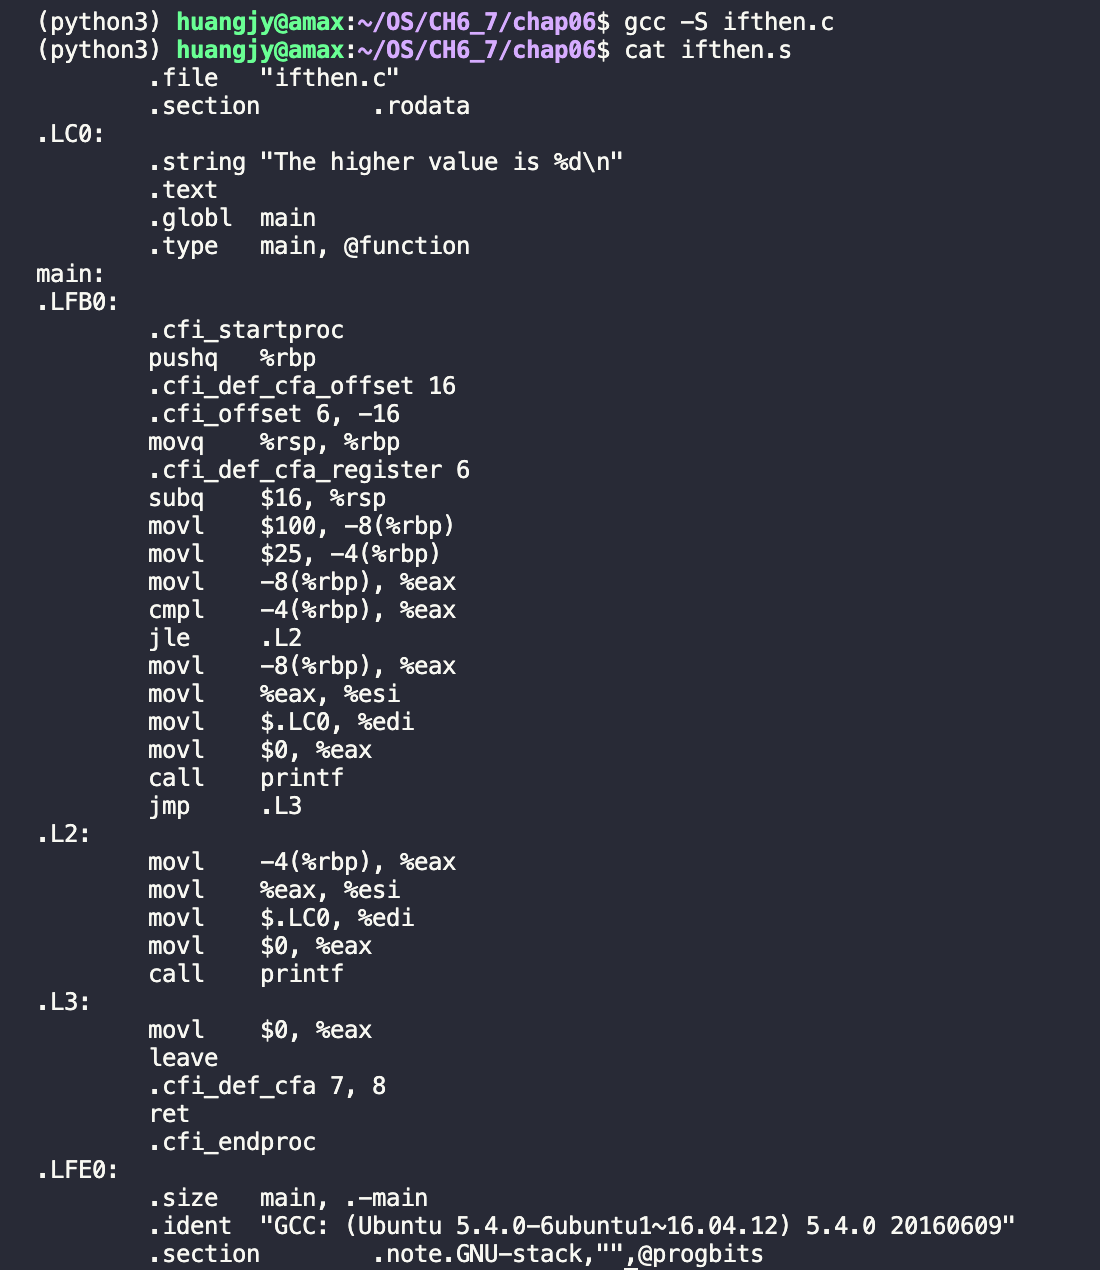
- Disassembling high-level language: C
Here are two fairly simply C language codes, although it looks super easy to read and understand, at the moment when we unwrap its assembly code, something surprising is happening!
C Code:
/* ifthen.c A sample C if-then program */#include <stdio.h>int main(){ int a = 100; int b = 25; if (a > b) { printf("The higher value is %d\n", a); } else printf("The higher value is %d\n", b); return 0;}
We can check how this C snippet works by entering gcc -S [filename.c] cat [filename.s]
Result:
C Code:
/* for.c A sample C for program */#include <stdio.h>int main(){ int i = 0; int j; for (i = 0; i < 1000; i++) { j = i * 5; printf("The answer is %d\n", j); } return 0;}
Result:
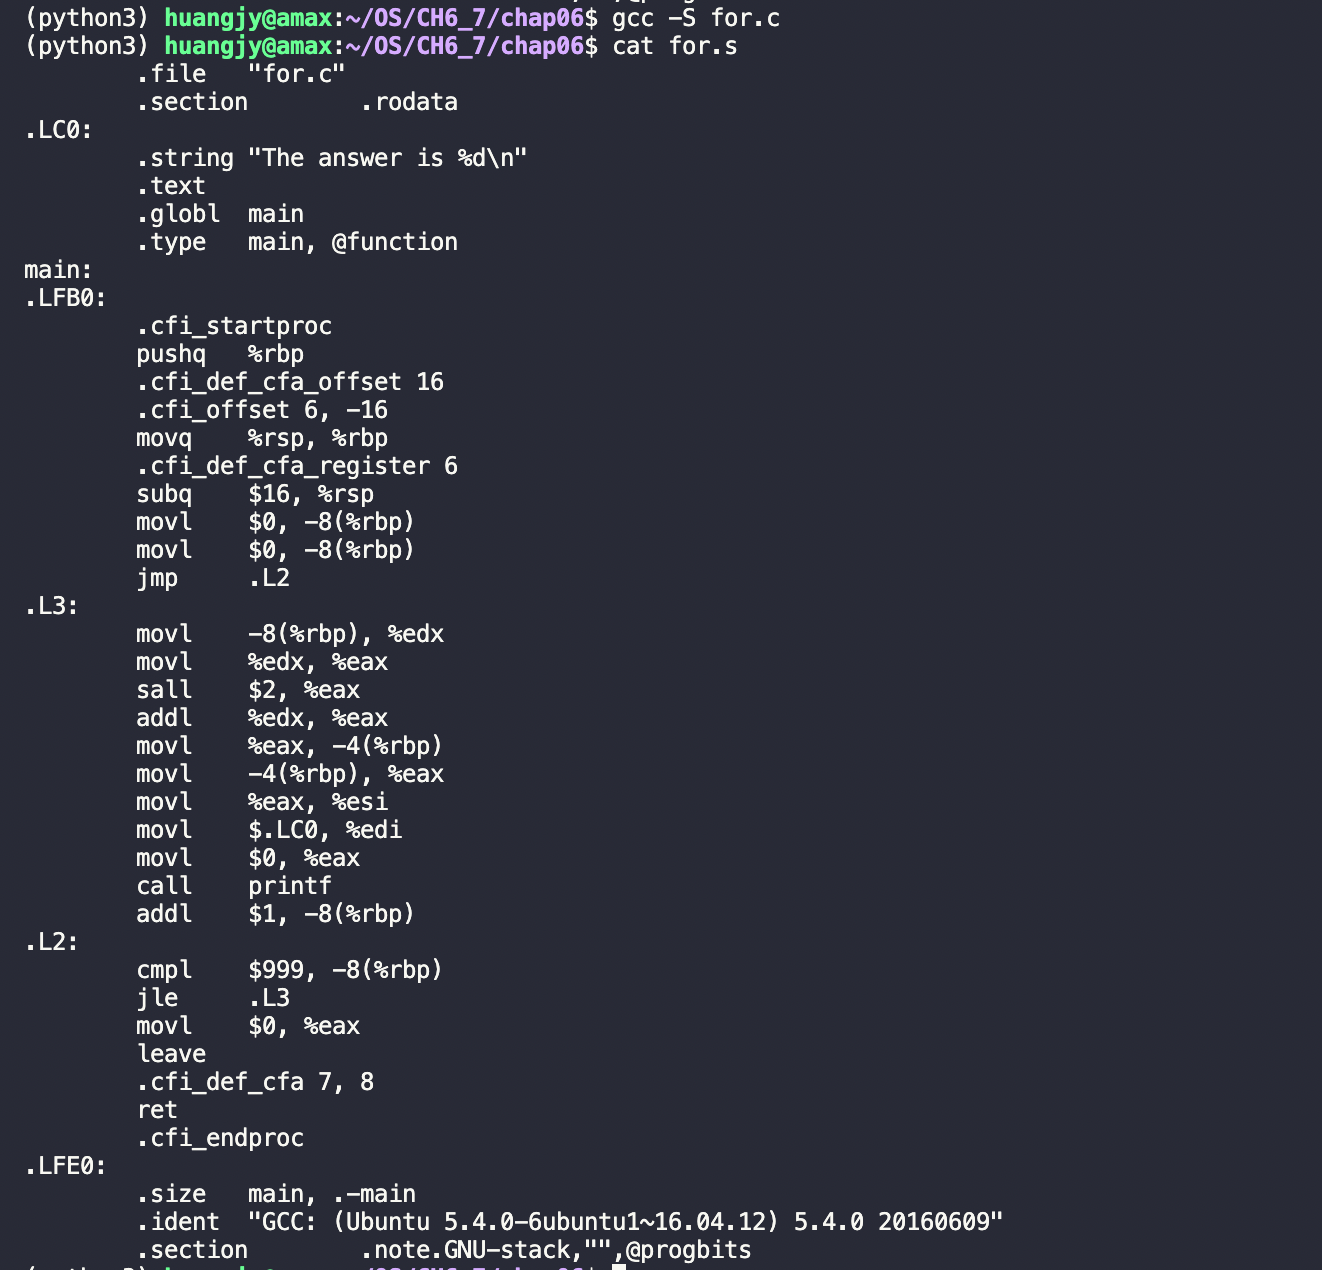
From the above assembly codes, we can sum up with a brief conclusion, even through the form high-level language is extremely simple, we need to understand how it works in assembly language, thus get insights into its processing principle.
Chapter 07 Using Numbers
1.Integers
Here are four terms defined to represent four kinds of the organisation of bits.
❑ Byte: 8 bits 0 , through 255
❑ Word: 16 bits, 0 through 65,535
❑ Doubleword: 32 bits, 0 through 4,294,967,295
❑ Quadword: 64 bits, 0 through 18,446,744,073,709,551,615
Now, we are going to check how numbers work in assembly language throughout this chapter.
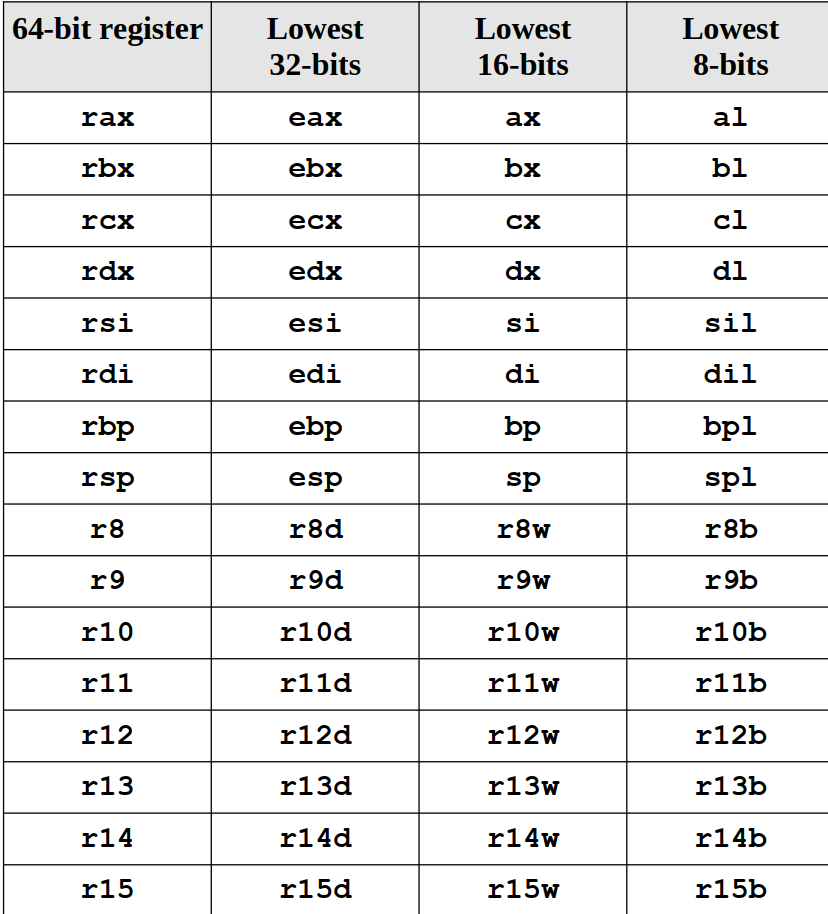
上表是通用寄存器(GPRs)所能储存的位数对应的寄存器名称。

上图是同一行中的通用寄存器之间的大小关系。rax的子集有eax,ax,ah,al;eax的子集有ax,ah,al,以此类推。
- Signed integers
Assembly Code:
# inttest.s - An example of using signed integers.section .datadata: .int -45.section .text.globl _start_start: nop movl $-345, %ecx movw $0xffb1, %dx #这里的movw表示移动的位数为16bits,对应上表可知,选择dx寄存器是对的。 movl data, %ebx movl $1, %eax int $0x80
Result:


When I try to print the value in EDX register, I got 65457 in decimal and 0xffb1 in hexadecimal, which is wrong.
0xffb1 in EDX where the value is interpreted as doubleword signed integer, whereas it actually contains a word.
在DX中的值是负数,在EDX中却是一个无符号数。这表明在EDX中符号并没有得到扩展,而是保留最高位符号位为0。
If we just simply use instruction mov to move values between high capacity registers and low, the signed bit won’t be taken care.
- Extending unsigned integers
Assembly Code:
# movzxtest.s - An example of the MOVZX instruction.section .text.globl _start_start: nop movl $279, %ecx movzx %cl, %ebx # 相当于是移动存放在寄存器ECX中的一个8bits子集 movl $1, %eax int $0x80
The movzxtest.s program simply puts a large value in the ECX register, and then uses the MOVZX instruction to copy the lower 8 bits to the EBX register.
Binary code of 279 is 0000000100010111
Result:

The lower 8 bits has been moved to EBX.
- Extending signed integers
Intel has provided theMOVSXinstruction to allow extending signed integers and preserving the sign.
Assembly Code:
# movsxtest.s - An example of the MOVSX instruction.section .text.globl _start_start: nop movw $-79, %cx movl $0, %ebx movw %cx, %bx movsx %cx, %eax movl $1, %eax movl $0, %ebx int $0x80
Result:

Compared to the value(65457 incorrect) in EBX moved by instruction movw , the value in EAX is -79 moved by instruction movsx, we notice that the value in EAX is 0xffffffb1 which has been extended and thus is what we expected.
Hence, instruction moves can move signed integer to a bigger register with leading 1(if what it moves is a negative number)
In contrast, movw just simply moves corrsponding bits to another register without any extension.
Assembly Code:
# movsxtest2.s - Another example using the MOVSX instruction.section .text.globl _start_start: nop movw $79, %cx xor %ebx, %ebx movw %cx, %bx movsx %cx, %eax movl $1, %eax movl $0, %ebx int $0x80
Result:

In this snippet, we moved a positive number and other instructions remain the same as last snippet.
- Defining integers in GAS
.quad directive allows us to define quadword signed integer values.
Assembly Code:
# quadtest.s - An example of quad integers.section .datadata1: .int 1, -1, 463345, -333252322, 0data2: .quad 1, -1, 463345, -333252322, 0 #each value is quadword, i.e. 64bits.section .text.globl _start_start: nop movl $1, %eax movl $0, %ebx int $0x80
Result:

我们可以用
x/5gd来显示memory中quad类型的值

little-endian存储方式,data1被定义为int类型的数组,观察下图,每个数字占4bytes,如0x01,0x00, 0x00,0x00为data1中的数值1

data2被定义为quad类型的数组,每个数字占8bytes,如0x01, 0x00, 0x00, 0x00, 0x00, 0x00, 0x00, 0x00表示data2中的数值1

2. SIMD Integers
- Moving MMX integers(Multimedia Extension)
The Multimedia Extension (MMX) technology introduced in the Pentium MMX and Pentium II processors provided three new integer types:
❑ 64-bit packed byte integers
❑ 64-bit packed word integers
❑ 64-bit packed doubleword integers
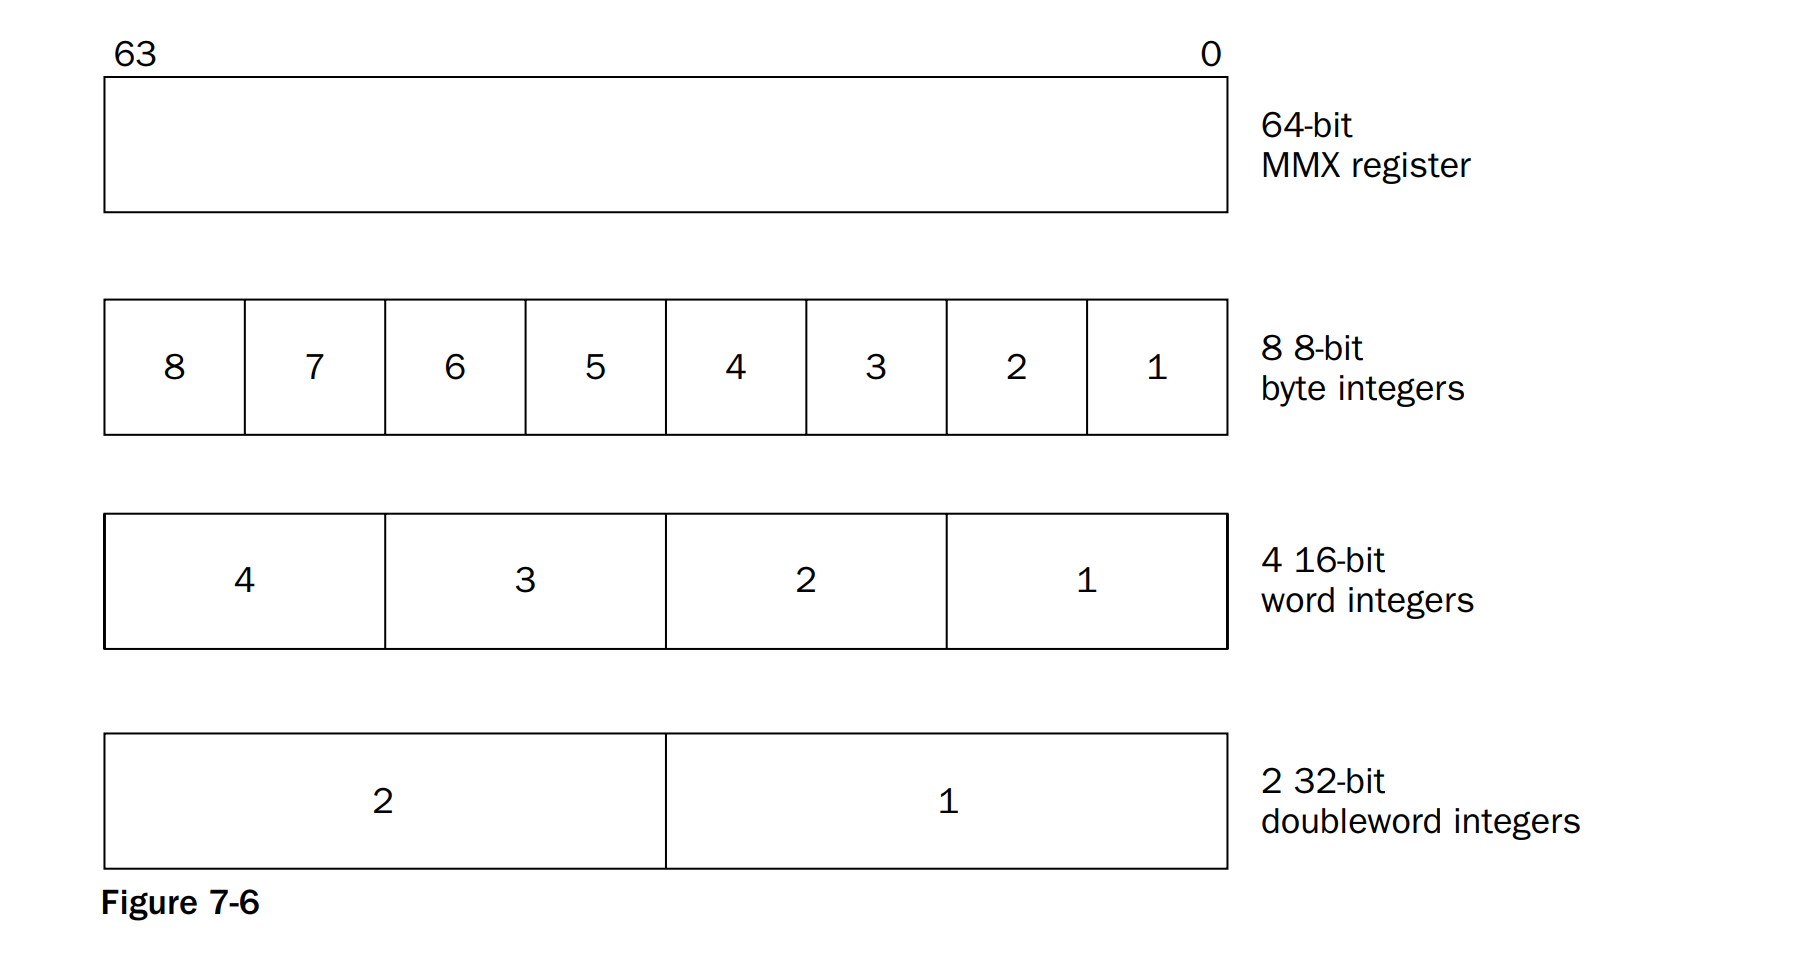
The figure above demonstrates how each data type fits in 64-bit register.
The format of the MOVQ instruction is
movq source, destination where source and destination can be an MMX register, an SSE register, or a 64-bit memory location
Assembly Code:
# mmxtest.s - An example of using the MMX data types.section .datavalues1: .int 1, -1values2: .byte 0x10, 0x05, 0xff, 0x32, 0x47, 0xe4, 0x00, 0x01.section .text.globl _start_start: nop movq values1, %mm0 movq values2, %mm1 movl $1, %eax movl $0, %ebx int $0x80
Result:

I was getting into trouble, there seems no MM0 and MM1 registers in my processor?
3. Binary Coded Decimal
- Moving BCD values
Index:floating-point unit (FPU)
!! ST0 refers to the register at the top of the stack. When a value is pushed into the FPU register stack, it is placed in the ST0 register, and the previous value of ST0 is loaded into ST1.
The
FBLDinstruction is used to move a packed 80-bit BCD value into the FPU register stack.
Assembly Code:
# bcdtest.s - An example of using BCD integer values.section .datadata1: .byte 0x34, 0x12, 0x00, 0x00, 0x00, 0x00, 0x00, 0x00, 0x00, 0x00data2: .int 2.section .text.globl _start_start: nop fbld data1 # load the value into the top of the FPU register stack (ST0) fimul data2 # multiply the ST0 register by the integer value at the data2 memory location. fbstp data1 # move the new value on the stack back into the data1 memory location movl $1, %eax movl $0, %ebx int $0x80
Result:

观察data1中的数值;
执行fbld data1

BCD码1234被move到st0中;
执行fimul data2

st0中的BCD码1234乘以2得到2468;
执行fbstp data1

上一条指令执行后的结果以BCD的格式被放置到data1的存储位置。
4.Floating-Point Numbers
- Moving floating-point values
The format of the FLD instruction is
fld source where source can be a 32-, 64-, or 80-bit memory location.
FST instruction is used for retrieving the top value on the FPU register stack and placing the value in a memory location.
Assembly Code:
# floattest.s - An example of using floating point numbers.section .datavalue1: .float 12.34value2: .double 2353.631.section .bss .lcomm data, 8.section .text.globl _start_start: nop # FLD指令load单精度和多精度浮点数进入FPU寄存器栈 flds value1 #loading single-precision floating-point numbers, fldl value2 #loading double-precision floating-point numbers fstl data #(fstl双精度,fsts单精度)retrieving the top value on the FPU register stack and placing the value in a memory location movl $1, %eax movl $0, %ebx int $0x80
Result:
The figure below is how the floating-point values are stored in the memory locations.

We also can view its decimal form.


从st0寄存器的结果可以看出,单精度浮点数率先被置入FPU寄存器栈,随后是双精度浮点数,而此时单精度浮点数被置于st1寄存器中;
-
Using preset floating-point values

Assembly Code:
# fpuvals.s - An example of pushing floating point constants.section .text.globl _start_start: nop fld1 fldl2t fldl2e fldpi fldlg2 fldln2 fldz movl $1, %eax movl $0, %ebx int $0x80
Result:

根据一系列指令,我们可以在FPU寄存器栈里置入相应的值,如pi,log等。
- Moving SSE integers
The Streaming SIMD Extensions (SSE) technology provides eight 128-bit XMM registers (named XMM0 through XMM7) for handling packed data.
❑ 128-bit packed byte integers
❑ 128-bit packed word integers
❑ 128-bit packed doubleword integers
❑ 128-bit packed quadword integers
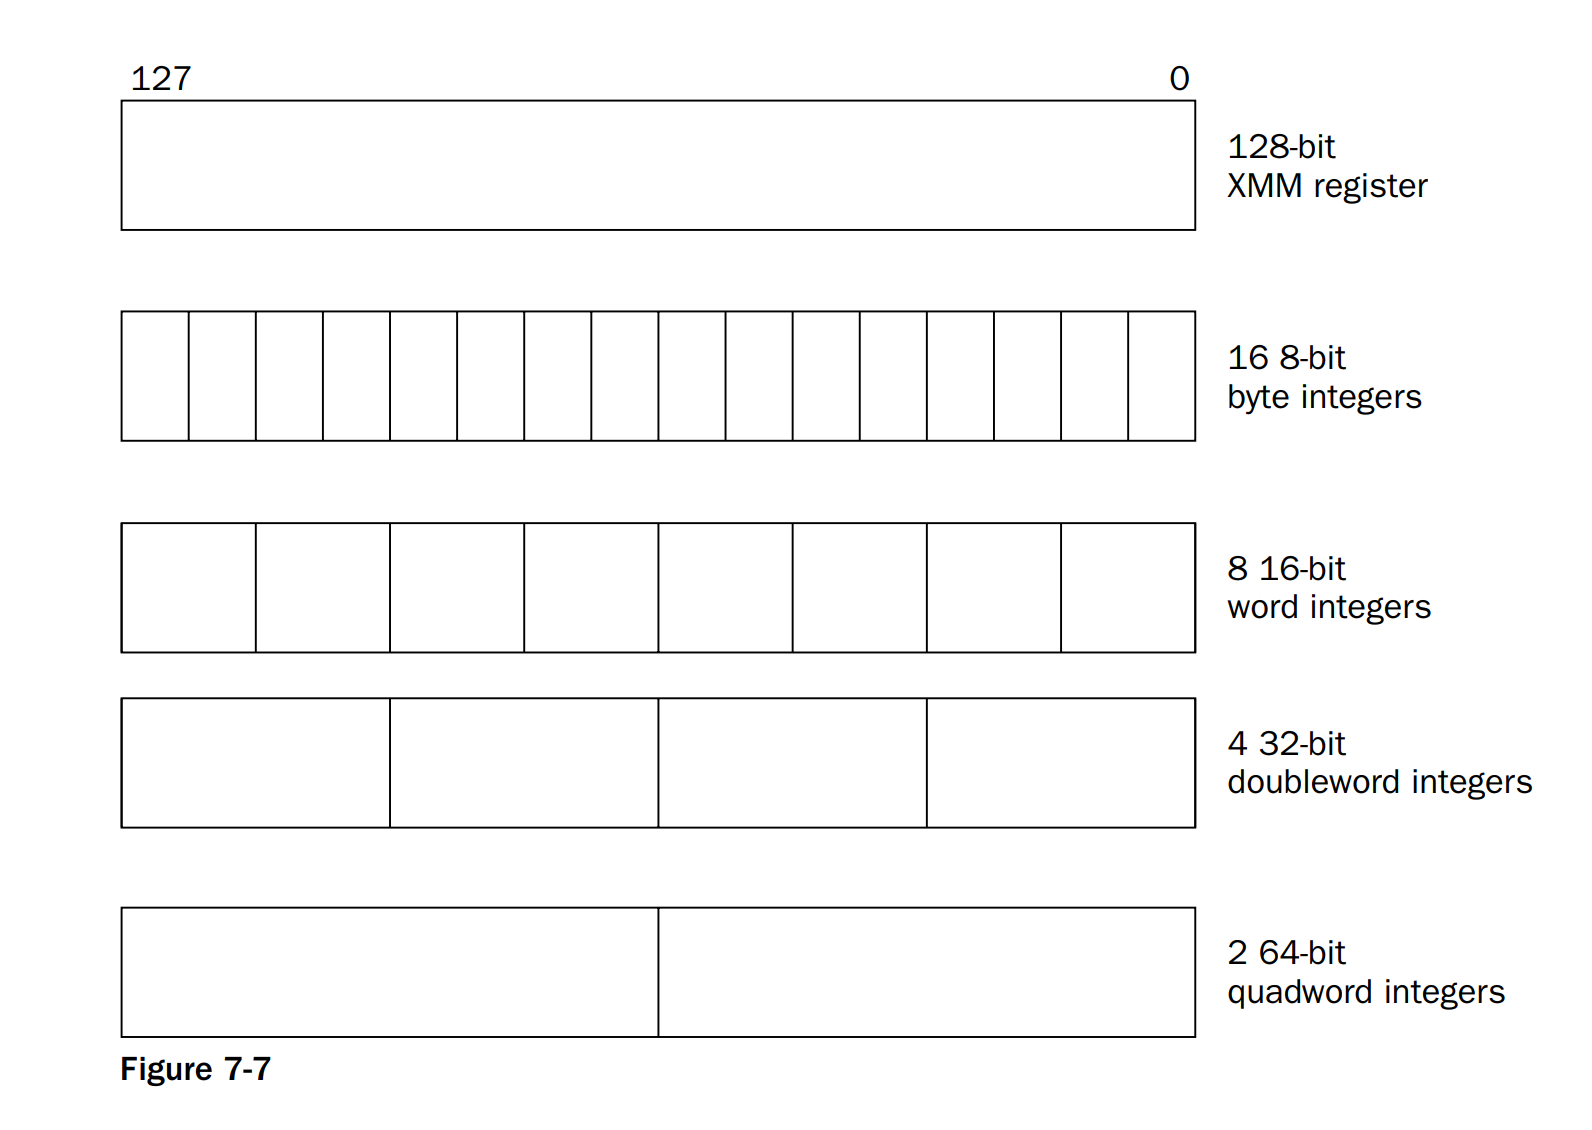
The figure above shows how values are packed into the 128-bit XMM registers.
The format of both the MOVDQA and MOVDQU instruction is
movdq(a/u) source, destination The a and u parts of the mnemonic stand for aligned and unaligned, referring to how the data is stored in memory.
Assembly Code:
# ssetest.s - An example of using 128-bit SSE registers.section .datavalues1: .int 1, -1, 0, 135246 #32 bits each valuevalues2: .quad 1, -1 #64 bits each value.section .text.globl _start_start: nop movdqu values1, %xmm0 movdqu values2, %xmm1 movl $1, %eax movl $0, %ebx int $0x80
Result:

对于XMM0, 我们关注 “v4_int32” 这里与我们预期的要求一致
对于XMM1, 我们关注 “v2_int64” 这里与我们预期的要求一致
- SSE2 floating-point values
The following table describes the new instructions that can be used to move SSE2 packed double-precision floating-point data types.

Assembly Code:
# sse2float.s - An example of moving SSE2 FP data types.section .datavalue1: .double 12.34, 2345.543value2: .double -5439.234, 32121.4.section .bss .lcomm data, 16.section .text.globl _start_start: nop movupd value1, %xmm0 #Move two unaligned, double-precision values to XMM registers or memory movupd value2, %xmm1 #Move two unaligned, double-precision values to XMM registers or memory movupd %xmm0, %xmm2 movupd %xmm0, data movl $1, %eax movl $0, %ebx int $0x80
Result:

- Moving SSE floating-point values
Moving 128-bit packed single-precision floating-point values between memory and the XMM registers on the processor.
图中是XMM寄存器的结构,它可以存储128bits的数据。

Assembly Code:
# ssefloat.s - An example of moving SSE FP data types.section .datavalue1: .float 12.34, 2345.543, -3493.2, 0.44901value2: .float -5439.234, 32121.4, 1.0094, 0.000003.section .bss .lcomm data, 16 #16bytes.section .text.globl _start_start: nop movups value1, %xmm0 # Move four unaligned, packed single-precision values to XMM registers or memory movups value2, %xmm1 movups %xmm0, %xmm2 movups %xmm0, data movl $1, %eax movl $0, %ebx int $0x80
Result:

通过指令movups将数组中的值置入XMM寄存器中。

指令movups %xmm0, data 将XMM中的值拷贝到data中;
5.Conversions
- Conversion instructions
Assembly Code:
# convtest.s - An example of data conversion.section .datavalue1: .float 1.25, 124.79, 200.0, -312.5value2: .int 1, -435, 0, -25.section .bssdata1: .lcomm data, 16.section .text.globl _start_start: nop cvtps2dq value1, %xmm0 # Packed single-precision FP to packed doubleword integers (XMM) cvttps2dq value1, %xmm1 # Packed single-precision FP to packed doubleword integers (XMM, truncated) cvtdq2ps value2, %xmm2 # Packed doubleword integers to packed single-precision FP (XMM) movdqu %xmm0, data movl $1, %eax movl $0, %ebx int $0x80
Result:


In the first result image, the values are displayed correctly in the v4_int32 format with rounded values and the second one we focus on v4_float where integer value has been converted to packed single-precision FP.
Conclusion
In these two chapters, covered a lot of ground regarding how the IA-32 platform deals with numbers, including integers, floating points, double, and so forth. I learnt how to move and define different types of numbers that covered discussed in this report in assembly language. Surprisingly, I was attracted by the assembly code when I unwrapped the C language code, its really complex comparing to high-level language. Besides, conditional and unconditional jump is two of important concept in chapter 6, calls are similar to jumps, but support the capability to return to the location after the call.
👾Reference
1.Professional Assembly Language - Richard Blum.2005
2.assembly x86-64 with Ubuntu


 87
87

 被折叠的 条评论
为什么被折叠?
被折叠的 条评论
为什么被折叠?
 到【灌水乐园】发言


