


前言
在canvas绘图的过程中有时我们需要绘制箭头,但canvas本身没有绘制箭头的方法,于是就需要我们自己来封装。本文章就介绍一下我是如何封装绘制箭头的方法的。
一、绘制图形箭头
1.函数签名
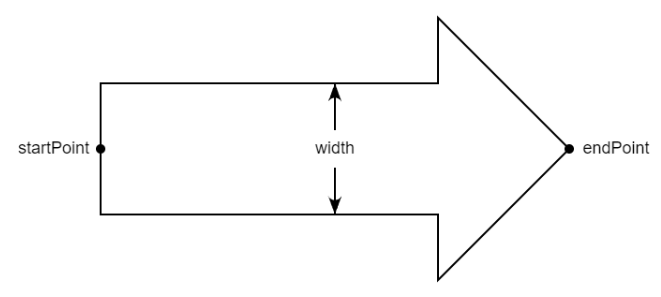
drawGraphArrow(ctx, startPoint, endPoint, width, style)
- ctx - canvas 2d 绘图上下文
- startPoint - 箭头的起始点
- endPoint - 箭头的结束点
- width - 箭头的宽度
- style - 箭头的样式对象,包括如下属性
-
- lineWidth - 箭头的边线宽度 默认为2
- strokeColor - 箭头的边线颜色 默认为黑色
- fillColor - 箭头的填充颜色 默认无色
2.绘制过程
我在绘制图形箭头时采用先绘制一半再绘制另一半的方式。我们绘制一条经过startPoint 和 endPoint的直线,箭头就被分为了两半。这条直线被我称为 主轴 ,它也是箭头的对称轴,因此我们只要能将一半的箭头画出来,那么画出完整的箭头也就很简单了。
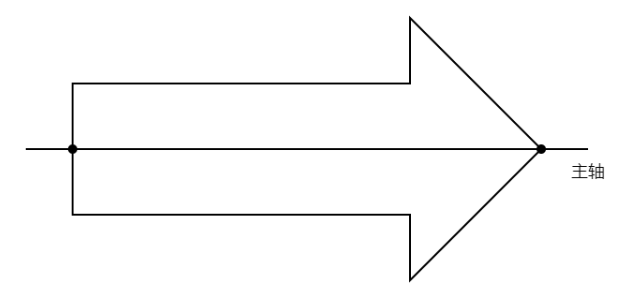
我们可以看到每一半的箭头都包含5个点,包括已知的startPoint 和 endPoint,以及三个未知的中间点 p1、p2、p3 ,如果能够搞清除这三个未知点的坐标的话,就可以绘制出一半的箭头了。

想要计算出三个点的坐标,就需要知道 主轴和副轴的角度(副轴是与主轴垂直的一条直线)以及 Sp1、p1p2、p2p3这三条边的长度。
首先为了辅助计算,我事先准备好了三个方法(详细的原理可以参考我写的坐标正算与坐标反算的文章)
  /**
   *  计算直线角度
   * @param {*} from 直线起点
   * @param {*} to 直线终点
   * @returns
   */
  static function getAngle(from, to) {
    return Math.atan2(to[1] - from[1], to[0] - from[0])
  }


  /**
   *  计算未知点坐标
   * @param {*} point 已知点的坐标
   * @param {*} angle  直线的角度
   * @param {*} length  直线的长度
   * @returns
   */
 static function getPoint(point, angle, length) {
    return [
      point[0] + Math.cos(angle) * length,
      point[1] + Math.sin(angle) * length,
    ]
  }


  /**
   * 计算直线长度
   * @param {*} p1 直线端点1
   * @param {*} p2 直线的端点2
   * @returns
   */
 static function getLength(p1, p2) {
    return Math.hypot(p1[0] - p2[0], p1[1] - p2[1])
  }
主轴的角度就可以通过起点与终点坐标计算出来,而副轴由于与主轴垂直,所以它的角度就等于主轴角度加减90°
     let angleM = getAngle(startPoint , endPoint)
     let angleC = angleM + Math.PI / 2
而三条边的长度则需要根据箭头的设计尺寸来计算,我的设计如下:
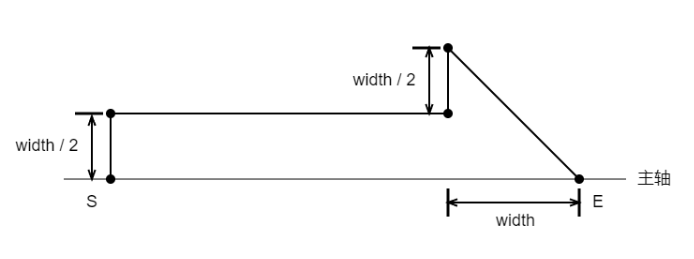
所以Sp1 = width/2 p1p2 = length - widt p2p3 = width/2 ,其中length是箭头的总长度,可以通过起点与终点坐标计算出来。现在我们就可以计算出三个中间点的坐标了。
  let length = getLength(startPoint, endPoint)

  let p1 = this.getPoint(startPoint, angleC, width / 2),
    p2 = this.getPoint(p1, angleM, length - width),
    p3 = this.getPoint(p2, angleC, width / 2)
然后只要依次连接五个点的坐标就可以画出一半的箭头。
    ctx.beginPath()

    ctx.moveTo(...startPoint)
    ctx.lineTo(...p1)
    ctx.lineTo(...p2)
    ctx.lineTo(...p3)
    ctx.lineTo(...endPoint)
另一半的绘制方法也一样,唯一不同的是要将副轴的角度重新设置为之前的反角。
    // i-重新计算另一侧的特征点坐标
    angleC = angleM - Math.PI / 2 //箭头副轴方位角

    p1 = this.getPoint(startPoint, angleC, width / 2)
    p2 = this.getPoint(p1, angleM, length - width)
    p3 = this.getPoint(p2, angleC, width / 2)

    // i-绘制另一半的箭头
    ctx.moveTo(...startPoint)
    ctx.lineTo(...p1)
    ctx.lineTo(...p2)
    ctx.lineTo(...p3)
    ctx.lineTo(...endPoint)
3.函数代码
static function drawGraphArrow({ ctx, startPoint, endPoint, width, style = {} }) {
    //i- 设置样式默认值
    style = Object.assign(
      {},
      {
        lineWidth: 2,
        strokeColor: 'black',
        fillColor: 'rgba(0,0,0,0)',
      },
      style
    )

    //I- 计算箭头的长度 , 计算主轴和副轴的方位角
    let length = this.getLength(startPoint, endPoint), //箭头的总长度
      angleM = this.getAngle(startPoint,endPoint), //箭头主轴方位角
      angleC = angleM + Math.PI / 2 //箭头副轴方位角

    //i-计算三个特征点
    let p1 = this.getPoint(startPoint, angleC, width / 2),
      p2 = this.getPoint(p1, angleM, length - width),
      p3 = this.getPoint(p2, angleC, width / 2)

    ctx.save()

    //i- 绘制一半的箭头
    ctx.lineWidth = style.lineWidth
    ctx.strokeStyle = style.strokeColor
    ctx.fillStyle = style.fillColor

    ctx.beginPath()

    ctx.moveTo(...startPoint)
    ctx.lineTo(...p1)
    ctx.lineTo(...p2)
    ctx.lineTo(...p3)
    ctx.lineTo(...endPoint)

    // i-重新计算另一侧的特征点坐标
    angleC = angleM - Math.PI / 2 //箭头副轴方位角

    p1 = this.getPoint(startPoint, angleC, width / 2)
    p2 = this.getPoint(p1, angleM, length - width)
    p3 = this.getPoint(p2, angleC, width / 2)

    // i-绘制另一半的箭头
    ctx.moveTo(...startPoint)
    ctx.lineTo(...p1)
    ctx.lineTo(...p2)
    ctx.lineTo(...p3)
    ctx.lineTo(...endPoint)

    ctx.stroke()
    ctx.fill()

    ctx.restore()
  }
二、绘制直线箭头
1.函数签名
drawLineArrow(ctx , startPoint , endPoint , barbAngle , arrowLengle , arrowMode , which ,style)
- ctx - canvas 2d 绘图上下文
- startPoint - 箭头的起始点
- endPoint - 箭头的结束点
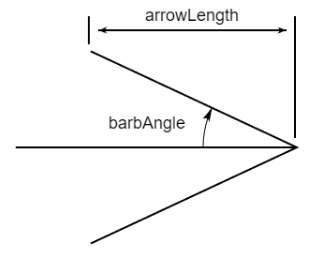
- barbAngle - 从箭杆线到箭头一侧边线的角度 - 默认值为 20°
- arrowLength - 从箭头点向后沿着箭杆线到箭头背部的距离 - 默认值为10
- arrowMode - 要绘制的箭头的类型, 默认值是 0
-
- 0 - 弯背填充箭头
- 1 - 直背填充箭头
- 2 - 描边箭头
- function( ctx , endPoint , cornerPointTop , cornerPointTBot) - 用户提供的绘制箭头的函数。endPoint是直线的端点,cornerPointTop 和 cornerPointTBot)是两个后角点。
- which - 在箭柄线的哪一端添加箭头,默认值为 1(在终点添加箭头)
-
- 0 - 都不添加
- 1 - x2,y2 的那一端
- 2 - x1,y1 的那一端
- 3 - (即 1+2) 两个端点都添加
- style - 图形的样式对象,包括如下属性
-
- lineWidth - 箭头的边线宽度 默认为2
- strokeColor - 箭头的边线颜色 默认为黑色
- fillColor - 箭头的填充颜色 默认黑色
2.绘制过程
直线箭头的绘制其实很简单我们只要搞清楚箭头的两个后角点的坐标就可以了,而想要计算后角点的坐标则需要箭头侧边线的长度与角度。
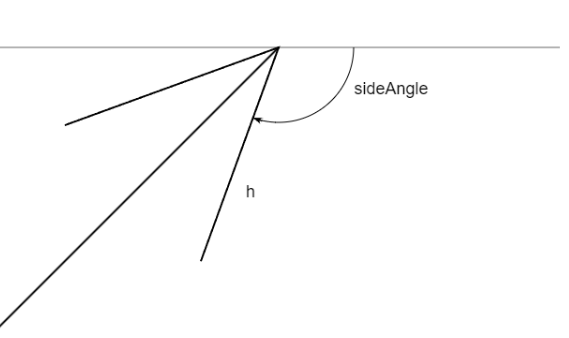
首先计算箭头侧边线长度,通过三角函数就可以计算出来,cos(barbAngle) = arrowLength / h , 进而可以推导出 h = arrowLength / cos(barbAngle)
const hypotenuse = Math.abs(arrowLength / Math.cos(barbAngle))接着计算侧边线的角度,侧边线的角度等于箭杆的角度加减 barbAngle 。但是要注意我们这里要计算的箭杆角度是从结束点到开始点的角度,所以要用 startPoint 减去 endPoint。
const angle = Math.atan2(
  startPoint[1] - endPoint[1],
  startPoint[0] - endPoint[0]
)

// i- 计算两个箭头边线的方位角
const angleTop = angle + barbAngle,
angleBot = angle - barbAngle现在我们直接调用之前用过的getPoint方法就可以计算出两个后角点的坐标
// i-计算箭头的两个后角点的坐标
const cornerPointTop = this.getPoint(endPoint, angleTop, hypotenuse),
cornerPointTBot = this.getPoint(endPoint, angleBot, hypotenuse)计算出两个后角点后,就可以直接绘制了,我封装了一个drawHead方法专门用于绘制箭头,它可以根据arrowMode参数的不同绘制三种不同的箭头,当然drawLineArrow也支持我们传入一个自定义函数来绘制箭头。
3.函数代码
  // t-绘制直线箭头
 static function drawLineArrow({
    ctx,
    startPoint,
    endPoint,
    barbAngle = 20,
    arrowLength = 10,
    arrowMode = 0,
    which = 1,
    style = {},
  }) {
    ctx.save()

    // i- 根据参数arrowMode获取绘制箭头的方法
    const toDrawHead =
      typeof arrowMode == 'function' ? arrowMode : this.drawHead

    // i- 将箭头的倒角转换为弧度
    barbAngle = (barbAngle * Math.PI) / 180

    //i- 设置样式默认值
    style = Object.assign(
      {},
      {
        lineWidth: 2,
        strokeColor: 'black',
        fillColor: 'black',
      },
      style
    )

    // i- 设置绘图样式
    ctx.lineWidth = style.lineWidth
    ctx.strokeStyle = style.strokeColor
    ctx.fillStyle = style.fillColor

    // i- 绘制箭杆
    ctx.beginPath()
    ctx.moveTo(...startPoint)
    ctx.lineTo(...endPoint)
    ctx.stroke()

    if (which == 1 || which == 3) {

      const angle = Math.atan2(
        startPoint[1] - endPoint[1],
        startPoint[0] - endPoint[0]
      )

      // i- 计算两个箭头边线的方位角
      const angleTop = angle + barbAngle,
        angleBot = angle - barbAngle

      // i- 箭头斜边长度
      const hypotenuse = Math.abs(arrowLength / Math.cos(barbAngle))
      // i-计算箭头的两个后角点的坐标
      const cornerPointTop = this.getPoint(endPoint, angleTop, hypotenuse),
        cornerPointTBot = this.getPoint(endPoint, angleBot, hypotenuse)

      toDrawHead.call(
        this,
        ctx,
        endPoint,
        cornerPointTop,
        cornerPointTBot,
        arrowMode
      )
    }

    if (which == 2 || which == 3) {
      //i- 计算箭杆线从 endP 到  startP方向上的方位角
      const angle = Math.atan2(
        endPoint[1] - startPoint[1],
        endPoint[0] - startPoint[0]
      )
      // i- 计算两个箭头边线的方位角
      const angleTop = angle + barbAngle,
        angleBot = angle - barbAngle

      // i- 箭头斜边长度
      const hypotenuse = Math.abs(arrowLength / Math.cos(barbAngle))
      // i-计算箭头的两个后角点的坐标
      const cornerPointTop = this.getPoint(startPoint, angleTop, hypotenuse),
        cornerPointTBot = this.getPoint(startPoint, angleBot, hypotenuse)

      toDrawHead.call(
        this,
        ctx,
        startPoint,
        cornerPointTop,
        cornerPointTBot,
        arrowMode
      )
    }

    ctx.restore()
  }
// t-绘制箭头(头部)
static function drawHead(ctx, arrowPoint, cornerPontTop, cornerPontTBot, arrowMode) {
// debugger
ctx.beginPath()
ctx.moveTo(...cornerPontTop)
ctx.lineTo(...arrowPoint)
ctx.lineTo(...cornerPontTBot)
switch (arrowMode) {
case 0:
// i-arcTo 弯背填充箭头
const backL = this.getLength(cornerPontTBot, cornerPontTop)
ctx.arcTo(...arrowPoint, ...cornerPontTop, backL * 0.55)
ctx.fill()
break
case 1:
// i- 直背填充箭头
ctx.lineTo(...cornerPontTop)
ctx.fill()
break
case 2:
// i-未填充箭头
ctx.stroke()
break
default:
throw new Error('请传入正确的arrowMode参数')
}
}三、绘制弧线箭头
1.函数签名
drawArcArrow(ctx , center , radius , startAngle, endAngle , anticlockwise , barbAngle , arrowLength , arrowMode , which , style)
- ctx - 2d绘图上下文
- center - 弧线所在圆的圆心
- radius - 圆的半径
- startangle - 弧线的开始角
- endangle - 弧线的结束角
- anticlockwise - 如果弧线按逆时针方向绘制则值为
true - barbAngle - 从箭杆线到箭头一侧边线的角度 - 默认值为 20°
- arrowLength - 从箭头点向后沿着箭杆线到箭头背部的距离 - 默认值为10
- arrowMode - 箭头的样式,详情请参考上面的
drawArrow方法 - which - 弧线的哪一端得到箭头,详情请参考上面的
drawArrow方法 - style - 图形的样式, 详情请参考上面的
drawArrow方法
2.绘制过程
绘制弧线箭头其实也很简单,大致思路是先绘制弧线,然后再弧线需要添加箭头的端点上,在端点的切线方向上使用drawLineArrow方法绘制一个直线箭头。
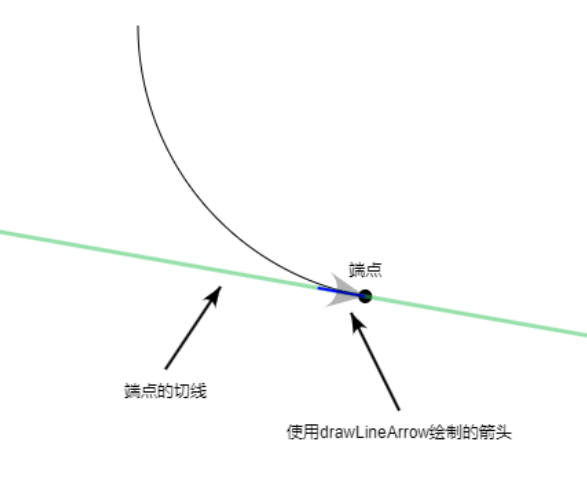
绘制弧线非常简单,我的方法中使用的是arc进行绘制的 , 这里就不赘述了, 当然你也可以尝试使用其它的方法绘制弧线。我们的主要的焦点还是放讨论如何在弧线端点上添加箭头。
首先要计算弧线端点的坐标,这个用之前准备的getPoint方法就可以得到。
//i-计算箭头点坐标(弧线的端点)
const arrowPoint = this.getPoint(center, endAngle, radius)现在我们得到了直线箭头的结束点,只要再计算出直线箭头的起点就可以使用drawLineArrow绘制箭头了。现在我们已知结束点的坐标,求开始点的坐标,就还需要两点间的距离和两点连线的角度。
两点的连线实际上就是在弧线端点处的切线,因此我们就可以使用这个公式:dy/dx=(a-x)/(y-b)
它表示以 (a,b) 为中心的圆上的(x,y)点处的斜率,dy/dx就是斜率,dy是y方向上的坐标增量,dx是x方向上的坐标增量。这样我们就可以算出切线的角度了:
  // i-计算切线的角度
  const lineAngle = Math.atan2(
    center[0] - arrowPoint[0],
    arrowPoint[1] - center[1]
  )
而两点间的距离我设置为10,我建议将距离尽可能设小,这样箭杆就可以被箭头所遮住。当然你也可以通过设置箭杆线颜色的方式将其隐藏,如果是这个样的话这个距离就可以随便设置了。
有了角度和距离就可以计算起点坐标了,这里注意考虑弧线按顺时针和按逆时针绘制的两种情况。
// i- 计算在切线上与箭头点相距 10像素的点
let destPoint
if (anticlockwise) {
  destPoint = [
    arrowPoint[0] - Math.cos(lineAngle) * 10,
    arrowPoint[1] - Math.sin(lineAngle) * 10,
  ]
} else {
  destPoint = [
    arrowPoint[0] + Math.cos(lineAngle) * 10,
    arrowPoint[1] + Math.sin(lineAngle) * 10,
  ]
}最后调用drawLineArrow绘制箭头即可,这里就不继续阐述了。
3.函数代码
  // t- 绘制弧线箭头
  static drawArcArrow({
    ctx,
    center,
    radius,
    startAngle,
    endAngle,
    anticlockwise = false,
    barbAngle = 20,
    arrowLength = 10,
    arrowMode = 0,
    which = 1,
    style = {},
  }) {
    ctx.save()

    // i- 根据参数arrowMode获取绘制箭头的方法
    const toDrawHead =
      typeof arrowMode == 'function' ? arrowMode : this.drawHead

    // i- 将参数中的角度都转换为弧度
    startAngle = (startAngle * Math.PI) / 180
    endAngle = (endAngle * Math.PI) / 180
    barbAngle = (barbAngle * Math.PI) / 180

    //i- 设置样式默认值
    style = Object.assign(
      {},
      {
        lineWidth: 1,
        strokeColor: 'black',
        fillColor: 'black',
      },
      style
    )

    // i- 设置绘图样式
    ctx.lineWidth = style.lineWidth
    ctx.strokeStyle = style.strokeColor
    ctx.fillStyle = style.fillColor

    // i- 绘制弧线
    ctx.beginPath()
    ctx.arc(...center, radius, startAngle, endAngle, anticlockwise)
    ctx.stroke()

    // i-绘制箭头
    if (which == 1 || which == 3) {
      //i-计算箭头点坐标(弧线的端点)
      const arrowPoint = this.getPoint(center, endAngle, radius)
      // i-计算切线的方位角
      const lineAngle = Math.atan2(
        center[0] - arrowPoint[0],
        arrowPoint[1] - center[1]
      )

      // i- 计算在切线上与箭头点相距 10像素的点
      let destPoint
      if (anticlockwise) {
        destPoint = [
          arrowPoint[0] - Math.cos(lineAngle) * 10,
          arrowPoint[1] - Math.sin(lineAngle) * 10,
        ]
      } else {
        destPoint = [
          arrowPoint[0] + Math.cos(lineAngle) * 10,
          arrowPoint[1] + Math.sin(lineAngle) * 10,
        ]
      }

      this.drawLineArrow({
        ctx,
        startPoint: destPoint,
        endPoint: arrowPoint,
        barbAngle: (barbAngle * 180) / Math.PI,
        arrowLength,
        arrowMode,
        which: 1,
        style,
      })
    }

    if (which == 2 || which == 3) {
      //i-计算箭头点坐标
      const arrowPoint = this.getPoint(center, startAngle, radius)
      // i-计算切线的方位角
      const lineAngle = Math.atan2(
        center[0] - arrowPoint[0],
        arrowPoint[1] - center[1]
      )

      // i- 计算在切线上与箭头点相距 10像素的点
      let destPoint
      if (anticlockwise) {
        destPoint = [
          arrowPoint[0] - Math.cos(lineAngle) * 10,
          arrowPoint[1] - Math.sin(lineAngle) * 10,
        ]
      } else {
        destPoint = [
          arrowPoint[0] + Math.cos(lineAngle) * 10,
          arrowPoint[1] + Math.sin(lineAngle) * 10,
        ]
      }

      this.drawLineArrow({
        ctx,
        startPoint: destPoint,
        endPoint: arrowPoint,
        barbAngle: (barbAngle * 180) / Math.PI,
        arrowLength,
        arrowMode,
        which: 2,
        style,
      })
    }
  }


 4808
4808

 被折叠的 条评论
为什么被折叠?
被折叠的 条评论
为什么被折叠?
 到【灌水乐园】发言


