


1NFS基础知识
1.1NFS简介
NFS是一种基于TCP/IP传输的网络文件系统协议,最初由Sun公司开发.
NFS服务可以将远程Linux系统上的文件共享资源挂载到本地主机的目录上,从而使得Linux客户端基于TCP/IP协议,像使用本地主机上的资源那样读写远程Linux系统上的共享文件。
特点:
1.采用TCP/IP传输网络文件
2.安全性低
3.简单易操作
4.适合局域网环境
优点:节省本地存储空间,减少本地磁盘的使用率。
1.2NFS工作原理
NFS网络文件系统,基于内核的文件系统。用户和程序可以像访问本地文件一样访问远程系统上的文件,基于RPC实现。
1.3NFS软件介绍
红帽系统:nfs-utils包括服务器和客户端相关工具
Ubuntu:nfs-kernel-server服务器包名,nfs-common客户端包名
NFS服务主要进程
rpc.nfsd最主要的NFS进程,管理客户端是否可登录
rpc.mountd挂载和卸载nfs文件系统,包括权限管理
rpc.lockd非必要,管理文件锁,避免同时写出错
rpc.statd非必要,检查文件一致性,可修复文件
日志:/var/lib/nfs
NFS配置文件:
/etc/exports
/etc/exports.d/*.exports
1.4NFS共享配置文件格式
主机格式:
anonymous:表示使用*通配所有客户端
IP networks:两种掩码格式均支持
172.18.0.0/255.255.0.0
172.18.0.0/16
wildcards:主机名通配,例如:*.magedu.com,IP不可以
netgroups:NIS域的主机组,@group_name
NFS服务程序的配置文件为/etc/exports,默认情况下里面没有任何内容。
NFS服务程序配置文件的参数
| 参数 | 作用 |
|---|---|
| ro | 只读 |
| rw | 读写 |
| root_squash | 当NFS客户端以root访问时,映射为NFS服务器的匿名用户 |
| no_root_squash | 当NFS客户端以root访问时,映射为NFS服务器的root用户 |
| all_squash | 无论NFS客户端使用什么身份登录,都映射为NFS服务器的匿名用户 |
| sync | 同时将数据写入到内存与硬盘中,保证不丢失数据 |
| async | 优先将数据保存到内存,然后再写入硬盘;这样效率更高,但可能会丢失数据 |
范例:NFS配置示例
vim /etc/exports
/myshare server.example.com
/myshare *.example.com
/myshare server?.example.com
/myshare server[0-20].example.com
/myshare 172.25.11.10
/myshare 172.25.0.0/16
/myshare 2000:472:18:b51:c32:a21
/myshare 2000:472:18:b51::/64
/myshare *.example.com 172.25.0.0/16
/myshare desktop.example.com(ro)
/myshare desktop.example.com(ro) server[0-20].example.com(rw)
/myshare diskless.example.com(rw,no_root_squash)
1.5NFS工具
1.rpcinfo工具可以查看RPC相关信息
rpcinfo -p hostname #查看注册在指定主机的RPC程序
rpcinfo -s hostname #查看rpc注册程序
rpcinfo -p 10.1.1.163 #查看远程主机
2.exportfs可用于管理NFS导出的文件系统
-v #查看本机的所有NFS共享
-r #重读配置文件,并共享目录
-a #输出本机所有共享
-au #停止本机的所有共享
3.showmount -e hostname #查看远程主机的NFS共享
shoumount命令中的可用参数和作用
| 参数 | 作用 |
|---|---|
| -e | 显示NFS服务器的共享列表 |
| -a | 显示本机挂载的文件资源的情况 |
| -v | 显示版本号 |
4.mount.nfs #客户端NFS挂载
fg #(默认)前台挂载
bg #后台挂载
hard #(默认)持续请求
soft   #非持续请求
intr   #和hard配合,请求可中断
rsize #和wsize 一次读和写数据最大字节数,rsize=32768
_netdev #无网络服务时不挂载NFS资源
范例:临时挂载NFS共享
mount -o rw,nosuid,fg,hard,intr, 10.1.1.161:/testdir /mnt/nfs/
范例:开机挂载
vim /etc/fstab
10.1.1.161:/public /mnt/nfs nfs defaults,_netdev 00
2数据的实时同步
2.1实时同步技术介绍
实现实时同步的方法:inotify+rsync方式实现
工作原理
要利用监控服务(inotify),监控同步数据服务器目录中的信息变化,发现目录中数据产生变化,就利用rsync服务推送到备份服务器上
实现inotify软件:inotify-tools 、sersync、lrsyncd
inotify+rsync使用方式:
inotify对同步数据目录信息的监控
rsync完成对数据的同步
利用脚本进行结合
2.2实现inotify
[root@nfs-server ~]# yum -y install inotify-tools
inotify-tools包主要工具:
inotifywait:在被监控的文件或目录上等待特定文件系统事件(open,close,delete等)发生,常用于实时同步的目录监控
inotifywatch:收集被监控的文件系统使用的统计数据,指文件系统发生的次数统计
rsync服务
rsync 常用于做为 linux系统下的数据镜像备份工具,实现远程同步,支持本地复制,或者与其他SSH、rsync主机同步数据,支持增量备份,配合任务计划,rsync能实现定时或间隔同步,配合inotify或sersync,可以实现触发式的实时数据同步
软件包:rsync、rsync-daemon
服务文件:/usr/lib/systemd/system/rsyncd.service
配置文件:/etc/rsyncd.conf 端口:873/tcp
rsync有三种工作方式:
1.本地文件系统上实现同步。
2.本地主机使用远程shell和远程主机通信。
3.本地主机通过网络套接字连接远程主机上的rsync daemon.
前两者的本质是通过本地或远程shell,第三种则是让远程主机上运行rsyncd服务,使其监听在一个端口上,等待客户端连接。
3.NFS+实时同步
rsync+inotify+nfs实现数据实时备份
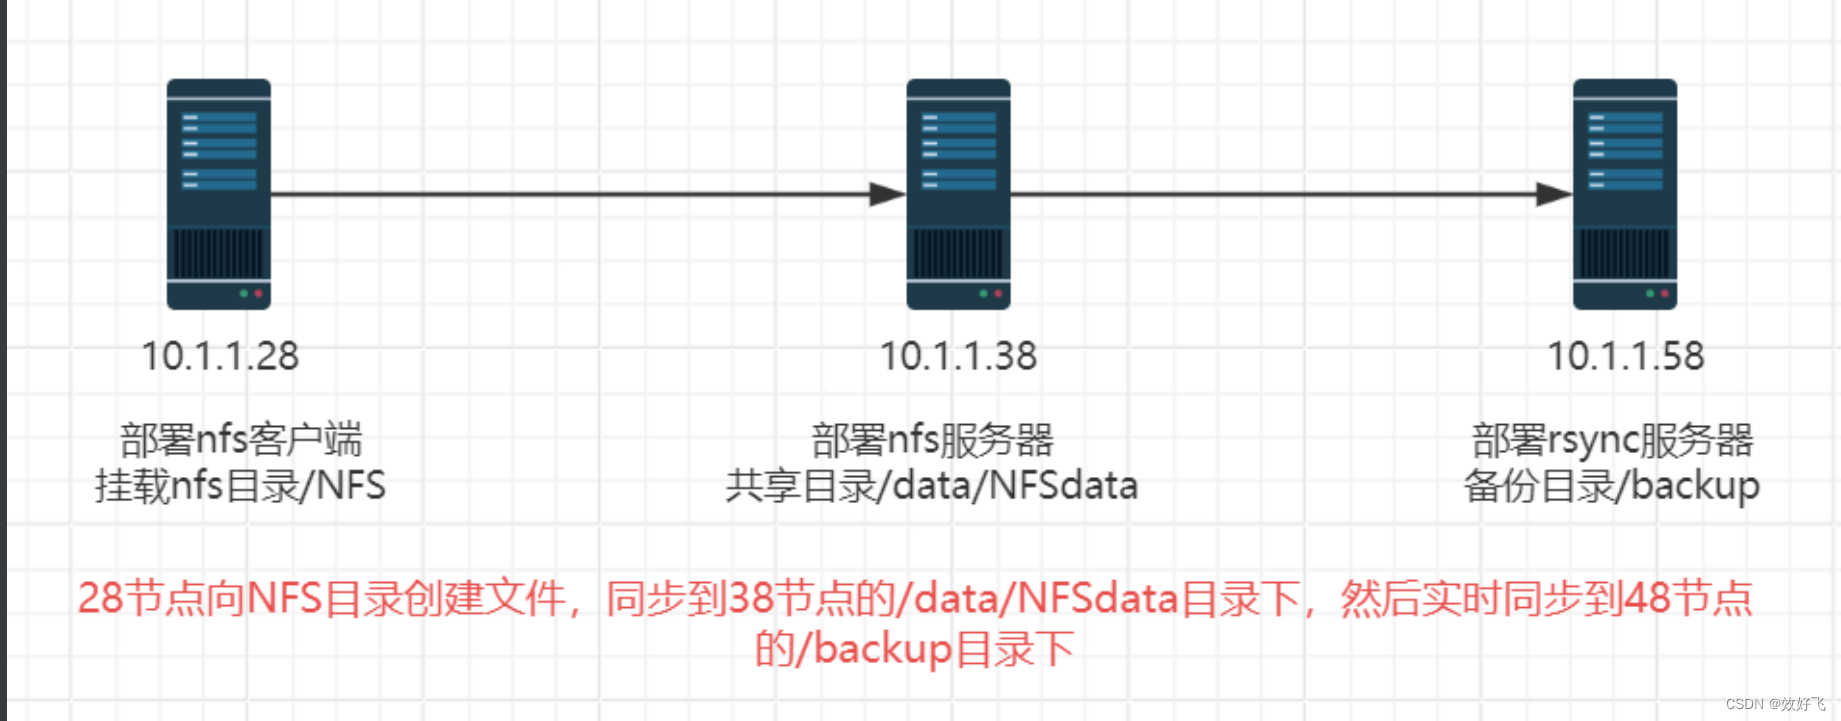
1.(10.1.1.38)部署nfs服务器
[root@nfs-server ~]# yum install -y nfs-utils rpcbind
nfs-utils:提供了NFS服务器程序和对应的管理工具
rpcbind:获取nfs服务器端的端口等信息
(2)启动rpcbind检查是否启动了rpcbind服务并监听111端口
[root@nfs-server ~]# systemctl start rpcbind
[root@nfs-server ~]# netstat -tunlp | grep 111
3.配置NFS服务的配置文件,参数配置:vi /etc/exports
[root@nfs-server ~]# vim /etc/exports
/data/NFSdata 10.1.1.0/24(rw,sync)
(4)创建/data/NFSdata目录,更改属主、属组
[root@nfs-server ~]# mkdir -p /data/NFSdata
[root@nfs-server ~]# chown -R nobody:nobody /data
[root@nfs-server ~]# systemctl start nfs-server.service
6)设置开机启动
[root@nfs-server ~]# systemctl enable rpcbind.service
[root@nfs-server ~]# systemctl enable nfs-server.service --now
2.(10.1.1.28)部署nfs客户端
(1)下载工具包nfs-utils
[root@nfs-client ~]# yum -y install nfs-utils
(3)挂载
[root@nfs-client ~]# showmount -e 10.1.1.38
Export list for 10.1.1.38:
/data/NFSdata 10.1.1.0/24
[root@nfs-client ~]# mkdir /NFS
[root@nfs-client ~]# vim /etc/fstab
10.1.1.38:/data/NFSdata /NFS nfs defaults 0 0
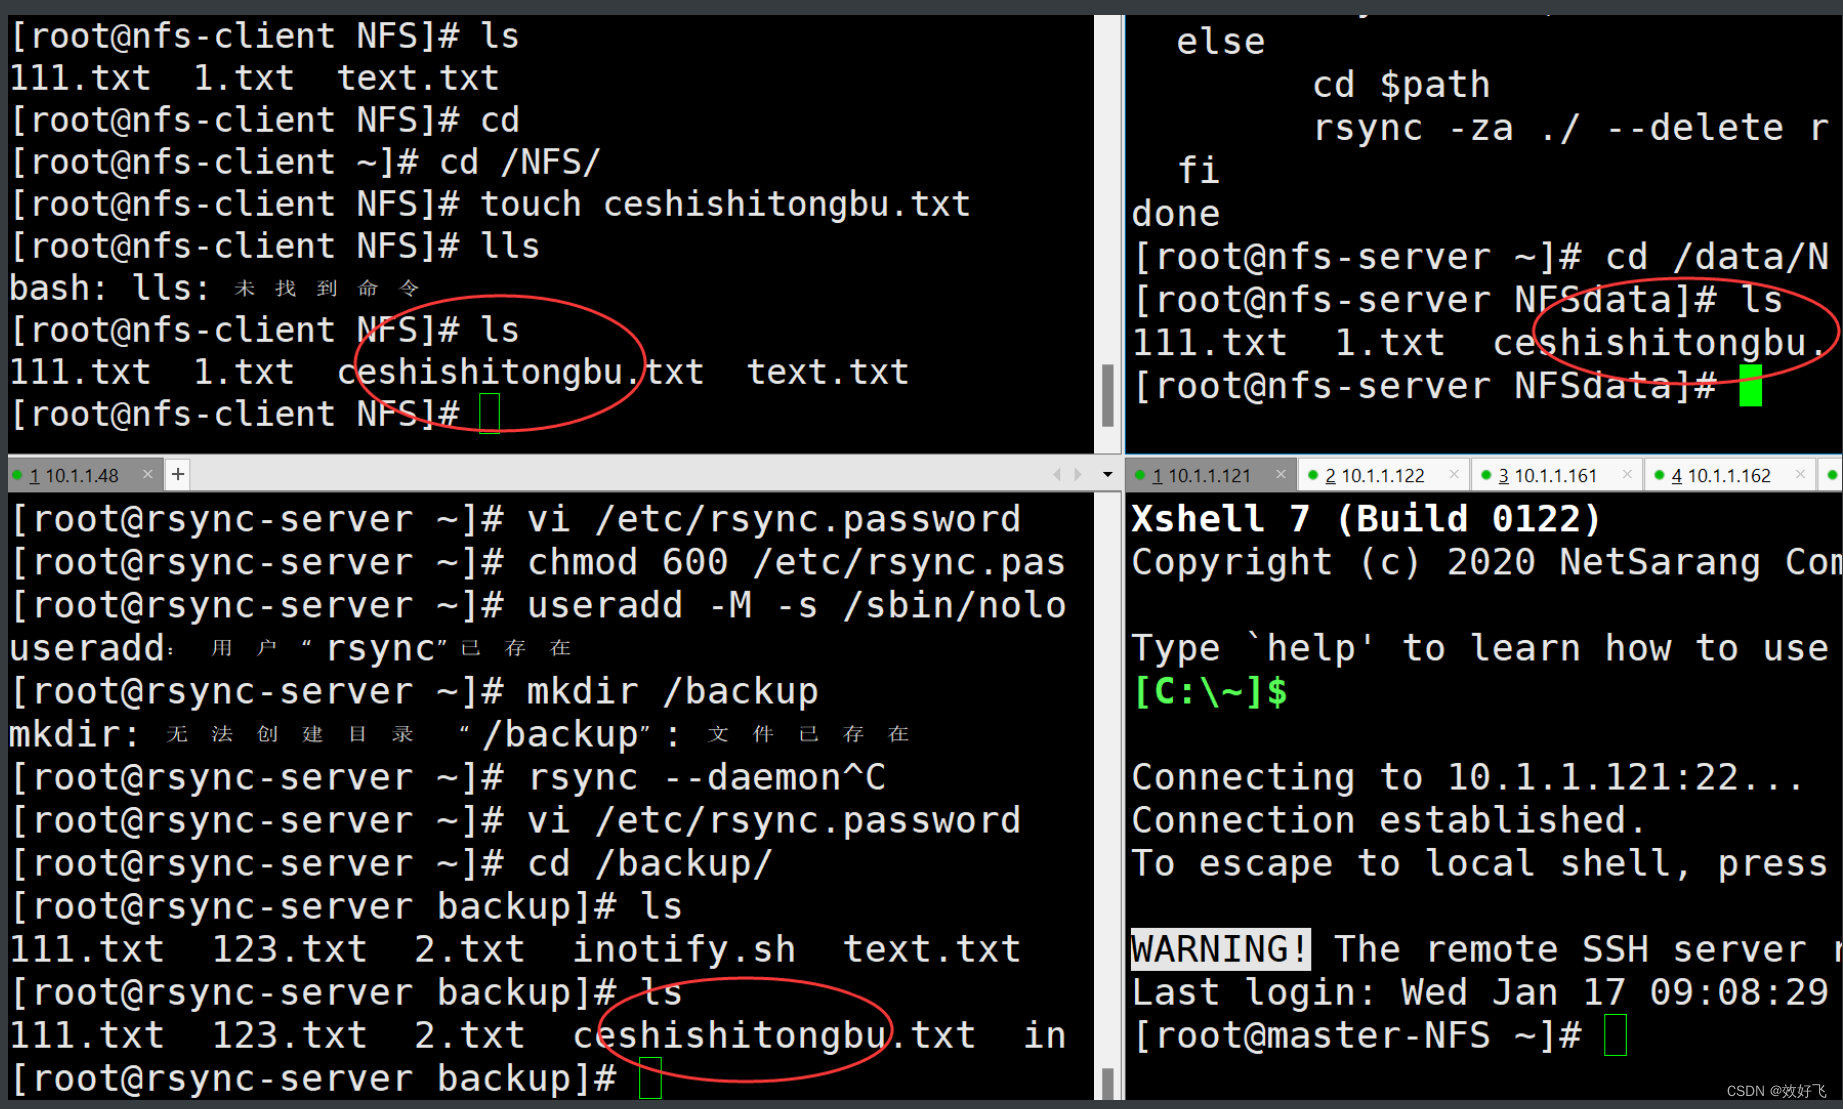
(4)测试同步
[root@nfs-client ~]# cd /NFS/
[root@nfs-client NFS]# touch text.txt
[root@nfs-client NFS]# ls
111.txt 1.txt text.txt
[root@nfs-server NFSdata]# ls
111.txt 1.txt text.txt
3.(10.1.1.48)部署Rsync服务端
(1)下载Rsync软件包
[root@rsync-server ~]# yum -y install rsync
(2)新增vi /etc/rsyncd.conf配置文件
[root@rsync-server ~]# cat /etc/rsyncd.conf
#用户id
uid = rsync
#组id
gid = rsync
#程序安全设置
use chroot = no
#客户端连接数
max connections = 200
#进程号文件位置
pid file = /var/run/rsyncd.pid
#进程锁文件位置
lock file = /var/run/rsync.lock
#日志文件位置
log file = /var/run/rsyncd.log
#连接超时时间
timeout = 300
#3.1版本以上要加这个
fake super = yes
#模块名称
[backup]
#同步数据的目录
path = /backup
#有错误时忽略
ignore errors
#只读模式(true为只读,false为可读可写)
read only = false
#阻止远程列表
list = false
#允许访问的IP
hosts allow = 10.1.1.0/24
#虚拟用户
auth users = rsync_backup
#存放用户和密码的文件
secrets file = /etc/rsync.password
3)创建密码文件vi /etc/rsync.password
[root@rsync-server ~]# vi /etc/rsync.password
rsync_backup:123456
(4)给/etc/rsync.password降权
[root@rsync-server ~]# chmod 600 /etc/rsync.password
(5)创建程序用户rsync
[root@rsync-server ~]# useradd -M -s /sbin/nologin rsync
(6)创建/backup目录
[root@rsync-server ~]# mkdir /backup
[root@rsync-server ~]# chown rsync.rsync /backup
(7)守护进程启动rsync
[root@rsync-server ~]# rsync --daemon
4.(10.1.1.38)作为Rsync客户端
1)38客户端节点新增密码文件vi /etc/rsync.password
[root@nfs-server ~]# vi /etc/rsync.password
123456
2)给/etc/rsync.password降权
[root@nfs-server ~]# chmod 600 /etc/rsync.password
(3)测试38节点传输文件到48节点
[root@nfs-server ~]# touch 123.txt
[root@nfs-server ~]# rsync -zav 123.txt rsync_backup@10.1.1.48::backup --password-file=/etc/rsync.password
sending incremental file list
123.txt
sent 90 bytes received 43 bytes 266.00 bytes/sec
total size is 0 speedup is 0.00
[root@rsync-server backup]# ls
111.txt 123.txt 2.txt inotify.sh text.txt
5.(10.1.1.38)部署inotify服务
1)下载阿里云网络源
[root@nfs-server ~]# yum install -y https://mirrors.aliyun.com/epel/epel-release-latest-8.noarch.rpm
(2)更新yum源
[root@nfs-server ~]# yum clean all
(3)下载inotify-tools工具包
[root@nfs-server ~]# yum -y install inotify-tools
(4)编写inotify.sh脚本
[root@nfs-server ~]# cat inotify.sh
backupServer=10.1.1.48
path=/data/NFSdata
inotifywait -mrq --format '%w%f' -e create,close_write,delete $path | while read line
do
if [ -f $line ];then
rsync -za $line --delete rsync_backup@$backupServer::backup --password-file=/etc/rsync.password
else
cd $path
rsync -za ./ --delete rsync_backup@$backupServer::backup --password-file=/etc/rsync.password
fi
done
(5)后台启动脚本
sh inotify.sh &
6)测试数据同步


 1843
1843


 被折叠的 条评论
为什么被折叠?
被折叠的 条评论
为什么被折叠?
 到【灌水乐园】发言


