


- 🍨 本文为🔗365天深度学习训练营 中的学习记录博客
- 🍖 原作者:K同学啊
我的环境:
- 语言环境:Python3.11.2
- 编译器:PyCharm Community Edition 2022.3
- 深度学习环境:TensorFlow2
一、设置数据
本次依旧使用好莱坞明星数据集进行学习。先导入数据。
import tensorflow as tf
import PIL,pathlib
import matplotlib.pyplot as plt
from tensorflow.keras import models,layers
from tensorflow.keras.callbacks import ModelCheckpoint,EarlyStopping
import numpy as np

path = 'F:/48-data/48-data'
data = pathlib.Path(path)
img = len(list(data.glob('*/*.jpg')))
print(img)
'''
imag = list(data.glob('Angelina Jolie/*.jpg'))
PIL.Image.open(str(imag[0])).show()
'''
batch_size = 16
image_height = 336
image_weigh = 336
train_ds = tf.keras.preprocessing.image_dataset_from_directory(
    data,
    validation_split=0.1,
    subset='training',
    seed=123,
    image_size=(image_height,image_weigh),
    batch_size=batch_size
)
val_ds = tf.keras.preprocessing.image_dataset_from_directory(
    data,
    validation_split=0.2,
    subset='validation',
    seed=123,
    image_size=(image_height,image_weigh),
    batch_size=batch_size
)
class_name = train_ds.class_names
print(class_name)
AUTOTUNE = tf.data.AUTOTUNE
def preprocessing_image(image,label):
    return (image/255.0,label)

train_ds = train_ds.map(preprocessing_image,num_parallel_calls=AUTOTUNE)
val_ds = val_ds.map(preprocessing_image,num_parallel_calls=AUTOTUNE)

train_ds = train_ds.cache().shuffle(1000).prefetch(buffer_size=AUTOTUNE)
val_ds = val_ds.cache().prefetch(buffer_size=AUTOTUNE)
二、优化器对比
使用不同的优化器编译模型。
优化器是一种算法,在模型优化过程中动态的调整梯度大小和方向,使模型收敛到更好的位置或更快的收敛。主要包括三大类。
第一大类为梯度下降法主要包括BGD批量梯度下降法、SGD随机梯度下降法、Mini_batch Gradient Denscent小批量梯度下降法。
第二类为动量优化法,因为梯度下降可能被困在局部最优又或是收敛速度慢,故提出此方法。
第三类为自适应学习率优化法。其中adam就是其中之一。
from tensorflow.keras.layers import Dense,Conv2D,BatchNormalization,Dropout
from tensorflow.keras.models import Model
def create(optimizer='adam'):
#加载模型
vgg_16 = tf.keras.applications.vgg16.VGG16(weights='imagenet',include_top=False,input_shape=(height,width,3),pooling='avg')
X=vgg_16.output
x=Dense(170,activation='relu')(X)
output= Dense(len(class_name),activate='softmax')(x)
model = Model(vgg_16.input,output)
model.compile(optimizer=optimizer,loss='sparse_categorical_crossentropy',metrics=['accuracy'])
return model
model1=create()
model2=create(tf.keras.optimizers.SGD())
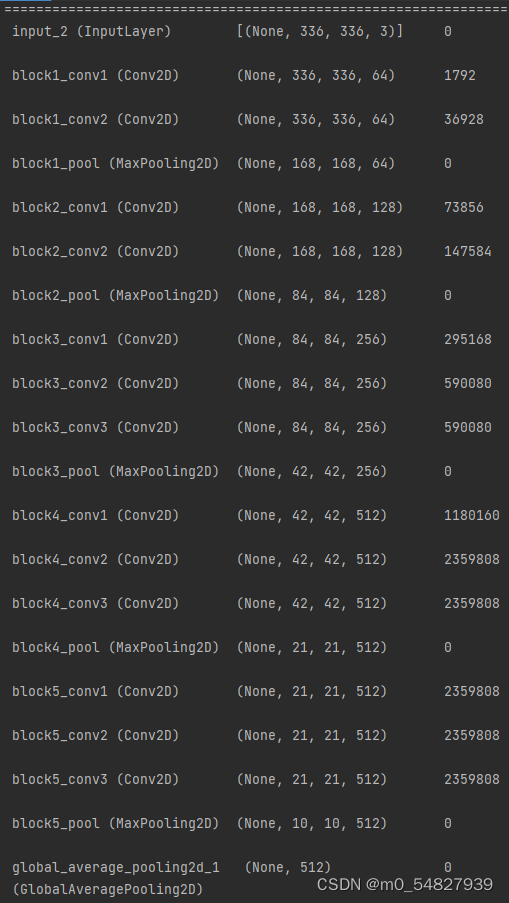
model2.summary()
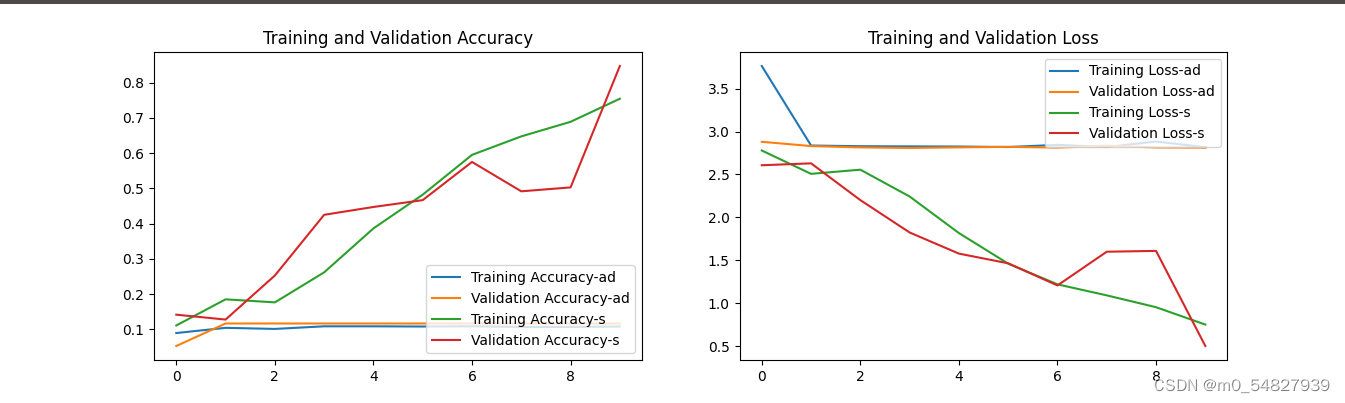
history1 = model1.fit(train_ds,validation_data=val_ds,epochs=10)
history2 = model2.fit(train_ds,validation_data=val_ds,epochs=10)通过自定义神经网络配置优化器。
三、对比
acc1 = history1.history['accuracy']
val_acc1 = history1.history['val_accuracy']
acc2 = history2.history['accuracy']
val_acc2 = history2.history['val_accuracy']

loss1 = history1.history['loss']
val_loss1 = history1.history['val_loss']
loss2 = history2.history['loss']
val_loss2 = history2.history['val_loss']

epochs_range = range(len(acc1))

plt.figure(figsize=(12,4))
plt.subplot(1,2,1)
plt.plot(epochs_range,acc1,label='Training Accuracy-ad')
plt.plot(epochs_range,val_acc1,label='Validation Accuracy-ad')
plt.plot(epochs_range,acc2,label='Training Accuracy-s')
plt.plot(epochs_range,val_acc2,label='Validation Accuracy-s')
plt.legend(loc='lower right')
plt.title('Training and Validation Accuracy')

plt.subplot(1,2,2)
plt.plot(epochs_range,loss1,label='Training Loss-ad')
plt.plot(epochs_range,val_loss1,label='Validation Loss-ad')
plt.plot(epochs_range,loss2,label='Training Loss-s')
plt.plot(epochs_range,val_loss2,label='Validation Loss-s')
plt.legend(loc='upper right')
plt.title('Training and Validation Loss')
plt.show()
四、总结
到此周学习完成了TensorFlow的基础入门,了解了TensorFlow的基础知识。学习了卷积神经网络中卷积的原理、池化的原理。学习了神经网络的构筑。学习了调用Sequential神经网络模型、神经网络的编译及训练方法,学习了如何配置数据集、设置早停以及如何保持模型权重。学习了VGG16网络模型的搭建、使用train_on_batch方法训练模型、数据集增强以及优化器的种类及选择。同时巩固了python库的其他一些基础。让我对机器学习有了新的了解。


 被折叠的 条评论
为什么被折叠?
被折叠的 条评论
为什么被折叠?
 到【灌水乐园】发言


