


引言
在现代游戏和应用程序中,实时人脸识别技术已成为增强用户交互和提升用户体验的重要工具。本文将介绍如何在 Unity 中使用 Barracuda 深度学习框架加载 version-RFB-320.onnx 模型来实现人脸识别,并通过 Compute Shader 处理输入输出数据以优化性能。
1. Unity Barracuda 简介
Unity Barracuda 是一个为 Unity 开发的跨平台深度学习推理库,支持 ONNX(开放神经网络交换格式)。它使得在游戏和应用中集成和运行深度学习模型变得简单快捷。
2. 分析ONNX 模型
首先,需要在 Unity 项目中导入 Barracuda 包和 version-RFB-320.onnx 模型。这个模型是一个已经训练好的人脸识别模型,能够在输入图像中检测人脸位置。导入模型后可以知道模型的输入输出值:

由图可知该模型的输入值是一个形状为(1,240,320,3)的张量(张量可以理解成多维数组),即一张高240,宽320,三通道(rgb)的一张图片;
输出值有两个, scores :float32[1,4420,2];boxes : float32[1,4420,4];如何理解这两个输出张量:
Scores (float32[1,4420,2])
-
维度说明:
1:批次大小,表示这一批处理的图像数量,这里为1表示一次处理一张图像。4420:这个维度代表了检测框的数量,即模型在图像中预测出4420个潜在的对象位置。2:对于每个对象,通常有两个分数,一般是非脸得分和是脸的得分。
-
功能:
- 这个张量提供了每个预测框是否包含对象的置信度。一般来说,第二个数值表示模型对该区域是感兴趣对象的置信度(如人脸),而第一个数值可能表示是背景的置信度。
Boxes (float32[1,4420,4])
-
维度说明:
1:同样代表批次大小。4420:与scores张量中的4420相对应,表示为每个预测生成一个边界框。4:代表每个边界框的四个坐标,通常是[x_min, y_min, x_max, y_max]。
-
功能:
- 这个张量具体描述了每个检测到的对象在图像中的位置。坐标通常是相对于输入图像的尺寸进行标准化的,表示相对位置。
知道了模型的输入输出值就好办了,把图片处理好传入模型,拿到输出值就知道人脸的位置了。
3.加载onnx模型
  public NNModel modelAsset;
  public Model model;
  private IWorker worker;

void InitModel()
{
        model = ModelLoader.Load(modelAsset);
        worker = model.CreateWorker();
}
4.处理输入图片
传入的图片需要特殊处理将颜色值从 [0, 1] 范围映射到 [-1, 1],高为240,宽为320:
#pragma kernel Preprocess

// Input
sampler2D Input; //输入图片
uint2 ImageSize; //输出的图片大小

// Output
RWStructuredBuffer<float> Output;

[numthreads(8, 8, 1)]
void Preprocess(uint2 id : SV_DispatchThreadID)
{
    //在图形处理中,纹理坐标通常是以纹理的左上角为原点(0,0)定义的。
    float2 uv = float2(0.5 + id.x, ImageSize.y - 0.5 - id.y) / ImageSize;


    float2 duv_dx = float2(1.0 / ImageSize.x, 0);
    float2 duv_dy = float2(0, -1.0 / ImageSize.y);


    float3 rgb = tex2Dgrad(Input, uv, duv_dx, duv_dy).rgb * 2 - 1;


    uint offs = (id.y * ImageSize.x + id.x) * 3;
    Output[offs + 0] = rgb.r;
    Output[offs + 1] = rgb.g;
    Output[offs + 2] = rgb.b;
}
   preprocess.SetInts("ImageSize", inputTexWidth,inputTexHeight);
        preprocess.SetTexture(0, "Input", source);
        preprocess.SetBuffer(0, "Output", preprocessBuffer);
        preprocess.Dispatch(0, inputTexWidth/8 ,inputTexHeight/8, 1);
5.运行模型
将处理过后的数据传入模型,运行过后就可以获取输出值(score,boxes):
 using (var t = new Tensor(new TensorShape(1, inputTexHeight, inputTexWidth, 3), preprocessBuffer))
             worker.Execute(t);

        using (var scoreOutput = worker.PeekOutput("scores"))
        {
            var scoreOutputTemp = scoreOutput.Reshape(new TensorShape(1, scores.height, scores.width, 2));
            scoreOutputTemp.ToRenderTexture(scores);
            scoreOutputTemp.Dispose();
        }

        using ( var boxesOutput = worker.PeekOutput("boxes"))
        {
            var boxesOutputTemp = boxesOutput.Reshape(new TensorShape(1, boxes.height, boxes.width, 4));
            boxesOutputTemp.ToRenderTexture(boxes);
            boxesOutputTemp.Dispose();
        }
6.筛选数据
拿到分数和预测框就可以筛选出得分大于阈值的预测框:
#pragma kernel Postprocess1

#include "Common.hlsl"

// Input
Texture2D<float2> Scores;
Texture2D<float4> Boxes;
uint2 InputSize;
float Threshold;

// Output
RWStructuredBuffer<Detection> Output;
RWStructuredBuffer<uint> OutputCount;

[numthreads(16, 4, 1)]
void Postprocess1(uint2 id : SV_DispatchThreadID)
{
    if (!all(id < InputSize)) return;

    float score = Scores[uint2(id.x, id.y)].y;
    float4 box = Boxes[uint2(id.x, id.y)];

    if (score < Threshold) return;

    Detection data;

    data.x1 = box.x;
    data.y1 = box.y;
    data.x2 = box.z;
    data.y2 = box.w;
    data.score = score;
    data.pad = 0;
    //自动更新count
    uint count = OutputCount.IncrementCounter();
    if (count < MAX_DETECTION) Output[count] = data;
}
光筛选出分数大于阈值的预测框还不够,因为预测框会发生重叠,还要进一步筛选:
#pragma kernel Postprocess2

#include "Common.hlsl"

// Input
StructuredBuffer<Detection> Input;
RWStructuredBuffer<uint> InputCount; // Only used as a counter
float Threshold;

// Output
AppendStructuredBuffer<Detection> Output;

// Local arrays for data cache
groupshared Detection _entries[MAX_DETECTION];
groupshared bool _flags[MAX_DETECTION];

[numthreads(1, 1, 1)]
void Postprocess2(uint3 id : SV_DispatchThreadID)
{
    // Initialize data cache arrays
    uint entry_count = min(MAX_DETECTION, InputCount.IncrementCounter());
    if (entry_count == 0) return;

    for (uint i = 0; i < entry_count; i++)
    {
        _entries[i] = Input[i];
        _flags[i] = true;
    }

    // Overlap test permutation
    for (i = 0; i < entry_count - 1; i++)
    {
        if (!_flags[i]) continue;

        for (uint j = i + 1; j < entry_count; j++)
        {
            if (!_flags[j]) continue;

            // Overlap test
            if (CalculateIOU(_entries[i], _entries[j]) < Threshold) continue;

            // Score comparison
            if (_entries[i].score < _entries[j].score)
            {
                _flags[i] = false;
                // The box in the outer loop is removed. Break the inner loop.
                break;
            }
            else
                _flags[j] = false;
        }
    }

    // Output aggregation
    for (i = 0; i < entry_count; i++)
        if (_flags[i]) Output.Append(_entries[i]);
}
post2.SetCounterValue(0);
counter.SetCounterValue(0);
postprocess1.SetTexture(0, "Scores", scores);
postprocess1.SetTexture(0, "Boxes", boxes);
postprocess1.SetInts("InputSize", boxes.width,boxes.height);
postprocess1.SetFloat("Threshold", threshold);
postprocess1.SetBuffer(0, "Output", post1);
postprocess1.SetBuffer(0, "OutputCount", counter);
postprocess1.Dispatch (0, (boxes.width+15)/16,boxes.height/4,1);
postprocess2.SetFloat("Threshold", 0.5f);
postprocess2.SetBuffer(0, "Input", post1);
postprocess2.SetBuffer(0, "InputCount", counter);
postprocess2.SetBuffer(0, "Output", post2);
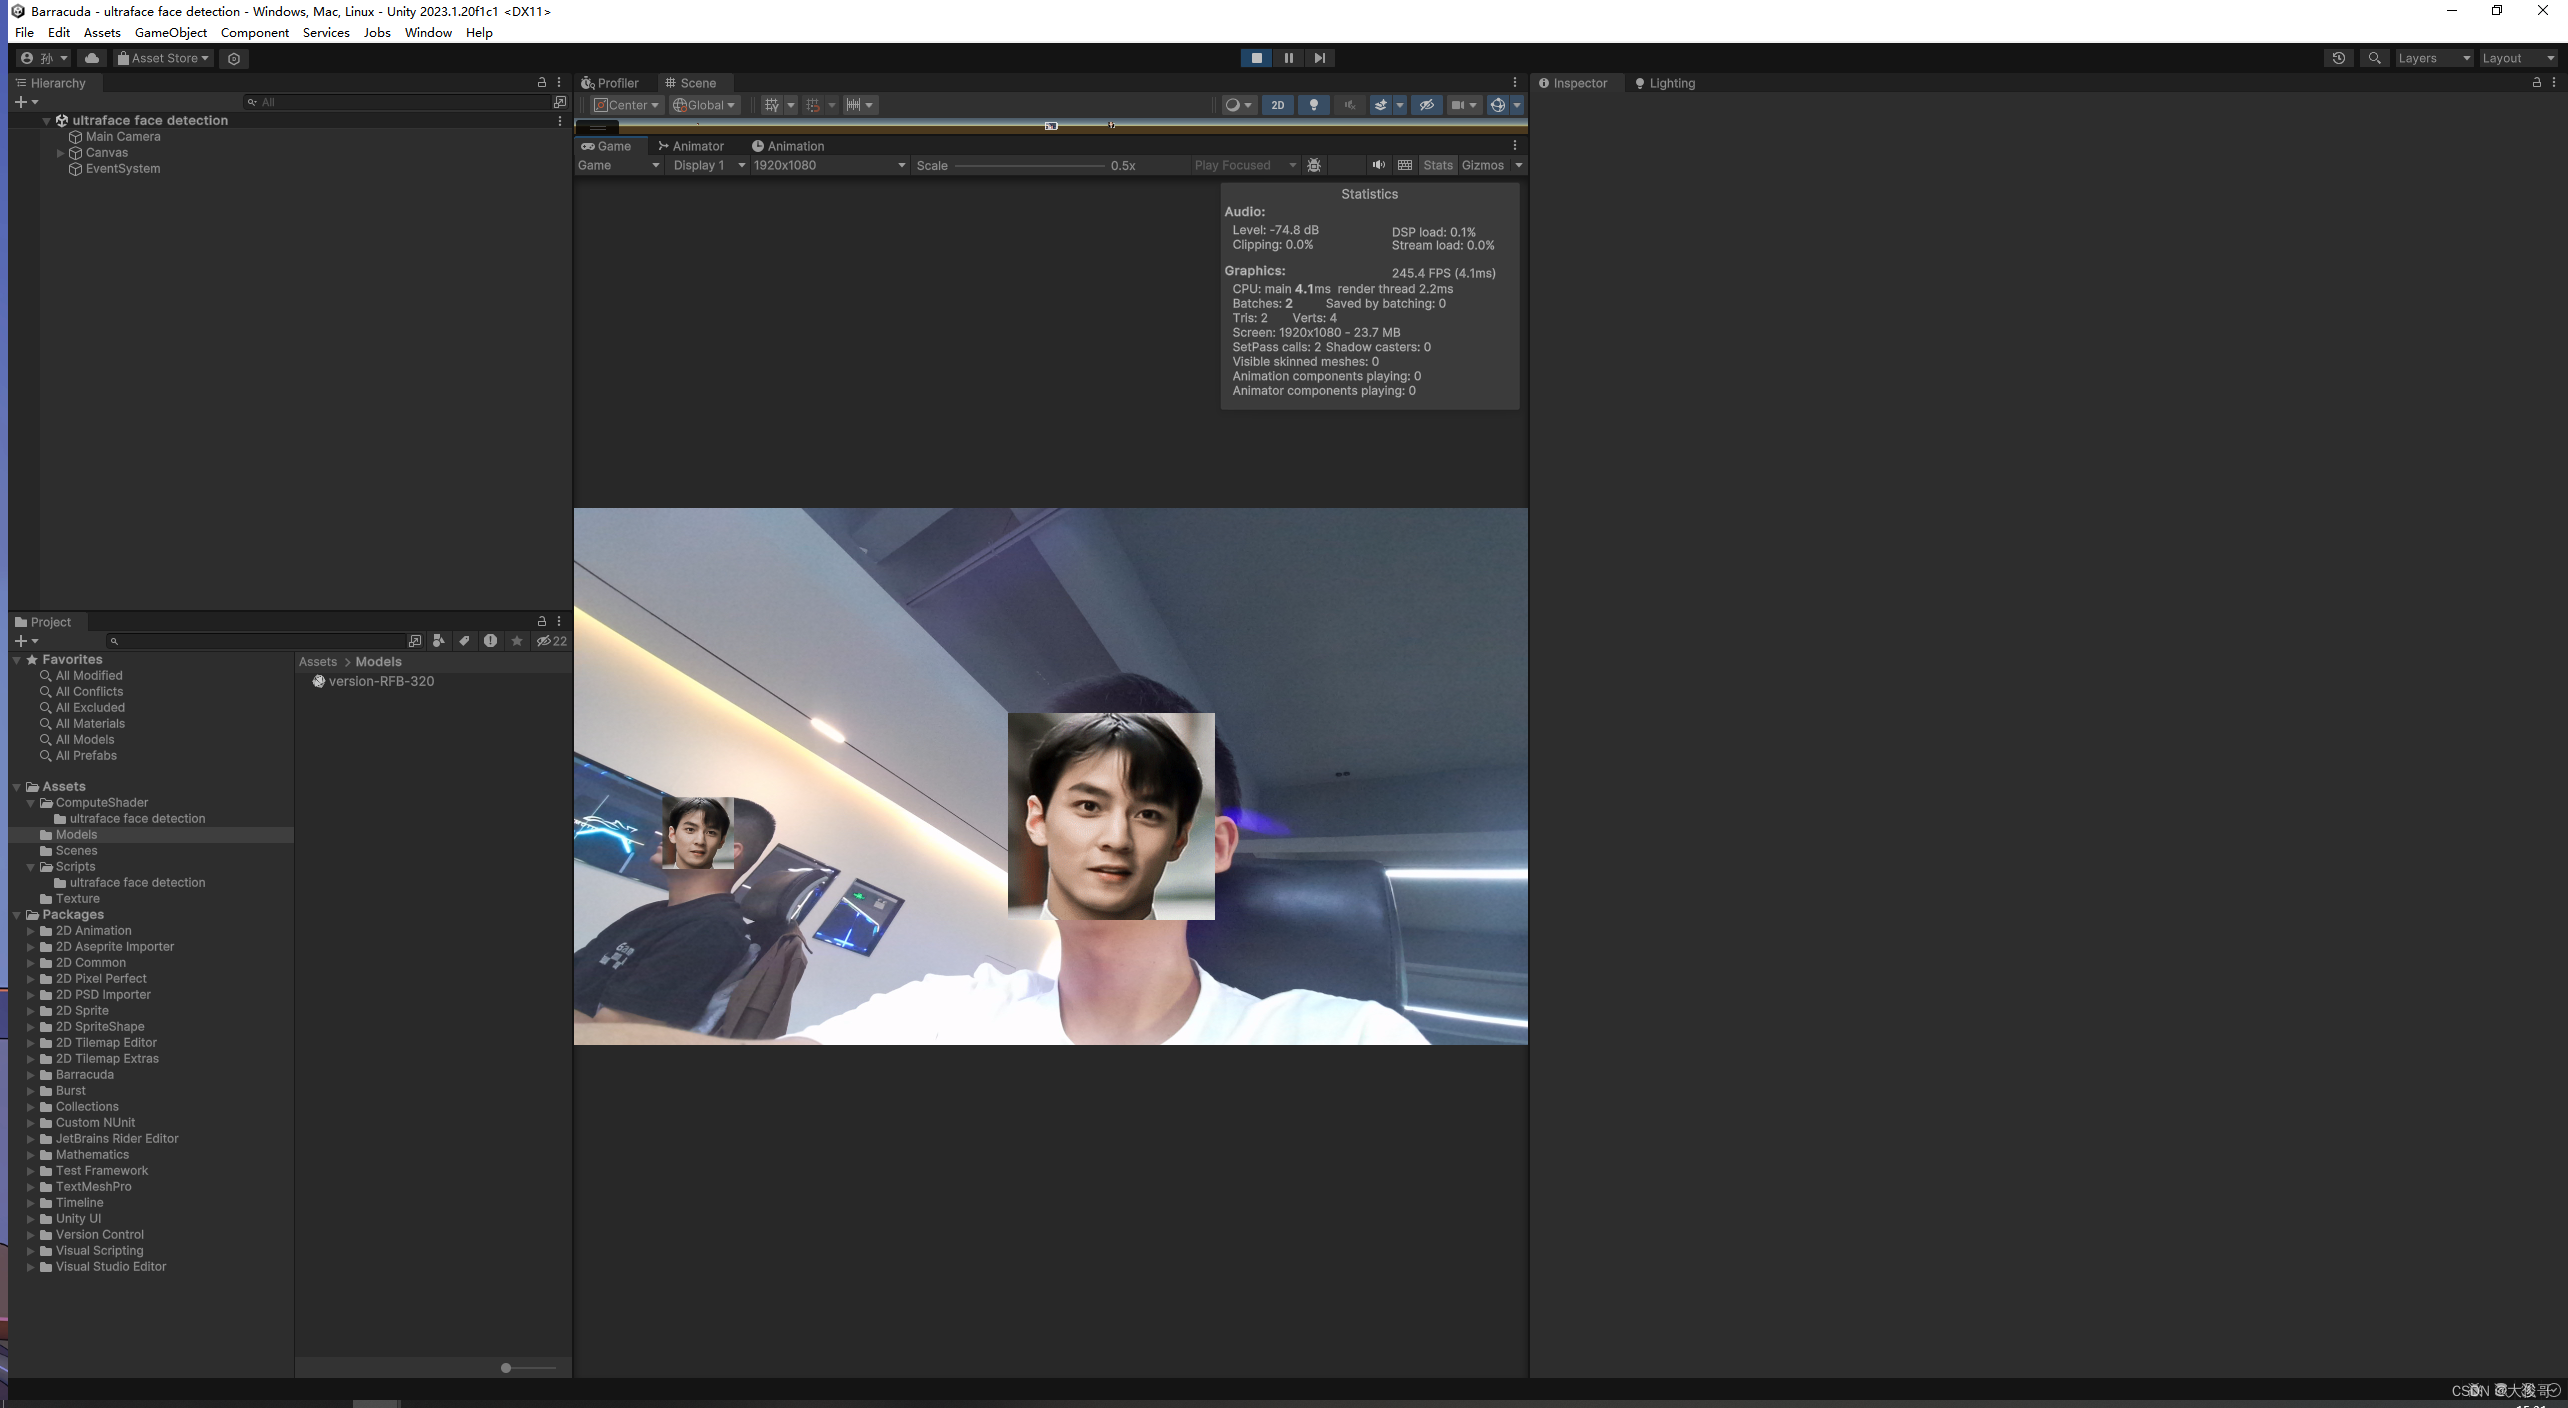
postprocess2.Dispatch(0, 1, 1, 1); 7.绘制彦祖
知道预测框的位置后就可以把彦祖的脸换上了。
完整代码:
using UnityEngine;
using Unity.Barracuda;
using UnityEngine.UI;


public class Ultraface  : MonoBehaviour
{
    public NNModel modelAsset;
    public Model model;
    private IWorker worker;

    private int inputTexWidth = 320, inputTexHeight = 240;
    private int OutputCount = 4420;


    public  struct Detection
    {
        public   float x1, y1, x2, y2;
        public   float score;
        public   float pad1, pad2, pad3;
        public static int Size = 8 * sizeof(float);
    }


    [SerializeField]private WebCamTexture webTex;


    public ComputeShader preprocess;
    private ComputeBuffer preprocessBuffer;

    public ComputeShader postprocess1;
    private RenderTexture scores;
    private RenderTexture boxes;
    private ComputeBuffer post1;

    public ComputeShader postprocess2;
    private ComputeBuffer post2;
    private ComputeBuffer counter;


    [SerializeField]  Shader _visualizer = null;
    Material _material;
    ComputeBuffer _drawArgs;
    [SerializeField] private Texture2D _texture;

    [SerializeField]  RawImage _previewUI = null;
    [SerializeField] private Texture2D dTexture;

    public void SetIndirectDrawCount(ComputeBuffer drawArgs)
        => ComputeBuffer.CopyCount( post2, drawArgs, sizeof(uint));
    private void Start()
    {
        InitWebCam();
        InitModel();
        InitBuffer();
        _material = new Material(_visualizer);

        _drawArgs = new ComputeBuffer(4, sizeof(uint),
            ComputeBufferType.IndirectArguments);
        _drawArgs.SetData(new int [] {6, 0, 0, 0});

        _previewUI.texture = webTex;
    }

    private void Update()
    {
        RunModel(webTex,0.2f);
    }


    void OnRenderObject()
    {
        SetIndirectDrawCount(_drawArgs);
        _material.SetFloat("_Threshold", 0.2f);
        _material.SetTexture("_Texture", _texture);
        _material.SetBuffer("_Detections", post2);
        _material.SetPass(_texture == null ? 0 : 1);
        Graphics.DrawProceduralIndirectNow(MeshTopology.Triangles, _drawArgs, 0);
    }


    void InitWebCam()
    {
        webTex = new WebCamTexture(1920, 1080,30);
        webTex.deviceName = WebCamTexture.devices[0].name;
        webTex.Play();

    }

    void InitModel()
    {
        model = ModelLoader.Load(modelAsset);
        worker = model.CreateWorker();
    }

    void InitBuffer()
    {
        preprocessBuffer = new ComputeBuffer(inputTexWidth * inputTexHeight * 3, sizeof(float));
        scores = new RenderTexture(OutputCount / 20, 20, 0, RenderTextureFormat.RGFloat);
        boxes = new RenderTexture(OutputCount / 20, 20, 0, RenderTextureFormat.ARGBFloat);
        post1 = new ComputeBuffer(512, Detection.Size);
        post2 = new ComputeBuffer(512, Detection.Size, ComputeBufferType.Append);
        counter = new ComputeBuffer(1, sizeof(uint), ComputeBufferType.Counter);

    }


    void RunModel(Texture source, float threshold)
    {
        preprocess.SetInts("ImageSize", inputTexWidth,inputTexHeight);
        preprocess.SetTexture(0, "Input", source);
        preprocess.SetBuffer(0, "Output", preprocessBuffer);
        preprocess.Dispatch(0, inputTexWidth/8 ,inputTexHeight/8, 1);


        using (var t = new Tensor(new TensorShape(1, inputTexHeight, inputTexWidth, 3), preprocessBuffer))
             worker.Execute(t);

        using (var scoreOutput = worker.PeekOutput("scores"))
        {
            var scoreOutputTemp = scoreOutput.Reshape(new TensorShape(1, scores.height, scores.width, 2));
            scoreOutputTemp.ToRenderTexture(scores);
            scoreOutputTemp.Dispose();
        }

        using ( var boxesOutput = worker.PeekOutput("boxes"))
        {
            var boxesOutputTemp = boxesOutput.Reshape(new TensorShape(1, boxes.height, boxes.width, 4));
            boxesOutputTemp.ToRenderTexture(boxes);
            boxesOutputTemp.Dispose();
        }


        post2.SetCounterValue(0);
        counter.SetCounterValue(0);

        postprocess1.SetTexture(0, "Scores",  scores);
        postprocess1.SetTexture(0, "Boxes", boxes);
        postprocess1.SetInts("InputSize", boxes.width,boxes.height);
        postprocess1.SetFloat("Threshold", threshold);
        postprocess1.SetBuffer(0, "Output",  post1);
        postprocess1.SetBuffer(0, "OutputCount",  counter);
        postprocess1.Dispatch (0, (boxes.width+15)/16,boxes.height/4,1);


        postprocess2.SetFloat("Threshold", 0.5f);
        postprocess2.SetBuffer(0, "Input",  post1);
        postprocess2.SetBuffer(0, "InputCount",  counter);
        postprocess2.SetBuffer(0, "Output",  post2);
        postprocess2.Dispatch(0, 1, 1, 1);


    }


    private void OnDestroy()
    {
        worker.Dispose();
        preprocessBuffer.Dispose();
        post1.Dispose();
        post2.Dispose();
        counter.Dispose();
        _drawArgs.Dispose();
        Destroy(webTex);
        Destroy(scores);
        Destroy(boxes);
        Destroy(_material);
    }
}


 5012
5012


 被折叠的 条评论
为什么被折叠?
被折叠的 条评论
为什么被折叠?
 到【灌水乐园】发言


