


前言
通过整合 Unity Barracuda 和 TinyYOLOv2 模型,开发者可以在 Unity 中实现高效的实时物体识别功能。这种技术不仅可以增强游戏和应用的交互性,还可以应用于虚拟现实(VR)和增强现实(AR)等创新项目中,为用户创造更加沉浸和动态的体验。
TinyYOLOv2 模型概述
TinyYOLOv2 是 YOLO(You Only Look Once)系列模型的一个轻量级版本,特别适合在计算资源有限的设备上运行。该模型能在单次前向传播中预测图像中的多个物体和它们的位置,非常适合实时物体检测任务。
模型输入和输出
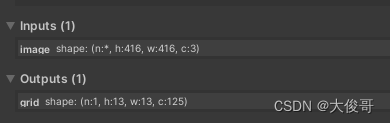
- 输入: 模型接受的输入尺寸是 416x416x3,这意味着每张输入图像的宽高为 416 像素,并且是 RGB 三通道颜色。
- 输出: 输出的维度是 1x13x13x125。这里的输出是一个特征图,13x13 表示特征图被分为13*13个grid,每个格子有5个anchor(先验框),每个Anchor有五个参数,x,y,w,h,c,可以识别的种类数CLASS_COUNT = 20,所以每个Anchor有25个参数,5个anchor就5*25=125。
核心代码
1.将输入图片处理成(413*413*3)的格式;
2.获取输出值,分析输出值;
3.剔除重叠大的预测框;
 public void ProcessImage
      (Texture sourceTexture, float scoreThreshold, float overlapThreshold)
    {
        // 重置buffer计数器
        _post1Buffer.SetCounterValue(0);
        _post2Buffer.SetCounterValue(0);

        var pre = _resources.preprocess; //预处理computeShader

        var imageSize = Config.ImageSize; //图片大小416
        pre.SetTexture(0, "_Texture", sourceTexture); //将sourceTexture传入_Texture
        pre.SetBuffer(0, "_Tensor", _preBuffer); //将预处理的computerBuffer传入_Tensor
        pre.SetInt("_ImageSize", imageSize);
        pre.Dispatch(0, imageSize / 8, imageSize / 8, 1); //执行着色器,分配线程组

        // Run the YOLO model. 传入_preBuffer为 (1*416*416*3)
        using (var tensor = new Tensor(1, imageSize, imageSize, 3, _preBuffer))
            _worker.Execute(tensor);

        // Output tensor (13x13x125) -> Temporary render texture  reshape (125x169)

        var reshape = new TensorShape
          (1, Config.TotalCells, Config.OutputPerCell, 1);

        var reshapedRT = RenderTexture.GetTemporary
          (reshape.width, reshape.height, 0, RenderTextureFormat.RFloat);

        //Yolo处理并生成张量,并将他传给reshapedRT
        using (var tensor = _worker.PeekOutput().Reshape(reshape))
            tensor.ToRenderTexture(reshapedRT);

        // 1st postprocess (bounding box aggregation)
        var post1 = _resources.postprocess1;  //一阶段后处理计算着色器
        post1.SetFloat("_Threshold", scoreThreshold); //得分阈值传入shader
        post1.SetTexture(0, "_Input", reshapedRT); //将Yolo输出的纹理传入
        post1.SetBuffer(0, "_Output", _post1Buffer);
        post1.Dispatch(0, 1, 1, 1);//执行shader

        RenderTexture.ReleaseTemporary(reshapedRT); //释放临时纹理

        // Bounding box count  ,Bounding box 数量传入_countBuffer
        ComputeBuffer.CopyCount(_post1Buffer, _countBuffer, 0);

        // 2nd postprocess (overlap removal)
        var post2 = _resources.postprocess2; //二阶段后处理
        post2.SetFloat("_Threshold", overlapThreshold); //覆盖阈值
        post2.SetBuffer(0, "_Input", _post1Buffer);
        post2.SetBuffer(0, "_Count", _countBuffer);
        post2.SetBuffer(0, "_Output", _post2Buffer);
        post2.Dispatch(0, 1, 1, 1);


    }
#pragma kernel Preprocess


sampler2D _Texture;
uint _ImageSize;//416

// Output
RWBuffer<float> _Tensor;

[numthreads(8, 8, 1)]
void Preprocess(uint3 id : SV_DispatchThreadID) //SV_DispatchThreadID:这是该线程全局唯一的ID,相当于在所有线程中该线程的坐标位置,算法为线程组大小*线程数大小+该线程坐标
{
    // UV (vertically flipped) 垂直翻转
    float2 uv = float2(0.5 + id.x, _ImageSize - 0.5 - id.y) / _ImageSize;

    // UV gradients
    float2 duv_dx = float2(1.0 / _ImageSize, 0);
    float2 duv_dy = float2(0, -1.0 / _ImageSize);

    // Texture sample
    float3 rgb = tex2Dgrad(_Texture, uv, duv_dx, duv_dy).rgb * 255;

    // Tensor element output
    //一维张量 id的取值为(0,415) ,把(416,416,3)的三维张量转成 (1*416*416*3)的一维张量,相当于拉直图片
    uint offs = (id.y * _ImageSize + id.x) * 3;
    _Tensor[offs + 0] = rgb.r;
    _Tensor[offs + 1] = rgb.g;
    _Tensor[offs + 2] = rgb.b;
}
#pragma kernel Postprocess1


#include "Common.hlsl"

// Input uniforms
Texture2D _Input;
float _Threshold;

// Output uniforms
AppendStructuredBuffer<BoundingBox> _Output;

[numthreads(CELLS_IN_ROW, CELLS_IN_ROW, 1)]
void Postprocess1(uint3 id : SV_DispatchThreadID)
{
    // We're not sure why but the direction of the tensor is flipped, so we
    // read them in the reversed order.
    //ref_y范围为0-168,对应_Input的height 169
    uint ref_y = (CELLS_IN_ROW - 1 - id.y) * CELLS_IN_ROW +
                 (CELLS_IN_ROW - 1 - id.x);

    //遍历每个Anchor,每个格子有5个anchor 先验框
    for (uint aidx = 0; aidx < ANCHOR_COUNT; aidx++)
    {
        //每个Anchor有五个参数,x,y,w,h,c,可以识别的种类数CLASS_COUNT = 20,所以每个Anchor有25个参数
        //5个anchor就是5*25=125,对应_Input的w 125;
        uint ref_x = aidx * (5 + CLASS_COUNT);

        // Bounding box / confidence
        float x = _Input[uint2(ref_x + 0, ref_y)].x;
        float y = _Input[uint2(ref_x + 1, ref_y)].x;
        float w = _Input[uint2(ref_x + 2, ref_y)].x;
        float h = _Input[uint2(ref_x + 3, ref_y)].x;
        float c = _Input[uint2(ref_x + 4, ref_y)].x;

        // ArgMax[SoftMax[classes]]
        uint maxClass = 0;
        float maxScore = exp(_Input[uint2(ref_x + 5, ref_y)].x);
        float scoreSum = maxScore;
        for (uint cidx = 1; cidx < CLASS_COUNT; cidx++)
        {
            float score = exp(_Input[uint2(ref_x + 5 + cidx, ref_y)].x);
            if (score > maxScore)
            {
                maxClass = cidx;
                maxScore = score;
            }
            scoreSum += score;
        }

        // Output structure
        BoundingBox box;
        box.x = (id.x + Sigmoid(x)) / CELLS_IN_ROW;
        box.y = (id.y + Sigmoid(y)) / CELLS_IN_ROW;
        box.w = exp(w) * anchors[aidx].x / CELLS_IN_ROW;
        box.h = exp(h) * anchors[aidx].y / CELLS_IN_ROW;
        box.classIndex = maxClass;
        box.score = Sigmoid(c) * maxScore / scoreSum;

        // Thresholding
        if (box.score > _Threshold) _Output.Append(box);
    }
}
#pragma kernel Postprocess2

//
// 2nd postprocessor (overlap removal)
//

#include "Common.hlsl"

// Input uniforms
ConsumeStructuredBuffer<BoundingBox> _Input;  //上阶段获取的bounding box
ByteAddressBuffer _Count;  //上阶段获取的bounding box的数量
float _Threshold; //阈值

// Output uniforms
AppendStructuredBuffer<BoundingBox> _Output;

// Local arrays for data cache
groupshared BoundingBox _boxes[MAX_DETECTION];  //共享的BoundingBox
groupshared bool _flags[MAX_DETECTION];

[numthreads(1, 1, 1)]
void Postprocess2(uint3 id : SV_DispatchThreadID)
{
    // Initialize data cache arrays
    uint entry_count = _Count.Load(0); //上阶段获取的bounding box的数量
    if (entry_count == 0) return;       //如果数量为零就返回

    for (uint i = 0; i < entry_count; i++)
    {
        _boxes[i] = _Input.Consume();  //填入_boxes
        _flags[i] = true;              //对应bool值
    }

    // Overlap test permutation
    for (i = 0; i < entry_count - 1; i++)
    {
        if (!_flags[i]) continue;   //如果不符合,下一个

        for (uint j = i + 1; j < entry_count; j++) //遍历i之后的元素
        {
            if (!_flags[j]) continue;

            // Overlap test
            // j与i计算交并比,如果小于阈值,交并比越小说明两个重合的越少,所以跳过
            if (CalculateIOU(_boxes[i], _boxes[j]) < _Threshold) continue;

            // Score comparison
            //如果交并比过大,对比两个box的得分情况
            if (_boxes[i].score < _boxes[j].score)
            {
                _flags[i] = false;
                // The box in the outer loop is removed. Break the inner loop.
                break;
            }
            else
                _flags[j] = false;
        }
    }

    // Output aggregation
    for (i = 0; i < entry_count; i++)
        if (_flags[i]) _Output.Append(_boxes[i]);
}


 2672
2672


 被折叠的 条评论
为什么被折叠?
被折叠的 条评论
为什么被折叠?
 到【灌水乐园】发言


