


本案例中没有用SpringApplication.run来直接启动Spring,而是通过自己new一个Bean工厂,逐步添加后置处理器来实现解析Bean对象的功能,大体上包括如下内容:
- BeanFactory的功能很弱,后置处理器BeanFactoryPostProcessors和BeanPostProcessors如何添加、如何解析、如何调整顺序?
- ApplicationContext的四大通用功能(国际化、通配符、读取配置文件、事件发布与监听)
- ApplicationContext的几种常用实现,内部都是**调用了对应的BeanDefinationReader进行读取定义信息,自动注入并解析后置处理器(refresh()方法)**用于在不同的阶段解析@Configuration、@Bean、@Autowired、@Resource等
- 如果不用SpringBoot,该如何准备一个简单的web环境:配置:(内嵌容器
ServletWebServerFactory、接口路由DispatcherServlet、路由注册到web环境DispatcherServletRegistrationBean)
1.BeanFactory和ApplicationContext的关系
-
其实这个
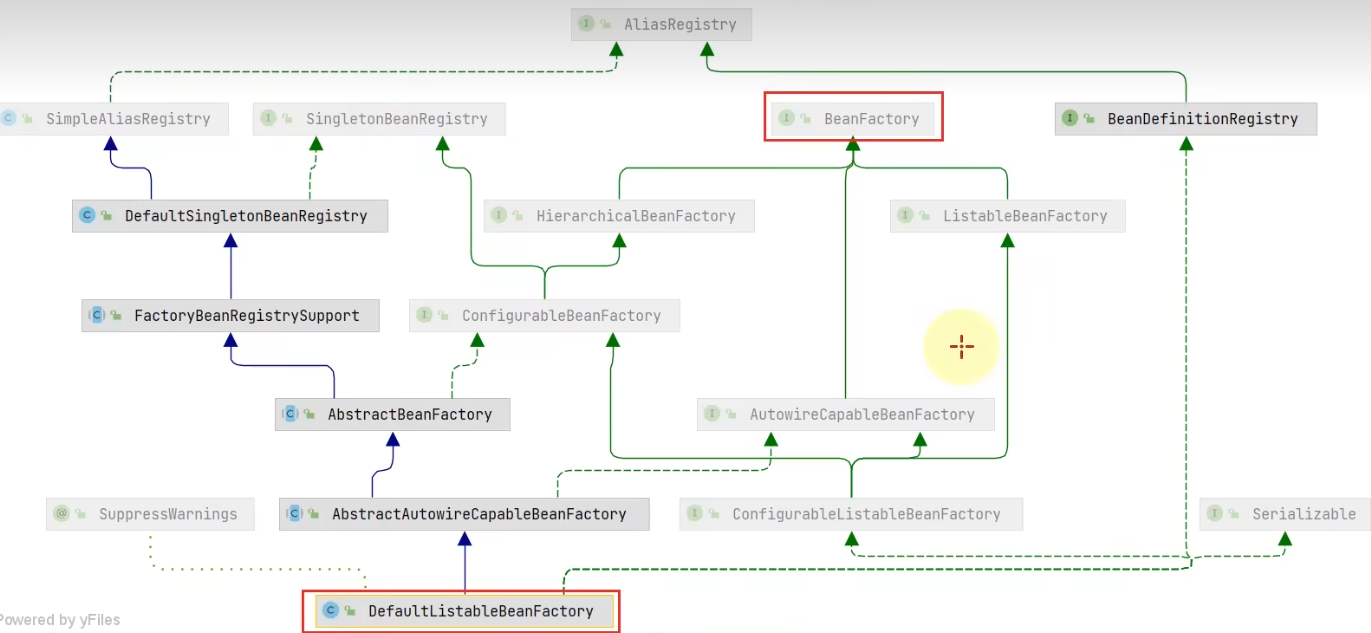
BeanFactory(接口)才是真正的Spring IOC容器(但是像控制反转,依赖注入,Bean生命周期的各种功能,具体都是由DefaultListableBeanFactory实现的),而ApplicationContext(接口)是对其组合、横向扩展(例如如何去读取注解、配置文件等);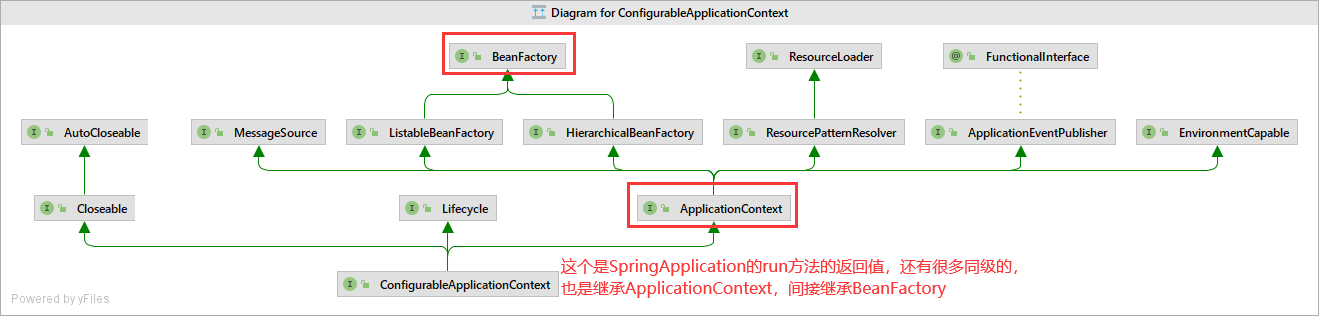
-
ApplicationContext(接口)下又有很多的实现类,且他们用的都是这个唯一的DefaultListableBeanFactory(类对象,保存的IOC中的bean,实现了BeanFactory);
-
ApplicationContext下的抽象实现类AbstractApplicationContext(其下有很多实现类)可以调用getBean(String name),且底层是先获取BeanFactory再getBean
2.IOC管理者:DefaultListableBeanFactory
这玩意是Spring中实际的IOC容器,我们可以自己new一个DefaultListableBeanFactory
2.1大体流程
2.1.0准备两个Bean
@Configuration//本案例中可以省略(这个注解本身也只是为了被发现)
public class MyConfig {

    @Bean//需要用BeanFactoryPostProcessors来解析
    public Bean2 bean2(){//Bean2中用@Autowired注入了Bean1,需要用BeanPostProcessors解析
        return new Bean2();
    }

    @Bean
    public Bean1 bean1(){
        return new Bean1();
    }
}
public class Bean2 {
    @Autowired
    Bean1 bean1;

    public Bean2() {
        System.out.println("bean2初始化");
    }
2.1.1基本的注册Bean
@Component及其下面的几个注解本身只是为了被Spring启动的时候发现(本案例中因为是手动,即便是不写@Component也可以正常注入),且BeanFactory本身没有提供解析@Bean、@Autowired等注解的功能(需要后置处理器BeanFactoryPostProcessors、BeanPostProcessors来实现解析)
- 用
BeanDefinitionBuilder.genericBeanDefinition( MyConfig.class)...getBeanDefinition()获取Bean的定义信息 - 然后用
defaultListableBeanFactory.registerBeanDefinition("myConfig",beanDefinition)通过bean定义信息注册到bean工厂(IOC容器)中
此时只能解析这个myConfig,而不能解析其下的@Bean
public static void main(String[] args) {
    //1.创建一个bean工厂(实际的)
    DefaultListableBeanFactory defaultListableBeanFactory = new DefaultListableBeanFactory();
    //2.生成bean定义信息:读取MyConfig本身,设置为singleton(创建一个单例myConfig对象)
    AbstractBeanDefinition beanDefinition = BeanDefinitionBuilder
            .genericBeanDefinition(MyConfig.class)
            .setScope("singleton").getBeanDefinition();
    defaultListableBeanFactory.registerBeanDefinition("myConfig",beanDefinition);
2.1.2添加常用的BeanFactoryPostProcessors
-
使用Spring提供的工具包来注入到容器,用于解析不同的Bean生命周期
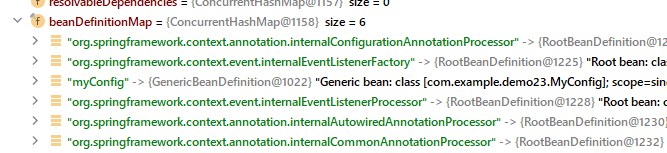
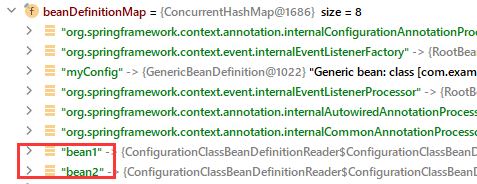
AnnotationConfigUtils.registerAnnotationConfigProcessors(defaultListableBeanFactory) -
这个工具一共注入5个bean,其中两个是BeanFactoryPostProcessors的实现类,通过Debug可以发现这两个分别是
ConfigurationClassPostProcessor(用于解析@Configuration和@Bean) 和EventListenerMethodProcessor -
在XML中通过标签
 注入,效果相同
  //4. 给 BeanFactory添加一些常用的工厂后置处理器,让它具备解析@Configuration、@Bean等注解的能力(还需要再注册)
          //IOC容器中会多出来5个Bean,包括两个BeanFactoryPostProcessor的实现类
  AnnotationConfigUtils.registerAnnotationConfigProcessors(defaultListableBeanFactory);
看下源码部分
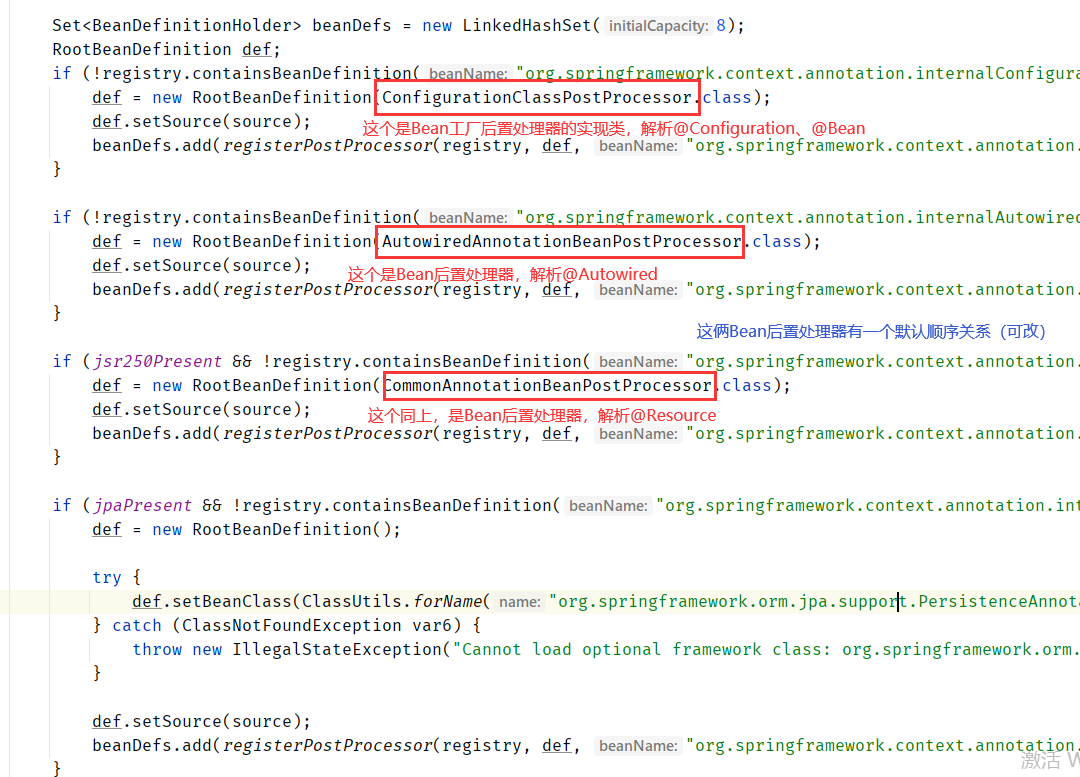 关于先后顺序的order值相差1(这是一个Spring源码写的不规范的地方,二者用了不同的表示方法)
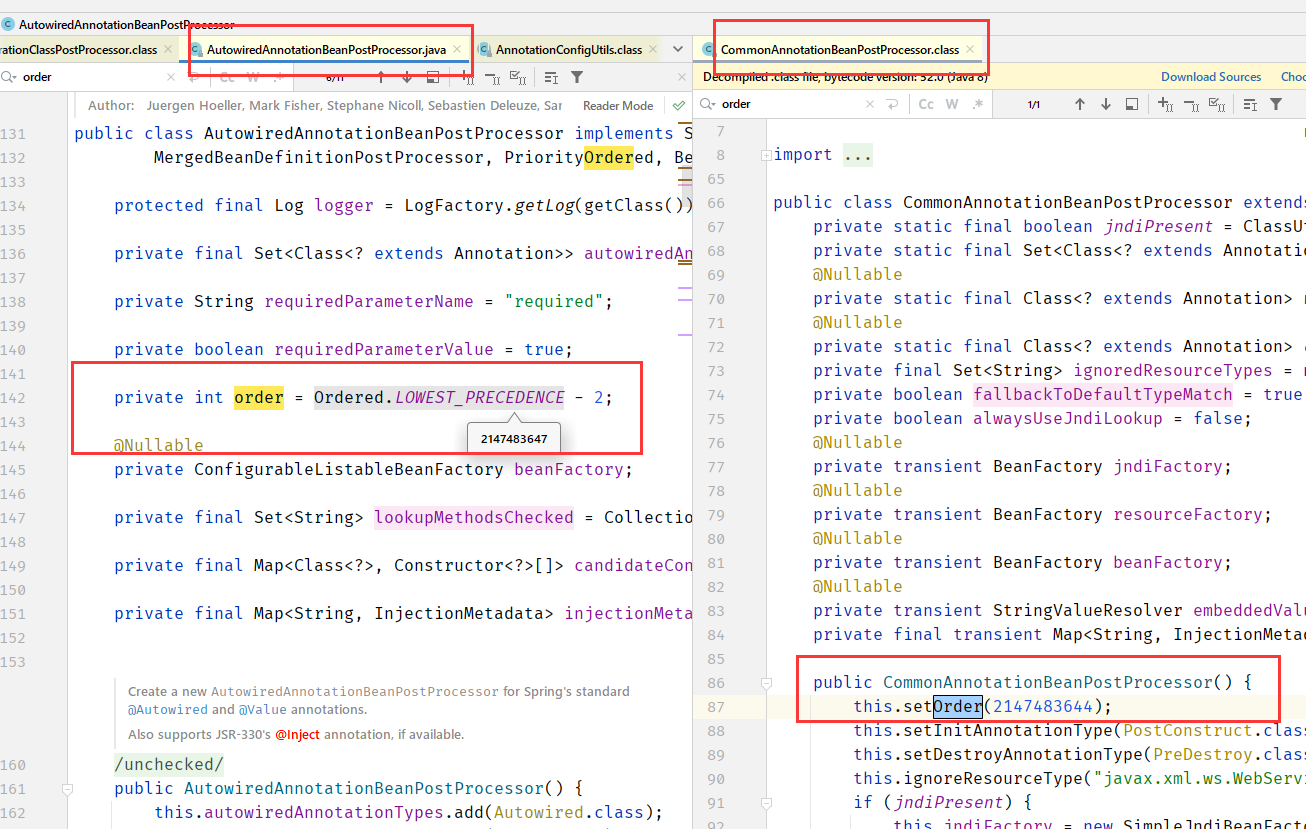 在这个工具类中
AnnotationConfigUtils,通过order设置了解析顺序(例如会影响@Autowired和@Resource谁生效)

2.1.3BeanFactoryPostProcessors:解析@Configuration和@Bean
因为上一步已经注入了ConfigurationClassPostProcessor,但是只是作为bean注入的,没有执行解析的步骤
    //5. 从bean工厂中取出BeanFactory的后处理器,并且执行这些后处理器
          // BeanFactory 后处理器BeanFactoryPostProcessor主要功能,补充了一些 bean 的定义
    defaultListableBeanFactory.getBeansOfType(BeanFactoryPostProcessor.class)
            .values().forEach(beanFactoryPostProcessor -> {
        //一共2种bean工厂后置处理器,注册到bean工厂去
        beanFactoryPostProcessor.postProcessBeanFactory(defaultListableBeanFactory);
    });
    Bean2 bean2 = defaultListableBeanFactory.getBean(Bean2.class);//默认的懒汉式,所以需要手动获取一下
此时解析到了@Bean,但@Autowired还没有被解析,bean2中的bean1=null
2.1.4BeanPostProcessor:解析@Autowired、@Resource等注解
- 可以针对Bean的生命周期的各个阶段提供扩展
- 对于@Autowired、@Resource的增强这个过程是发生在依赖注入阶段的
   //7.要想@Autowired、@Resource等注解被解析,还要添加Bean的后处理器(非Bean工厂后置处理器),
    defaultListableBeanFactory
            .getBeansOfType(BeanPostProcessor.class)
            .values()
            .forEach(defaultListableBeanFactory::addBeanPostProcessor);
  Bean2 bean2 = defaultListableBeanFactory.getBean(Bean2.class);
可以看到@Autowired解析成功

2.2关于BeanFactoryPostProcessors的先后顺序(order)
2.2.0准备一个接口和两个Bean
interface Inter {  }

static class Bean3 implements Inter {
    public Bean3() {
        System.out.println("构造 Bean3()");
    }
}


static class Bean4 implements Inter {
    public Bean4() {
        System.out.println("构造 Bean4()");
    }
}
然后再Bean5中注入Inter
    static class Bean5{
        //@Autowired、@Resource(不指定名字的话)都是根据参数名匹配bean对象
//        @Autowired
//        @Resource
//        Inter bean3;
    }
MyConfig注入@Bean
    @Bean
    public Bean5 bean5(){
        return new Bean5();
    }
2.2.1注入规则
-
@Autowired、@Resource(不指定名字的话)都是根据参数名匹配bean对象
-
@Resource(“beanName”)可以指定注入
-
默认情况下:二者同时存在时@Autowired生效,例如
  	static class Bean5{
  	        //注入的是bean3
  	        @Autowired
  	        @Resource(name = "bean4")
  	        Inter bean3;
  	    }
2.2.2改变后置处理器的顺序:3种方法
-
方法1:反转后手动添加
ArrayList<BeanPostProcessor> list = new ArrayList<>(beanFactory .getBeansOfType(BeanPostProcessor.class).values()); Collections.reverse(list); beanFactory.addBeanPostProcessors(list); -
方法2:Stream利用原生order顺序
beanFactory.addBeanPostProcessors(beanFactory .getBeansOfType(BeanPostProcessor.class).values() .stream() .sorted(beanFactory.getDependencyComparator()) .collect(Collectors.toCollection(ArrayList::new))); -
方法3:直接利用order顺序
  beanFactory.getBeansOfType(BeanPostProcessor.class).values()
  .forEach(beanFactory::addBeanPostProcessor);
  或者
  beanFactory.addBeanPostProcessors
  (beanFactory.getBeansOfType(BeanPostProcessor.class).values());
3.ApplicationContext的4大功能
先看继承图,可以看到有如下几个功能(见名知意)
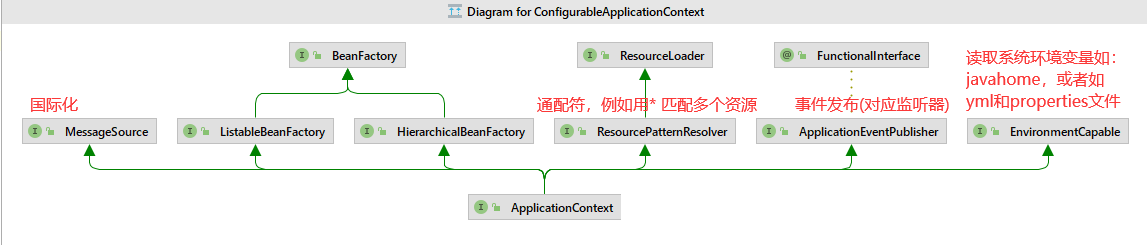
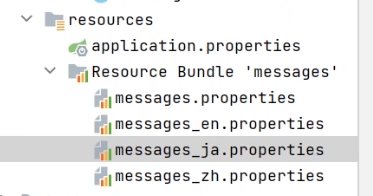
3.1MessageSource国际化
- 先准备好不同语言的配置文件,写键值对例如在zh中hi=你好
- 使用的时候直接
context.getMessage("hi",null,Local.CHINA);就会打印"你好" - 一般是从请求头获取需要什么语言,然后做一个判断就行了
3.2ResourcePatternResolver通配符获取资源路径
3.2.1类路径下找:url
        //1. :是只在类路径下找 [classpath:application.properties]
        Resource[] resources = context.getResources("classpath:application.properties");
        for (Resource res : resources) {
            if(res.exists())
            System.out.println(res);
        }
3.2.2jar包中找*:url
        //2. *:可以找到引入依赖的jar包中,通配符匹配多个
//        URL [jar:file:/D:/apache-maven-3.8.3/maven-repo/org/springframework/boot/spring-boot/2.7.3/spring-boot-2.7.3.jar!/META-INF/spring.factories]
//        URL [jar:file:/D:/apache-maven-3.8.3/maven-repo/org/springframework/boot/spring-boot-autoconfigure/2.7.3/spring-boot-autoconfigure-2.7.3.jar!/META-INF/spring.factories]
//        URL [jar:file:/D:/apache-maven-3.8.3/maven-repo/org/springframework/spring-beans/5.3.22/spring-beans-5.3.22.jar!/META-INF/spring.factories]
        Resource[] resources1 = context.getResources("classpath*:META-INF/spring.factories");
        for (Resource res : resources1) {
            if(res.exists())
            System.out.println(res);
        }
3.3EnvironmentCapable读取具体配置文件中的信息or环境变量
    //在application.properties中配过hi=hello
    System.out.println(context.getEnvironment().getProperty("hi"));
    //系统变量,直接读取
    System.out.println(context.getEnvironment().getProperty("java_home"));
3.4ApplicationEventPublisher发布事件与监听
- 其实这个就是个监听器,Spring内置的监听器监听的事件也是继承了
ApplicationEvent - 可以用于解耦(分布式环境用MQ解耦,本地用事件可以解耦)
3.4.1定义事件
public class MyEvent extends ApplicationEvent {

    public MyEvent(Object source) {//source就是事件源(谁发的这个事件,我们可以传入一个context参数)
        super(source);
    }

}
3.4.2发布事件
    //context发布事件MyEvent,其中发布源是:context
    context.publishEvent(new MyEvent(context));
3.4.3监听事件
API使用上类似于Spring整合RabbitMQ
@Component
public class MyListener {
    @EventListener
    public void listen(MyEvent event){
        System.out.println("收到了消息"+new Date());
    }

}
4.ApplicationContext的4种常用实现
- 其实我个人更想从Bean的生命周期最开始:读取bean定义信息来讲,因为配置Bean方式不同,Spring做了一个BeanDefinitionReader的抽象,ApplicationContext的实现类也是基于Reader的,用
XmlWebApplicationContext举例: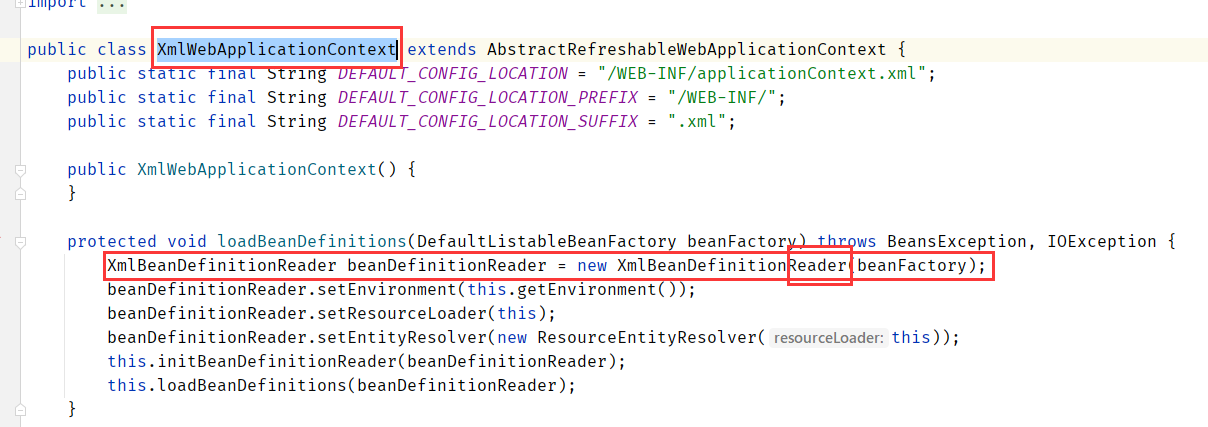
- ApplicationContext的实现类封装了Bean的读取及初始化、会自动加上5个后处理器、自动解析
4.1基于xml文件
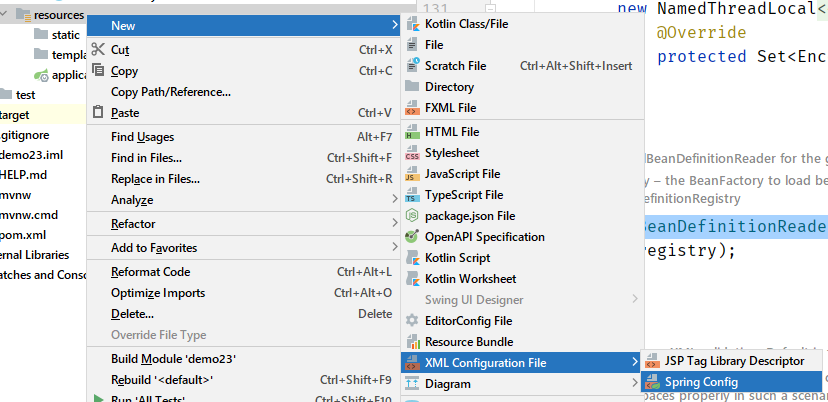
<?xml version="1.0" encoding="UTF-8"?>
<beans xmlns="http://www.springframework.org/schema/beans"
       xmlns:xsi="http://www.w3.org/2001/XMLSchema-instance"
       xmlns:context="http://www.springframework.org/schema/context"
       xsi:schemaLocation="http://www.springframework.org/schema/beans http://www.springframework.org/schema/beans/spring-beans.xsd http://www.springframework.org/schema/context https://www.springframework.org/schema/context/spring-context.xsd">

    <!--
    <context:annotation-config />
     把5个后处理器加进来
         等价于:AnnotationConfigUtils.registerAnnotationConfigProcessors(beanFactory);
 -->
    <context:annotation-config />
    <bean id="bean1" class="com.example.demo23.Bean1" />
    <bean id="bean2" class="com.example.demo23.Bean2">
        <property name="bean1" ref="bean1"/>
    </bean>

</beans>
4.1.1xml基于classpath的相对路径
这个容器中就有5个后置处理器 和 两个bean
ClassPathXmlApplicationContext context = new ClassPathXmlApplicationContext("spring_bean.xml");
4.1.2xml基于磁盘的绝对路径
FileSystemXmlApplicationContext context = new FileSystemXmlApplicationContext
("C:\Users\Administrator\IdeaProjects\demo23\src\main\resources\spring_bean.xml");
也可以简化为
FileSystemXmlApplicationContext context = new FileSystemXmlApplicationContext
("src\main\resources\spring_bean.xml");
4.2基于Java配置类
这一步包括了注入MyConfig,和其下的所有@Bean、相关的@Autowired等;
相比XML配置法会多出一个myConfig的bean对象
AnnotationConfigApplicationContext context = new AnnotationConfigApplicationContext(MyConfig.class);
4.3基于Web容器:支持Java配置类和Servlet
因为要支持Servlet,所以要在WebConfig中至少配置这三个:
ServletWebServerFactory:WebServer工厂(Spring的web容器,可以选Tomcat、Jetty等)DispatcherServlet:web项目必备的DispatcherServlet(所有的请求路由分发)DispatcherServletRegistrationBean:将DispatcherServlet注册到WebServer上
还需要提供一个接口用于测试:实现Controller接口的Bean
(是 org.springframework.web.servlet.mvc.Controller接口,不是注解,需要实现handleRequest()方法)
@Configuration
class WebConfig {
    @Bean
    // 1. WebServer工厂,这里用Tomcat
    public ServletWebServerFactory servletWebServerFactory() {
        return new TomcatServletWebServerFactory();
    }

    @Bean
    // 2. web项目必备的DispatcherServlet
    public DispatcherServlet dispatcherServlet() {
        return new DispatcherServlet();
    }

    @Bean
    // 3. 将DispatcherServlet注册到WebServer上
    public DispatcherServletRegistrationBean dispatcherServletRegistrationBean(DispatcherServlet dispatcherServlet) {
        return new DispatcherServletRegistrationBean(dispatcherServlet, "/");
    }

    @Bean("/hello")//必须以/开头才能被识别为路径
    public Controller controller1() {
    //重写匿名
        return (request, response) -> {
            response.getWriter().println("hello");
            return null;
        };
    }
}

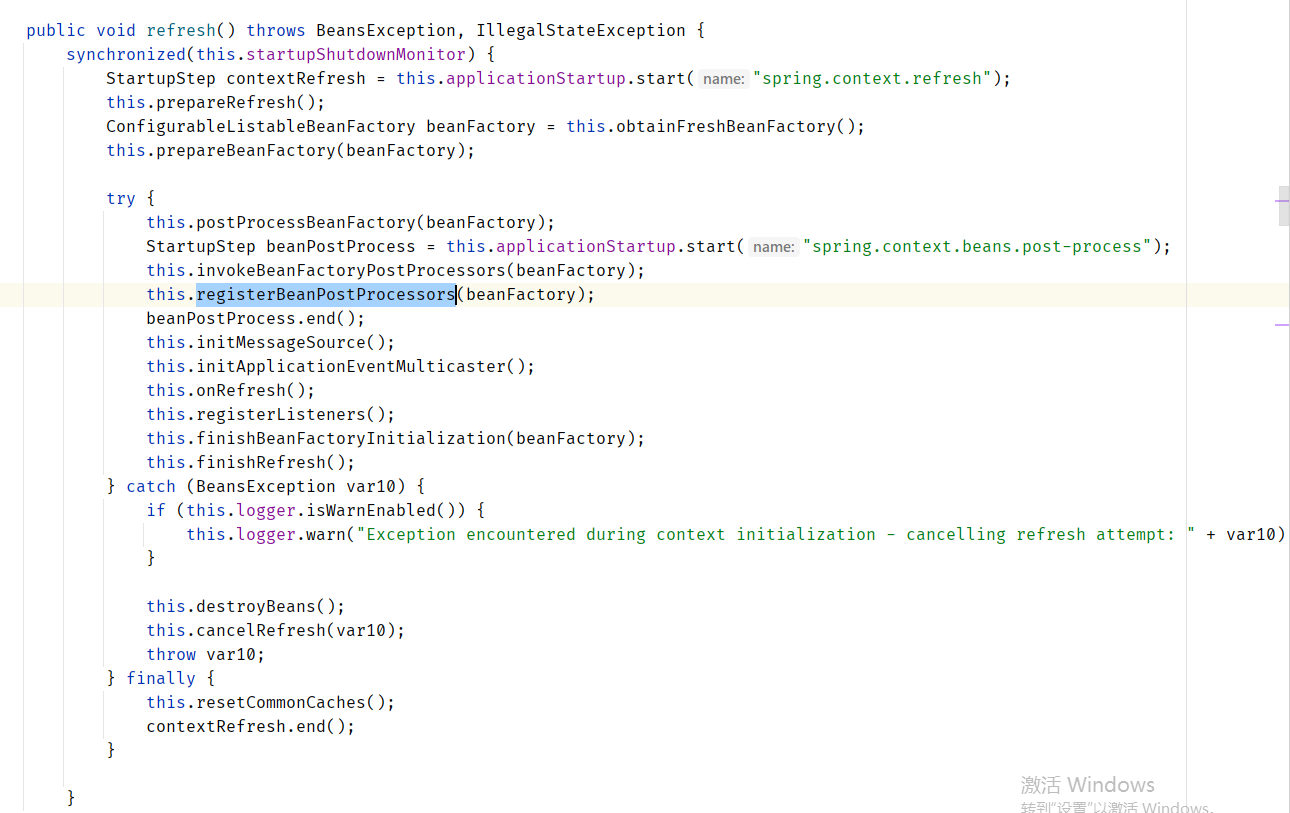
4.4补充
AbstractApplicationContext中的refresh()方法对bean生命周期的各个阶段进行了增强,本文不细讲


 628
628


 被折叠的 条评论
为什么被折叠?
被折叠的 条评论
为什么被折叠?
 到【灌水乐园】发言


